Nautobot Relationships

Blog Detail

The native data model in Nautobot will suffice for the majority of use cases. However, some deployments have additional requirements between objects based on the design of their networks. Nautobot now provides the capability to define new relationships to support a more customized network data model.

For example, a VLAN may need to be defined on a per-device basis, rather than the native model of a VLAN per site. This would allow a user to define and model VLANs for a network device that are locally significant.

This series of posts will outline the new user-defined relationship feature in Nautobot and explore some use cases where this feature can be applied to help model a network design.

Relationships Primer

One of the columns in a database table will store a primary key, which will uniquely identify each object. This field is used in the object-relational mapping (ORM) when defining relationships between objects. This simply allows objects to build associations with each other.

A common example used to explain this concept uses books. A publisher has a relationship with a book as it can publish a book. Each book will have a publisher.

db-assoc

Additional constraints can be introduced to be more specific in the relationship definition. The next sections outline the different types of relationships that can exist between objects.

One-to-Many

one-to-many type introduces a constraint in that a book can have only one publisher, denoted with the 1 on line beside the publisher. A publisher can have many books, denoted with N for number on the many side.

rel-one-to-many

Many-to-Many

many-to-many relationship has no constraints. A customer can buy many books and a book can be bought by many customers.
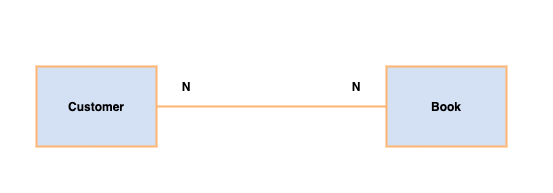
rel-many-to-many

One-to-One

one-to-one relationship has a unique constraint on both sides of the relationship. For example, an order can have only one payment and a payment can be made on one order.

rel-one-to-one

Nautobot Model

Nautobot is designed as a Source of Truth application aimed at modeling modern networks. Its core data models allow users to define the intended state of a network. This is achieved by providing a native data model, with its inherent relationships between the objects.

As an example, a subset of the Nautobot core data model illustrates the relationships between some of the objects in the nautobot.ipam and nautobot.circuit applications. The database tables are represented as boxes including their fields. The lines between the tables denote an association or relationship between the tables. The diagram shows how an IPAddress can have a VRF, a Prefix can have a VRF and a VLAN, and finally a Circuit can have a Provider. At a database level, we can see that these relationships are represented as foreign keys between the database tables.
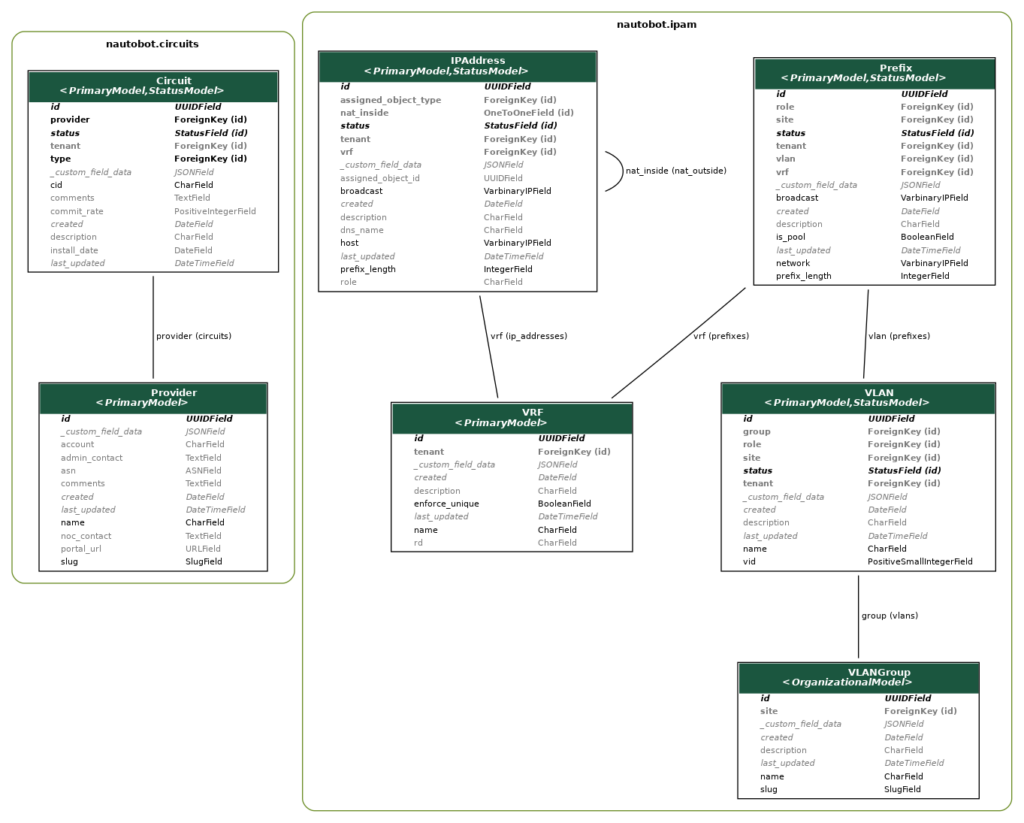
graph_model_incl_fields

INFO: This diagram was rendered using the graph models feature in the django_extensions package.

The core data model is quite established, based on years of iterative open-source development that began with the NetBox project. However, it’s very difficult to provide a standard framework that can meet the requirements of all networks. There will always be components of the network that will be different. One of the key objectives of Nautobot is to provide maximum data model flexibility. This is where the new Relationships feature can be applied. It allows users to define their own relationships between the objects in the system.

Use Case 1: IPAddress – Circuit

The first use case will focus on modeling an IPv4-based circuit, such as an enterprise router connection to an Internet Service Provider WAN. Each circuit can have two IP addresses, one at each end of the circuit. This type of relationship is not defined in the native data model. To enable it, a new relationship (highlighted in red) can be created between an IPAddress and a Circuit.
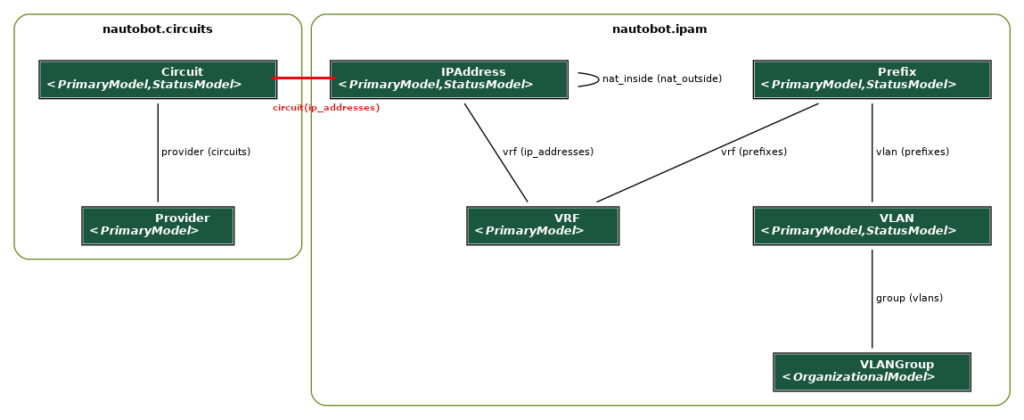
graph_model_no_fields_new_rel

New Relationship: IPAddress – Circuit

To create a new relationship, navigate to Extensibility -> Relationships on the Nautobot web user interface. The use case in question supports one circuit having two IPs. Any model that can have more than one object in the association is defined as a many in the relationship. Enter a custom name to identify the new relationship and set the relationship type as One to Many.

The Source type is circuit | circuit as this is the one side of the relationship and it is defined as the source. The Source Label will be used to display the other end of the relationship, on the source page. For this use case the Source Label is IP Address. The Destination fields are the reverse of the Source fields. Both source and destination filters can be left blank.
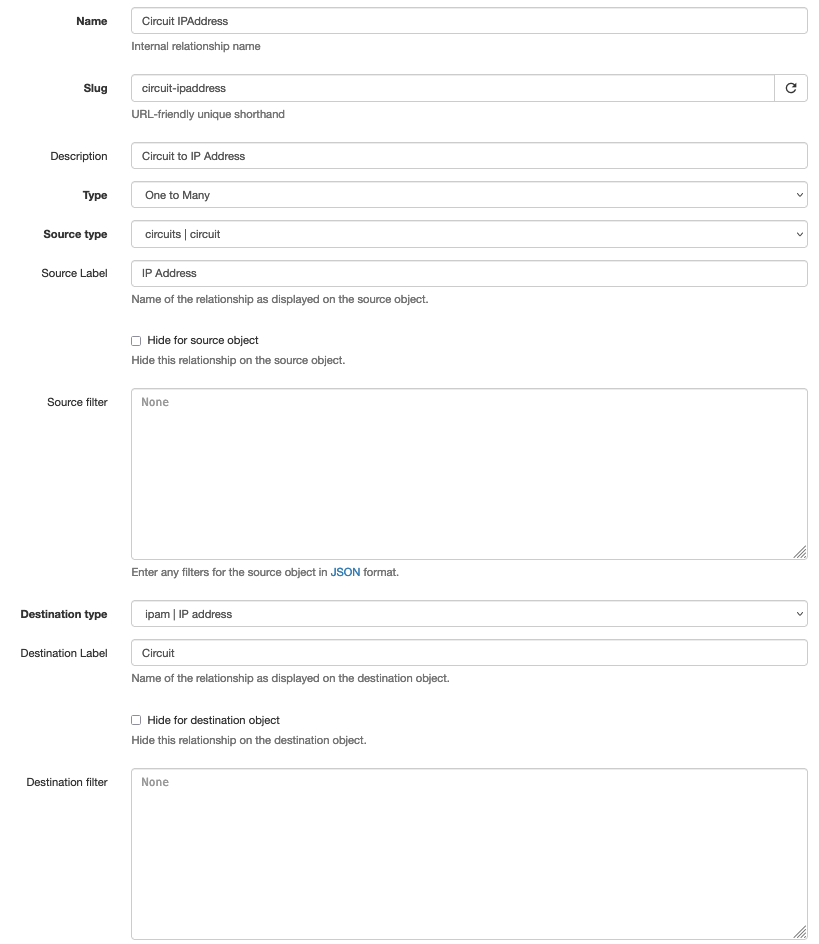
circuit-ipaddress-relationship

Update Circuit

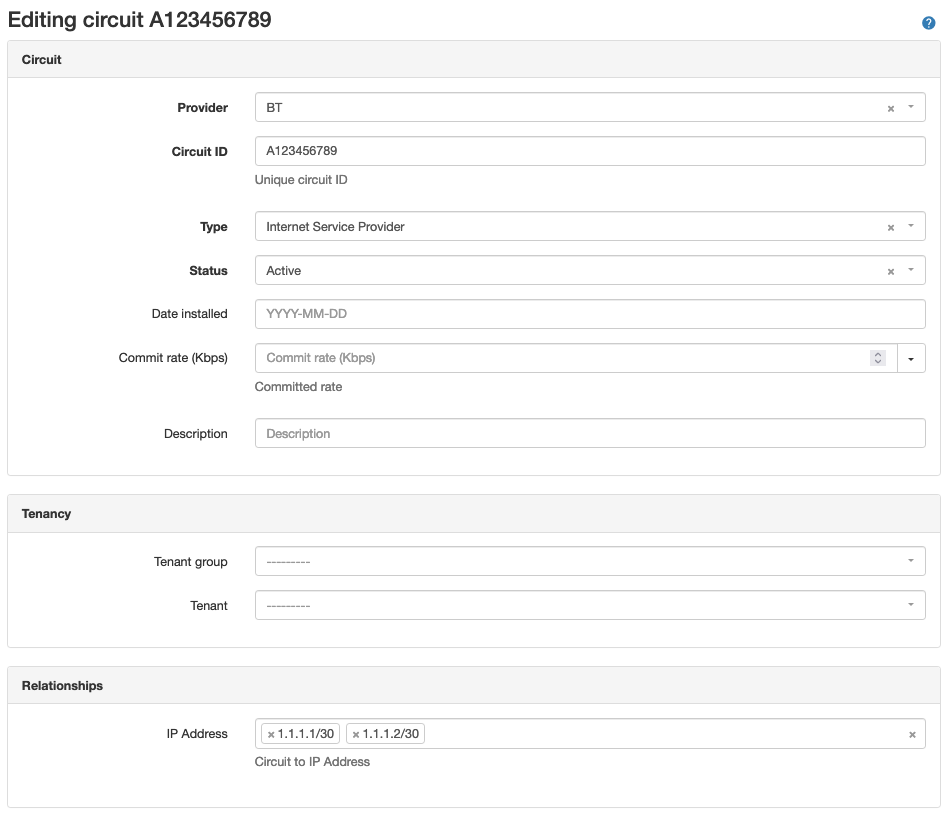
Once a relationship has been created, it will be visible when configuring one of the model objects. A new Relationship panel will be available to select an existing object of the defined source/destination type.

In the example, circuit A123456789 has two IP addresses associated with it. Multiple IPs can be can be selected since IPAddress is on the many side of the new relationship.
edit_circuit_ip_relationship

Update IP Address

For the IP addresses, one circuit can be selected in each IP address object. The selection drop-down list will only allow one object to be configured, as Circuit is on the one side of the relationship.

edit_ipaddress_circuit_relationship

Defining a new relationship allows network design use cases to be managed through the web user interface by creating new associations between existing objects. This reduces the need to manage additional layers of data by adding custom fields to objects and maintaining the custom field data synchronization through scripts or playbooks. Relationships can also be defined using the REST API.

An alternative solution for this use case might involve creating a one-to-one relationship between an IP Address and Circuit. In this case, a circuit would be associated with one IP Address. Creating two of these associations would model the circuit end-to-end.

Use Case 2: VLAN – VLAN Group

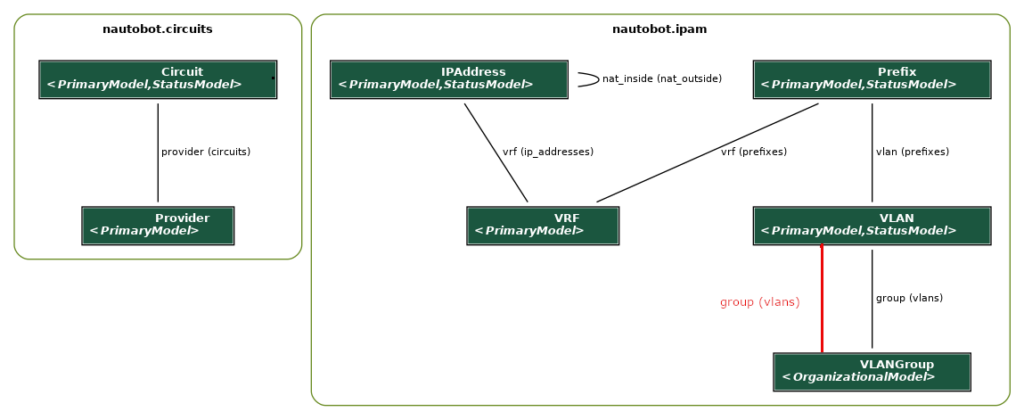
Another, perhaps more advanced, use case would be to create a relationship between models that already have a native relationship. For example, a VLAN group and VLAN have an inherent One to Many relationship, whereby a VLAN Group can have many VLANs but a VLAN can only be a member of only one VLAN group. Some networks may have a need to have VLANs in multiple VLAN groups. VLANs could be members of a management group for a site, while also being part of a group that requires access to cloud-based Operational Support Systems (OSS). This use case could be managed with custom tags or custom fields, but relationships provide a way to overlay a new association between the models and link existing objects together.

The diagram below illustrates how the new relationship (highlighted in red) would be modeled, alongside the existing relationship.
graph_model_no_fields_vlans

New Relationship: VLAN – VLAN Group

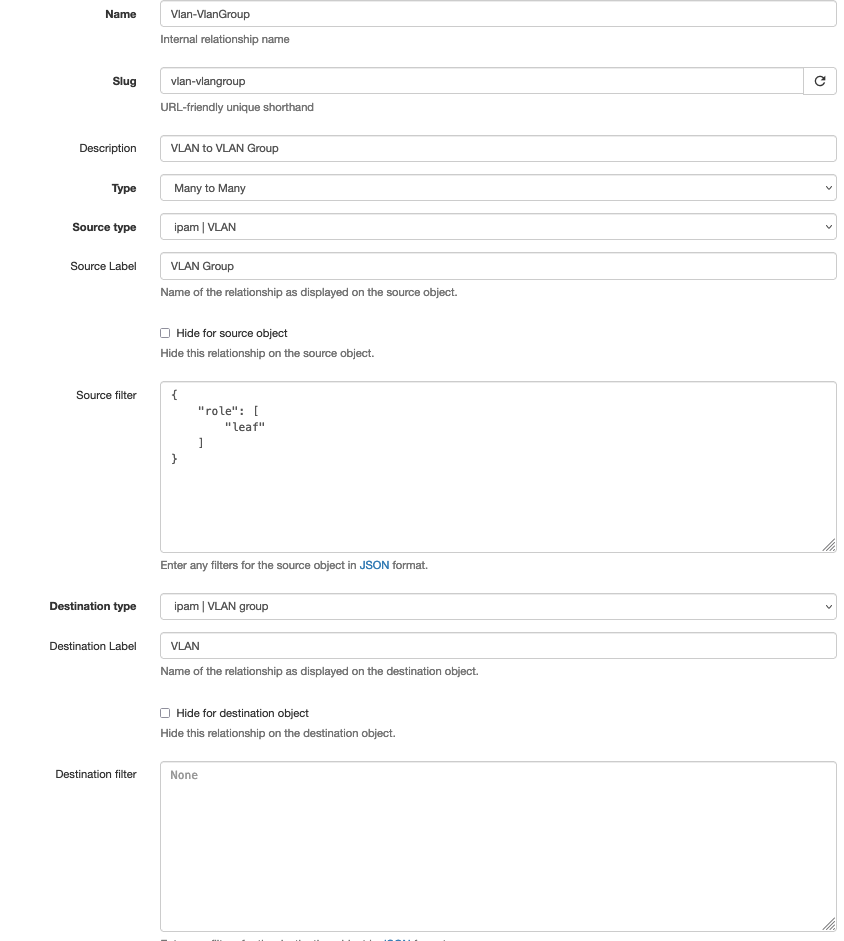
Many to Many relationship is required to support this use case. Following on from the guidelines in the previous use case, with the addition of a filter to restrict the relationship to VLANs with the role of leaf, filtering is defined using JSON data format to identify the model fields and their values.

In the example, the new relationship will be applied only on VLANs that have a role of leaf. Roles can be applied to VLANs to assist with network design modeling e.g., define leaf-switch VLANs.
vlan_edit_multiple_groups_relationship

For demonstration purposes, a short list of VLANs shows some Leaf and Core roles to illustrate the filtering capability.

vlan_list_relationship

Update VLAN

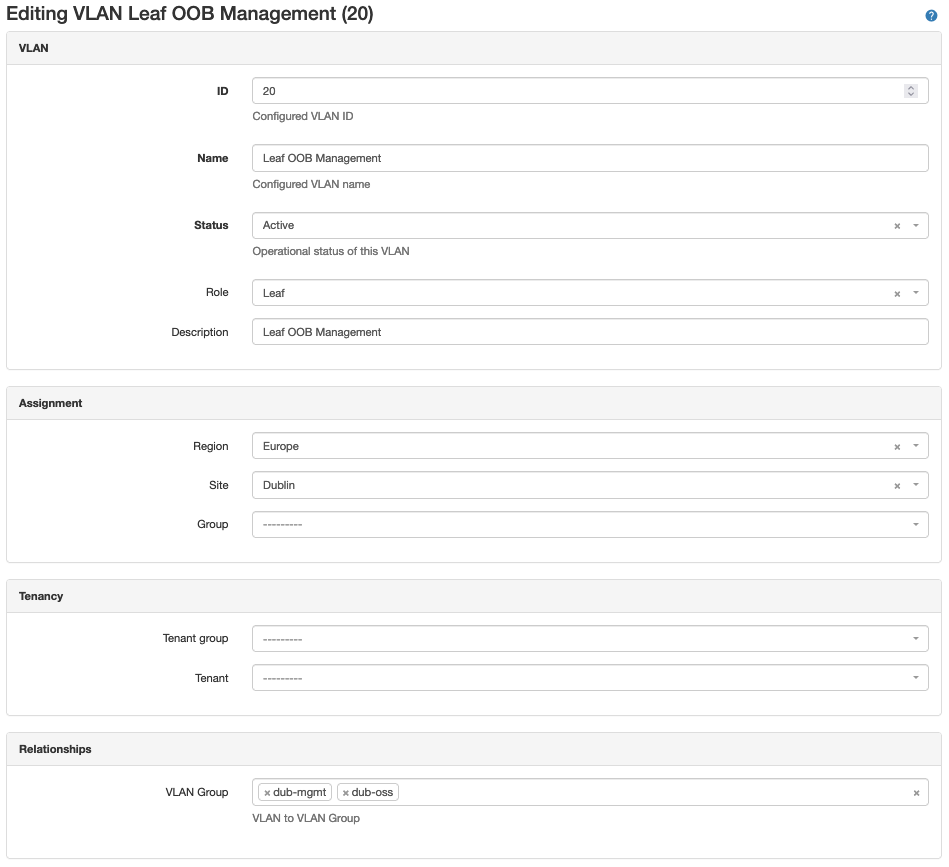
Editing a VLAN allows multiple VLAN groups to be associated with a single VLAN through the newly defined relationship. A key point to note is that the new relationship is managed through the Relationships panel and not through the native Group field, which is left blank.
edit_vlan_relationship

Update VLAN Group

For VLAN group(s) configured in the relationship, apply the new VLANs. Due to the filtering applied on the VLAN side of the relationship, only VLANs with a role of Leaf can be selected.
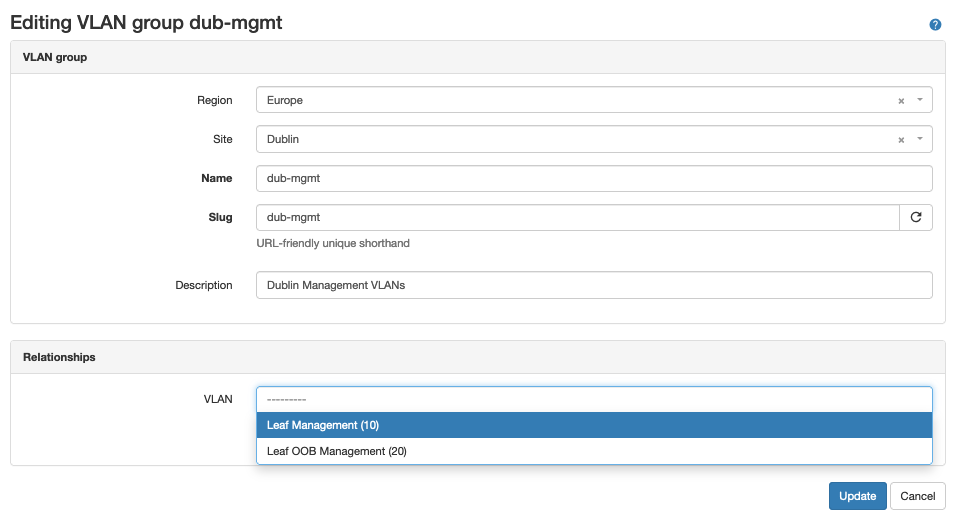
vlan_group_edit_filter_vlan_relationship

Management of the new VLANs is through the Relationships panel on the VLAN Group page. For this advanced use case, the native VLAN view (right-hand side) on the VLAN group page is not populated.

vlan_group_manage_vlan

Selecting the VLANs hyperlink displays all of the VLANs through the relationship-association table.

vlan_group_relationship_assoc

Conclusion

Defining new relationships is a very powerful feature in Nautobot. It supports flexible data modeling to assist with specific use cases of network design representation in a Source of Truth application.

This guide focused on how to define the relationships in the web user interface. In a future post, we’ll look at using REST and GraphQL based APIs to interact with the new relationships in Nautobot.

-Paddy

Resources


ntc img
ntc img

Contact Us to Learn More

Share details about yourself & someone from our team will reach out to you ASAP!

Filter JSON Data in Ansible Using json_query

Blog Detail

Parsing structured JSON data in Ansible playbooks is a common task. Nowadays, the JSON format is heavily used by equipment vendors to represent complex objects in a structured way to allow programmatic interaction with devices. JSON utilizes two main data structures:

  • object – an unordered collection of key/value pairs (like Python dict)
  • array – an ordered sequence of objects (like Python list)

Ansible provides many built-in capabilities to consume JSON using Ansible specific filters or the Jinja2 built-in filters. The extensive filters available, and what to use and when, can be overwhelming at first and the desired result can often require multiple filters chained together. This can lead to complex task definition, making playbook maintenance more difficult.

The built-in json_query filter provides the functionality for filtering, shaping, and transforming JSON data. It uses the third-party jmespath library, a powerful JSON query language supporting the parsing of complex structured data.

Setup

The jmespath third-party library must be installed on the host for the json_query filter to operate.

pip install jmespath

Data

Those familiar with Palo Alto firewalls will recognize a modified version of an application content update query. This result dataset will be used to demonstrate how to manipulate JSON data using the json_query filter.

response:
      result:
        content-updates:
          entry:
          - app-version: 8368-6520
            current: 'no'
            downloaded: 'no'
            filename: panupv2-all-apps-8368-6520
            version: 8368-6520
          - app-version: 8369-6522
            current: 'no'
            downloaded: 'no'
            filename: panupv2-all-apps-8369-6522
            version: 8369-6522
          - app-version: 8367-6513
            current: 'no'
            downloaded: 'no'
            filename: panupv2-all-apps-8367-6513
            version: 8367-6513
          - app-version: 8371-6531
            current: 'no'
            downloaded: 'no'
            filename: panupv2-all-apps-8371-6531
            version: 8371-6531
          - app-version: 8366-6503
            current: 'no'
            downloaded: 'no'
            filename: panupv2-all-apps-8366-6503
            version: 8366-6503
          - app-version: 8370-6526
            current: 'no'
            downloaded: 'no'
            filename: panupv2-all-apps-8370-6526
            version: 8370-6526
          - app-version: 8373-6537
            current: 'no'
            downloaded: 'yes'
            filename: panupv2-all-apps-8373-6537
            version: 8373-6537
          - app-version: 8365-6501
            current: 'no'
            downloaded: 'no'
            filename: panupv2-all-apps-8365-6501
            version: 8365-6501
          - app-version: 8364-6497
            current: 'no'
            downloaded: 'no'
            filename: panupv2-all-apps-8364-6497
            version: 8364-6497
          - app-version: 8372-6534
            current: 'yes'
            downloaded: 'yes'
            filename: panupv2-all-apps-8372-6534
            version: 8372-6534

On Palo Alto devices the default stdout response is returned as a JSON encoded string. This string can be passed into the from_json filter to provide a valid JSON data structure. A result variable was set to simplify the readability of the following examples. The json_query filter expects valid JSON as an input, so the Jinja2 expression below can also be passed directly into the json_query filter.

- name: "SET FACT FOR DEVICE STDOUT RESPONSE"
  set_fact:
    result: "{{ (content_info['stdout'] | from_json)['response']['result'] }}"

The yaml callback plugin is configured in ansible.cfg for the following examples. This will render output to the console terminal in YAML format, which can be slightly easier to read. See references at the end for Ansible callback usage.

# Use the YAML callback plugin for output
stdout_callback = yaml

Practical Examples

The JMESPath Operators table below summarizes some of the most common operators used in the jmespath query language. See references at the end for the jmespath specification.

JMESPath Operators

OperatorDescription
@The current node being evaluated.
*Wildcard. All elements.
.keyDot-notation to access a value of the given key.
[index0index1, ..]Indexing array elements, like a list.
[?expression]Filter expression. Boolean evaluation.
&&AND expression.
|Pipe expression, like unix pipe.
&expressionUsing an expression evaluation as a data type.

Basic Filter

Using the result data, the filter is applied to the valid JSON result with an additional query string argument. The query string provides the expression that is evaluated against the data to return filtered output. The default data type returned by json_query filter is a list.

In the Basic Filter example below, the query string selects the version key for each element in the entry array.

- name: "BASIC FILTER"
  debug:
    msg: "{{ result['content-updates'] | json_query('entry[*].version') }}"
TASK [BASIC FILTER - VERSION] ***************************************************
ok: [demo-fw01] =>
  msg:
  - 8368-6520
  - 8369-6522
  - 8367-6513
  - 8371-6531
  - 8366-6503
  - 8370-6526
  - 8373-6537
  - 8365-6501
  - 8364-6497
  - 8372-6534

Return Array Element

A pipe expression can be used to select the value of an array by declaring the desired index location. This operates in much the same way as the unix pipe, within the query string.

In the Array Index example below, the first element is selected. Array indexing begins at zero.

- name: "ARRAY INDEX VALUE"
  debug:
    msg: "{{ result['content-updates'] | json_query('entry[*].version | [0]') }}"

The response output is a string value for the first element in the array.

TASK [ARRAY INDEX VALUE] *********************************************************
ok: [demo-fw01] =>
  msg: 8368-6520

Filter

Using a filter expression within the json_query string, the query result can be filtered using standard comparison operators. A filter expression allows each element of the array to be evaluated against the expression. If the result evaluates to true, the element is included in the returned result.

The equality comparision operator is used in the following example to retrieve the filename(s) of the software version(s) downloaded on the device. Elements in the array that have downloaded=='yes' will have the filename included in the returned result. This provides the ability to use certain keys for the selection criteria, and return the value(s) of other keys for the result.

- name: "FILTER EXACT MATCH"
  debug:
    msg: "{{ result['content-updates'] | json_query('entry[?downloaded==`yes`].filename') }}"

The output shows the list of filenames returned.

TASK [FILTER EXACT MATCH] ********************************************************
ok: [demo-fw01] =>
  msg:
  - panupv2-all-apps-8373-6537
  - panupv2-all-apps-8372-6534

Function

The jmespath library provides built-in functions to assist in transformation and filtering tasks, for example the max_by function that returns the maximum element in an array. The following task selects the filename of the maximum app-version value from the entry array. The & provides the ability to define an expression which will be evaluated as a data type value when processed by the function.

Using an Ansible variable for the query string can be a cleaner approach to the query definition. It also helps with string quotations that are necessary when the key name is hyphenated. When using an expression data type, the jmespath library requires the key name within quotation marks, e.g., &"key-name". Where key names are not hyphenated, quotation marks are not required, e.g., &keyname.

- name: "MAX BY APP-VERSION"
  set_fact:
    content_file: "{{ result['content-updates'] | json_query(querystr) }}"
  vars:
    querystr: 'max_by(entry, &"app-version").filename'

The resulting filename value is returned.

TASK [JMESPATH FUNCTION] *********************************************************
ok: [demo-fw01] =>
  msg: panupv2-all-apps-8373-6537

Using single quotes in the previous example instructs the filter to treat the expression as a string, returning the first element of the array.

vars:
  querystr: "max_by(entry, &'app-version').filename"
TASK [MAX BY APP-VERSION] *******************************************************
ok: [demo-fw01] =>
  msg: panupv2-all-apps-8368-6520

Query String with Dynamic Variable

Ansible facts can be substituted into the query string. Again, quotation marks are relevant, so it is preferable to define a separate string as a variable within the task.

In this example the filter expression is used with a built-in function, contains. This function provides a boolean result, based on a match with a search string, on any element within the version array. The search string in this case is an Ansible variable passed into the query using a Jinja2 template.

- name: "FUNCTION WITH VARIABLE"
  debug:
    msg: "{{ result['content-updates'] | json_query(querystr) }}"
  vars:
    querystr: "entry[?contains(version, '{{ content_version }}')].filename | [0]"
    content_version: "8368-6520"

Again, the first filename, within the returned list using the indexing capability, has been selected.

TASK [FUNCTION WITH VARIABLE] **************************************************
ok: [demo-fw01] =>
  msg: panupv2-all-apps-8368-6520

Multiple Expressions

Multiple expressions can be evaluated using the logical AND operation, following the normal truth table rules. Along with the filter operator, two expressions are provided to be evaluated. This will filter the resulting data based on two selection criteria and provide a list of version values.

- name: "MULTIPLE FILTER EXPRESSIONS"
  debug:
    msg: "{{ result['content-updates']  | json_query(querystr) }}"
  vars:
    querystr: "entry[?contains(filename, '{{ version }}') && downloaded==`yes`].version"
    version: "8373-6537"

In this case, one element is returned in the list.

TASK [MULTIPLE FILTER EXPRESSIONS] ***********************************************
ok: [demo-fw01] =>
  msg:
  - 8373-6537

Tips

Here are some general tips that could be useful while developing a playbook using json_query.

  • Get familiar with basic jmespath expressions using the interactive tutorial.
  • Ensure the data provided as input to the json_query filter is a valid JSON object.
  • Use a test playbook, using the same data as your original playbook, with tasks dedicated to printing query string evaluation output to the console.
  • Be mindful of quotes within a query string, especially when using linters that specify a standard that may conflict with the jmespath specification.

Conclusion

The jmespath specification has good documentation and support for numerous languages. It requires learning a new query language, but hopefully this guide will help you get started with some common use cases.

The json_query filter is a powerful tool to have at your disposal. It can solve many JSON parsing tasks within your playbook, avoiding the need to write custom filters. If you’d like to see more, please let us know.

-Paddy

References


ntc img
ntc img

Contact Us to Learn More

Share details about yourself & someone from our team will reach out to you ASAP!