Blog Detail
In the previous two blog posts (Part1 and Part2), I discussed Nautobot Helm charts and how to deploy these Helm charts to Kubernetes following a GitOps approach. I used the minimal parameters needed to achieve a Nautobot deployment.
In the default deployment with Helm charts, the Nautobot version is bound to the Helm charts version, which means that the Helm charts version X.Y.Z will deploy Nautobot version A.B.C, which is bound to that version of Helm Charts. That is suitable for simple deployments and testing, but you usually want to add a custom configuration file, additional plugins, jobs, or other extensions to Nautobot.
The Managed Services team deals with this daily, as every customer has different requirements for their Nautobot deployment. With Kubernetes deployments, we must prepare Nautobot Docker images in advance. Following the “automate everything” approach, we also use automated procedures to build and deploy Nautobot images to Kubernetes.
In this blog post, I will show you a procedure you can use to automate the release process for your Nautobot deployment.
Prepare the Basic Dockerfile
In the first step, I will prepare the basic Dockerfile used to build the custom Nautobot image.
I already have a Git repository I created in the previous blog post explaining the GitOps approach to deploying Nautobot. I added Kubernetes objects and other files required for Kubernetes deployment in the Git repository. The structure of the Git repository looks like this:
.
└── nautobot-kubernetes
    ├── README.md
    ├── clusters
    │   └── minikube
    │       └── flux-system
    │           ├── gotk-components.yaml
    │           ├── gotk-sync.yaml
    │           ├── kustomization.yaml
    │           └── nautobot-kustomization.yaml
    └── kubernetes
        ├── helmrelease.yaml
        ├── kustomization.yaml
        ├── namespace.yaml
        ├── nautobot-helmrepo.yaml
        └── values.yaml

5 directories, 10 files
I will use the same repository to add files required for a custom image and the automation needed to build and deploy the new image.
Let’s create a base Dockerfile in the top directory in my repository.
.
└── nautobot-kubernetes
    ├── Dockerfile
    ├── README.md
    ├── clusters
    │   └── minikube
    │       └── flux-system
    │           ├── gotk-components.yaml
    │           ├── gotk-sync.yaml
    │           ├── kustomization.yaml
    │           └── nautobot-kustomization.yaml
    └── kubernetes
        ├── helmrelease.yaml
        ├── kustomization.yaml
        ├── namespace.yaml
        ├── nautobot-helmrepo.yaml
        └── values.yaml

5 directories, 11 files
Now that I have a Dockerfile, I will add some content.
ARG NAUTOBOT_VERSION=1.4.2
ARG PYTHON_VERSION=3.9
FROM ghcr.io/nautobot/nautobot:${NAUTOBOT_VERSION}-py${PYTHON_VERSION}
In this case, Docker will pull the base Nautobot image and assign a new tag to the image. I know this looks very simple, but I think this is a great first step. I can now test whether I can build my image.
➜  ~ docker build -t ghcr.io/networktocode/nautobot-kubernetes:dev .
[+] Building 75.3s (6/6) FINISHED
 => [internal] load build definition from Dockerfile                                                                                          0.1s
 => => transferring dockerfile: 164B                                                                                                          0.0s
 => [internal] load .dockerignore                                                                                                             0.0s
 => => transferring context: 2B                                                                                                               0.0s
 => [internal] load metadata for ghcr.io/nautobot/nautobot:1.4.2-py3.9                                                                       34.1s
 => [auth] nautobot/nautobot:pull token for ghcr.io                                                                                           0.0s
 => [1/1] FROM ghcr.io/nautobot/nautobot:1.4.2-py3.9@sha256:59f4d8338a1e6025ebe0051ee5244d4c0e94b0223079f806eb61eb63b6a04e62                 41.0s
 => => resolve ghcr.io/nautobot/nautobot:1.4.2-py3.9@sha256:59f4d8338a1e6025ebe0051ee5244d4c0e94b0223079f806eb61eb63b6a04e62                  0.0s
 => => sha256:7a6db449b51b92eac5c81cdbd82917785343f1664b2be57b22337b0a40c5b29d 31.38MB / 31.38MB                                             15.6s
 => => sha256:b94fc7ac342a843369c0eaa335613ab9b3761ff5ddfe0217a65bfd3678614e22 11.59MB / 11.59MB                                              3.8s
<.. Omitted ..>
 => => extracting sha256:8a4f3d60582c68bbdf8beb6b9d5fe1b0d159f2722cf07938ca9bf290dbfaeb6e                                                     0.0s
 => exporting to image                                                                                                                        0.0s
 => => exporting layers                                                                                                                       0.0s
 => => writing image sha256:a164511865f73bf08eb2a30a62ad270211b544006708f073efddcd7ef6a10830                                                  0.0s
 => => naming to ghcr.io/networktocode/nautobot-kubernetes:dev                                                                                0.0s
I can see that the image is successfully built:
➜  ~ docker image ls | grep nautobot-kubernetes
ghcr.io/networktocode/nautobot-kubernetes                                 dev                        a164511865f7   8 days ago      580MB
To make this process a bit easier, I will also create a Makefile, which will have some basic targets to simplify building, pushing, etc…. I will add targets, such as build, push, etc. So instead of using the docker build -t ghcr.io/networktocode/nautobot-kubernetes:dev . command to build the image, I will use the make build command.
# Get current branch by default
tag := $(shell git rev-parse --abbrev-ref HEAD)

build:
	docker build -t ghcr.io/networktocode/nautobot-kubernetes:$(tag) .

push:
	docker push ghcr.io/networktocode/nautobot-kubernetes:$(tag)

pull:
	docker pull ghcr.io/networktocode/nautobot-kubernetes:$(tag)
I added three commands for now: build, push, and pull. The default tag will be the current branch, but I can pass my custom tag to the make build command if I want. Now that this is ready, I can test my Makefile.
➜  ~ make build
docker build -t ghcr.io/networktocode/nautobot-kubernetes:main .
[+] Building 1.0s (5/5) FINISHED
 => [internal] load build definition from Dockerfile                                                                                          0.0s
 => => transferring dockerfile: 36B                                                                                                           0.0s
 => [internal] load .dockerignore                                                                                                             0.0s
 => => transferring context: 2B                                                                                                               0.0s
 => [internal] load metadata for ghcr.io/nautobot/nautobot:1.4.2-py3.9                                                                        0.8s
 => CACHED [1/1] FROM ghcr.io/nautobot/nautobot:1.4.2-py3.9@sha256:59f4d8338a1e6025ebe0051ee5244d4c0e94b0223079f806eb61eb63b6a04e62           0.0s
 => exporting to image                                                                                                                        0.0s
 => => exporting layers                                                                                                                       0.0s
 => => writing image sha256:a164511865f73bf08eb2a30a62ad270211b544006708f073efddcd7ef6a10830                                                  0.0s
 => => naming to ghcr.io/networktocode/nautobot-kubernetes:main                                                                               0.0s
Let me also test whether I can push the image to the Docker repository hosted on ghcr.io.
➜  ~ make push
docker push ghcr.io/networktocode/nautobot-kubernetes:main
The push refers to repository [ghcr.io/networktocode/nautobot-kubernetes]
3cec5ea1ba13: Mounted from nautobot/nautobot
5f70bf18a086: Mounted from nautobot/nautobot
4078cbb0dac2: Mounted from nautobot/nautobot
28330db6782d: Mounted from nautobot/nautobot
46b0ede2b6bc: Mounted from nautobot/nautobot
f970a3b06182: Mounted from nautobot/nautobot
50f757c5b291: Mounted from nautobot/nautobot
34ada2d2351f: Mounted from nautobot/nautobot
2fe7c3cac96a: Mounted from nautobot/nautobot
ba48a538e919: Mounted from nautobot/nautobot
639278003173: Mounted from nautobot/nautobot
294d3956baee: Mounted from nautobot/nautobot
5652b0fe3051: Mounted from nautobot/nautobot
782cc2d2412a: Mounted from nautobot/nautobot
1d7e8ad8920f: Mounted from nautobot/nautobot
81514ea14697: Mounted from nautobot/nautobot
630337cfb78d: Mounted from nautobot/nautobot
6485bed63627: Mounted from nautobot/nautobot
main: digest: sha256:c9826f09ba3277300a3e6d359a2daebf952485097383a10c37d6e239dbac0713 size: 4087
Great, this is working as well.
Deploy the Custom Image to Kubernetes
I have my initial image in the repository. Before automating the deployment, I will test whether I can deploy my custom image. To do that, I need to update ./kubernetes/values.yaml file. There are a couple of things you need to add to your values. Let me first show the current content of a file:
---
postgresql:
  postgresqlPassword: "SuperSecret123"
redis:
  auth:
    password: "SuperSecret456"
celeryWorker:
  replicaCount: 4
I added those values in my previous blog post. If I want to specify the custom image, I must define the nautobot.image section in my values. Check Nautobot Helm charts documentation for more details.
---
postgresql:
  postgresqlPassword: "SuperSecret123"
redis:
  auth:
    password: "SuperSecret456"
celeryWorker:
  replicaCount: 4
nautobot:
  image:
    registry: "ghcr.io"
    repository: "networktocode/nautobot-kubernetes"
    tag: "main"
    pullSecrets:
      - "ghcr.io"
I think the parameters are self-explanatory. I defined the Docker repository, the image, and the image tag. As this is a private repository, I must define pullSecrets as well. This section describes the Kubernetes secret used to pull the image from a private registry. I will create this secret manually. Of course, there are options to automate this step, using HashiCorp Vault, for example. But that is out of scope for this blog post. Well, let’s create the Kubernetes secret now. To do this, you need a token, which you can generate under your GitHub profile.
➜  ~ kubectl create secret docker-registry --docker-server=ghcr.io --docker-username=ubajze --docker-password=<TOKEN> -n nautobot ghcr.io
secret/ghcr.io created
Now that I have the Kubernetes secret, I have updated the values.yaml. I can commit and push the changes. Remember, Flux will do the rest for me, meaning the new image will be deployed automatically. Let’s do that and observe the process.
I must wait a few minutes for Flux to sync the Git repository. After that, Flux will reconcile the current Helm release and apply new values from values.yaml. The output below shows the intermediate state, where a new container is being created.
➜  ~ kubectl get pods
NAME                                      READY   STATUS              RESTARTS   AGE
nautobot-544c88f9b8-gb652                 0/1     ContainerCreating   0          0s
nautobot-577c89f9c7-fzs2s                 1/1     Running             0          2d
nautobot-577c89f9c7-hczbx                 1/1     Running             1          2d
nautobot-celery-beat-554fb6fc7c-n847n     0/1     ContainerCreating   0          0s
nautobot-celery-beat-7d9f864c58-2c9r7     1/1     Running             2          2d
nautobot-celery-worker-647cc6d8dd-564p6   1/1     Running             2          47h
nautobot-celery-worker-647cc6d8dd-7xwtb   1/1     Running             2          47h
nautobot-celery-worker-647cc6d8dd-npx42   1/1     Terminating         2          2d
nautobot-celery-worker-647cc6d8dd-plmjq   1/1     Running             2          2d
nautobot-celery-worker-84bf689ff-k2dph    0/1     ContainerCreating   0          0s
nautobot-celery-worker-84bf689ff-tp92c    0/1     Pending             0          0s
nautobot-postgresql-0                     1/1     Running             0          2d
nautobot-redis-master-0                   1/1     Running             0          2d
After a few minutes, I have a new deployment with a new image.
➜  ~ kubectl get pods
NAME                                     READY   STATUS    RESTARTS   AGE
nautobot-544c88f9b8-cwdnj                1/1     Running   0          2m21s
nautobot-544c88f9b8-gb652                1/1     Running   0          4m1s
nautobot-celery-beat-554fb6fc7c-n847n    1/1     Running   1          4m1s
nautobot-celery-worker-84bf689ff-5wzmh   1/1     Running   0          117s
nautobot-celery-worker-84bf689ff-dwjdt   1/1     Running   0          106s
nautobot-celery-worker-84bf689ff-k2dph   1/1     Running   0          4m1s
nautobot-celery-worker-84bf689ff-tp92c   1/1     Running   0          4m1s
nautobot-postgresql-0                    1/1     Running   0          2d
nautobot-redis-master-0                  1/1     Running   0          2d
I can prove that by describing one of the pods.
➜  ~ kubectl describe pod nautobot-544c88f9b8-cwdnj | grep Image
    Image:          ghcr.io/networktocode/nautobot-kubernetes:main
    Image ID:       ghcr.io/networktocode/nautobot-kubernetes@sha256:c9826f09ba3277300a3e6d359a2daebf952485097383a10c37d6e239dbac0713
As you can see, the image was pulled from my new repository, and the main tag is used. Great, this means my automated deployment is working. If I want to deploy a new image, I can build the new image and push the image to the Docker repository. Then I must update the tag in the ./kubernetes/values.yaml file, commit and push changes. Flux will automatically re-deploy the new image.
Automate the Deployment Process
The next step is to automate the deployment process. My goal is to deploy a new image every time I create a new release in GitHub. To do this automatically, I will use GitHub Actions CI/CD, triggered when a new release is created.
I want to have the following steps in my CI/CD workflow:
- Lint
- Build
- Test
- Deploy
I will simulate the Lint and Test steps, as this is out of scope for this blog post. But there is a value in linting your code and then testing the build.
Before specifying the CI/CD workflow I will add some more targets to my Makefile. I will use these commands in a workflow. So let me first update the Makefile.
# Get current branch by default
tag := $(shell git rev-parse --abbrev-ref HEAD)
values := "./kubernetes/values.yaml"

build:
	docker build -t ghcr.io/networktocode/nautobot-kubernetes:$(tag) .

push:
	docker push ghcr.io/networktocode/nautobot-kubernetes:$(tag)

pull:
	docker pull ghcr.io/networktocode/nautobot-kubernetes:$(tag)

lint:
	@echo "Linting..."
	@sleep 1
	@echo "Done."

test:
	@echo "Testing..."
	@sleep 1
	@echo "Done."

update-tag:
	sed -i 's/tag: \".*\"/tag: \"$(tag)\"/g' $(values)
I added three more targets in my Makefile. The lint and test targets simulate linting and testing. The update-tag target is more interesting. It replaces the current tag in ./kubernetes/values.yaml with the new tag specified when running the command. This command will be used in the CI/CD workflow to update the tag in a file. Apart from that, I will also commit and push the changes to the main branch directly from the CI/CD workflow. Flux will detect a change in the main branch and redeploy Nautobot using a new image specified in the values.yaml. Of course, this process is just one approach. Other options include updating the ConfigMap with the image tag directly from your CI/CD workflow. Choosing the correct approach depends on your use case.
Now that I have the basics, I can create a CI/CD definition for GitHub Actions. The workflows are defined in the YAML file and must be stored in the ./.github/workflows directory. Any YAML file in this directory will be loaded by GitHub Action and executed. I will not go into the details of GitHub Actions; that’s not the purpose of this blog post. You can achieve the same results on other platforms for CI/CD workflows.
So, let me create a file with the following content:
---
name: "CI/CD"
on:
  push:
    branches:
      - "*"
  pull_request:
  release:
    types:
      - "created"

permissions:
  packages: "write"
  contents: "write"
  id-token: "write"

jobs:
  lint:
    runs-on: "ubuntu-20.04"
    steps:
      - name: "Check out repository code"
        uses: "actions/checkout@v3"
      - name: "Linting"
        run: "make lint"
  build:
    runs-on: "ubuntu-20.04"
    needs:
      - "lint"
    steps:
      - name: "Check out repository code"
        uses: "actions/checkout@v3"
      - name: "Build the image"
        run: "make tag=${{ github.ref_name }} build"
      - name: "Login to ghcr.io"
        run: "echo ${{ secrets.GITHUB_TOKEN }} | docker login ghcr.io -u USERNAME --password-stdin"
      - name: "Push the image to the repository"
        run: "make tag=${{ github.ref_name }} push"
  test:
    runs-on: "ubuntu-20.04"
    needs:
      - "build"
    steps:
      - name: "Check out repository code"
        uses: "actions/checkout@v3"
      - name: "Run tests"
        run: "make test"
  deploy:
    runs-on: "ubuntu-20.04"
    needs:
      - "test"
    if: "${{ github.event_name == 'release' }}"
    steps:
      - name: "Check out repository code"
        uses: "actions/checkout@v3"
        with:
          ref: "main"
      - name: "Update the image tag"
        run: "make tag=${{ github.ref_name }} update-tag"
      - name: "Commit changes"
        run: |
          git config user.name github-actions
          git config user.email github-actions@github.com
          git commit -am "Updating the Docker image tag"
          git push origin main
I will give you just the overall description of a file, as the above GitHub Actions syntax is out of scope for this blog post. I created four jobs where GitHub Actions will execute each job after the previous job is finished successfully. The first job started is the lint job. In the build job, I will build the image, assign a tag (the name of the Git tag for the release) to the image, and push the image to the Docker repository. The test job is used to test the image that was built previously. And the deploy job will update the image tag in the ./kubernetes/values.yaml file. After that, it will commit and push the changes back to the repository in the main branch. The “if” statement means this job will only be executed if the CI/CD workflow is triggered by creating a new release in GitHub.
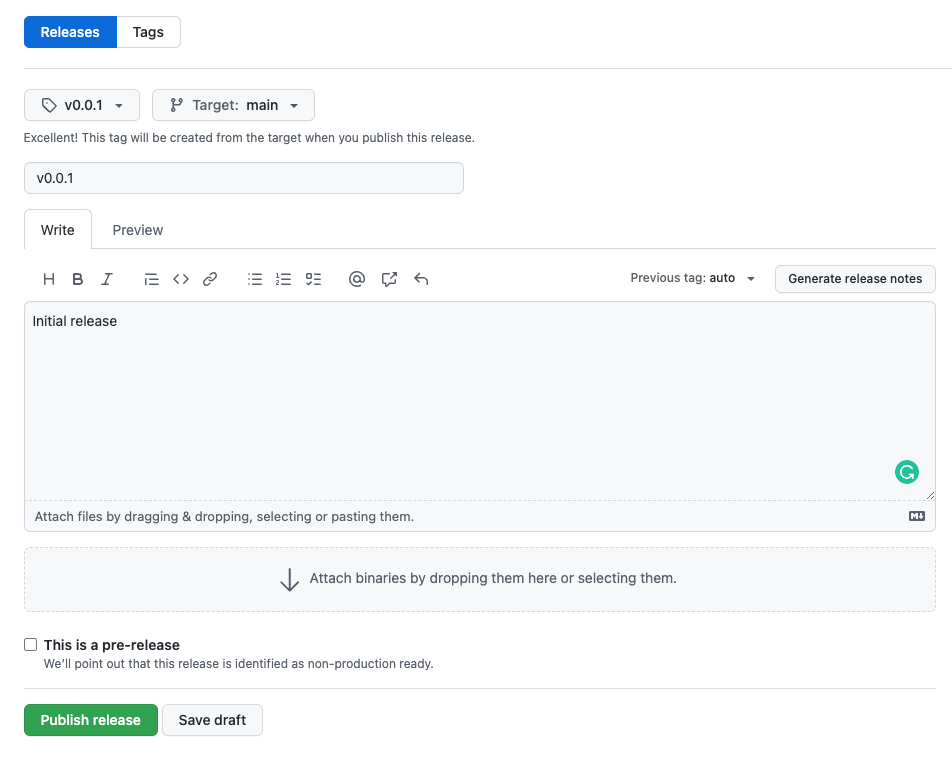
So, now I can give it a try. I will create a new release on GitHub.

Creating a release triggers a new workflow.

If I pull the latest changes from the GitHub repository, I can see that the tag was updated in the ./kubernetes/values.yaml file. The new value is now v0.0.1.
---
postgresql:
  postgresqlPassword: "SuperSecret123"
redis:
  auth:
    password: "SuperSecret456"
celeryWorker:
  replicaCount: 4
nautobot:
  image:
    registry: "ghcr.io"
    repository: "networktocode/nautobot-kubernetes"
    tag: "v0.0.1"
    pullSecrets:
      - "ghcr.io"
After a few minutes, the new image is deployed to Kubernetes.
➜  ~ kubectl describe pod nautobot-5b99dd5cb-5pcwp | grep Image
    Image:          ghcr.io/networktocode/nautobot-kubernetes:v0.0.1
    Image ID:       ghcr.io/networktocode/nautobot-kubernetes@sha256:3ca8699ed1ed970889d026d684231f1d1618e5adeeb383e418082b8f3e27d6ee
Great, my workflow is working as expected.
Release a New Nautobot Image
Remember, I created a very simple Dockerfile, which only pulls the Nautobot image and applies new tags. Usually, this is not a use case, so I will make this a bit more complex. I will install the Golden Config plugin and add the custom Nautobot configuration.
I must tell the Dockerfile how to install the plugin. So I will create the requirements.txt file and specify all plugins I want to install in my image. In the Dockerfile, I will install requirements from the file using the pip command.
So, let me first create the requirements.txt file to define the plugins and dependencies I want to install in my image. I will specify the Golden Config plugin, but I need to add the Nautobot Nornir plugin, as this is a requirement for the Golden Config plugin.
➜  ~ cat requirements.txt
nautobot_plugin_nornir==1.0.0
nautobot-golden-config==1.2.0
Just installing the plugins is not enough. I must also enable the plugins in the configuration and add the configuration parameters required for plugins. So I will take the base config from my current Nautobot deployment. I will store the configuration in the ./configuration/nautobot_config.py file. Then I will update the configuration file with the required plugin settings.
My repository contains the following files:
.
└── nautobot-kubernetes
    ├── Dockerfile
    ├── Makefile
    ├── README.md
    ├── clusters
    │   └── minikube
    │       └── flux-system
    │           ├── gotk-components.yaml
    │           ├── gotk-sync.yaml
    │           ├── kustomization.yaml
    │           └── nautobot-kustomization.yaml
    ├── configuration
    │   └── nautobot_config.py
    ├── kubernetes
    │   ├── helmrelease.yaml
    │   ├── kustomization.yaml
    │   ├── namespace.yaml
    │   ├── nautobot-helmrepo.yaml
    │   └── values.yaml
    └── requirements.txt

6 directories, 14 files
Now I must add additional instructions to the Dockerfile.
ARG NAUTOBOT_VERSION=1.4.2
ARG PYTHON_VERSION=3.9
FROM ghcr.io/nautobot/nautobot:${NAUTOBOT_VERSION}-py${PYTHON_VERSION}

COPY requirements.txt /tmp/

RUN pip install -r /tmp/requirements.txt

COPY ./configuration/nautobot_config.py /opt/nautobot/
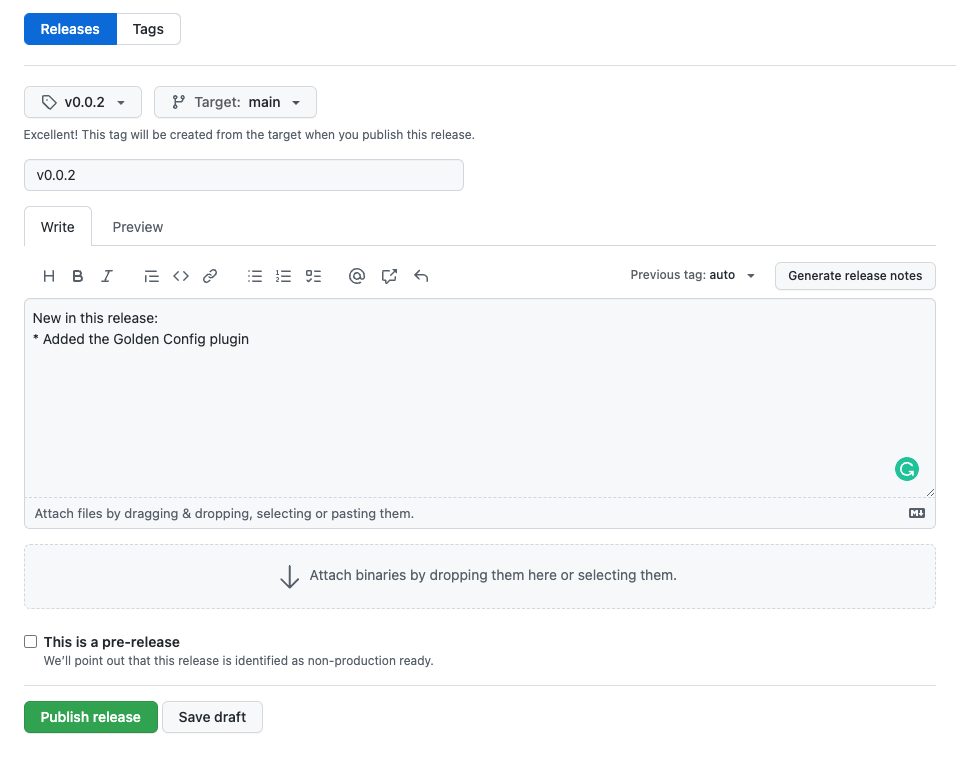
I can now commit and push all changes and create a new release in GitHub to deploy the new image.

The release triggers a new CI/CD workflow, which updates the image tag in ./kubernetes/values.yaml to v0.0.2. I have to wait for Flux to sync the Git repository. After a few minutes, the new image is deployed to Kubernetes.
➜  ~ kubectl describe pod nautobot-55f4cfc777-82qvr | grep Image
    Image:          ghcr.io/networktocode/nautobot-kubernetes:v0.0.2
    Image ID:       ghcr.io/networktocode/nautobot-kubernetes@sha256:2bd861b5b6b74cf0f09a34fefbcca264c22f3df7440320742012568a0046917b
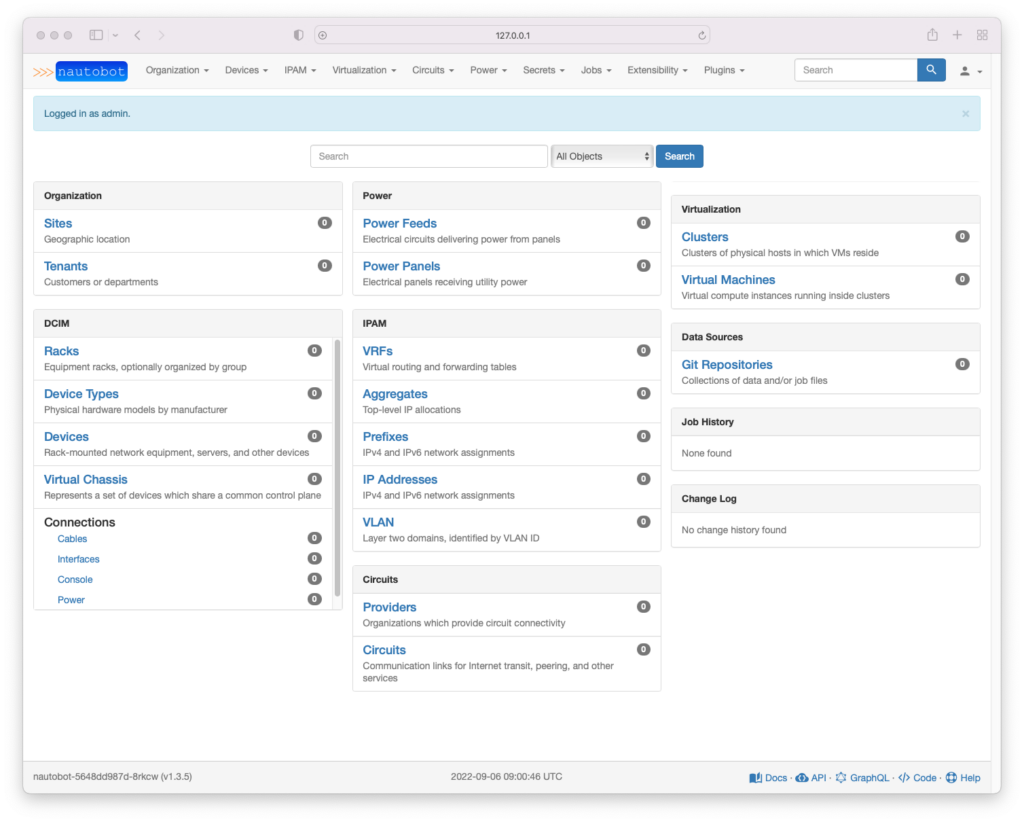
If I now connect to my Nautobot instance, I can see the plugins are installed and enabled.

As you can see, I updated the Nautobot deployment without even touching Kubernetes. All I have to do is update my repository and create a new release. Automation enables every developer to update the Nautobot deployment, even without having an understanding of Kubernetes.
Conclusion
In a series of three blog posts, I wanted to show how the Network to Code Managed Services team manages Nautobot deployments. We have several Nautobot deployments, so we must ensure that as many steps as possible are automated. The examples in these blog posts were quite simple. Of course, our deployments are much more complex. Usually we have multiple environments (production and integration at minimum), with many integrations with other systems, such as HashiCorp Vault, S3 backend storage, etc. Configuration in those cases is much more complex.
Anyway, I hope you understand how we are dealing with Nautobot deployments. If you have any questions regarding this, do not hesitate to reach out on Slack or contact us directly.
-Uros
Tags :
Contact Us to Learn More
Share details about yourself & someone from our team will reach out to you ASAP!


