Nautobot GraphQL Requests via Postman and Python

Blog Detail

GraphQL is a powerful query tool because it allows efficient queries for specific information that can span multiple resources that would otherwise require literally dozens of individual REST queries and extensive data filtering, post-processing, and isolation.

This article builds on the prior articles in this series, which describe how to craft GraphQL queries in Nautobot’s GraphiQL interface and how to use GraphQL aliasing to customize the returned key names and do multiple queries in a single GraphQL request.

The previous post in this series demonstrated how to leverage the Pynautobot Python package for programmatic GraphQL queries, showing a contrasting way (from the Postman-centric way described in the post below) to construct programmatic GraphQL queries in Python against Nautobot. The Pynautobot Python path provides a very clean, customized way to programmatically run simple or sophisticated GraphQL requests against Nautobot. The methodology described in this post examines a more general way to go about that, but at the expense of additional steps. Depending on your use case, one way or the other may be preferable.

This post will demonstrate three different techniques for configuring token authentication within Postman and two different data formats in the request body.

This post uses Postman version 8.0.6.

The examples in this post all use the public Nautobot demo site and the free Postman app. Readers are encouraged to follow along.

Authentication

Security tokens are typically required for programmatic access to Nautobot’s data. The following sections cover how to obtain a token and how to leverage it within Postman to craft GraphQL API calls.

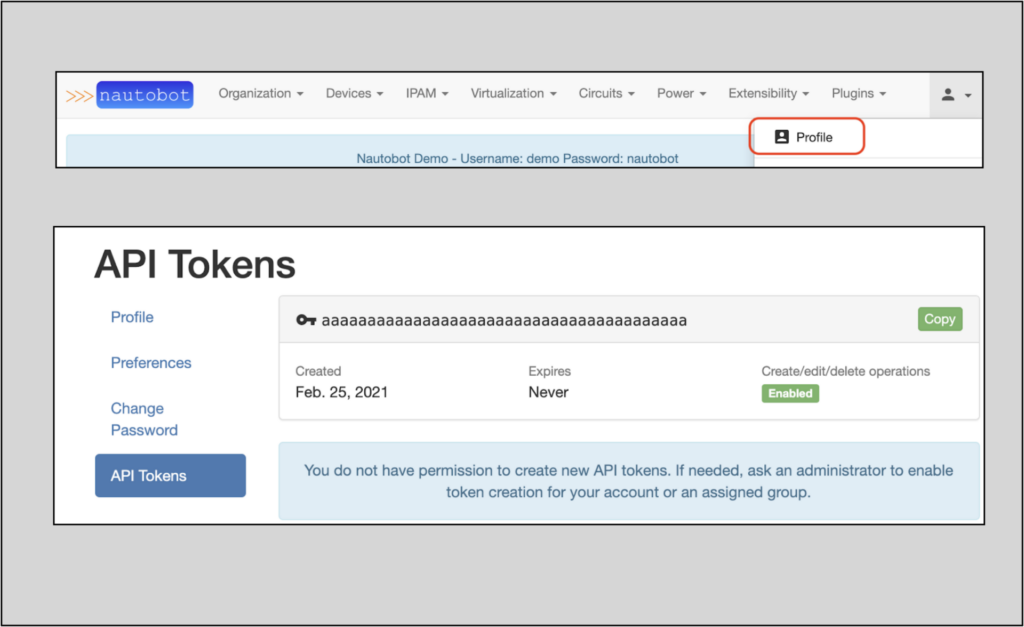
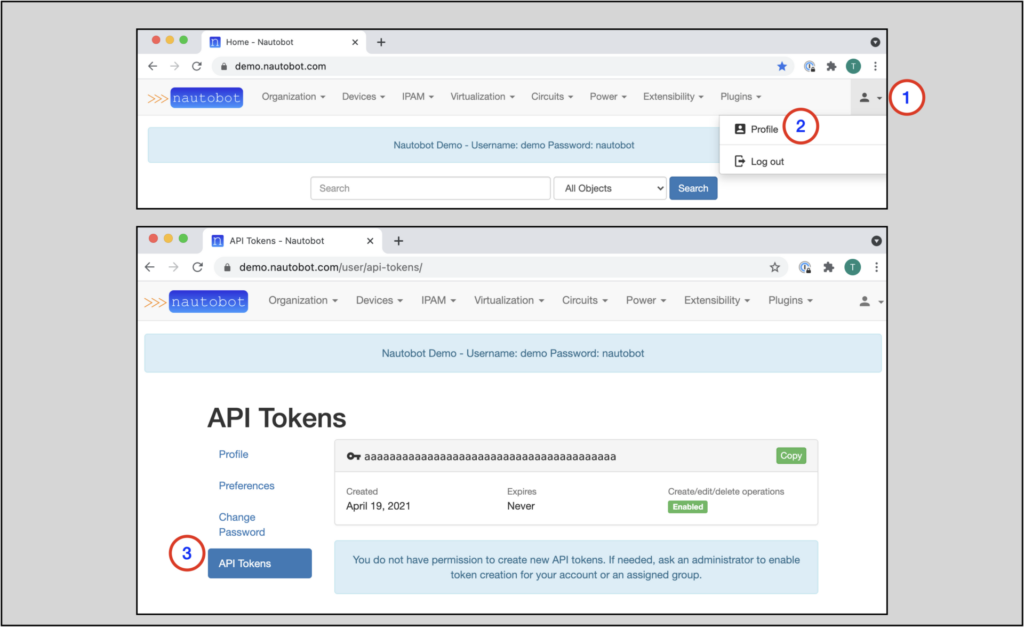
Nautobot security tokens are created in the Web UI. To view your token(s), navigate to the API Tokens page under your user profile. If there is no token present, create one or get the necessary permissions to do so.
1-api-token

Setting Up Postman Token Authentication

There are multiple ways to authenticate your Nautobot API queries in Postman:

  • Directly inserting the token information in the request header
  • The Authentication tab for the request
  • The Authorization tab for the collection

Authentication Option 1: Editing the Header

Inserting the token authentication information directly in the header allows individual queries to authenticate, but the user must manually populate the header with the authentication info on each new query.

To start a query that uses this method within Postman, create a new Postman collection:

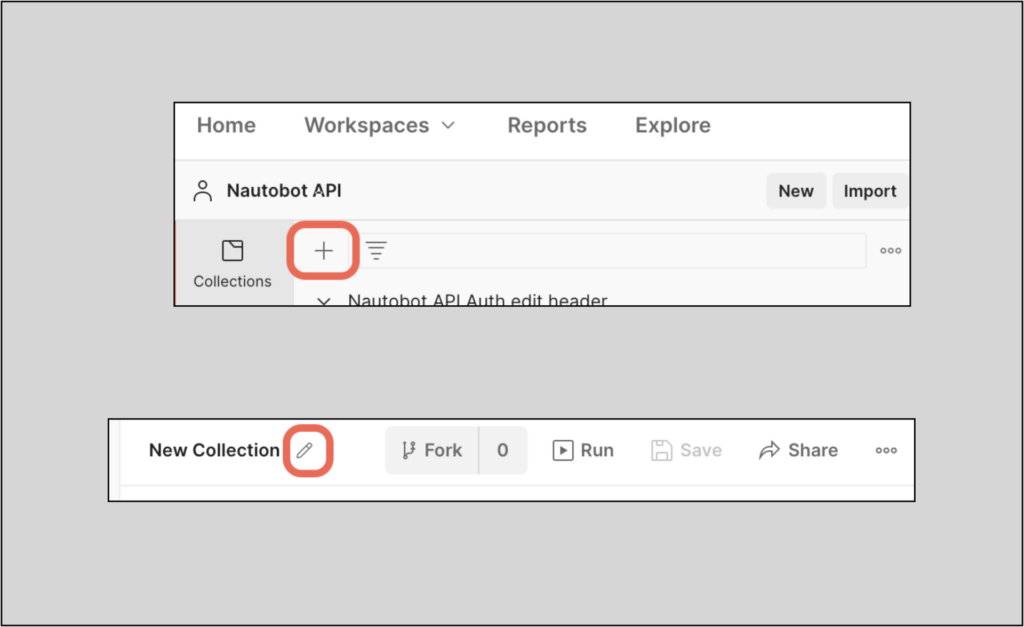
  • Click on the ‘+’ sign on the upper left of the app.
  • Name the collection by clicking on the pencil/edit button by the default New Collection name.

NOTE: A Postman Collection is a group of saved requests, oftentimes with a common theme, workflow, or function
2-collection

Name the collection Authentication Testing.

Create a new API request by clicking on the ‘+’ sign to the right of the new collection tab.
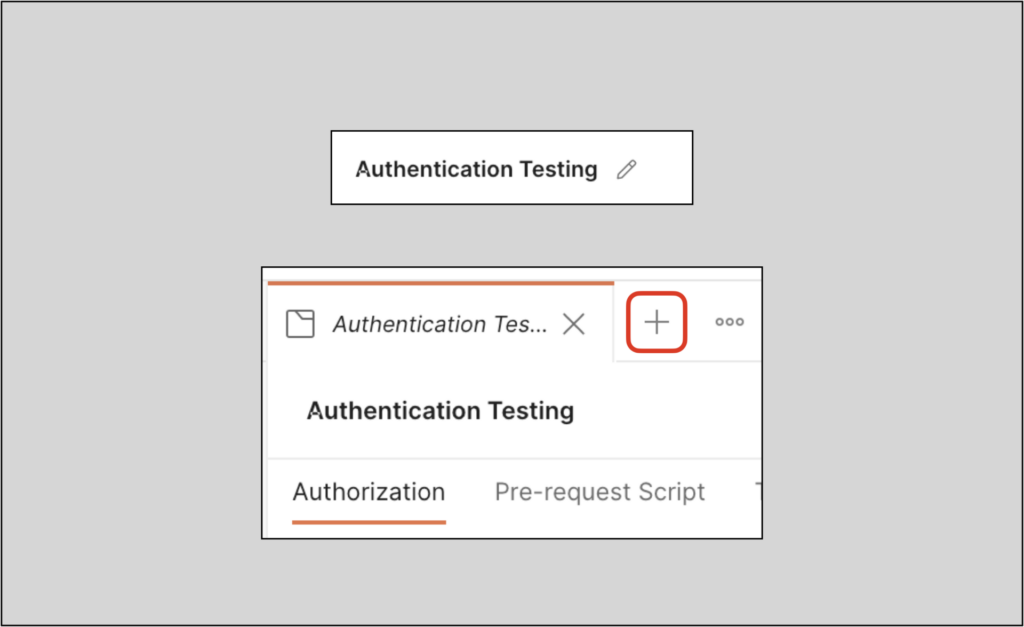
3-auth-testing

Before we create the actual request, we’ll edit the header by adding the authentication/token info:

  1. Go to the Headers tab
  2. View the auto-generated headers (click on the eyeball)
  3. In the next available row, type Authorization in the Key column (it should allow you to auto-complete)
  4. In the Value column, type in the word Token<space><key>
    • In this example I entered Token aaaaaaaaaaaaaaaaaaaaaaaaaaaaaaaaaaaaaaaa
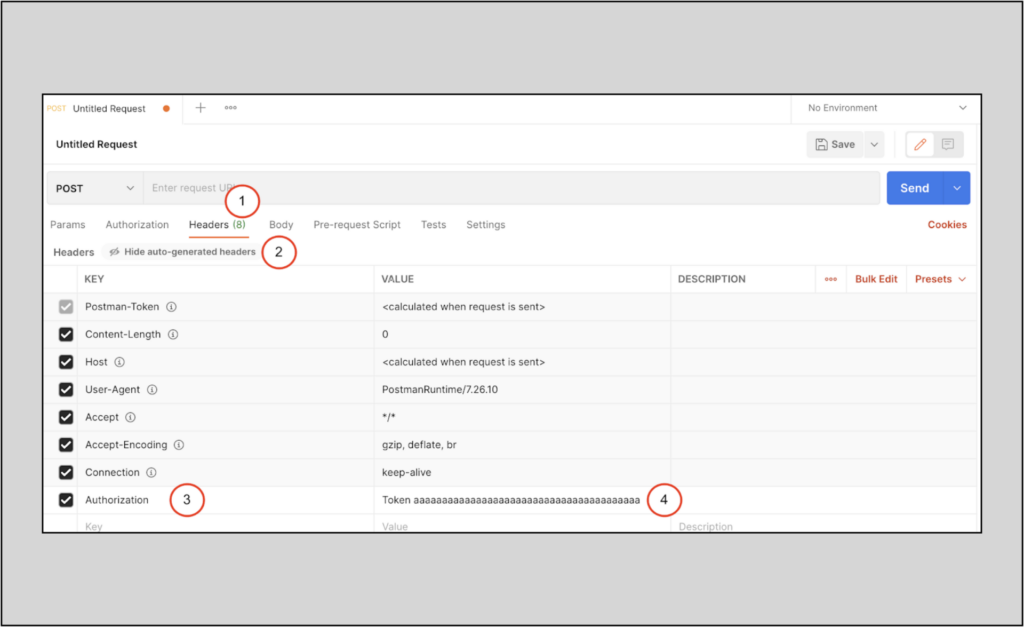
The Nautobot public sandbox key is aaaaaaaaaaaaaaaaaaaaaaaaaaaaaaaaaaaaaaaa

4-edit-header

Your Authorization portion is now complete.

Query via GraphQL in Body

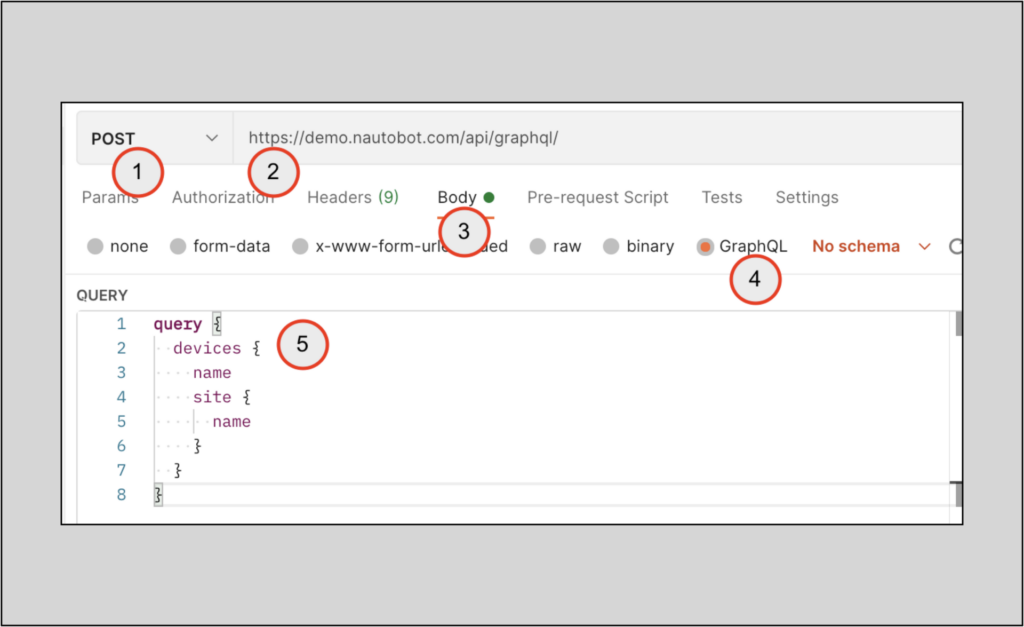
The next steps will guide you through crafting the rest of the query. This query will retrieve the name of each device along with the device’s site name.

This example will use the GraphQL format in the body.

  1. Change the request type to POST
  2. Enter the Nautobot server + GraphQL endpoint URL <server>/api/graphql/
  3. Go to the Body section
  4. Select GraphQL
  5. Input the specific query shown below
query {
 devices {
   name
   site {
    name
  }
 }
}
5-graphql-body

Click the Send button and wait for the return data. You should see output similar to the picture below if you are using the public-facing Nautobot demo site.
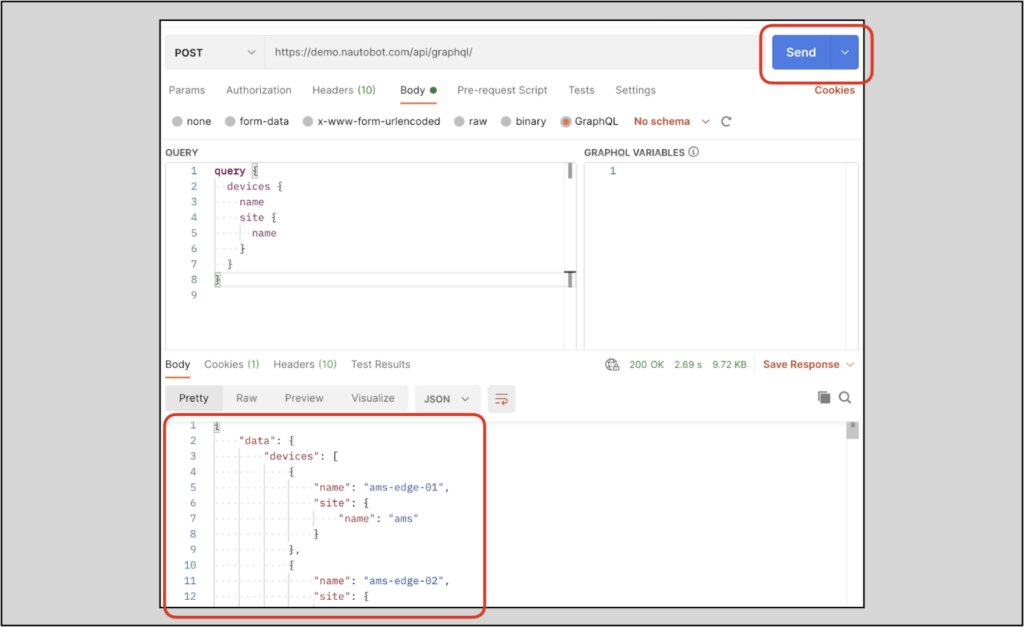
6-returned-data

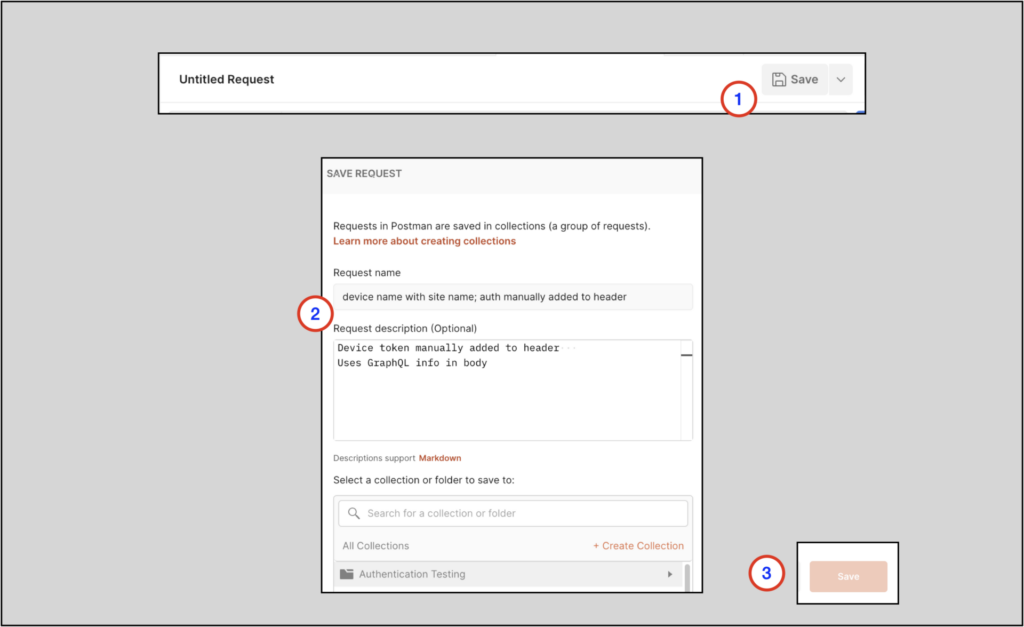
Save the request in the collection.

7-save-request

Authentication Option 2: The Authorization Tab

This section will show an example of authentication in the request’s Authorization tab. This example will reside in the same Authentication Testing collection.

To create the new request:

  1. Right-click on the collection name
  2. Select Add Request
  3. Name the request bkk devices; uses Authorization Tab
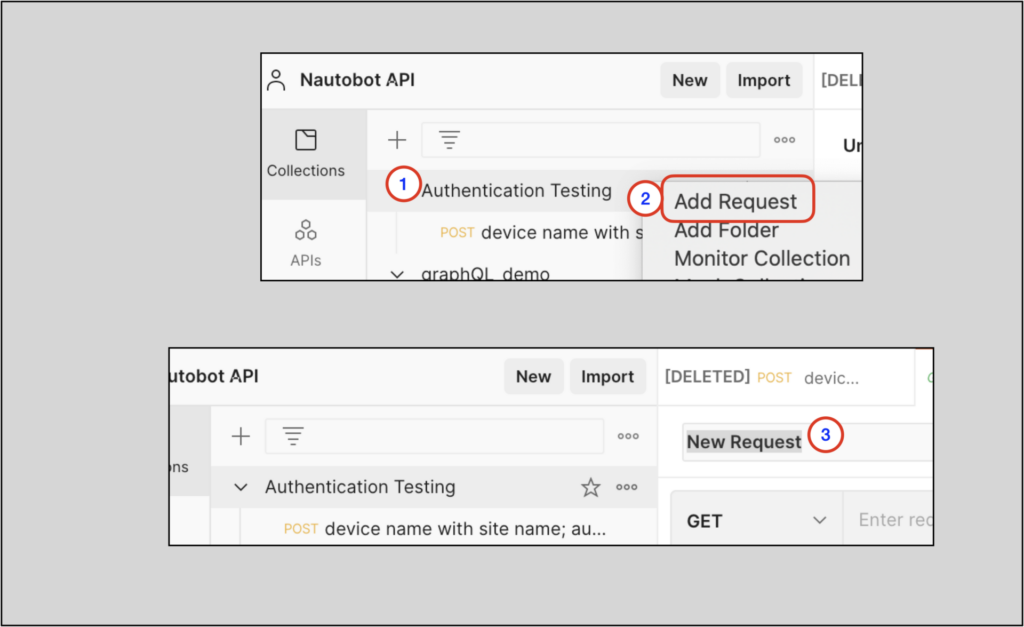
8-add-request

Configure the Authorization tab first, using the settings shown below; the Token aaaaaaaaaaaaaaaaaaaaaaaaaaaaaaaaaaaaaaaa entry is the same as in the prior section.
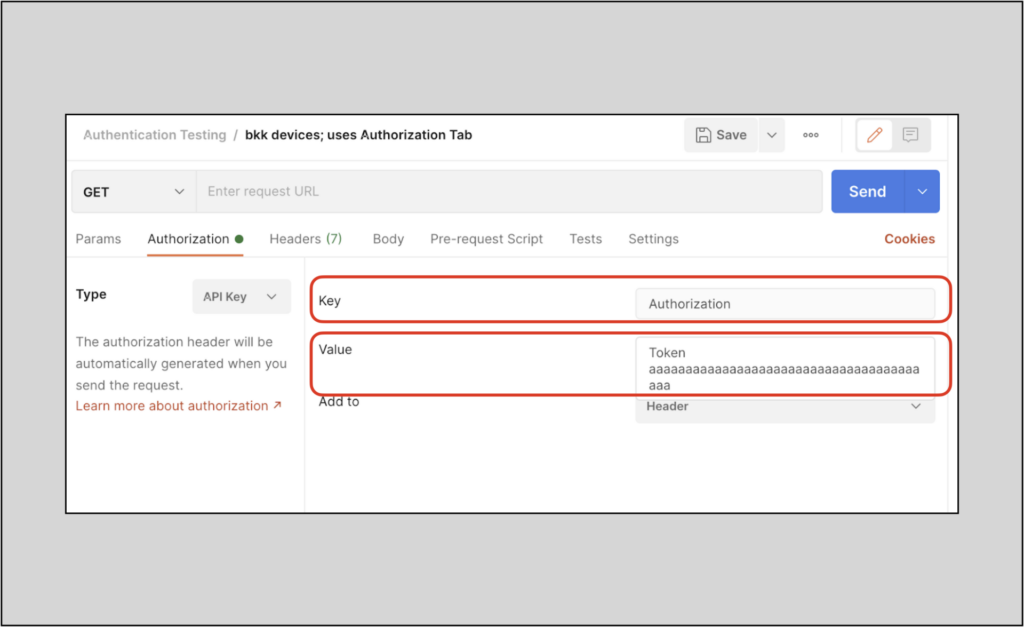
9-edit-auth-tab

Go to the Headers tab. If the hidden headers are not already being shown, click on the hidden headers eyeball to view the hidden headers. The Authorization key-value pair should be visible now. This was auto-generated from info in the Authorization tab.
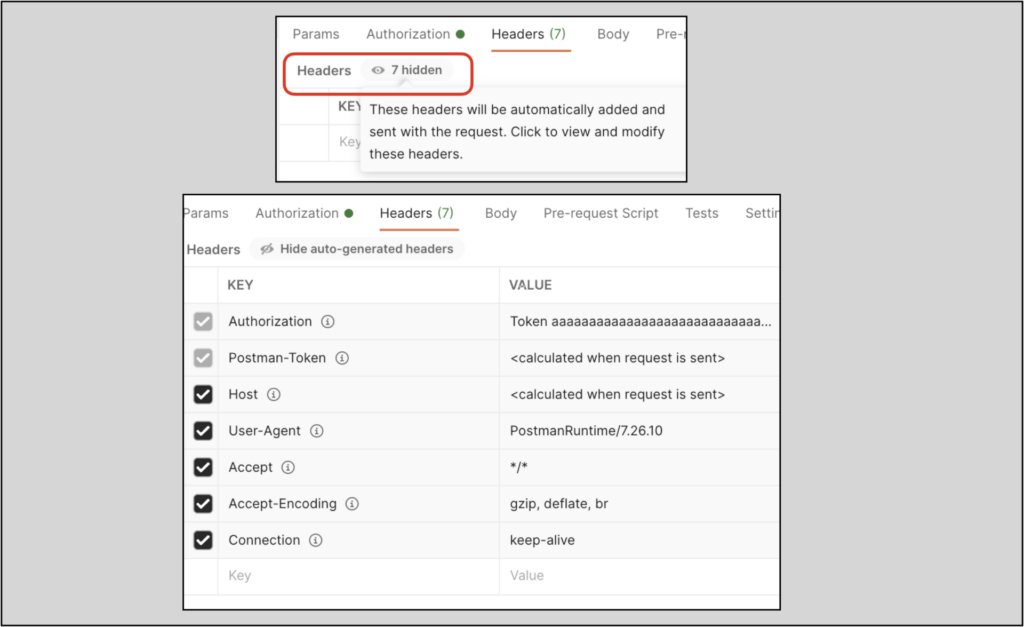
10-show-headers

Query via Raw Data

Finish out the query, but this time use raw in the Body section. Be sure to specify the format as JSON.

This query will return the device names in the bkk site, along with each device’s rack name and device role name. Be sure to escape the double-quotes in the site query parameter as shown below.

{
   "query": "query {devices(site:\"bkk\") {name device_role { name } rack { name } } }"
}

NOTE: Raw format is really cumbersome to work with, in part because of the requirement to escape quotes
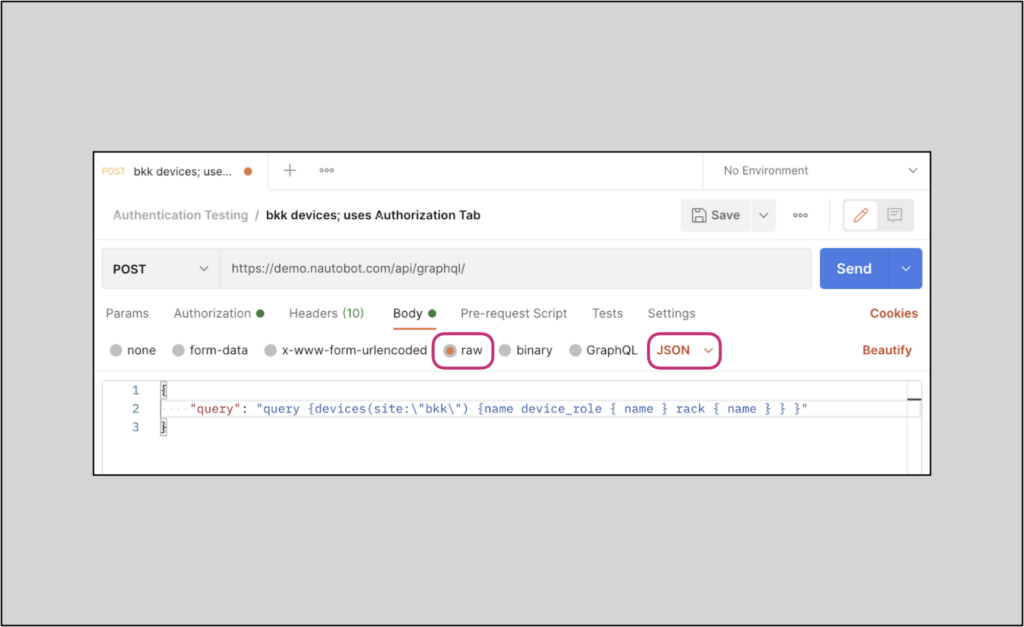
11-raw-body-query

Notice the potentially tedious nature of crafting the query above using the raw data option. It may be best to use the GraphQL format in the body for more complex queries.

If you check the Headers tab again, you’ll notice that changing the body format to JSON sets the Content-Type value to application/json.
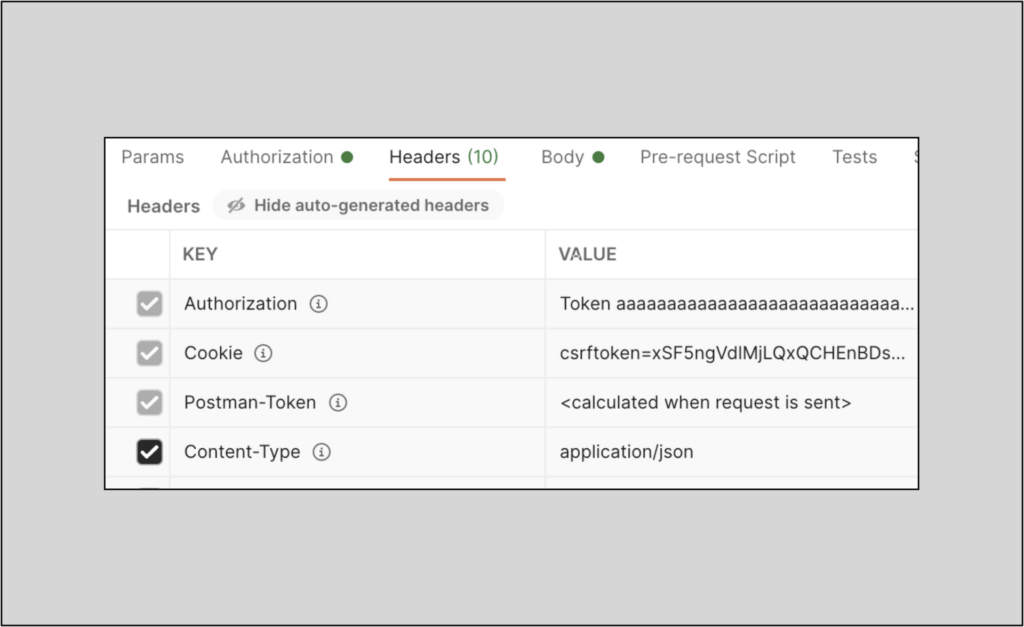
12-updated-headers

Authentication Option 3: Via the Collection Environment

Within a Postman collection, it is more practical to configure authentication in the collection’s environment instead of configuring authentication for each request. Configuring authentication for the entire collection lets the user configure authentication just once.

This next section will describe how to set authentication at the collection level.

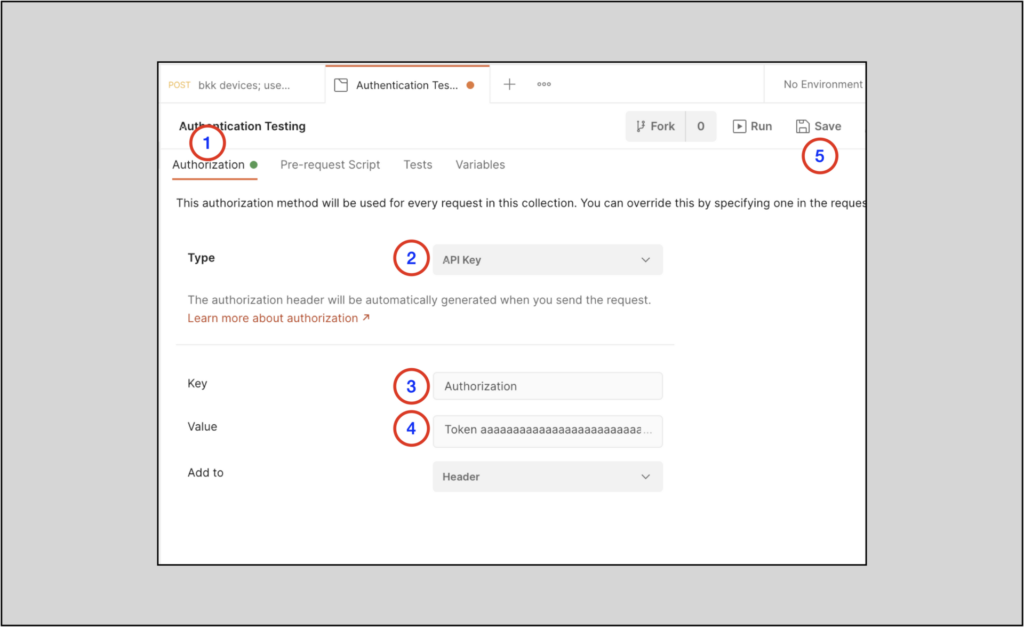
To the right of the collection name there are 3 dots (1); click on them and select Edit (2).
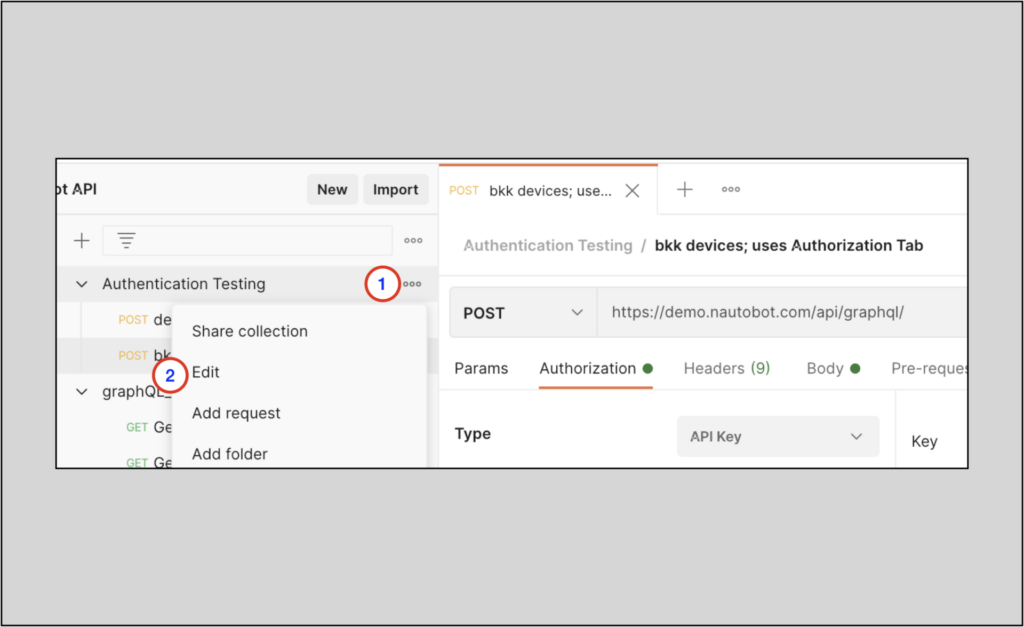
13-collection-auth

From here

  1. Select the Authorization tab
  2. Select API Key for Type
  3. Set Key to Authorization
  4. Set Value to Token<space><key>
  5. Save
14-collection-auth-config

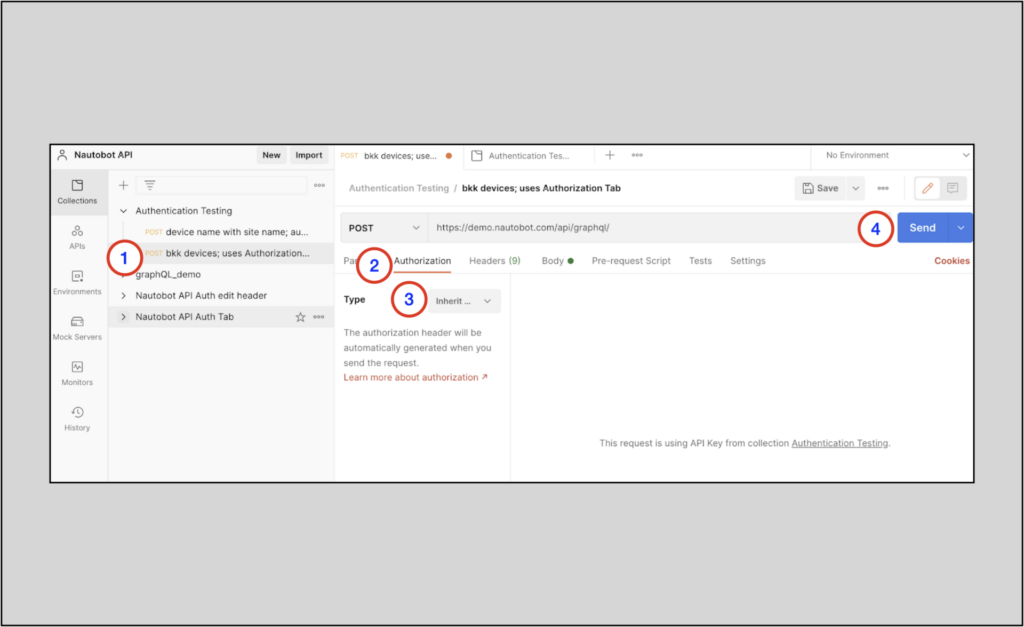
Any added requests in this collection can now use the Inherit auth from parent setting.

To configure a request to use the collection’s authentication:

  1. Select the bkk devices request that uses the Authorization tab (for example)
  2. Select the Authorization tab within the request
  3. Switch the Type to Inherit auth from parent
  4. Click Send
15-auth-from-parent

Save this updated request if you wish.

Converting Postman Queries to Python

Postman has helped us construct our GraphQL requests. This next section describes how to leverage those requests programmatically in Python.

This section will continue on from where we left off above, with the bkk devices request.

Postman has a very useful capability to export your crafted requests into a code format of your choice. On the right-hand side of the app, select the Code snippet button, marked as </>.
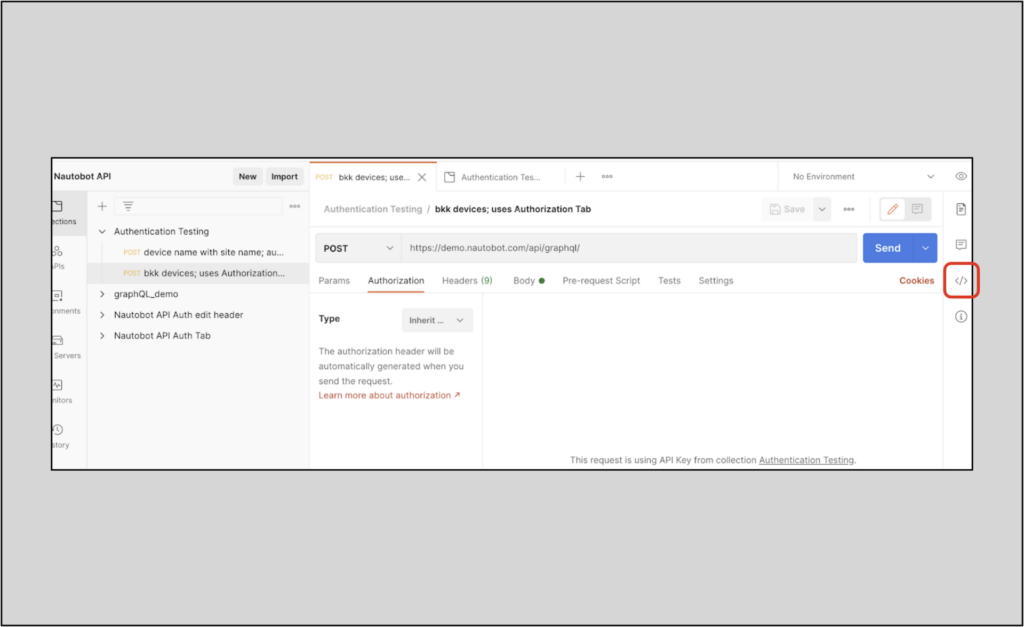
16-code-export-button

Within the search box that appears you can type Python or select from any of the languages that appear in the dropdown menu. This example will use the Python requests library.
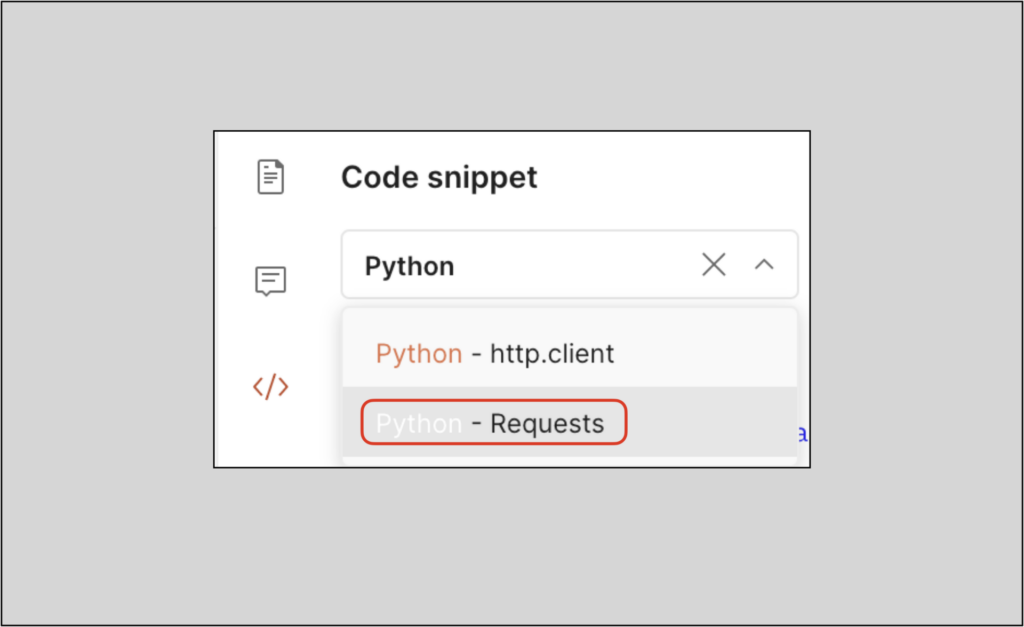
17-select-python-requests (1)

Selecting the Python – Requests option, you will now see Python code that will programmatically make the request using Python’s requests library and return the response.
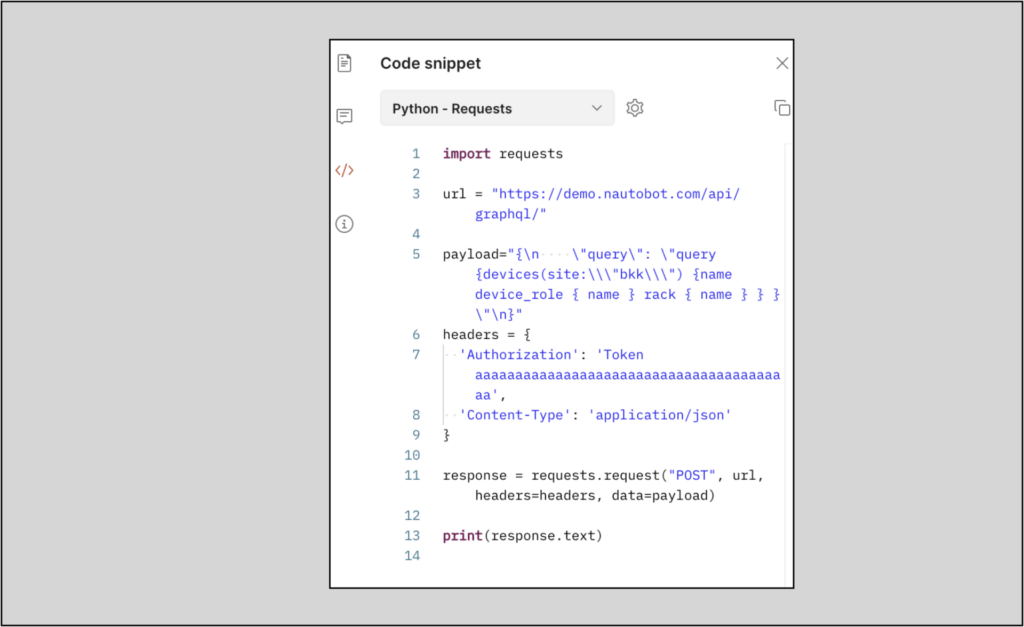
18-python-code

If cookie information appears in the code and you do not wish this to be present, you can manually delete it from the code or prevent it from being generated by clicking on Cookies (located directly beneath the Send button) to open the Cookie Manager; delete any cookies configured and then regenerate the Python code.
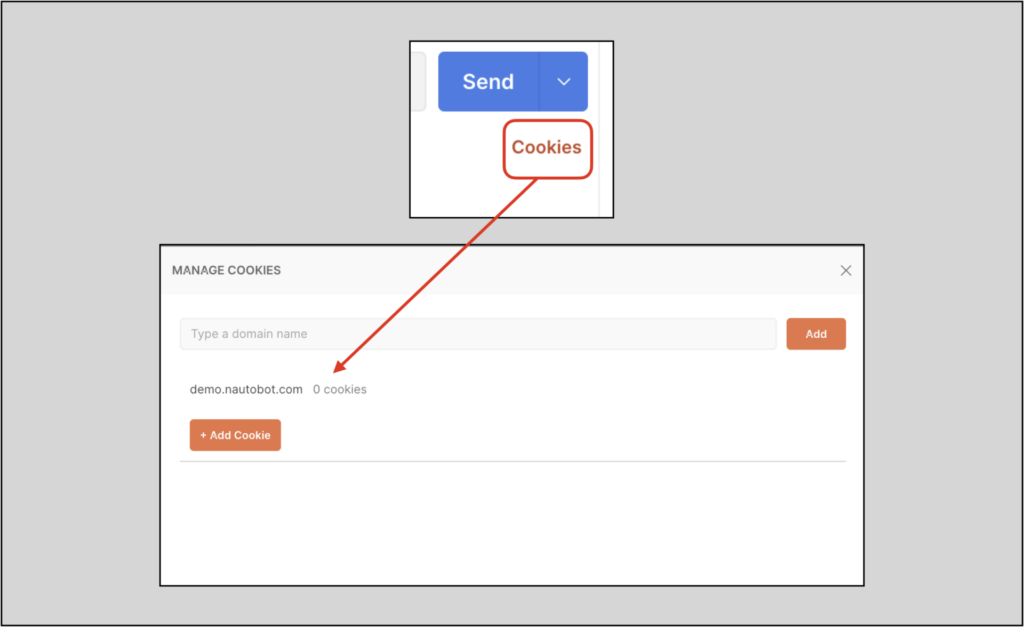
19-cookies

This Python code snippet can be added to any script or simply inserted into a Python interpreter:

~ % python3
Python 3.9.2 (v3.9.2:1a79785e3e, Feb 19 2021, 09:06:10)
[Clang 6.0 (clang-600.0.57)] on darwin
Type "help", "copyright", "credits" or "license" for more information.
>>> import requests
>>>
>>> url = "https://demo.nautobot.com/api/graphql/"
>>>
>>> payload="{\n    \"query\": \"query {devices(site:\\"bkk\\") {name device_role { name } rack { name } } }\"\n}"
>>> headers = {
...   'Authorization': 'Token aaaaaaaaaaaaaaaaaaaaaaaaaaaaaaaaaaaaaaaa',
...   'Content-Type': 'application/json'
... }
>>>
>>> response = requests.request("POST", url, headers=headers, data=payload)
>>>
>>> print(response.text)
{"data":{"devices":[{"name":"bkk-edge-01","device_role":{"name":"edge"},"rack":{"name":"bkk-101"}},{"name":"bkk-edge-02","device_role":{"name":"edge"},"rack":{"name":"bkk-102"}},{"name":"bkk-leaf-01","device_role":{"name":"leaf"},"rack":{"name":"bkk-101"}},{"name":"bkk-leaf-02","device_role":{"name":"leaf"},"rack":{"name":"bkk-102"}},{"name":"bkk-leaf-03","device_role":{"name":"leaf"},"rack":{"name":"bkk-103"}},{"name":"bkk-leaf-04","device_role":{"name":"leaf"},"rack":{"name":"bkk-104"}},{"name":"bkk-leaf-05","device_role":{"name":"leaf"},"rack":{"name":"bkk-105"}},{"name":"bkk-leaf-06","device_role":{"name":"leaf"},"rack":{"name":"bkk-106"}},{"name":"bkk-leaf-07","device_role":{"name":"leaf"},"rack":{"name":"bkk-107"}},{"name":"bkk-leaf-08","device_role":{"name":"leaf"},"rack":{"name":"bkk-108"}}]}}
>>>

NOTE: Being that there are multiple ways to use the requests library, you can also use the more concise requests.post method: response = requests.post(url, headers=headers, data=payload).

Here is a Python script that uses the requests.post method. The script executes the GraphQL request, prints the text response, and then pretty prints the returned json data:

import json
import requests

from pprint import pprint

print("Querying Nautobot via graphQL API call.")
print()

url = "https://demo.nautobot.com/api/graphql/"
print("url is: {}".format(url))
print()

payload="{\n    \"query\": \"query {devices(site:\\"bkk\\") {name device_role { name } rack { name } } }\"\n}"
print("payload is: {}".format(payload))
print()

headers = {
  'Authorization': 'Token aaaaaaaaaaaaaaaaaaaaaaaaaaaaaaaaaaaaaaaa',
  'Content-Type': 'application/json'
}
print("headers is: {}".format(headers))
print()

response = requests.post(url, headers=headers, data=payload)

response_data = response.json()

print("Here is the response data in json:")
pprint(response_data)

Note the tedious nature of crafting payload variable in the script above – it’s fairly complex with all the escaping backslashes. Luckily, the Postman app will create the object in the code for us, whether we use GraphQL or raw for the Body format.


Conclusion

To fully leverage GraphQL’s efficiency, it must be used programmatically. Prior posts in this series demonstrated using Nautobot’s GraphiQL interface to craft GraphQL queries and how to use GraphQL aliasing. This post builds on that by showing how to convert those GraphQL queries into remote requests in Postman and going on to export those requests to Python code for programmatic use. Also be sure to check out the prior post on using programmatic GraphQL requests with Nautobot via the pynautobot package and how that stacks up against the methodology in this post. Generally, the pynautobot path has fewer moving parts and offers customized APIs for Nautobot that allow sophisticated GraphQL queries. The Postman+requests path offers a more general framework but with more steps.


ntc img
ntc img

Contact Us to Learn More

Share details about yourself & someone from our team will reach out to you ASAP!

Programmatic Nautobot GraphQL Requests via Pynautobot

Blog Detail

Thanks to its ability to efficiently allow the request of specific information that can span multiple resources, GraphQL is a powerful query tool. A single GraphQL API request can return information that would otherwise require literally dozens of individual REST queries and extensive data filtering, post-processing, and isolation.

prior blog post in this series covered how to craft Nautobot GraphQL queries using the Nautobot GraphiQL interface. Recall that the GraphiQL interface is just for testing the GraphQL queries. This post will build on that knowledge, showing you how to leverage those queries to craft remote GraphQL requests for programmatic use via the open source pynautobot Python library. The pynautobot project page is here; the GitHub repository can be found here.

The pynautobot Python library is an API wrapper that allows easy interactions with Nautobot. This specific article will focus the GraphQL capabilities within the library.

The examples in this post all use the public Nautobot demo site https://demo.nautobot.com/. Readers are encouraged to follow along.

Authentication

Security tokens are typically required for programmatic access to Nautobot’s data. The following sections cover how to obtain a token and how to leverage it within Postman to craft GraphQL API calls.

Tokens

Nautobot security tokens are created in the Web UI. To view your token(s), navigate to the API Tokens page under your user profile. If there is no token present, create one or get the necessary permissions to do so.

Getting Started with Pynautobot

Installing Pynautobot

pynautobot is a Python library. From your environment install it via pip3:

% pip3 install pynautobot
Collecting pynautobot
Downloading pynautobot-1.0.1-py3-none-any.whl (29 kB)
. . . 
Successfully installed pynautobot-1.0.1
% 

Using Pynautbot

This first example will walk through a pynautobot GraphQL query in a Python interpreter.

Start a Python shell and import pynautobot:

% python3
Python 3.9.2 (v3.9.2:1a79785e3e, Feb 19 2021, 09:06:10) 
[Clang 6.0 (clang-600.0.57)] on darwin
Type "help", "copyright", "credits" or "license" for more information.
>>> 
>>> 
>>> import pynautobot
>>> 

Taking a quick look at Classes within pynautobotapi is the one we will want to use. The help tells us that the api Class can take url and token as parameters.

>>> dir(pynautobot)
['AllocationError', 'ContentError', 'DistributionNotFound', 'RequestError',  << dunders snipped >>, 'api', 'core', 'get_distribution', 'models']
>>> 
>>> help(pynautobot.api)


Help on class Api in module pynautobot.core.api:

class Api(builtins.object)
 |  Api(url, token=None, threading=False)
 . . . 

NOTE: the token from the https://demo.nautobot.com server is aaaaaaaaaaaaaaaaaaaaaaaaaaaaaaaaaaaaaaaa

Define a value token with the token value from your Nautobot implementation and a value url for your Nautobot server.

>>> url = "https://demo.nautobot.com"
>>> 
>>> token = "aaaaaaaaaaaaaaaaaaaaaaaaaaaaaaaaaaaaaaaa"
>>> 

This live example will use a query from a previous post. Define query in Python using the exact text from the query used in example 3 in the GraphiQL post:

NOTE: the query text can be found in the last section of the blog, under Text Query Examples and Results

>>> query = """
... query {
...  devices(site:"ams") {
...    name
...  }
... }
... """
>>> 
>>> query
'\nquery {\n devices(site:"ams") {\n   name\n }\n}\n'
>>> 
>>> print(query)

query {
 devices(site:"ams") {
   name
 }
}
>>> 

Now construct the pynautobot.api Class with the parameters we have:

>>> 
>>> nb = pynautobot.api(url, token)
>>> 

Notice that the nb Object instance has a graphql attribute . . .

>>> dir(nb)
['__class__', << dunders snipped >>, 'base_url', 'circuits', 'dcim', 'extras', 'graphql', 'headers', 'http_session', 'ipam', 'openapi', 'plugins', 'status', 'tenancy', 'threading', 'token', 'users', 'version', 'virtualization']
>>> 

. . . and graphql has a query method:

>>> dir(nb.graphql)
['__class__', << dunders snipped >>, 'api', 'query', 'url']
>>> 
>>> help(nb.graphql.query)

Help on method query in module pynautobot.core.graphql:

query(query: str, variables: Optional[Dict[str, Any]] = None) -> pynautobot.core.graphql.GraphQLRecord method of pynautobot.core.graphql.GraphQLQuery instance
    Runs query against Nautobot Graphql endpoint.
    
    Args:
        query (str): Query string to send to the API
        variables (dict): Dictionary of variables to use with the query string, defaults to None
    
    Raises:
        GraphQLException:
            - When the query string is invalid.
        TypeError:
            - When `query` passed in is not of type string.
            - When `variables` passed in is not a dictionary.
        Exception:
            - When unknown error is passed in, please open an issue so this can be addressed.
    
    Examples:
        >>> try:
        ...   response.raise_for_status()
        ... except Exception as e:
        ...   variable = e
        ... 
        >>> variable
        >>> variable.response.json()
        {'errors': [{'message': 'Cannot query field "nae" on type "DeviceType". Did you mean "name" or "face"?', 'locations': [{'line': 4, 'column': 5}]}]}
    
        >>> variable.response.status_code
        400
    
    Returns:
        GraphQLRecord: Response of the API call


Using the structure above, create the query and explore the results.

>>> 
>>> response = nb.graphql.query(query=query)
>>> 
>>> dir(response)
['__class__', << dunders snipped >>, 'json', 'status_code']
>>> 
>>> response.status_code
200
>>> 
>>> response.json
{'data': {'devices': [{'name': 'ams-edge-01'}, {'name': 'ams-edge-02'}, {'name': 'ams-leaf-01'}, {'name': 'ams-leaf-02'}, {'name': 'ams-leaf-03'}, {'name': 'ams-leaf-04'}, {'name': 'ams-leaf-05'}, {'name': 'ams-leaf-06'}, {'name': 'ams-leaf-07'}, {'name': 'ams-leaf-08'}]}}
>>> 

Here is response in a more readable format:

>>> from pprint import pprint
>>> pprint(response.json)
{'data': {'devices': [{'name': 'ams-edge-01'},
                      {'name': 'ams-edge-02'},
                      {'name': 'ams-leaf-01'},
                      {'name': 'ams-leaf-02'},
                      {'name': 'ams-leaf-03'},
                      {'name': 'ams-leaf-04'},
                      {'name': 'ams-leaf-05'},
                      {'name': 'ams-leaf-06'},
                      {'name': 'ams-leaf-07'},
                      {'name': 'ams-leaf-08'}]}}
>>> 

The response object can be parsed, making the data accessible to your Python code:

>>> 
>>> devices = response.json['data']['devices']
>>> 
>>> devices[2]
{'name': 'ams-leaf-01'}
>>> 

A Full Pynautobot Script

This next example features a full script, using an example from the GraphQL Aliasing with Nautobot post in this series. You can also see the YouTube video that accompanies the post here.

The script below features a query that uses GraphQL aliasing to request device names for multiple sites in a single query. The device names in each site will be returned grouped by the site name; each device name will be alaised with an inventory_hostname key (instead of name) for use in an Ansible environment.

The query text for this script was pulled directly from the Aliasing Solves the Problem section of the referenced blog post and copied directly into the query variable.

import json
import pynautobot

from pprint import pprint

print("Querying Nautobot via pynautobot.")
print()

url = "https://demo.nautobot.com"
print("url is: {}".format(url))
print()

query = """
query {
  ams_devices:devices(site:"ams") {
    inventory_hostname:name
  }
  sin_devices:devices(site:"sin") {
    inventory_hostname:name
  }
  bkk_devices:devices(site:"bkk") {
    inventory_hostname:name
  }
}
"""

print("query is:")
print(query)
print()

token = "aaaaaaaaaaaaaaaaaaaaaaaaaaaaaaaaaaaaaaaa"

nb = pynautobot.api(url, token)

response = nb.graphql.query(query=query)
response_data = response.json

print("Here is the response data in json:")
pprint(response_data)
print()

print("Here are the bkk devices:")
pprint(response_data['data']['bkk_devices'])

Here is the script’s output:

% python3 -i graphql_ams_query_pynautobot.py
Querying Nautobot via pynautobot.

url is: https://demo.nautobot.com

query is:

query {
  ams_devices:devices(site:"ams") {
    inventory_hostname:name
  }
  sin_devices:devices(site:"sin") {
    inventory_hostname:name
  }
  bkk_devices:devices(site:"bkk") {
    inventory_hostname:name
  }
}


Here is the response data in json:
{'data': {'ams_devices': [{'inventory_hostname': 'ams-edge-01'},
                          {'inventory_hostname': 'ams-edge-02'},
                          {'inventory_hostname': 'ams-leaf-01'},
                          {'inventory_hostname': 'ams-leaf-02'},
                          {'inventory_hostname': 'ams-leaf-03'},
                          {'inventory_hostname': 'ams-leaf-04'},
                          {'inventory_hostname': 'ams-leaf-05'},
                          {'inventory_hostname': 'ams-leaf-06'},
                          {'inventory_hostname': 'ams-leaf-07'},
                          {'inventory_hostname': 'ams-leaf-08'}],
          'bkk_devices': [{'inventory_hostname': 'bkk-edge-01'},
                          {'inventory_hostname': 'bkk-edge-02'},
                          {'inventory_hostname': 'bkk-leaf-01'},
                          {'inventory_hostname': 'bkk-leaf-02'},
                          {'inventory_hostname': 'bkk-leaf-03'},
                          {'inventory_hostname': 'bkk-leaf-04'},
                          {'inventory_hostname': 'bkk-leaf-05'},
                          {'inventory_hostname': 'bkk-leaf-06'},
                          {'inventory_hostname': 'bkk-leaf-07'},
                          {'inventory_hostname': 'bkk-leaf-08'}],
          'sin_devices': [{'inventory_hostname': 'sin-edge-01'},
                          {'inventory_hostname': 'sin-edge-02'},
                          {'inventory_hostname': 'sin-leaf-01'},
                          {'inventory_hostname': 'sin-leaf-02'},
                          {'inventory_hostname': 'sin-leaf-03'},
                          {'inventory_hostname': 'sin-leaf-04'},
                          {'inventory_hostname': 'sin-leaf-05'},
                          {'inventory_hostname': 'sin-leaf-06'},
                          {'inventory_hostname': 'sin-leaf-07'},
                          {'inventory_hostname': 'sin-leaf-08'}]}}

Here are the bkk devices:
[{'inventory_hostname': 'bkk-edge-01'},
 {'inventory_hostname': 'bkk-edge-02'},
 {'inventory_hostname': 'bkk-leaf-01'},
 {'inventory_hostname': 'bkk-leaf-02'},
 {'inventory_hostname': 'bkk-leaf-03'},
 {'inventory_hostname': 'bkk-leaf-04'},
 {'inventory_hostname': 'bkk-leaf-05'},
 {'inventory_hostname': 'bkk-leaf-06'},
 {'inventory_hostname': 'bkk-leaf-07'},
 {'inventory_hostname': 'bkk-leaf-08'}]
>>> 

Conclusion

To fully leverage GraphQL’s efficiency, it must be used programmatically. The first post in this series demonstrated using Nautobot’s GraphiQL interface to craft GraphQL queries. This post builds on that by showing how to convert those GraphQL queries into remote requests in Python code for programmatic use.

To find out more about pynautobot, including the additional capabilities not described in this post, start with the pynautobot Github repo.


ntc img
ntc img

Contact Us to Learn More

Share details about yourself & someone from our team will reach out to you ASAP!

GraphQL Aliasing with Nautobot

Blog Detail

GraphQL aliasing is a very potent feature that allows the user to customize the query results by specifying key names in the returned data.

GraphQL is very efficient, in large part because it allows a single query to access info from multiple resources and returns only the specific information the user requests. This greatly reduces the number of required queries and eliminates the need for post-query data filtering.

GraphQL aliasing is another feature within GraphQL that increases efficiency. This post will demonstrate GraphQL aliasing with two real-world use cases and examples.

recent Network to Code blog post covered how to construct GraphQL queries using Nautobot’s GraphiQL interface. This post will build on that prior post, so if you have not read that prior post yet and are not familiar with GraphQL, I’d recommend reading that before going further because this article builds on those concepts.

What Is GraphQL Aliasing?

GraphQL aliasing allows the user to customize the names of data keys in the returned data. This is helpful in situations where the user is working in a pre-existing data architecture that expects specific key names or where it’s helpful to have key names that conform to the existing architecture’s naming conventions.

This is perhaps better explained with examples, so let’s get to those. The reader can follow along with these examples at the Nautobot public demo sandbox at https://demo.nautobot.com/. Log in with the posted username and password on the site.

An Ansible Context

Ansible is a powerful abstraction and orchestration tool. Working in that context, it’s helpful to have Nautobot return data that conforms to Ansible’s naming conventions.

A Baseline Query

Here is a GraphQL query in Nautobot that uses a query parameter and returns all device names in a site:

query {
  ams_devices:devices(site:"ams") {
    name
  }
}

NOTE: The query keyword is optional. The above query can also be conducted with query omitted, as such:

{
  ams_devices:devices(site:"ams") {
    name
  }
}

Here is the returned data for this baseline example:

{
  "data": {
    "ams_devices": [
      {
        "name": "ams-edge-01"
      },
      {
        "name": "ams-edge-02"
      },
      {
        "name": "ams-leaf-01"
      },
      {
        "name": "ams-leaf-02"
      },
      {
        "name": "ams-leaf-03"
      },
      {
        "name": "ams-leaf-04"
      },
      {
        "name": "ams-leaf-05"
      },
      {
        "name": "ams-leaf-06"
      },
      {
        "name": "ams-leaf-07"
      },
      {
        "name": "ams-leaf-08"
      }
    ]
  }
}

Query with Aliasing

Since we’re in an Ansible context in this example, it’s likely more useful to have the device names come back with an inventory_hostname key instead of the name key since inventory_hostname matches up well with Ansible terminology and use cases.

Here is an example that does that. Notice the aliasing, done by prepending inventory_hostname: to the queried name parameter:

{
  ams_devices:devices(site:"ams") {
    inventory_hostname:name
  }
}

This is the data that gets returned:

{
  "data": {
    "ams_devices": [
      {
        "inventory_hostname": "ams-edge-01"
      },
      {
        "inventory_hostname": "ams-edge-02"
      },
      {
        "inventory_hostname": "ams-leaf-01"
      },
      {
        "inventory_hostname": "ams-leaf-02"
      },
      {
        "inventory_hostname": "ams-leaf-03"
      },
      {
        "inventory_hostname": "ams-leaf-04"
      },
      {
        "inventory_hostname": "ams-leaf-05"
      },
      {
        "inventory_hostname": "ams-leaf-06"
      },
      {
        "inventory_hostname": "ams-leaf-07"
      },
      {
        "inventory_hostname": "ams-leaf-08"
      }
    ]
  }
}

Pretty slick! Again, there is no need to post-process the data since GraphQL returned only the data we asked for and gave it the specific key name we want.

Executing Multiple Targeted Queries

Aliasing is also useful for executing what would be multiple targeted queries in a single request.

The Problem Statement

Building on the example above, imagine that you need inventory_hostname values from multiple specific sites. You want the inventory_hostname data grouped by each queried site.

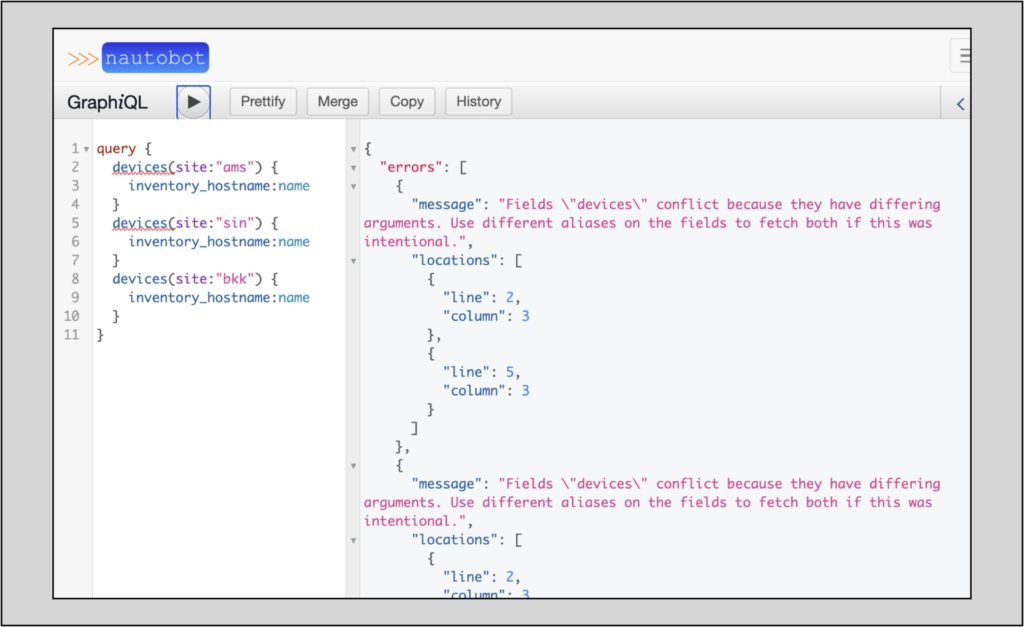
Querying for multiple device sets, each with different parameters, with only a single query produces errors:

GraphQL does not like the multiple devices queries because each query has a different parameter (site, in this example).

Aliasing Solves the Problem

Aliasing allows the user to execute those multiple queries in a single request. In this use case, we will alias each devices query, making it unique within the query set:

query {
  ams_devices:devices(site:"ams") {
    inventory_hostname:name
  }
  sin_devices:devices(site:"sin") {
    inventory_hostname:name
  }
  bkk_devices:devices(site:"bkk") {
    inventory_hostname:name
  }
}

Notice each devices query is aliased to <site name>_devices (ams_devicessin_devices, and bkk_devices), making it unique within the query set. Aliasing solves the uniqueness problem within the multiple query set, making the request valid.

Here are the returned results from Nautobot (snipped for brevity):

{
  "data": {
    "ams_devices": [
      {
        "inventory_hostname": "ams-edge-01"
      },
      {
        "inventory_hostname": "ams-edge-02"
      },
      {
        "inventory_hostname": "ams-leaf-01"
      },
    <---- snip ---->
      {
        "inventory_hostname": "ams-leaf-08"
      }
    ],
    "sin_devices": [
      {
        "inventory_hostname": "sin-edge-01"
      },
      {
        "inventory_hostname": "sin-edge-02"
      },
      {
        "inventory_hostname": "sin-leaf-01"
      },
    <---- snip ---->
      {
        "inventory_hostname": "sin-leaf-08"
      }
    ],
    "bkk_devices": [
      {
        "inventory_hostname": "bkk-edge-01"
      },
      {
        "inventory_hostname": "bkk-edge-02"
      },
      {
        "inventory_hostname": "bkk-leaf-01"
      },
    <---- snip ---->
      {
        "inventory_hostname": "bkk-leaf-08"
      }
    ]
  }
}

Notice how each site’s inventory_hostname list is a value for the site’s alias, making this data programmatically easy to leverage.

GraphQL Efficiency

Aliasing is another tool GraphQL offers that allows the user to efficiently query for specific data with a minimal amount of requests and little to no required post-processing of the returned data.

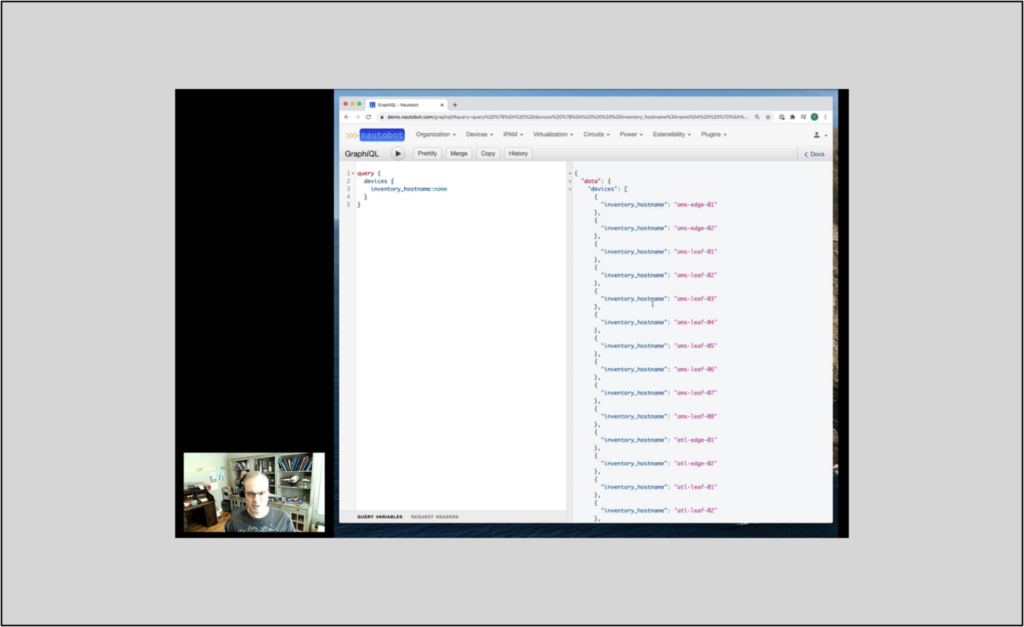
Be sure to check out the accompanying YouTube video for this post here, or click the image below.


ntc img
ntc img

Contact Us to Learn More

Share details about yourself & someone from our team will reach out to you ASAP!