Nautobot Apps and Data Model Relationships

Blog Detail

When developing a Nautobot App, there are multiple ways to integrate any new data models belonging to that App with the core data models provided by Nautobot itself. I’m writing to share a few quick tips about which approaches to choose.

Classes of Data Relationships

There are four basic classes of data relationships you might wish to implement in your App:

  1. One to One: Each record of type A relates to at most one record of type B and vice versa. For example, a VirtualChassis has at most one Device serving as the primary for that chassis, and a Device is the primary for at most one VirtualChassis.
  2. One to Many: Each record of type A relates to any number of records of type B, but each record of type B relates to at most one record of type A. For example, a Location may have many Racks, but each Rack has only one Location.
  3. Many to One: The reverse of the previous class. I’m calling it out as a separate item, because in some cases it needs to be handled differently when developing an App.
  4. Many to Many: Any number of records of type A relate to any number of records of type B. For example, a VRF might have many associated RouteTarget records as its import and export targets, and a RouteTarget might be reused across many VRF records.

Options for Implementing Data Relationships in Nautobot

The first, and seemingly easiest, approach to implement would be something like a CharField on your App’s model (or a String-type CustomField added to a core model) that identifies a related record(s) by its nameslug, or similar natural key. I’m including this only for completeness, as really you should never do this. It has many drawbacks, notably in terms of data validation and consistency. For example, there’s no inherent guarantee that the related record exists in the first place, or that it will continue to exist so long as you have a reference to it. Nautobot is built atop a relational database and as such has first-class support for representing and tracking object relationships at the database level. You should take advantage of these features instead!

The next, and most traditional, approach is to represent data relationships using native database features such as foreign keys. This has a lot of advantages, including database validation, data consistency, and optimal performance. In most cases, this will be your preferred approach when developing new data models in your App, but there are a few cases where it isn’t possible.

The final approach, which is specific to Nautobot, is to make use of Nautobot’s Relationship feature, which allows a user or developer to define arbitrary data relationships between any two models. This is an extremely powerful and flexible feature, and is especially useful to a Nautobot user who wishes to associate existing models in a new way, but from an App developer standpoint, it should often be your fallback choice rather than your first choice, because it lacks some of the performance advantages of native database constructs.

Implementing One-to-One Data Relationships

A one-to-one relationship between App data models, or between an App model and a core Nautobot model, should generally be implemented as a Django OneToOneField on the appropriate App data model. This is a special case of a ForeignKey and provides all of the same inherent performance and data consistency benefits. You can use Django features such as on_delete=models.PROTECT or on_delete=models.CASCADE to control how your data model will automatically respond when the other related model is deleted.

An example from the nautobot-firewall-models App:

class CapircaPolicy(PrimaryModel):
    """CapircaPolicy model."""

    device = models.OneToOneField(
        to="dcim.Device",
        blank=True,
        null=True,
        on_delete=models.CASCADE,
        related_name="capirca_policy",
    )

In this example, each CapircaPolicy maps to at most one Device, and vice versa. Deleting a Device will result in its associated CapircaPolicy being automatically deleted as well.

If, and only if, your App needs to define a new relationship between two core Nautobot models, you cannot use a OneToOneField because an App cannot directly modify a core model. In this case, your fallback option would be to create a one-to-one Relationship record as the way of adding this data relationship. This is a pretty rare case, so I don’t have a real-world example to point to, but it would conceptually be implemented using the nautobot_database_ready signal:

def handle_nautobot_database_ready(sender, *, apps, **kwargs):
    Relationship.objects.get_or_create(
        slug="originating_device_to_vrf",
        defaults={
            "name": "Originating Device to VRF",
            "type": RelationshipTypeChoices.TYPE_ONE_TO_ONE,
            "source_type": ContentType.objects.get_for_model(Device),
            "destination_type": ContentType.objects.get_for_model(VRF),
        },
    )

Implementing One-to-Many and Many-to-One Data Relationships

A one-to-many or many-to-one data relationship between two App models should be implemented as a standard Django ForeignKey field from the “many” model to the “one” model. The same approach works for a many-to-one relationship from an App model to a core Nautobot model.

An example from the nautobot-device-lifecycle-mgmt App:

class SoftwareLCM(PrimaryModel):
    """Software Life-Cycle Management model."""

    device_platform = models.ForeignKey(
        to="dcim.Platform",
        on_delete=models.CASCADE,
        verbose_name="Device Platform"
    )

In this example, many SoftwareLCM may all map to a single Platform, and deleting a Platform will automatically delete all such SoftwareLCM records.

Because, again, an App cannot directly modify a core model, this approach cannot be used for a one-to-many relation from an App model to a core model, or between two core models, because it would require adding a ForeignKey on the core model itself. In this case, you’ll need to create a Relationship, as in this example from the nautobot-ssot App’s Infoblox integration:

def nautobot_database_ready_callback(sender, *, apps, **kwargs):
    # ...

    # add Prefix -> VLAN Relationship
    relationship_dict = {
        "name": "Prefix -> VLAN",
        "slug": "prefix_to_vlan",
        "type": RelationshipTypeChoices.TYPE_ONE_TO_MANY,
        "source_type": ContentType.objects.get_for_model(Prefix),
        "source_label": "Prefix",
        "destination_type": ContentType.objects.get_for_model(VLAN),
        "destination_label": "VLAN",
    }
    Relationship.objects.get_or_create(name=relationship_dict["name"], defaults=relationship_dict)

Implementing Many-to-Many Data Relationships

A many-to-many data relationship involving App models should be implemented via a Django ManyToManyField. An example from the nautobot-circuit-maintenance App:

class NotificationSource(OrganizationalModel):
    # ...

    providers = models.ManyToManyField(
        Provider,
        help_text="The Provider(s) that this Notification Source applies to.",
        blank=True,
    )

One NotificationSource can provide notifications for many different Providers, and any given Provider may have multiple distinct NotificationSources.

Once again, the only exception is when a relationship between two core Nautobot models is desired, in which case use of a Relationship would be required. This is another fairly rare case and so I don’t have a real-world example to point to here, but it would follow the similar pattern to the other Relationship examples above.

Conclusion and Summary

Here’s a handy table summarizing which approach to take for various data relationships:

Model AModel BCardinalityRecommended Approach
App modelApp modelOne-to-OneOneToOneField on either model
App modelApp modelOne-to-ManyForeignKey on model B
App modelApp modelMany-to-OneForeignKey on model A
App modelApp modelMany-to-ManyManyToManyField on either model
App modelCore modelOne-to-OneOneToOneField on model A
App modelCore modelOne-to-ManyRelationship definition
App modelCore modelMany-to-OneForeignKey on model A
App modelCore modelMany-to-ManyManyToManyField on model A
Core modelCore modelOne-to-OneRelationship definition
Core modelCore modelOne-to-ManyRelationship definition
Core modelCore modelMany-to-OneRelationship definition
Core modelCore modelMany-to-ManyRelationship definition

Conclusion

I hope you’ve found this post useful. Go forth and model some data!

-Glenn


ntc img
ntc img

Contact Us to Learn More

Share details about yourself & someone from our team will reach out to you ASAP!

Nautobot and Django QuerySet Annotations – Part 2

Blog Detail

This is Part 2 of the series on Django QuerySet annotations. In Part 1 we talked about what the annotations are and why you would want to use them. We then worked through a few examples showing simple use cases.

In this post we’ll look at the behavior of annotations when used with the values clause. We’ll then discuss subqueries and how these can be used with annotations.

UsingvaluesClause with Annotations

Normally, annotation adds one field per each object in the QuerySet. This behavior changes when values1 clause is used before the annotation is applied.

In this case, original results are grouped according to the combinations specified in the values clause. The annotation is then provided for each unique value group.

One of the use cases for this is counting number of members in each group. For instance, we could count how many devices are in each of the possible states (Active, Planned, etc.) for a given site.

When using values, we will usually have to clear the default ordering to stop it from interfering with the grouping operation. You do this by applying order_by()2 method without specifying any fields.

Order of applying values and annotations matters. If annotation goes first, it will be computed over all objects, and values will just return specified column or columns. We’ve seen this behavior in the examples in the previous post.

If what you want is to apply annotation to groups of values, you need to use values before using annotations.

Let’s see how this looks in action:

from django.db.models import Count

device_role_count = Device.objects.values("device_role__name") \
    .order_by() \
    .annotate(count=Count("device_role__name"))
>>> from pprint import pprint
>>> pprint(list(device_role_count))
[{'count': 4, 'device_role__name': 'spine'},
 {'count': 4, 'device_role__name': 'Router'},
 {'count': 158, 'device_role__name': 'leaf'},
 {'count': 2, 'device_role__name': 'Backbone'},
 {'count': 40, 'device_role__name': 'edge'}]
  • values("device_role__name") gets device role names for all of the devices.
  • order_by() clears the default ordering.
  • annotate(count=Count("device_role__name")) annotates the result with the count of the number of devices for each of the device role names.

Computing Ratios between Results ofCountAggregator

Another use case where annotations with values() are handy is when computing ratios between two or more counts.

For instance, you want to know the percentage of free interfaces (i.e., interfaces that are not connected) for each of your devices. To get that information you could use the below query.

from django.db.models import F, Q

devices = Device.objects.filter(interfaces__isnull=False) \
    .annotate(intf_total=Count("interfaces"), 
              notconn_intf=Count("interfaces", filter=Q(interfaces__cable=None)), 
              intf_free_perc=100 * F("notconn_intf") / F("intf_total")) \
    .values("name", "intf_total", "notconn_intf", "intf_free_perc") \
    .order_by("intf_free_perc")
>>> pprint(list(devices)[:5])
[{'intf_free_perc': 70,
  'intf_total': 10,
  'name': 'jcy-rtr-01.infra.ntc.com',
  'notconn_intf': 7},
 {'intf_free_perc': 70,
  'intf_total': 10,
  'name': 'jcy-rtr-02.infra.ntc.com',
  'notconn_intf': 7},
 {'intf_free_perc': 70,
  'intf_total': 10,
  'name': 'jcy-bb-01.infra.ntc.com',
  'notconn_intf': 7},
 {'intf_free_perc': 77,
  'intf_total': 62,
  'name': 'lax-edge-02',
  'notconn_intf': 48},
 {'intf_free_perc': 77,
  'intf_total': 62,
  'name': 'lax-edge-01',
  'notconn_intf': 48}]

There are a lot of moving parts here, so let’s break this query down.

  • filter(interfaces__isnull=False) – first we filter out devices that don’t have any interfaces.

Next we create annotations. The first two annotations are examples of counts that we’ve seen before.

  • intf_total=Count("interfaces") – gives us the total number of interfaces per device.
  • notconn_intf=Count("interfaces", filter=Q(interfaces__cable=None)) – returns count of the interfaces that are not connected to a cable.
  • intf_free_perc=100 * F("notconn_intf") / F("intf_total") – this is the interesting bit. We’re making use of F3 object, which allows us to refer to the value of another field of the model when running queries. Dynamically computed fields added by annotations can also be referred to here. We take advantage of that fact and compute the ratio between the fields we just computed, notconn_intf and intf_total. To get the value as a percentage, we multiply the result by 100.
  • values("name", "intf_total", "notconn_intf", "intf_free_perc") – in the final result, we’re only interested in the three annotation fields displayed next to the name of each of the devices.
  • order_by("intf_free_perc") – to top it off, we sort the results by the percentage of free interfaces per device in ascending order.

Even though this query looks complicated, it really is quite readable once you break it down into the individual components.

Subqueries

Before we move on, we need to briefly touch upon the concept of subqueries4.

Subqueries are queries with results that can be used inside of other queries, as well as in annotations.

You would use a subquery to express logic that would be difficult or impossible to express with a simple query.

Let’s have a look at an example so you can see how useful they can be.

Imagine that you want to find devices belonging to the site with the most recently updated VLAN. To do that, you first define a query to get the most recently updated VLAN. We return only one value, the site of the most recently updated VLAN.

most_recent_vlan_update = VLAN.objects.order_by("-last_updated").values("site")[:1]

We then explicitly wrap this query in a Subquery object and use it in the outer query.

from django.db.models import Subquery

devices = Device.objects.filter(site=Subquery(most_recent_vlan_update))

This query is run against Device objects. We filter these objects to only the ones with a site field value that matches the value returned by the subquery.

<span role="button" tabindex="0" data-code=">>> pprint(list(devices)) [<Device: jfk-edge-01>, <Device: jfk-edge-02>, <Device: jfk-leaf-01>, <Device: jfk-leaf-02>, <Device: jfk-leaf-03>, <Device: jfk-leaf-04>, <Device: jfk-leaf-05>, <Device: jfk-leaf-06>, <Device: jfk-leaf-07>,
>>> pprint(list(devices))
[<Device: jfk-edge-01>,
 <Device: jfk-edge-02>,
 <Device: jfk-leaf-01>,
 <Device: jfk-leaf-02>,
 <Device: jfk-leaf-03>,
 <Device: jfk-leaf-04>,
 <Device: jfk-leaf-05>,
 <Device: jfk-leaf-06>,
 <Device: jfk-leaf-07>,
 <Device: jfk-leaf-08>]

The end result is devices matching the site returned by the subquery.

There is another reason for using subqueries. In most cases, their use results in performance improvements as your application makes fewer calls to the database.

The above query, where we used a subquery, resulted in a single call to the database. Django internally translated that query to a single SQL expression.

Compare this to the below code, where we make two separate queries to the database. The first query evaluates instantly, and the result is assigned to the site variable. We then use its value in the second query.

site = VLAN.objects.order_by("-last_updated").first().site
devices = Device.objects.filter(site=site)

The efficiency gains can be huge, especially in the cases where we replace Python loops containing queries with optimized queries containing subqueries and annotations.

Having this short introduction to subqueries, let’s return to our discussion of annotations.

Using Subqueries in Annotations

We can use subqueries in annotations. This means we can take the result of the subquery and assign it to a dynamically generated field on the model in the outer query.

Let’s take the subquery we defined above, this time returning VLAN name, and use it in the annotation.

most_recent_vlan_update = VLAN.objects.order_by("-last_updated").values("name")[:1]

devices = Device.objects \
            .annotate(most_recent_vlan_update=Subquery(most_recent_vlan_update)) \
            .values("name", "most_recent_vlan_update")
>>> pprint(list(devices)[::20])
[{'most_recent_vlan_update': 'jfk-108-mgmt', 'name': 'ams-edge-01'},
 {'most_recent_vlan_update': 'jfk-108-mgmt', 'name': 'bkk-edge-01'},
 {'most_recent_vlan_update': 'jfk-108-mgmt', 'name': 'cdg-edge-01'},
 {'most_recent_vlan_update': 'jfk-108-mgmt', 'name': 'del-leaf-09'},
 {'most_recent_vlan_update': 'jfk-108-mgmt', 'name': 'dfw-leaf-07'},
 {'most_recent_vlan_update': 'jfk-108-mgmt', 'name': 'fra-leaf-07'},
 {'most_recent_vlan_update': 'jfk-108-mgmt', 'name': 'hnd-leaf-07'},
 {'most_recent_vlan_update': 'jfk-108-mgmt', 'name': 'jfk-leaf-06'},
 {'most_recent_vlan_update': 'jfk-108-mgmt', 'name': 'lhr-leaf-04'},
 {'most_recent_vlan_update': 'jfk-108-mgmt', 'name': 'ord-leaf-07'},
 {'most_recent_vlan_update': 'jfk-108-mgmt', 'name': 'sin-leaf-01'}]

The idea here is to add to each device a new field that would hold the name of the most recently updated VLAN.

But this doesn’t quite work as it should. Each device gets assigned the same VLAN. That is, the subquery returns the most recently updated VLAN across all of the sites, and this is what is used in the annotation.

Is there a way of matching the site of the device with the site used in the subquery?

Yes, there is!

Subqueries and OuterRef

To fix our query we need to use OuterRef5 expression.

OuterRef acts like an F object, except it works across the query-subquery boundary. With OuterRef, you can refer (inside the subquery) to the field from the outer query.

Let’s modify our subquery so that only VLANs assigned to the same site as the device are taken into account in the annotation.

from django.db.models import OuterRef

most_recent_vlan_update = VLAN.objects \
                            .filter(site=OuterRef("site")) \
                            .order_by("-last_updated") \
                            .values("name")[:1]

devices = Device.objects \
            .annotate(most_recent_vlan_update=Subquery(most_recent_vlan_update)) \
            .values("name", "most_recent_vlan_update")
>>> pprint(list(devices)[::20])
[{'most_recent_vlan_update': 'ams-108-mgmt', 'name': 'ams-edge-01'},
 {'most_recent_vlan_update': 'bkk-108-mgmt', 'name': 'bkk-edge-01'},
 {'most_recent_vlan_update': 'cdg-108-mgmt', 'name': 'cdg-edge-01'},
 {'most_recent_vlan_update': 'del-110-mgmt', 'name': 'del-leaf-09'},
 {'most_recent_vlan_update': 'dfw-108-mgmt', 'name': 'dfw-leaf-07'},
 {'most_recent_vlan_update': 'fra-108-mgmt', 'name': 'fra-leaf-07'},
 {'most_recent_vlan_update': 'hnd-108-mgmt', 'name': 'hnd-leaf-07'},
 {'most_recent_vlan_update': 'jfk-108-mgmt', 'name': 'jfk-leaf-06'},
 {'most_recent_vlan_update': 'lhr-108-mgmt', 'name': 'lhr-leaf-04'},
 {'most_recent_vlan_update': 'ord-108-mgmt', 'name': 'ord-leaf-07'},
 {'most_recent_vlan_update': 'sin-108-mgmt', 'name': 'sin-leaf-01'}]

Much better. Now each device is assigned the most recently updated VLAN with a site matching the site of the device.

References

  1. Django docs – QuerySet – values() 
  2. Django docs – QuerySet – order_by() 
  3. Django docs – Query Expressions – F() expressions 
  4. Django docs – Query Expressions – Subquery() expressions 
  5. Django docs – Query Expressions – Referencing columns from the outer queryset 

Conclusion

In this post, we learned how the values clause changes the way Django QuerySet annotations work. We also learned about subqueries and how they can help us build more advanced annotation. In the next part of this series, we will look at more examples of using subqueries with annotations. Stay tuned!

-Przemek


ntc img
ntc img

Contact Us to Learn More

Share details about yourself & someone from our team will reach out to you ASAP!

Django & JavaScript – Part 4 Vue.js & Axios

Blog Detail

This is the fourth post in a multipart series that explores web front-end technologies and how they can be used with Django. You can find the previous post here: Django & JavaScript – Part 3 JavaScript & jQuery.

To be able to do React JS & Vue.js justice, I have decided to break them into separate posts with this post focusing on Vue.js and using Axios for API calls.

Requirements

  1. Single process to host the UI & API
  2. Django + Django REST framework
  3. Overarching web framework from day 1
  4. Intuitive UI/UX that can be dynamically updated without loading a new page

DRF API Class

This API class will be used for all examples using the API, in which DRF handles all PUT/PATCH/POST/GET/DELETE operations.

Vue.js

Vue.js is a JavaScript framework that builds on top of HTML, CSS, and JavaScript to provide a declarative model that helped me to develop the simple examples I am using to compare each framework. Vue.js is a lot more powerful than I will be demonstrating today and has been used to build some very robust single-page and multi-page webpages.

Creating a Vue Object

Since my examples are based on a Python back end and I will not be running node.js, I will be creating all of my Vue.js case as inline JavaScript using <script> tags in my HTML. The code could also be easily served via separate static .js files.

To instantiate my Vue objects for the examples, I will need a few pieces of information. I will need to know what my mount point is for Vue. A mount point is what informs Vue.js what parent element will be in scope of this Vue object. I will be using the ID of the element as my mount point. Next, I will be defining my set of data attributes that I will use when interacting with Vue and the DOM. Because I will be intermingling Django templating and Vue.js templating, I will also need to overload the default delimiters from double curly braces to something that will not conflict. Lastly, I will be defining a set of methods or functions that will be invoked based on triggers in my HTML code.

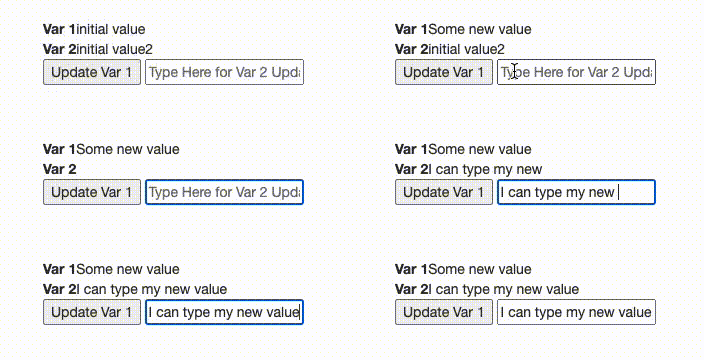
This initial Vue object will not do much of anything without wiring it up to some HTML and throwing in some trigger events. I will be tying var1 to a click event that will update the innerHTML of a <span> element and var2 will be updated based on keyup events in an <input> element to replace its respective innerHTML. I am informing the Vue object of the trigger events by specifying v-on:<trigger>="<function to call>". For example, v-on:click="update_var1" in the example below is notifying the Vue object that on clicking the button element I would like to run the update_var function that is declared in methods.

The end result without CSS making it look fancy is the following.

Vue Object

Axios

Axios is a JavaScript library used to make HTTP promise-based requests from a browser (or server if using node.js). A JavaScript Promise is a construct where you have execution code and callbacks that allows asynchronous methods to return values similar to synchronous methods. The promise is to supply the value at some point in the future. There are three states pertaining to a Promise (pendingfulfilled, and rejected), with fulfilled being a successful completion of the execution code.

In Axios once the Promise is fulfilled it passes the response to the .then(response) method, which is where we implement some magic. In the event the request has an error, we have the ability to .catch(error) and handle the error appropriately.

In my opinion Axios has done an elegant job creating a simple API client that integrated with my Vue.js code flawlessly.

Example 1 – Build DOM from Button Click

Initial Page Without Profile Data

Axios

Page with Profile Data

user profile

Initial HTML

Vue.js

In the first example I am creating a Vue object with a mount point of the <div> that has an ID of user-profile. Within my first nested element I have also introduced if/else Vue statements as attributes of the child <div> elements, v-if="<conditional>"/v-else="<same conditional>". This will translate as: IF the name attribute is truthy (empty string evaluates as false in JavaScript) the table will be visible, ELSE the button to load the profile will be visible.

I have also intermixed Django templating by passing in the user ID of the user making the initial HTTP request to load the page and passing it into v-on:click event function call. While the Vue object has the delimiters set to {( <var name> )} to avoid conflicts.

Lastly, I use Axios to perform an HTTP GET to /api/users/users/<user id>/ and use the response data in performing Vue templating. As soon as I set the name attribute, the Vue object will remove the initial <div> with the button element and replace it with a new <div> of the table that I am building. I don’t have to worry about selecting elements to then inject HTML, or changing attributes of the <div>s to hide one and unhide the other. It’s all handled with the Vue object and the three v- attributes inside the HTML elements.

Example 2 – Input Validation

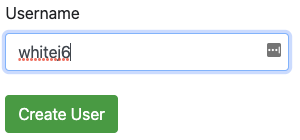
User Does Not Exist

Input Validation

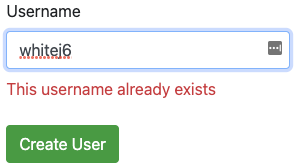
User Does Exist

Input Validation

HTML Form

Vue.js

new Vue({
  el: "#create-user",
  delimiters: ["{(", ")}"],
  data: {
    user_err: "",
    button_enabled: false
  },
  methods: {
    get_user: function (event){
      if (event.target.value) {
        axios
          .get("/api/users/users/?username=".concat(event.target.value))
          .then(response => {
            if (response.data.count == 1) {
              this.user_err = "This username already exists";
              this.button_enabled = false;
            } else {
              this.user_err = "";
              this.button_enabled = true;
            }
          })
          .catch(error =>{
            this.button_enabled = false;
            this.user_err = error;
          });
      } else {
        this.button_enabled = false;
        this.user_err = "";
      }
    }
  }
});

In this example I decided to implement error handling, which I did not do on the previous two blog posts. The ease of use and more object-oriented programming make me feel like demonstrating the rejected status of the Promise. One difference is that I am not mixing templating languages. I still keep the delimiters overloaded, as this page would most likely be processed by some form of render in Django and I still want to avoid conflicts.

For input validation, if a user backspaces to completely empty out the <input> field, I am resetting the user_err attribute and removing the Create User button. This is meant to prevent unneeded error messages AND remove the user’s ability to click the button IF the user field is empty.

On the Axios call, I implemented similar implied logic as before—that if one user is returned, I have an exact match on the query params and I CANNOT create the user. The difference here is that if this conditional is hit, I not only display the error but I also remove the Create User button to prevent a user from submitting a known invalid user for creation. I have also implemented a catch that will remove the button; and the error will be the error encountered by Axios during the call, resulting in a rejected state of the Promise.


Conclusion

The further along in this series I get, the more I am realizing I never gave JavaScript frameworks the credit they deserve, it’s always been eww JavaScript. So far, having a zero JavaScript solution like HTMX, I am thrilled at the idea of all processing being done server-side. I left last week’s post on jQuery feeling like “heck it might not be so bad.” BUT this week as I reflect on jQuery, it feels as though I spent more time than I would like worrying about DOM element selection/manipulation and less time in development. That’s where getting to Vue.js has really stood out to me. Even in the simplistic examples provided, I never felt like I was building selectors to manipulate the DOM or access a value. As someone who is more Python back-end focused, Vue.js felt more native to me compared to my previous interactions in writing JavaScript.

~ Jeremy


ntc img
ntc img

Contact Us to Learn More

Share details about yourself & someone from our team will reach out to you ASAP!