Blog Detail
This is the third post in a multipart series that explores web front-end technologies and how they can be used with Django. You can find the previous post here: Django & JavaScript – Part 2 HTMX.
Requirements
- Single process to host the UI & API
- Django + Django REST framework
- Overarching web framework from day 1
- Intuitive UI/UX that can be dynamically updated without loading a new page
DRF API Class
This API class will be used for all examples using the API, in which DRF handles all PUT/PATCH/POST/GET/DELETE operations.
class UserViewSet(ModelViewSet):
    queryset = User.objects.all()
    serializer_class = UserSerializer
    filterset_class = UserFilterSet
Raw JavaScript + jQuery
By building the site based on raw JavaScript enriched by jQuery I am able to provide a tremendous amount of flexibility due to being beholden to fewer opinionated constraints. This simplistic solution pushed the the data processing and rendering to the client side, which is common practice in rich modern webpages. Where issues start to become apparent is as a project scales out. The continual need to add large amounts of JavaScript that is not constrained by an opinionated framework can lead to inconsistencies and tech debt to manage long-term.
Have you ever taken a look at a webpage’s JavaScript and seen $ used preceding a function call or a tuple with a string? There is a high likelihood that this was jQuery and the $ is the jQuery object. An example of invoking a function on the jQuery object would be $.ajax({....}). Whereas using jQuery to access and interact with an HTML element would be using $(<selector>, <content>...) syntax. If I wanted to select all <p> HTML elements and hide them via jQuery, I would use $("p").hide(). For the scope of this blog post we will be taking a simplified approach and focusing on jQuery selectors and the function calls that can be performed on the returned element(s). I will be using a mixture of JavaScript and jQuery in my blog post examples.
jQuery Selectors
jQuery selectors are very much as the name suggests—a method of selecting HTML element(s) via some type of descriptor. Keep in mind ANY function performed against a selector will apply to ALL items selected. This makes for quick updates to large amounts of elements, but you must be sure you are not changing elements that are not meant to be changed.
ID Selector
In HTML it is best practice for ID attributes of HTML elements be globally unique for everything in the DOM and to be able to select just the one element by the ID attribute it would be represented by with #<id attribute value> as the selector. In the example of <p id="jquery">My fun paragraph</p> I can access this element via $("#jquery").
Comparison
// jQuery
$("#jquery")

// JavaScript
document.getElementByID("jquery");
Element Selector
To select ALL HTML elements of an element type, you pass in a string representation of the element type. For instance, if I wanted to select all paragraph elements which are represented by <p> the jQuery selector would be $("p"). And if I wanted to select just the first appearance of a <p> element, I would use the same selector but add :first to the element type $("p:first").
Comparison
// jQuery
$("p")

// JavaScript
document.getElementsByTag("p");
Class Selector
Similar to element selectors, class selectors are meant to return all HTML elements, but in this scenario it is any element with a specific class attribute. To represent the class selector, use a . followed by the class name, as such $(.table).
Comparison
// jQuery
$(".table")

// JavaScript
document.getElementsByClassName("table");
Create Selector
Create selectors are done as the HTML element type in <> symbols and will create a single instance of an HTML element in memory that is not directly applied to the DOM. This can be done via selecting another element and manipulating the HTML from that element.
Comparison
// jQuery
$("tr:last").append( // Selects the last table row
  $("<td>").html("Table Data innerHTML") // Adds a table data to the table row with innerHTML
)

// JavaScript
let tr = document.getElementsByTagName("tr"); // Selects all table rows
tr[-1].innerHTML = document.createElement("td").innerHTML = "Table Data innerHTML"; // Creates and applies table data with innerHTML to the last index of table rows selected
jQuery Events
Applying a jQuery event to a jQuery selector will make it so on the event trigger. For that element the browser will execute JavaScript defined inside the event. Common event types are click, keyup, submit, ready, and change, however there are several more.
Paragraph Highlight Example
In this example, every time the mouse cursor enters a <p> HTML element it will change the background of that element to a light gray; and upon leaving, the background color will become unset for that element.
$(document).ready(function(){
  $("p").on({
    mouseenter: function(){
      $(this).css("background-color", "lightgray");
    },
    mouseleave: function(){
      $(this).css("background-color", "unset");
    },
  });
});
Example 1 – Build DOM from Button Click
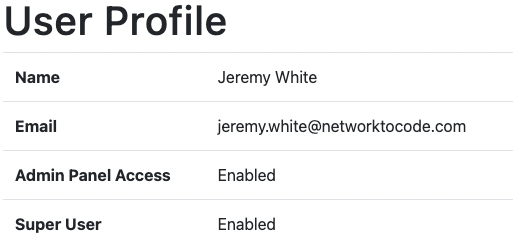
Initial Page Without Profile Data

Page with Profile Data

Initial HTML
<div class="container">
  <div class="col" id="dom-container">
    <h1 id="container-heading">Waiting to load user profile.</h1>
    <button
      class="btn btn-primary mt-2"
      onclick="load_user_profile(this, '{{ request.user.id }}')">
      Load User Profile
    </button>
  </div>
</div>
JavaScript/jQuery
<h1>User Profile</h1>
<table class="table">
  <tr>
    <th scope="row">Name</th>
    <td>{{ request.user.name }}</td>
  </tr>
  <tr>
    <th scope="row">Email</th>
    <td>{{ request.user.email }}</td>
  </tr>
  <tr>
    <th scope="row">Admin Panel Access</th>
    <td>{% if request.user.is_staff or request.user.is_superuser %}Enabled{% else %}Disabled{% endif %}</td>
  </tr>
  <tr>
    <th scope="row">Super User</th>
    <td>{% if request.user.is_superuser %}Enabled{% else %}Disabled{% endif %}</td>
  </tr>
</table>
Template View
class UserProfileView(TemplateView):
    template_name = "user-profile.html"
In this example we have a simple User Profile page that initially loads without any data. The data will be loaded via the Load User Profile button, which is triggered by a default hx-trigger of click. The action performed is hx-get to /user/profile, which makes a GET call to the URL, and the web server responds with the rendered table. Upon receiving the response, hx-target tells the browser to perform the hx-swap action of swapping the innerHTML of the element with an ID of dom-container.
Example 2 – Input Validation
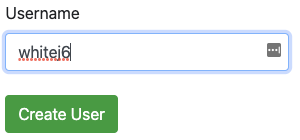
User Does Not Exist

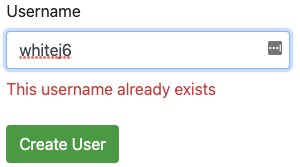
User Does Exist

HTML Form
<form method="POST" action="/create-user/" autocomplete="off">
  <div class="form-group mb-3">
    <label>Username</label>
    <input type="text"
      hx-trigger="keyup"
      hx-target="#user-err"
      hx-post="/check-user-exists/"
      class="form-control"
      name="user">
    <div class="text-danger mt-2" style="color:red;" id="user-err"></div>
  </div>
  <button type="submit" class="btn btn-success mt-2">Create User</button>
</form>
The name attribute will be used on accessing the field from the form in Django. The hx-trigger event in this case is every keyup event in the input field. The action is hx-post to perform a POST via /check-user-exists/. On response from the web server, the browser replaces the innerHTML of the div user-err with the response data, and also uses the default innerHTMLhx-swap.
Simple Function Based View
def check_username(request):
    username = request.POST.get("user")
    if User.objects.filter(username=username).exists():
        return HttpResponse("This username already exists")
    else:
        return HttpResponse("")
In the first screenshot, the expected behavior, user-err div innerHTML, is replaced with an empty string because the queryset returned False when applying .exists() function. In the second, the .exists() function returned True, which replaces the innerHTML with This username already exists.
Conclusion
HTMX is a very powerful and scalable solution from the frontend perspective that has a very low barrier for entry when it comes to JavaScript development. This post barely scratches the surface when it comes to HTMX but is enough to be dangerous. Of the frameworks I have worked with in my past it has be a great breath of fresh air as a Python developer to not have to worry about writing a single line of JavaScript.
~ Jeremy
Tags :
Contact Us to Learn More
Share details about yourself & someone from our team will reach out to you ASAP!
Django & JavaScript – Introduction
Blog Detail
Over the course of my career I have built a number of web portals, most of which have been designed by the seat of my pants and based on a series of decisions that I later wish I had spent more time thinking through. Early stages were always multi page applications where every page transition involved a link to another page or a form post. As things evolved I would start sprinkling in some JavaScript, and later a need to perform an additional call to enrich data post page load would pull in jQuery. Although the end solution of a multi page application enriched by JavaScript + jQuery was not a bad combination, I would always get to a point where I contemplated whether my end goal would have been better served with an overarching framework like Vue.js or React JS. My next project is giving me the opportunity to take some additional time in the design phase to fully evaluate the right tool for the job. Ride along with me in my evaluation that I will be performing in a four part series to find the solution I feel best suits what I am trying to achieve.
Requirements
- Single process to host the UI & API
- Django + Django REST Framework
- Overarching web framework from day 1
- Intuitive UI/UX that can be dynamically updated without loading a new page
Multi Page Applications
Multi Page Applications (MPAs) are akin to traditional web applications and are built on a design philosophy where the heavy lifting is performed server side and the client side only has to worry about displaying what is being sent. This was initially the design pattern of choice for earlier web pages as older browsers had limited support for heavy client side scripting and this influenced web design for several years. MPAs are still a predominant design pattern but are no longer limited by server side scripting.
Single Page Application
A single page application (SPA) is as the name suggests: the webpage is built off of one underlying page where interactive components are used to build and destroy HTML elements. The initial page is commonly served as a static page or with minimal templating server side, as all the magic happens client side via JavaScript. A slight variation of an SPA is more of a hybrid approach where there are a few purpose pages that are treated as their own apps. An example would be having the main application based on one page and the administrative portal being its own page.
One misconception with this pattern is negating the need for URL routing. Although in an SPA the name suggests having only one page, it is common for how you navigate the application to impact what is displayed; and being able to navigate back to that view can be highly frustrating if it can’t be shared via a like or bookmarked. Most solutions have the ability to perform some level of URL routing to inform the client side app what to render but do require some additional effort to accomplish this.
JavaScript Frameworks
In each of the following sections I will be introducing which libraries/frameworks I will be evaluating. The subsequent blog posts will go into more detail on differences and the underlying rationale for how it stacks up in my view of the success of the project.
Raw JavaScipt + jQuery
By building the site based on raw JavaScript enriched by jQuery, I am able to provide a tremendous amount of flexibility due to fewer opinionated constraints to be beholden to. This simplistic solution can take a hybrid approach of data processing and rendering on both client and server side. But issues start to become apparent as a project scales out. The continual need to add large amounts of JavaScript that is not constrained by an opinionated framework can lead to inconsistencies and tech debt to manage long term.
HTMX
HTMX provides a simplified set of HTML attributes that provide the ability to access modern browser features without having to directly write JavaScript. Behind the scenes HTMX is a JavaScript-driven package that relies on Ajax for HTTP requests to the underlying host that is then used for manipulation of HTML in the DOM. HTMX is built on the concept of server side processing and templating of HTML that is then injected into or replaces HTML elements without writing JavaScript. This provides a lower barrier for entry on developing more responsive modern web experiences, however it is meant for the server to respond with HTML instead of JSON data. This can have its trade-offs, mainly when taking the approach where every model has a DRF driven API. In that case there may be additional sets of views to build and manage that support each interactive component as we are performing server side processing of the data. This level of of flexibility is a great fit for both SPAs and MPAs that are managed by teams that are stronger as back-end solutions rather than front-end frameworks.
Vue.js and React JS
JavaScript Expression (JSX) is a JavaScript syntax extension that allows you to embed HTML and CSS into JavaScript. JSX also has templating capabilities which do not conflict with Django templating.
In Vue.js it is common to see NodeJS serving the web front end or another solution hosting the HTML as static files with all templating/rendering being performed client side. This dynamic is a common pattern in SPAs but can also work in MPAs. Having an ORM-driven API like Django/DRF can be very powerful in these scenarios. But why is it not as common to see Django serve both the front and back end of these deployments? Simplistic answer comes down to using each framework to its full potential, the templating languages for Vue.js and Django having overlap, along with additional conditions. One simple way of overcoming the templating overlap is to change the delimiter characters for Vue.js. This simple approach allows for both templating languages to exist in harmony (or use JSX instead of Vue.js HTML templating). An additional option is to abandon the use of Django templating in favor of Vue.js, having Django serving static files for the UI and Vue.js calling the API. There are two other common libraries for performing API calls to the back end, Axios and Fetch API.
React JS is similar in vein to Vue.js, where it is common to see SPA front ends built on either framework. One key difference is React, unlike Vue.js, does not have a native HTML templating language; its primary focus on DOM manipulation is via JSX. React also commonly leverages additional libraries for API calls.
I will be evaluating both Vue.js and React, but I’ll be making sure to use separate methodologies for each. For Vue.js I will be using Axios for API calls and exploring HTML templating with both Django and Vue.js. With React, Fetch will be the API client and will be leveraging JSX for DOM manipulation.
Conclusion
Over the coming weeks expect to see three additional posts where I evaluate each solution and try to keep the same or similar examples to help keep the evaluation an even playing field for my project.
~ Jeremy White
Tags :
Contact Us to Learn More
Share details about yourself & someone from our team will reach out to you ASAP!

