Git as a Network Engineer – Part 2

Blog Detail

In Part 1, we discussed why you should get started with Git as a Network Engineer and how to make your first commit. In Part 2, we will discuss how to get started with a Git server. In our example, to get started, we will utilize GitHub, as it is a free option. Most all of the same concepts apply to other Git servers as well, like GitLab, Gitea, etc. Keep in mind, though, that GitHub repositories by default are public, so anyone can view them on the internet. So be extremely careful what you put on them. Never store sensitive information in a public repository on any Git server systems. And even avoid saving it in private repositories whenever possible, as these systems are exposed to the internet. And there are vulnerabilities every day that could potentially be exploited to steal sensitive information. With that out of the way, on to using GitHub.

GitHub Account

For this blog we will assume you have an active GitHub account. If not, you will need to sign up for one. Once you are logged into GitHub, we will create a new repository. Make sure to enable multi-factor authentication (MFA) to make your account more resistant to hacking.

Create a Repository

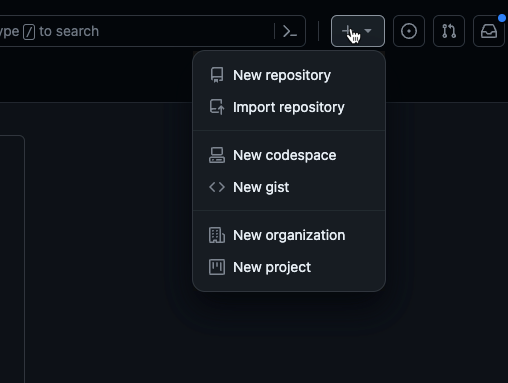
Select the plus sign near the top of the page and select new repository. GitHub will then prompt you for a repository name, description, etc.
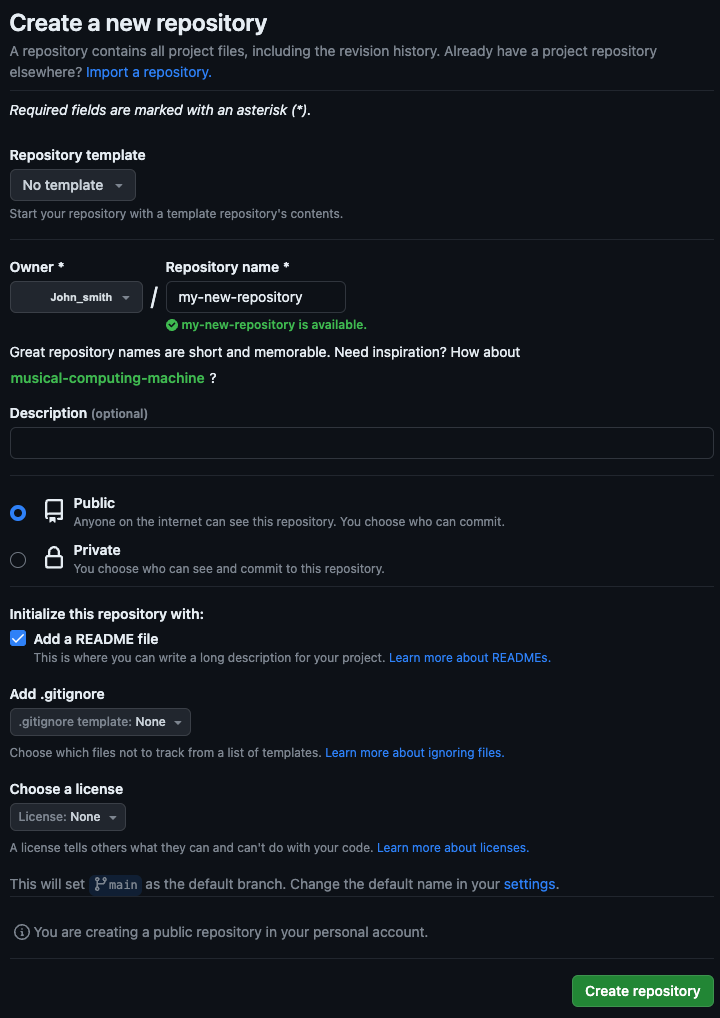
The repository name needs to be unique; description is optional. Select whether you’d like the repository to be public or private. If you were creating a brand-new repository for a project that hasn’t been started yet, it is simplest to have GitHub create at least the README.md file so you can clone the repo right away. In our case, since we have an existing Git repository on our local machine, we will not create a README.md, gitignore, or license file. Click on create repository.

When you don’t create the initial files using the repository create process, GitHub will provide you a couple of options to get existing code into the repository. We will use the second option, since we already started the Git repo locally. You will notice the url contains your username and the repository name. These are standard when working with GitHub, making it easy to find projects in a determinate way.

Back on your local system, we will create a README.md file by running the echo command with some text and use >> to pipe that into the README file. Then, we will initialize our working directory as a git repository using the git init command, and stage the changes we made to the README.md file. Then commit those changes to the Git history with the git commit command. Normally you would not need to use the -M parameter with the git branch command, but since the CLI git command sets the default branch to the name master, and GitHub sets the default branch to main unless you change it, that -M parameter forces a rename of the current local branch. We then add a “remote” to our repository, which is just the path to the repository on GitHub (or equivalent Git server). origin is the name of the remote that we created in the git remote add step, and main is the name of the branch we are pushing to. Lastly, we push our changes to the remote using the git push -u origin main (adding the -u parameter tells Git which named remote to use for a specific branch when you push or pull the repository).

echo "# blog" >> README.md
git init
git add README.md
git commit -m "first commit"
git branch -M main
git remote add origin https://github.com/zach/blog.git
git push -u origin main

Add an Existing Repository to GitHub

GitHub will also provide these commands to you if you create an empty repository, and it will be customized to your specific user/repository.

git remote add origin https://github.com/zach/blog.git
git branch -M main
git push -u origin main
Enumerating objects: 9, done.
Counting objects: 100% (9/9), done.
Delta compression using up to 10 threads
Compressing objects: 100% (4/4), done.
Writing objects: 100% (9/9), 2.97 KiB | 1012.00 KiB/s, done.
Total 9 (delta 2), reused 0 (delta 0), pack-reused 0
remote: Resolving deltas: 100% (2/2), done.
To https://github.com/zach/blog.git
 * [new branch]      main -> main
branch 'main' set up to track 'origin/main'.

We now have the concept of a remote. This is the idea of a link to a remote Git server which hosts our code/files. You can actually connect a repository to multiple remotes to push code to multiple places, but that is beyond the scope of this blog. origin is the name of the remote and is just a standard convention for the main remote for a repository. This can be any name you want, though; you could call it github if that’s easier to remember. If you look back in GitHub now, you should see test.txt and file2.txt in the repository online.

Clone a Repository

Say you want to change computers and need to go back and get your code from GitHub, or you deleted the code from your computer. You would accomplish this through a process called “cloning” the repository. If you visit your repository on GitHub in a web browser, there will be a green button called Code near the top of the screen. Clicking this will open a drop-down menu with some options. You can clone a repository via HTTPS, SSH, or GitHub CLI. For now, we will use HTTPS—this is the easiest way. Using SSH involves setting up SSH keys and is beyond the scope of this document, but as you start working with private repos or would like verified commits, you will want to configure SSH. Cloning also works with public projects or other repositories you have access to. It’s basically just the act of pulling all the code from GitHub (or “Git server”) to your local machine. By default, it clones only the main/master branch.

Make Some Changes

We’ll create a new file in the main branch called file3 and commit that so we have something to work with when we go to push changes. We use the command touch on Linux/Unix systems to create a blank file, then edit the file using vim (you can also use nano/pico/etc). Then, we add ALL changes to be staged for commit by using the git add -A command. You can also use git add ., which stages only new files and modified files, but not deletions. As well as git add -u, which stages modifications and deletions, but not new files. You can also add individual files or directories by specifying those after git add. For example to include just this new file you would run git add file3.txt. The same goes for directories–just list the directory in the command to stage the directory and everything inside it. The most common action is git add -A since you will usually want to commit all your changes at once. We then commit those changes to the Git history using the git commit command, and give it an explanation of what we changed using the -m parameter.

$ touch file3.txt
$ vim file3.txt
$ git add -A
$ git commit -m "add file3.txt"
[main 24c3f53] add file3.txt
 1 file changed, 1 insertion(+)
 create mode 100644 file3.txt

Now we will discuss how to get these changes back to GitHub for permanent storage and sharing.

Private Repositories and GitHub Authentication

We need to address one thing prior to sending our changes to GitHub. GitHub requires the use of PAT for HTTPS as of August 13, 2021. Here’s more Information. This means that in order to make changes to a repository, you must be authenticated using a Personal Access Token, or SSH Key.

Now we’ll briefly discuss private repositories when working with GitHub. Private repositories should not be treated as 100% secure. Although access to them is restricted by credentialed access, this doesn’t prevent data leakage if the GitHub servers are hacked. There are a couple of different ways to work with private repositories with GitHub. The simplest is to generate a Personal Access Token that will be used to authenticate when cloning/pushing over HTTPS. Go into your GitHub profile, then settings, and scroll down to developer settings. Once there, you can create a token. You will want to adjust the permissions according to what you will need to do with the token. Be sure to always use least privilege access when setting the permissions, and use separate tokens for different services. For example, if you are going to place your repository onto a server that needs only clone/pull access, don’t give that token write access, since it doesn’t need it. Save this token in a password manager.

Once you have your token, you’ll be able to clone private repositories using your username and the token. You can test this by creating a private repository on GitHub and cloning it. When you do the git clone <repository_url>, you will be prompted to enter your GitHub username and the password, which is your Personal Access Token (PAT). With MFA enabled, your password will not work here; but the PAT will.

Push a Repository

Once we have our changes that we want to send up to GitHub, there are a couple of steps involved. Intuitively, Git has a command called push, which is used to upload to a remote Git server (in our case GitHub) the commits we made locally. If we run git push, we will see what happens.

$ git push
Enumerating objects: 4, done.
Counting objects: 100% (4/4), done.
Delta compression using up to 10 threads
Compressing objects: 100% (2/2), done.
Writing objects: 100% (3/3), 1.48 KiB | 1.48 MiB/s, done.
Total 3 (delta 0), reused 0 (delta 0), pack-reused 0
To https://github.com/zach/blog.git
   9c643a1..22e3ce9  main -> main

Now our changes are in GitHub, and others can see our changes. You can view these changes by viewing the repository in a web browser. You will also notice that you can see information from the most recent commits and who made changes.


Conclusion

In this part of our blog series, we discussed getting started using GitHub as a Git server, how to clone/push/pull repositories, and how to share your code changes with others. In the next part, we will discuss Git branches and how to do merges and pull requests. See you in the next one!

-Zach


Tags :

ntc img
ntc img

Contact Us to Learn More

Share details about yourself & someone from our team will reach out to you ASAP!

Git as a Network Engineer – Part 1

Blog Detail

Learning Git is an essential part of transitioning from a Network Engineer to an Automation Engineer. But did you know that it’s also extremely useful for the average Network Engineer as well?

Oftentimes people get nervous when we talk about DevOps, GitOps, automation, and similar topics. They say to themselves, “I’m not a programmer; I don’t need to know about any of this. I’ll stick with the CLI.” I can completely sympathise with these people, as there is a lot to learn when you start looking at configuration as code and automation; and it can be quite overwhelming. Learning Git is an essential step in a transition to being an Automation Engineer, but you don’t have to learn to program to benefit from a version control system. One thing to keep in mind, is that you don’t need something like GitHub to use Git. We’ll cover the difference between Git and a version control server later on. Documentation is a great place to start using Git where it’s simple, with no chance of breaking anything. How many times have you seen documentation in a Word document, and in the folder it’s stored in there are numerous copies of the same document named something like this:

Documentation v1.doc
Documentation v2.doc
Documentation - Final.doc
Documentation - Really Final.doc
Documentation - FINAL.doc
Documentation - Newest.doc

You can definitely tell which one of these is the current version, right? Okay, maybe you could look at last modified date or something like that, but it’s extremely confusing for new engineers, or even for yourself six months later when you try and remember what you did. Version control systems, like Git, solve this problem for you. While there are certain file types that work better with Git, you can use just about any type of text format within a version control system. Some common types of documents that work well are standard text files, markdown documents, and restructured text documents. By starting to learn Git using your current documentation system, you are able to start learning the concepts required for more advanced automation or programming positions, which makes finding changes so much easier.

First, let’s define a few terms we’ll be using throughout this series:

  • Project/Repository – The folder that holds the files that you want to track with Git.
  • Git history – Git’s internal tracking of all changes in a repository over time.
  • Commit – The action of “saving” your changes to the Git history.
  • Git server – Central server (or cluster of servers) where projects/repositories are stored.
  • Remote – The URL/path of the repository on the Git server.
  • Origin – The default name/reference to the remote for the project. Think the original location the files came from.
  • Branch – Git uses tree analogies, and a branch is generally used to develop new features or changes without changing the default branch (usually called main or master).
  • Clone – Make a local copy of a repository hosted on a Git server
  • Pull – Pull down the latest changes from the Git server to your local copy.
  • Push – Push local changes to a Git server.
  • Merge – Applying changes from one branch to another. For example, your default branch is main, and you create a new branch called new_feature to do work on a new feature for your project. Once complete, you would merge new_feature into main to apply the changes you made in your branch into the main branch of the project.
  • Fork – Taking a complete copy of a project. Usually used in open source projects where you want to take the project in a different direction than the creators originally intended. Also used in open source projects where you do not have write access to the original repository, you may have to fork a repository in order to have a copy you have rights to push changes to.
  • Upstream – The original repository that was forked FROM.
  • Pull Request (PR) – This is a concept with Git server where you’d like to merge some changes from a branch you are working on into the main branch of a project and you do not have merge rights on the repository. You open a pull request for the maintainers of the project to “pull” your changes into their main branch. It is also worth noting that some Git servers (GitLab for example) may refer this as a Merge Request, they are referring to the exact some item just different nomenclature.
  • Gitignore – A file that can be used to list out files or directories that you do not want to track with Git.

If you’d like to follow along with some of the examples, you’ll want to install Git on your machine before reading any further. You can find the installation instructions here: Git.

Initial Configuration

The first basic configuration you will need to complete after Git is installed is telling it who you are. This information will be applied to your commits in order to identify who made a specific change. This is especially useful when you have a team of people all working on the same project. These values don’t necessarily have to be tied to anything, but it is useful when using a version control system like GitHub, as that information can be used to trigger notifications or other actions.

<span role="button" tabindex="0" data-code="git config –global user.name <your_name> git config –global user.email
git config --global user.name <your_name>
git config --global user.email <your_email>

Once this information is set, we can create a new directory to house a test project to get a feel for the basic Git workflow. Make a directory called test, then open a terminal/command prompt inside that directory. Once inside the directory, look at the contents with ls -la (or dir on Windows). Notice the directory is empty.

{} test$ ls -la
total 0
drwxr-xr-x   2 user  root    64 Jun  6 13:48 .
drwxr-x---+ 74 user  root  2368 Jun  6 13:48 ..
{} test$

Now run git init

[main] {} test$ ls -la
total 0
drwxr-xr-x   3 user  root    96 Jun  6 13:49 .
drwxr-x---+ 74 user  root  2368 Jun  6 13:50 ..
drwxr-xr-x   9 user  root   288 Jun  6 13:49 .git
[main] {} test$

Congratulations, you just created a repository! You will now see that you have a folder called .git, where the . denotes a hidden directory. The contents of this folder aren’t important at this time, but just know it stores the “Git history” and information about the Git repository. You can also run git status for some information about the repository.

[main] {} test$ git status
  On branch main

  No commits yet

  nothing to commit (create/copy files and use "git add" to track)
  [main] {} test$

We see that we are on the main (this could also be master depending on your configuration) branch and we haven’t made any commits yet. That’s what we’ll do next.

First Commit

Now, we’ll make our first commit by creating a file called test.txt in your favorite editor.

[main x] {} test$ ls -last
total 8
drwxr-xr-x   4 user  root   128 Jun  6 13:54 .
drwxr-x---+ 74 user  root  2368 Jun  6 13:54 ..
drwxr-xr-x   9 user  root   288 Jun  6 13:52 .git
-rw-r--r--   1 user  root    16 Jun  6 13:54 test.txt
[main x] {} test$

We can see the new file test.txt in our directory. Now it’s time to add it to be tracked in Git and then commit the change to our Git history. Run git add -A (add all untracked files in the current path to Git). Then git commit. What should happen when you do git commit is your system will open the default CLI text editor and prompt you to enter a commit message. This short message should give some kind of indication of what was changed/added/deleted in the repository. In this case, “Initial commit” was used. This is a standard convention when creating a new Git repository after setting up the initial file structure. You can also do the commit message in the commit command by using git commit -m "<your_message_here>"

[main] {} test$ git add -A
[main] {} test$ git commit
[main (root-commit) 37504c6] Initial commit
  1 file changed, 1 insertion(+)
  create mode 100644 test.txt
[main] {} test

See the History

Now if you run a git log, you’ll be able to see the commits in the order they were performed on the repository and the commit message that was included. We can also see the commit hash, which is the long random-looking string in the first line. This becomes useful later on, when we discuss reverting changes to a repository.

commit 37504c659302b8853a40b74daf21fbd3db4d9fba (HEAD -> main)
Author: user <user@example.com>
Date:   Tue Jun 6 13:57:29 2023 -0500

    Initial commit

Reverting Commits

So now that I’m working with Git and creating commits as I make changes to my repository, I made a mistake in my last commit.

# original contents of test.txt
This is a test.
# current contents of test.txt after making some changes and commiting
This is NOT a test.

If I do a git log I can see that a change was made by “user” to make it “not a test”. We can see commits listed in reverse chronological order (most recent first).

<span role="button" tabindex="0" data-code="commit ac2d6d6e75a3f9263c62a680d58f6dace396f8ca (HEAD -> main) Author: user <user@example.com> Date: Tue Jun 6 14:13:54 2023 -0500 Make it not a test commit 37504c659302b8853a40b74daf21fbd3db4d9fba Author: user
commit ac2d6d6e75a3f9263c62a680d58f6dace396f8ca (HEAD -> main)
Author: user <user@example.com>
Date:   Tue Jun 6 14:13:54 2023 -0500

    Make it not a test

commit 37504c659302b8853a40b74daf21fbd3db4d9fba
Author: user <user@example.com>
Date:   Tue Jun 6 13:57:29 2023 -0500

    Initial commit

If I decide that it should not have been made “not” a test, I can just revert that commit to go back to how it was before by specifying the commit I want to revert to. You can do this for any commit in the history, but be aware if you jump back multiple commits, all those in between get reverted as well. So if we run git revert ac2d6d6e75a3f9263c62a680d58f6dace396f8ca, the CLI will prompt for a new commit message and usually autofill something like “revert” where commit_message is whatever the commit message originally was on that commit. After saving the commit message, we can reopen the file and see the contents have been reverted back to the original text.

# original contents of test.txt
This is a test.

Conclusion

Way go to! You made your first commit, reverted another commit, and should understand basic Git use. In Part 2 we will discuss interacting with GitHub as a version control server to make collaboration with other people very simple.

-Zach


Tags :

ntc img
ntc img

Contact Us to Learn More

Share details about yourself & someone from our team will reach out to you ASAP!

Deploying Nautobot to Kubernetes – Part 3

Blog Detail

In the previous two blog posts (Part1 and Part2), I discussed Nautobot Helm charts and how to deploy these Helm charts to Kubernetes following a GitOps approach. I used the minimal parameters needed to achieve a Nautobot deployment.

In the default deployment with Helm charts, the Nautobot version is bound to the Helm charts version, which means that the Helm charts version X.Y.Z will deploy Nautobot version A.B.C, which is bound to that version of Helm Charts. That is suitable for simple deployments and testing, but you usually want to add a custom configuration file, additional plugins, jobs, or other extensions to Nautobot.

The Managed Services team deals with this daily, as every customer has different requirements for their Nautobot deployment. With Kubernetes deployments, we must prepare Nautobot Docker images in advance. Following the “automate everything” approach, we also use automated procedures to build and deploy Nautobot images to Kubernetes.

In this blog post, I will show you a procedure you can use to automate the release process for your Nautobot deployment.

Prepare the Basic Dockerfile

In the first step, I will prepare the basic Dockerfile used to build the custom Nautobot image.

I already have a Git repository I created in the previous blog post explaining the GitOps approach to deploying Nautobot. I added Kubernetes objects and other files required for Kubernetes deployment in the Git repository. The structure of the Git repository looks like this:

.
└── nautobot-kubernetes
    ├── README.md
    ├── clusters
    │   └── minikube
    │       └── flux-system
    │           ├── gotk-components.yaml
    │           ├── gotk-sync.yaml
    │           ├── kustomization.yaml
    │           └── nautobot-kustomization.yaml
    └── kubernetes
        ├── helmrelease.yaml
        ├── kustomization.yaml
        ├── namespace.yaml
        ├── nautobot-helmrepo.yaml
        └── values.yaml

5 directories, 10 files

I will use the same repository to add files required for a custom image and the automation needed to build and deploy the new image.

Let’s create a base Dockerfile in the top directory in my repository.

.
└── nautobot-kubernetes
    ├── Dockerfile
    ├── README.md
    ├── clusters
    │   └── minikube
    │       └── flux-system
    │           ├── gotk-components.yaml
    │           ├── gotk-sync.yaml
    │           ├── kustomization.yaml
    │           └── nautobot-kustomization.yaml
    └── kubernetes
        ├── helmrelease.yaml
        ├── kustomization.yaml
        ├── namespace.yaml
        ├── nautobot-helmrepo.yaml
        └── values.yaml

5 directories, 11 files

Now that I have a Dockerfile, I will add some content.

ARG NAUTOBOT_VERSION=1.4.2
ARG PYTHON_VERSION=3.9
FROM ghcr.io/nautobot/nautobot:${NAUTOBOT_VERSION}-py${PYTHON_VERSION}

In this case, Docker will pull the base Nautobot image and assign a new tag to the image. I know this looks very simple, but I think this is a great first step. I can now test whether I can build my image.

<span role="button" tabindex="0" data-code="➜ ~ docker build -t ghcr.io/networktocode/nautobot-kubernetes:dev . [+] Building 75.3s (6/6) FINISHED => [internal] load build definition from Dockerfile 0.1s => => transferring dockerfile: 164B 0.0s => [internal] load .dockerignore 0.0s => => transferring context: 2B 0.0s => [internal] load metadata for ghcr.io/nautobot/nautobot:1.4.2-py3.9 34.1s => [auth] nautobot/nautobot:pull token for ghcr.io 0.0s => [1/1] FROM ghcr.io/nautobot/nautobot:1.4.2-py3.9@sha256:59f4d8338a1e6025ebe0051ee5244d4c0e94b0223079f806eb61eb63b6a04e62 41.0s => => resolve ghcr.io/nautobot/nautobot:1.4.2-py3.9@sha256:59f4d8338a1e6025ebe0051ee5244d4c0e94b0223079f806eb61eb63b6a04e62 0.0s => => sha256:7a6db449b51b92eac5c81cdbd82917785343f1664b2be57b22337b0a40c5b29d 31.38MB / 31.38MB 15.6s => => sha256:b94fc7ac342a843369c0eaa335613ab9b3761ff5ddfe0217a65bfd3678614e22 11.59MB / 11.59MB 3.8s
~ docker build -t ghcr.io/networktocode/nautobot-kubernetes:dev .
[+] Building 75.3s (6/6) FINISHED                                                                                                                  
 => [internal] load build definition from Dockerfile                                                                                          0.1s
 => => transferring dockerfile: 164B                                                                                                          0.0s
 => [internal] load .dockerignore                                                                                                             0.0s
 => => transferring context: 2B                                                                                                               0.0s
 => [internal] load metadata for ghcr.io/nautobot/nautobot:1.4.2-py3.9                                                                       34.1s
 => [auth] nautobot/nautobot:pull token for ghcr.io                                                                                           0.0s
 => [1/1] FROM ghcr.io/nautobot/nautobot:1.4.2-py3.9@sha256:59f4d8338a1e6025ebe0051ee5244d4c0e94b0223079f806eb61eb63b6a04e62                 41.0s
 => => resolve ghcr.io/nautobot/nautobot:1.4.2-py3.9@sha256:59f4d8338a1e6025ebe0051ee5244d4c0e94b0223079f806eb61eb63b6a04e62                  0.0s
 => => sha256:7a6db449b51b92eac5c81cdbd82917785343f1664b2be57b22337b0a40c5b29d 31.38MB / 31.38MB                                             15.6s
 => => sha256:b94fc7ac342a843369c0eaa335613ab9b3761ff5ddfe0217a65bfd3678614e22 11.59MB / 11.59MB                                              3.8s
<.. Omitted ..>
 => => extracting sha256:8a4f3d60582c68bbdf8beb6b9d5fe1b0d159f2722cf07938ca9bf290dbfaeb6e                                                     0.0s
 => exporting to image                                                                                                                        0.0s
 => => exporting layers                                                                                                                       0.0s
 => => writing image sha256:a164511865f73bf08eb2a30a62ad270211b544006708f073efddcd7ef6a10830                                                  0.0s
 => => naming to ghcr.io/networktocode/nautobot-kubernetes:dev                                                                                0.0s

I can see that the image is successfully built:

~ docker image ls | grep nautobot-kubernetes
ghcr.io/networktocode/nautobot-kubernetes                                 dev                        a164511865f7   8 days ago      580MB

To make this process a bit easier, I will also create a Makefile, which will have some basic targets to simplify building, pushing, etc…. I will add targets, such as buildpush, etc. So instead of using the docker build -t ghcr.io/networktocode/nautobot-kubernetes:dev . command to build the image, I will use the make build command.

# Get current branch by default
tag := $(shell git rev-parse --abbrev-ref HEAD)

build:
	docker build -t ghcr.io/networktocode/nautobot-kubernetes:$(tag) .

push:
	docker push ghcr.io/networktocode/nautobot-kubernetes:$(tag)

pull:
	docker pull ghcr.io/networktocode/nautobot-kubernetes:$(tag)

I added three commands for now: buildpush, and pull. The default tag will be the current branch, but I can pass my custom tag to the make build command if I want. Now that this is ready, I can test my Makefile.

~ make build
docker build -t ghcr.io/networktocode/nautobot-kubernetes:main .
[+] Building 1.0s (5/5) FINISHED                                                                                                                   
 => [internal] load build definition from Dockerfile                                                                                          0.0s
 => => transferring dockerfile: 36B                                                                                                           0.0s
 => [internal] load .dockerignore                                                                                                             0.0s
 => => transferring context: 2B                                                                                                               0.0s
 => [internal] load metadata for ghcr.io/nautobot/nautobot:1.4.2-py3.9                                                                        0.8s
 => CACHED [1/1] FROM ghcr.io/nautobot/nautobot:1.4.2-py3.9@sha256:59f4d8338a1e6025ebe0051ee5244d4c0e94b0223079f806eb61eb63b6a04e62           0.0s
 => exporting to image                                                                                                                        0.0s
 => => exporting layers                                                                                                                       0.0s
 => => writing image sha256:a164511865f73bf08eb2a30a62ad270211b544006708f073efddcd7ef6a10830                                                  0.0s
 => => naming to ghcr.io/networktocode/nautobot-kubernetes:main                                                                               0.0s

Let me also test whether I can push the image to the Docker repository hosted on ghcr.io.

~ make push
docker push ghcr.io/networktocode/nautobot-kubernetes:main
The push refers to repository [ghcr.io/networktocode/nautobot-kubernetes]
3cec5ea1ba13: Mounted from nautobot/nautobot 
5f70bf18a086: Mounted from nautobot/nautobot 
4078cbb0dac2: Mounted from nautobot/nautobot 
28330db6782d: Mounted from nautobot/nautobot 
46b0ede2b6bc: Mounted from nautobot/nautobot 
f970a3b06182: Mounted from nautobot/nautobot 
50f757c5b291: Mounted from nautobot/nautobot 
34ada2d2351f: Mounted from nautobot/nautobot 
2fe7c3cac96a: Mounted from nautobot/nautobot 
ba48a538e919: Mounted from nautobot/nautobot 
639278003173: Mounted from nautobot/nautobot 
294d3956baee: Mounted from nautobot/nautobot 
5652b0fe3051: Mounted from nautobot/nautobot 
782cc2d2412a: Mounted from nautobot/nautobot 
1d7e8ad8920f: Mounted from nautobot/nautobot 
81514ea14697: Mounted from nautobot/nautobot 
630337cfb78d: Mounted from nautobot/nautobot 
6485bed63627: Mounted from nautobot/nautobot 
main: digest: sha256:c9826f09ba3277300a3e6d359a2daebf952485097383a10c37d6e239dbac0713 size: 4087

Great, this is working as well.

Deploy the Custom Image to Kubernetes

I have my initial image in the repository. Before automating the deployment, I will test whether I can deploy my custom image. To do that, I need to update ./kubernetes/values.yaml file. There are a couple of things you need to add to your values. Let me first show the current content of a file:

---
postgresql:
  postgresqlPassword: "SuperSecret123"
redis:
  auth:
    password: "SuperSecret456"
celeryWorker:
  replicaCount: 4

I added those values in my previous blog post. If I want to specify the custom image, I must define the nautobot.image section in my values. Check Nautobot Helm charts documentation for more details.

---
postgresql:
  postgresqlPassword: "SuperSecret123"
redis:
  auth:
    password: "SuperSecret456"
celeryWorker:
  replicaCount: 4
nautobot:
  image:
    registry: "ghcr.io"
    repository: "networktocode/nautobot-kubernetes"
    tag: "main"
    pullSecrets:
      - "ghcr.io"

I think the parameters are self-explanatory. I defined the Docker repository, the image, and the image tag. As this is a private repository, I must define pullSecrets as well. This section describes the Kubernetes secret used to pull the image from a private registry. I will create this secret manually. Of course, there are options to automate this step, using HashiCorp Vault, for example. But that is out of scope for this blog post. Well, let’s create the Kubernetes secret now. To do this, you need a token, which you can generate under your GitHub profile.

<span role="button" tabindex="0" data-code="➜ ~ kubectl create secret docker-registry –docker-server=ghcr.io –docker-username=ubajze –docker-password=
~ kubectl create secret docker-registry --docker-server=ghcr.io --docker-username=ubajze --docker-password=<TOKEN> -n nautobot ghcr.io
secret/ghcr.io created

Now that I have the Kubernetes secret, I have updated the values.yaml. I can commit and push the changes. Remember, Flux will do the rest for me, meaning the new image will be deployed automatically. Let’s do that and observe the process.

I must wait a few minutes for Flux to sync the Git repository. After that, Flux will reconcile the current Helm release and apply new values from values.yaml. The output below shows the intermediate state, where a new container is being created.

~ kubectl get pods
NAME                                      READY   STATUS              RESTARTS   AGE
nautobot-544c88f9b8-gb652                 0/1     ContainerCreating   0          0s
nautobot-577c89f9c7-fzs2s                 1/1     Running             0          2d
nautobot-577c89f9c7-hczbx                 1/1     Running             1          2d
nautobot-celery-beat-554fb6fc7c-n847n     0/1     ContainerCreating   0          0s
nautobot-celery-beat-7d9f864c58-2c9r7     1/1     Running             2          2d
nautobot-celery-worker-647cc6d8dd-564p6   1/1     Running             2          47h
nautobot-celery-worker-647cc6d8dd-7xwtb   1/1     Running             2          47h
nautobot-celery-worker-647cc6d8dd-npx42   1/1     Terminating         2          2d
nautobot-celery-worker-647cc6d8dd-plmjq   1/1     Running             2          2d
nautobot-celery-worker-84bf689ff-k2dph    0/1     ContainerCreating   0          0s
nautobot-celery-worker-84bf689ff-tp92c    0/1     Pending             0          0s
nautobot-postgresql-0                     1/1     Running             0          2d
nautobot-redis-master-0                   1/1     Running             0          2d

After a few minutes, I have a new deployment with a new image.

~ kubectl get pods
NAME                                     READY   STATUS    RESTARTS   AGE
nautobot-544c88f9b8-cwdnj                1/1     Running   0          2m21s
nautobot-544c88f9b8-gb652                1/1     Running   0          4m1s
nautobot-celery-beat-554fb6fc7c-n847n    1/1     Running   1          4m1s
nautobot-celery-worker-84bf689ff-5wzmh   1/1     Running   0          117s
nautobot-celery-worker-84bf689ff-dwjdt   1/1     Running   0          106s
nautobot-celery-worker-84bf689ff-k2dph   1/1     Running   0          4m1s
nautobot-celery-worker-84bf689ff-tp92c   1/1     Running   0          4m1s
nautobot-postgresql-0                    1/1     Running   0          2d
nautobot-redis-master-0                  1/1     Running   0          2d

I can prove that by describing one of the pods.

~ kubectl describe pod nautobot-544c88f9b8-cwdnj | grep Image
    Image:          ghcr.io/networktocode/nautobot-kubernetes:main
    Image ID:       ghcr.io/networktocode/nautobot-kubernetes@sha256:c9826f09ba3277300a3e6d359a2daebf952485097383a10c37d6e239dbac0713

As you can see, the image was pulled from my new repository, and the main tag is used. Great, this means my automated deployment is working. If I want to deploy a new image, I can build the new image and push the image to the Docker repository. Then I must update the tag in the ./kubernetes/values.yaml file, commit and push changes. Flux will automatically re-deploy the new image.

Automate the Deployment Process

The next step is to automate the deployment process. My goal is to deploy a new image every time I create a new release in GitHub. To do this automatically, I will use GitHub Actions CI/CD, triggered when a new release is created.

I want to have the following steps in my CI/CD workflow:

  • Lint
  • Build
  • Test
  • Deploy

I will simulate the Lint and Test steps, as this is out of scope for this blog post. But there is a value in linting your code and then testing the build.

Before specifying the CI/CD workflow I will add some more targets to my Makefile. I will use these commands in a workflow. So let me first update the Makefile.

# Get current branch by default
tag := $(shell git rev-parse --abbrev-ref HEAD)
values := "./kubernetes/values.yaml"

build:
	docker build -t ghcr.io/networktocode/nautobot-kubernetes:$(tag) .

push:
	docker push ghcr.io/networktocode/nautobot-kubernetes:$(tag)

pull:
	docker pull ghcr.io/networktocode/nautobot-kubernetes:$(tag)

lint:
	@echo "Linting..."
	@sleep 1
	@echo "Done."

test:
	@echo "Testing..."
	@sleep 1
	@echo "Done."

update-tag:
	sed -i 's/tag: \".*\"/tag: \"$(tag)\"/g' $(values)

I added three more targets in my Makefile. The lint and test targets simulate linting and testing. The update-tag target is more interesting. It replaces the current tag in ./kubernetes/values.yaml with the new tag specified when running the command. This command will be used in the CI/CD workflow to update the tag in a file. Apart from that, I will also commit and push the changes to the main branch directly from the CI/CD workflow. Flux will detect a change in the main branch and redeploy Nautobot using a new image specified in the values.yaml. Of course, this process is just one approach. Other options include updating the ConfigMap with the image tag directly from your CI/CD workflow. Choosing the correct approach depends on your use case.

Now that I have the basics, I can create a CI/CD definition for GitHub Actions. The workflows are defined in the YAML file and must be stored in the ./.github/workflows directory. Any YAML file in this directory will be loaded by GitHub Action and executed. I will not go into the details of GitHub Actions; that’s not the purpose of this blog post. You can achieve the same results on other platforms for CI/CD workflows.

So, let me create a file with the following content:

---
name: "CI/CD"
on:
  push:
    branches:
      - "*"
  pull_request:
  release:
    types:
      - "created"

permissions:
  packages: "write"
  contents: "write"
  id-token: "write"

jobs:
  lint:
    runs-on: "ubuntu-20.04"
    steps:
      - name: "Check out repository code"
        uses: "actions/checkout@v3"
      - name: "Linting"
        run: "make lint"
  build:
    runs-on: "ubuntu-20.04"
    needs:
      - "lint"
    steps:
      - name: "Check out repository code"
        uses: "actions/checkout@v3"
      - name: "Build the image"
        run: "make tag=${{ github.ref_name }} build"
      - name: "Login to ghcr.io"
        run: "echo ${{ secrets.GITHUB_TOKEN }} | docker login ghcr.io -u USERNAME --password-stdin"
      - name: "Push the image to the repository"
        run: "make tag=${{ github.ref_name }} push"
  test:
    runs-on: "ubuntu-20.04"
    needs:
      - "build"
    steps:
      - name: "Check out repository code"
        uses: "actions/checkout@v3"
      - name: "Run tests"
        run: "make test"
  deploy:
    runs-on: "ubuntu-20.04"
    needs:
      - "test"
    if: "${{ github.event_name == 'release' }}"
    steps:
      - name: "Check out repository code"
        uses: "actions/checkout@v3"
        with:
          ref: "main"
      - name: "Update the image tag"
        run: "make tag=${{ github.ref_name }} update-tag"
      - name: "Commit changes"
        run: |
          git config user.name github-actions
          git config user.email github-actions@github.com
          git commit -am "Updating the Docker image tag"
          git push origin main

I will give you just the overall description of a file, as the above GitHub Actions syntax is out of scope for this blog post. I created four jobs where GitHub Actions will execute each job after the previous job is finished successfully. The first job started is the lint job. In the build job, I will build the image, assign a tag (the name of the Git tag for the release) to the image, and push the image to the Docker repository. The test job is used to test the image that was built previously. And the deploy job will update the image tag in the ./kubernetes/values.yaml file. After that, it will commit and push the changes back to the repository in the main branch. The “if” statement means this job will only be executed if the CI/CD workflow is triggered by creating a new release in GitHub.

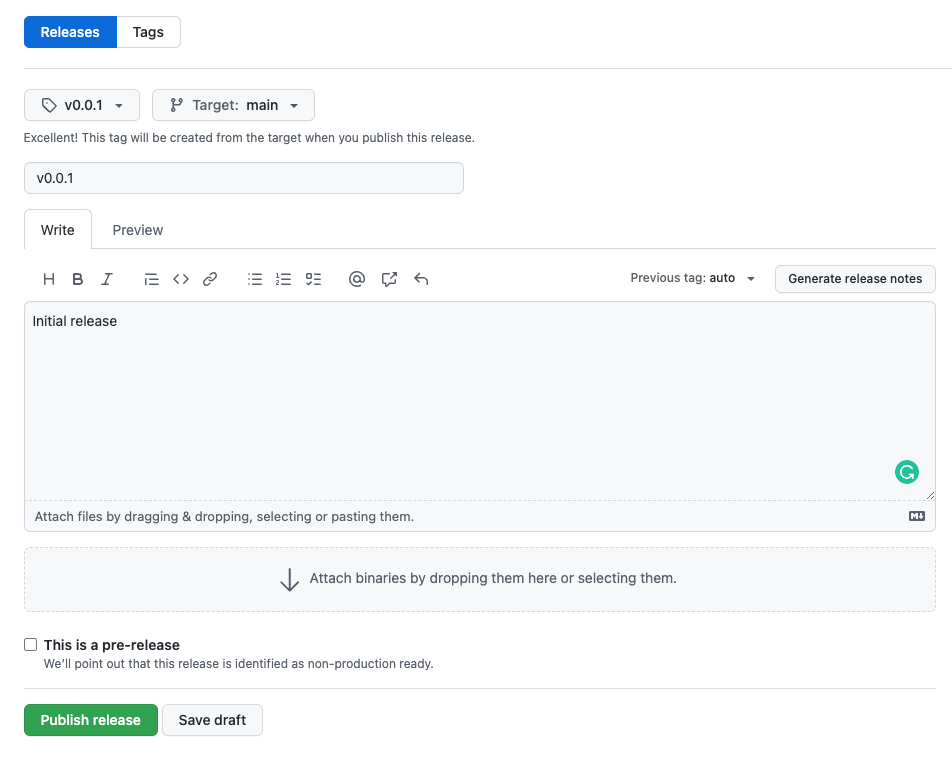
So, now I can give it a try. I will create a new release on GitHub.

Creating a release triggers a new workflow.

If I pull the latest changes from the GitHub repository, I can see that the tag was updated in the ./kubernetes/values.yaml file. The new value is now v0.0.1.

---
postgresql:
  postgresqlPassword: "SuperSecret123"
redis:
  auth:
    password: "SuperSecret456"
celeryWorker:
  replicaCount: 4
nautobot:
  image:
    registry: "ghcr.io"
    repository: "networktocode/nautobot-kubernetes"
    tag: "v0.0.1"
    pullSecrets:
      - "ghcr.io"

After a few minutes, the new image is deployed to Kubernetes.

~ kubectl describe pod nautobot-5b99dd5cb-5pcwp | grep Image
    Image:          ghcr.io/networktocode/nautobot-kubernetes:v0.0.1
    Image ID:       ghcr.io/networktocode/nautobot-kubernetes@sha256:3ca8699ed1ed970889d026d684231f1d1618e5adeeb383e418082b8f3e27d6ee

Great, my workflow is working as expected.

Release a New Nautobot Image

Remember, I created a very simple Dockerfile, which only pulls the Nautobot image and applies new tags. Usually, this is not a use case, so I will make this a bit more complex. I will install the Golden Config plugin and add the custom Nautobot configuration.

I must tell the Dockerfile how to install the plugin. So I will create the requirements.txt file and specify all plugins I want to install in my image. In the Dockerfile, I will install requirements from the file using the pip command.

So, let me first create the requirements.txt file to define the plugins and dependencies I want to install in my image. I will specify the Golden Config plugin, but I need to add the Nautobot Nornir plugin, as this is a requirement for the Golden Config plugin.

~ cat requirements.txt
nautobot_plugin_nornir==1.0.0
nautobot-golden-config==1.2.0

Just installing the plugins is not enough. I must also enable the plugins in the configuration and add the configuration parameters required for plugins. So I will take the base config from my current Nautobot deployment. I will store the configuration in the ./configuration/nautobot_config.py file. Then I will update the configuration file with the required plugin settings.

My repository contains the following files:

.
└── nautobot-kubernetes
    ├── Dockerfile
    ├── Makefile
    ├── README.md
    ├── clusters
    │   └── minikube
    │       └── flux-system
    │           ├── gotk-components.yaml
    │           ├── gotk-sync.yaml
    │           ├── kustomization.yaml
    │           └── nautobot-kustomization.yaml
    ├── configuration
    │   └── nautobot_config.py
    ├── kubernetes
    │   ├── helmrelease.yaml
    │   ├── kustomization.yaml
    │   ├── namespace.yaml
    │   ├── nautobot-helmrepo.yaml
    │   └── values.yaml
    └── requirements.txt

6 directories, 14 files

Now I must add additional instructions to the Dockerfile.

ARG NAUTOBOT_VERSION=1.4.2
ARG PYTHON_VERSION=3.9
FROM ghcr.io/nautobot/nautobot:${NAUTOBOT_VERSION}-py${PYTHON_VERSION}

COPY requirements.txt /tmp/

RUN pip install -r /tmp/requirements.txt

COPY ./configuration/nautobot_config.py /opt/nautobot/

I can now commit and push all changes and create a new release in GitHub to deploy the new image.

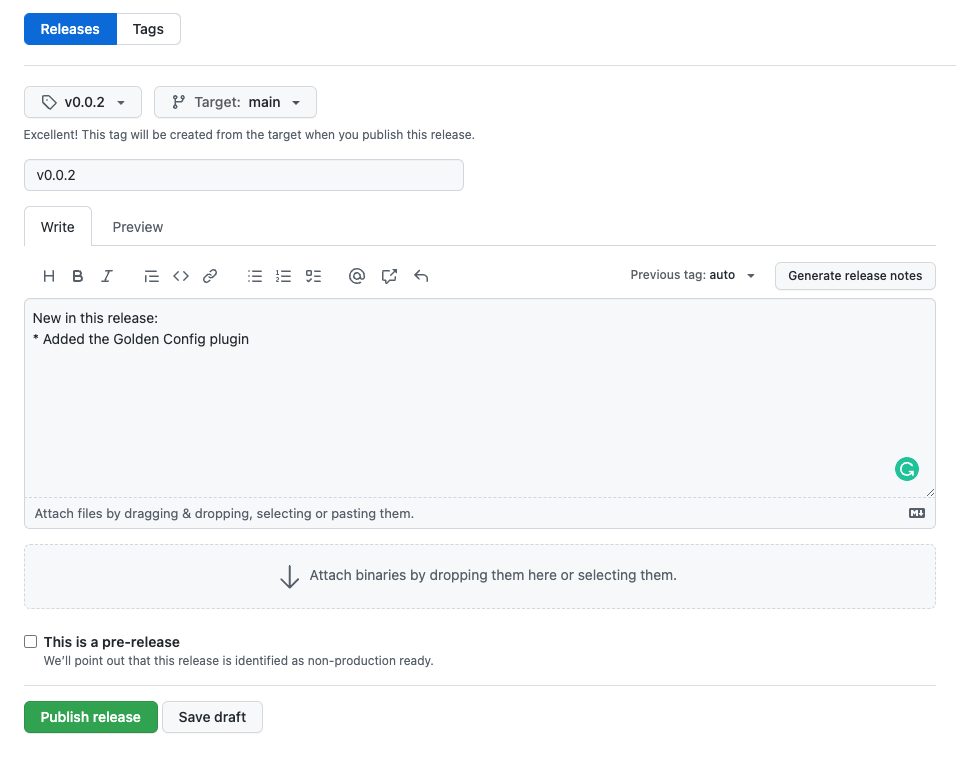
The release triggers a new CI/CD workflow, which updates the image tag in ./kubernetes/values.yaml to v0.0.2. I have to wait for Flux to sync the Git repository. After a few minutes, the new image is deployed to Kubernetes.

~ kubectl describe pod nautobot-55f4cfc777-82qvr | grep Image
    Image:          ghcr.io/networktocode/nautobot-kubernetes:v0.0.2
    Image ID:       ghcr.io/networktocode/nautobot-kubernetes@sha256:2bd861b5b6b74cf0f09a34fefbcca264c22f3df7440320742012568a0046917b

If I now connect to my Nautobot instance, I can see the plugins are installed and enabled.

As you can see, I updated the Nautobot deployment without even touching Kubernetes. All I have to do is update my repository and create a new release. Automation enables every developer to update the Nautobot deployment, even without having an understanding of Kubernetes.


Conclusion

In a series of three blog posts, I wanted to show how the Network to Code Managed Services team manages Nautobot deployments. We have several Nautobot deployments, so we must ensure that as many steps as possible are automated. The examples in these blog posts were quite simple. Of course, our deployments are much more complex. Usually we have multiple environments (production and integration at minimum), with many integrations with other systems, such as HashiCorp Vault, S3 backend storage, etc. Configuration in those cases is much more complex.

Anyway, I hope you understand how we are dealing with Nautobot deployments. If you have any questions regarding this, do not hesitate to reach out on Slack or contact us directly.

-Uros


ntc img
ntc img

Contact Us to Learn More

Share details about yourself & someone from our team will reach out to you ASAP!