Deploying Nautobot to Kubernetes – Part 1

Blog Detail

Our managed services team is responsible for running and managing applications for our customers. We need to run these applications efficiently and reliably as we work with multiple organizations. While there are many tools available to deploy applications and manage them efficiently, we believe Kubernetes is the right platform for our use case.

So we are deploying all our applications to Kubernetes, and Nautobot is no exception. This blog post is the first one in the series where I will try to explain on a high level how we are managing Nautobot deployments for our customers.

Deploying applications to Kubernetes can be complex, especially for beginners, as every application deployment consists of many Kubernetes objects, such as DeploymentsConfigMapsSecretsServiceAccount, etc. In this first post, I will explain how you can easily use Helm charts to deploy Nautobot using a few commands. We developed Nautobot Helm charts to deploy Nautobot following best practices gathered with experience running Nautobot in production. That is why using Helm charts for deployment is recommended.

I will lead you through the process of bringing up the development Kubernetes cluster using minikube. Then I will explain how to install Helm charts, and finally, I will show you how easily you can deploy Nautobot.

Start minikube Cluster

Deploying a production-ready Kubernetes cluster can be pretty challenging, which usually requires a team to deploy and manage. Luckily we have minikube. It is a development Kubernetes implementation that you can deploy with a single command on your laptop.

To run a minikube cluster, you must first install minikube. minikube installation is outside the scope of this blog post, but it is easy enough to follow the steps on the official minikube webpage.

I already have minikube installed, so I can go ahead and start a cluster. Let’s do that first. I will use the minikube start command to create and start a cluster.

~ minikube start
😄  minikube v1.22.0 on Darwin 12.5.1
✨  Using the hyperkit driver based on user configuration
👍  Starting control plane node minikube in cluster minikube
🔥  Creating hyperkit VM (CPUs=4, Memory=12000MB, Disk=20000MB) ...
📦  Preparing Kubernetes v1.21.2 on containerd 1.4.4 ...
    ▪ Generating certificates and keys ...
    ▪ Booting up control plane ...
    ▪ Configuring RBAC rules ...
🔗  Configuring bridge CNI (Container Networking Interface) ...
🔎  Verifying Kubernetes components...
    ▪ Using image gcr.io/k8s-minikube/storage-provisioner:v5
🌟  Enabled addons: storage-provisioner, default-storageclass
🏄  Done! kubectl is now configured to use "minikube" cluster and "default" namespace by default

I have a local development Kubernetes cluster up and running in a few minutes.

Nautobot Helm Charts

Now that I have the cluster, I can start the process of deploying a Nautobot instance. As I already mentioned, using Nautobot Helm charts is the recommended way to deploy Nautobot to Kubernetes.

Helm charts are a packaging format for Kubernetes, consisting of a collection of files (or templates) for Kubernetes objects. A chart typically accepts a list of input parameters (commonly referred to as values) that are translated to Kubernetes object definitions in a YAML format. These files are then directly deployed to Kubernetes. The advantage of using Helm charts is that charts hide deployment complexity from you. Templates are typically created to deploy an application with minimal input parameters using best practices.

We released 1.0 Nautobot Helm charts back in October 2021. You can read the official announcement in a blog post. We are hosting Nautobot Helm charts in a GitHub repository.

As mentioned, a Helm chart usually accepts many input parameters; some can be mandatory and others optional. There is usually a file called values.yaml containing all available parameters with default values. After the documentation, this file is a good source if you want to explore which parameters are available and what are the default values. Before using Helm charts to deploy Nautobot, it is a good practice to go through some parameters to get more familiar with what is available. For Nautobot Helm charts, you can find the list in the documentation or in the values.yaml.

Deploy Nautobot Helm Charts

Now that I’ve explained the basics, I can show you how to deploy Nautobot quickly using Helm charts.

To use Helm charts, you must install Helm software on your local machine. It is out of the scope of this blog post to show you how to install Helm, but again, it should be fairly easy to install Helm following the official documentation.

Once Helm is installed, the first step is deploying the Nautobot Helm repository. You can do this with the helm repo add command. Let me do that now:

~ helm repo add nautobot https://nautobot.github.io/helm-charts/
"nautobot" has been added to your repositories
~ helm repo list
NAME        URL
nautobot    https://nautobot.github.io/helm-charts/

Each repo contains multiple Helm charts versions. Run the helm search repo command to see the default version.

~ helm search repo nautobot
NAME              CHART VERSION APP VERSION DESCRIPTION
nautobot/nautobot 1.3.12        1.3.5       Nautobot is a Network Source of Truth and Netwo...

The output above shows the name, the chart version, the application version, and the description. The output shows a default version, but you can also see the application version. In this case, the chart version 1.3.12 is bound to the Nautobot version 1.3.5, meaning that deploying the chart version 1.3.12 will deploy the Nautobot version 1.3.5 by default.

You can use the -l option to see all versions available.

<span role="button" tabindex="0" data-code="➜ ~ helm search repo nautobot -l NAME CHART VERSION APP VERSION DESCRIPTION nautobot/nautobot 1.3.12 1.3.5 Nautobot is a Network Source of Truth and Netwo… nautobot/nautobot 1.3.11 1.3.4 Nautobot is a Network Source of Truth and Netwo… nautobot/nautobot 1.3.10 1.3.3 Nautobot is a Network Source of Truth and Netwo… nautobot/nautobot 1.3.9 1.3.2 Nautobot is a Network Source of Truth and Netwo… nautobot/nautobot 1.3.8 1.3.1 Nautobot is a Network Source of Truth and Netwo… nautobot/nautobot 1.3.7 1.2.11 Nautobot is a Network Source of Truth and Netwo… nautobot/nautobot 1.3.6 1.2.10 Nautobot is a Network Source of Truth and Netwo… nautobot/nautobot 1.3.5 1.2.9 Nautobot is a Network Source of Truth and Netwo… nautobot/nautobot 1.3.4 1.2.9 Nautobot is a Network Source of Truth and Netwo… nautobot/nautobot 1.3.3 1.2.8 Nautobot is a Network Source of Truth and Netwo… nautobot/nautobot 1.3.2 1.2.7 Nautobot is a Network Source of Truth and Netwo… nautobot/nautobot 1.3.1 1.2.7 Nautobot is a Network Source of Truth and Netwo… nautobot/nautobot 1.3.0 1.2.5 Nautobot is a Network Source of Truth and Netwo… nautobot/nautobot 1.2.4 1.2.5 Nautobot is a Network Source of Truth and Netwo…
~ helm search repo nautobot -l
NAME              CHART VERSION APP VERSION DESCRIPTION
nautobot/nautobot 1.3.12        1.3.5       Nautobot is a Network Source of Truth and Netwo...
nautobot/nautobot 1.3.11        1.3.4       Nautobot is a Network Source of Truth and Netwo...
nautobot/nautobot 1.3.10        1.3.3       Nautobot is a Network Source of Truth and Netwo...
nautobot/nautobot 1.3.9         1.3.2       Nautobot is a Network Source of Truth and Netwo...
nautobot/nautobot 1.3.8         1.3.1       Nautobot is a Network Source of Truth and Netwo...
nautobot/nautobot 1.3.7         1.2.11      Nautobot is a Network Source of Truth and Netwo...
nautobot/nautobot 1.3.6         1.2.10      Nautobot is a Network Source of Truth and Netwo...
nautobot/nautobot 1.3.5         1.2.9       Nautobot is a Network Source of Truth and Netwo...
nautobot/nautobot 1.3.4         1.2.9       Nautobot is a Network Source of Truth and Netwo...
nautobot/nautobot 1.3.3         1.2.8       Nautobot is a Network Source of Truth and Netwo...
nautobot/nautobot 1.3.2         1.2.7       Nautobot is a Network Source of Truth and Netwo...
nautobot/nautobot 1.3.1         1.2.7       Nautobot is a Network Source of Truth and Netwo...
nautobot/nautobot 1.3.0         1.2.5       Nautobot is a Network Source of Truth and Netwo...
nautobot/nautobot 1.2.4         1.2.5       Nautobot is a Network Source of Truth and Netwo...
<... Output omitted ...>

So after deploying the Nautobot Helm charts, I can proceed to the next step, deploying Nautobot itself using the newly installed Helm repository.

Deploy Nautobot

As discussed, you can use all sorts of parameters for Nautobot deployment. In this example, I will show you how to deploy Nautobot with minimal parameters. The default settings deploy a small Nautobot deployment, suitable for development or testing. This small deployment consists of two Nautobot instances, one Celery beat instance, two Celery worker instances, a PostgreSQL database, and Redis. The default configuration can be customized to deploy a full production deployment of Nautobot.

As part of the default Nautobot deployment, Helm charts deploy PostgreSQL and Redis instances. Under the hood, this is just a pass-through to Bitnami’s PostgreSQL and Redis Helm charts. Every parameter available for these two charts is also available in the Nautobot Helm charts. Of course, you can omit deploying a PostgreSQL database and Redis instance and deploy them yourself, in which case, you must correctly define DB and Redis parameters to use external instances.

So, let’s get back to the Nautobot deployment. As I already mentioned, input parameters can be mandatory or optional. However, there are two required parameters in Nautobot Helm charts:

  • A PostgreSQL password
  • A Redis password

Installing Helm charts is done with the helm install command. You can specify input parameters inline with the --set option, or you can create a YAML file containing all your parameters and use the --values option with the path to the YAML file.

In my example, I will specify input parameters inline, but you would usually want to create a file and store parameters there. It is just much easier to change a parameter in a file and rerun the helm command.

But anyway, let’s deploy Nautobot by passing the parameters inline.

~ helm install nautobot nautobot/nautobot \
        --set postgresql.postgresqlPassword=SuperSecret123 \
        --set redis.auth.password=SuperSecret456

NAME: nautobot
LAST DEPLOYED: Tue Sep  6 10:34:48 2022
NAMESPACE: default
STATUS: deployed
REVISION: 1
NOTES:
*********************************************************************
*** PLEASE BE PATIENT: Nautobot may take a few minutes to install ***
*********************************************************************

1. Get the Nautobot URL:

  echo "Nautobot URL: http://127.0.0.1:8080/"
  kubectl port-forward --namespace default svc/nautobot 8080:80

2. Get your Nautobot login admin credentials by running:

  echo Username: admin
  echo Password: $(kubectl get secret --namespace default nautobot-env -o jsonpath="{.data.NAUTOBOT_SUPERUSER_PASSWORD}" | base64 --decode)
  echo api-token: $(kubectl get secret --namespace default nautobot-env -o jsonpath="{.data.NAUTOBOT_SUPERUSER_API_TOKEN}" | base64 --decode)

Make sure you take note of your Nautobot `NAUTOBOT_SECRET_KEY` by running:

  echo Secret Key: $(kubectl get secret --namespace default nautobot-env -o jsonpath="{.data.NAUTOBOT_SECRET_KEY}" | base64 --decode)
To take a backup of the database run:

  export POSTGRES_PASSWORD=$(kubectl get secret --namespace default nautobot-postgresql -o jsonpath="{.data.postgresql-password}" | base64 --decode)
  echo $POSTGRES_PASSWORD | kubectl exec -itn default statefulset.apps/nautobot-postgresql -- pg_dump --username nautobot --clean --if-exists nautobot > backup.sql

After I applied the command, I needed to wait for a few minutes before the deployment was ready. After that, I should see all Kubernetes Pods up and running:

~ kubectl get pods
NAME                                      READY   STATUS    RESTARTS   AGE
nautobot-5648dd987d-8rkcw                 1/1     Running   1          5m30s
nautobot-5648dd987d-jz9qf                 1/1     Running   1          5m30s
nautobot-celery-beat-ccc96f8c9-ljhzr      1/1     Running   3          5m30s
nautobot-celery-worker-5d6597f5d9-2lf2h   1/1     Running   2          5m30s
nautobot-celery-worker-5d6597f5d9-5bgjz   1/1     Running   2          5m30s
nautobot-postgresql-0                     1/1     Running   0          5m30s
nautobot-redis-master-0                   1/1     Running   0          5m30s

As you can see, this default configuration deploys two Nautobot instances, a Celery beat instance, two Celery workers, a PostgreSQL instance, and a Redis instance.

I can now test whether I can connect to my deployment. Some basic instructions on how to connect to Nautobot are already provided in the output of the helm install command.

I will first extract the admin password.

~ echo Password: $(kubectl get secret --namespace default nautobot-env -o jsonpath="{.data.NAUTOBOT_SUPERUSER_PASSWORD}" | base64 --decode)
Password: R@kUT_ZW6l@KAb@k@J8x@6@_K@@@I5PtL@QO7ABu_fa@_@@@gsV7A@f@@s@@@3f@

Now that I have the admin password, I can enable port forwarding. Normally, you would create an ingress that would allow you to connect to your instance using a hostname. But since this is just for the demo purposes, and I don’t have any ingress controller enabled, I will just enable port forwarding and connect to my instance through the tunnel.

~ kubectl port-forward --namespace default svc/nautobot 8080:80
Forwarding from 127.0.0.1:8080 -> 8080
Forwarding from [::1]:8080 -> 8080

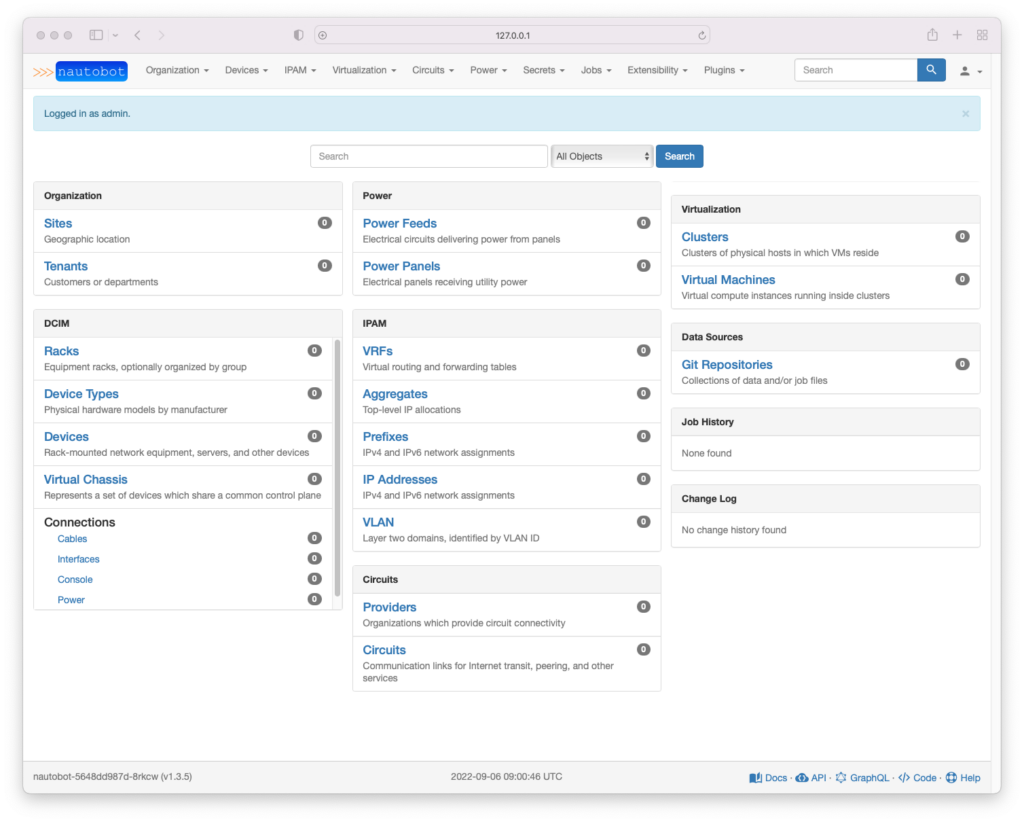
I can now go to my browser and connect to http://127.0.0.1:8080 to access the Nautobot instance. I will use the username admin and the password extracted in the previous step to log in to the instance.

Voila, I can access my Nautobot instance deployed to Kubernetes.

Conclusion

Deploying all required Kubernetes objects can be challenging, especially if you don’t fully understand all components needed for deploying an application. Luckily we have a tool called Helm, which comes with a packaging format called Helm charts. Helm charts can hide much complexity from a developer.

Nautobot Helm charts are actively maintained; so whenever you want to deploy Nautobot to Kubernetes, you should take a quicker route and deploy the application using Helm charts.

~ Uros


ntc img
ntc img

Contact Us to Learn More

Share details about yourself & someone from our team will reach out to you ASAP!

Introducing the Nautobot Helm Chart

Blog Detail

Today we are happy to announce the 1.0 release of the Nautobot Helm Chart for deploying Nautobot to KubernetesHelm is the unofficial package manager for Kubernetes and provides a simple method to deploy applications to Kubernetes. The Nautobot Helm Chart is designed to both provide a simple installation of Nautobot for beginners and advanced configuration capabilities for more complex deployments.

The Helm Chart can be configured using Helm Values just like any other Helm Chart, these values are documented extensively in the README. As well as several examples of common configuration options you may wish to use.

The Helm Chart by default includes a deployment of PostgreSQL and Redis based on the Bitnami Helm Charts. It also deploys Nautobot, Nautobot Celery workers, and optionally Nautobot RQ workers with 2 default replicas for High Availability (HA).

There are detailed instructions within the README and documentation in the repository. This will help you get up and running with Nautobot in Kubernetes within a few minutes!


Conclusion

Let us know via GitHub issues if there are issues, or feel free to reach out in the #nautobot Slack channel on Network to Code if you have any questions!

Thanks,

Nick


ntc img
ntc img

Contact Us to Learn More

Share details about yourself & someone from our team will reach out to you ASAP!

Getting Started Using the Kubernetes Collection in Ansible Tower

Blog Detail

In this post I’ll cover setting up and working with the community.kubernetes collection in Ansible Tower. I’ll describe my experience with the initial installation of the collection on the Ansible Tower controller, discuss using a Custom Credential Type in Ansible Tower for authentication to the Kubernetes API, and cover retrieving and parsing the output from the Kubernetes cluster. Finally, I’ll provide a sample playbook to create a pod in Kubernetes and query the pod status using the collection.

While the main topic and examples are focused on using the community.kubernetes collection, much of the information here is applicable to other Ansible collections or modules as well. For example, getting Tower to recognize a collection, creating and using a Custom Credential Type, and parsing output using the json_query filter are very relevant when using any Ansible module or collection.

Overview

Ansible collections were introduced recently as a way to help scale Ansible development by allowing the maintainers of the modules to manage them outside of Ansible core. As part of this transition, the core Kubernetes modules have been migrated to the community.kubernetes collection. The modules have the same functionality and syntax as the previous core modules, but will be maintained in the collection going forward. With that being the case, it is recommended to begin utilizing the collection rather than the core modules. The goal of this post is to help the reader get started with using the collection, specifically on Ansible Tower or AWX.

Setup

First, it is necessary to install the openshift Python module which is used by the community.kubernetes modules on the Ansible Tower controller. By default Ansible Tower uses a virtual environment located at /var/lib/awx/venv/, so you must first activate that virtual environment and then use pip to install the module.

[centos@ip-10-125-1-252 ~]$ source /var/lib/awx/venv/ansible/bin/activate
(ansible) [centos@ip-10-125-1-252 ~]$ pip install openshift

The above requires elevated privileges. If you are not running as root but have sudo privileges, run the command by specifying the full path to the pip utility: sudo /var/lib/awx/venv/ansible/bin/pip install openshift

The next step is installing the collection on the Ansible Tower controller and ensuring Tower is able to find the modules in the collection. I have been able to verify two methods that work on a Tower controller running Ansible 2.9.7 and Tower 3.6.3:

Option 1: Downloading the Collection On-Demand

With this option, Ansible Tower will download the collection each time the playbook is run. Create a folder in the root of your project called collections and inside that folder include a requirements.yml file with contents such as below:

---
collections:
  - name: community.kubernetes
    version: 0.9.0

The directory structure of the project would thus be:

├── collections
    └── requirements.yml

This might not be desirable due to the delay incurred when downloading the collection, in which case you can opt for Option #2 below.

Caching of collections may remediate this in future versions of Tower/AWX. See issue #7643. Thanks to NTC vet Josh VeDeraa for the tip!

Option 2: Include a copy of the collection in your source control repository

In order to avoid having to pull the collection on each playbook run, the collection can be installed as a folder in your project. This means it will be checked into your source control repository and be tracked along with your playbooks and other files. To accomplish this, first we need to create an ansible.cfg file in the root of the repository and create the following lines:

[defaults]
collections_paths = ./

Then run the ansible-galaxy command to install a copy of the collection into an ansible_collections folder inside your project. The requirements file should have the same contents as shown above in Option #1.

ansible-galaxy collection install -r requirements.yml

This will create an ansible_collections folder at the root of your repo which contains the Kubernetes collection. The directory structure in the project will then be:

├── ansible.cfg
├── ansible_collections
│   └── community
│       └── kubernetes
└── requirements.yml

Commit the newly created ansible_collections folder into the repo, and make sure to re-sync the Project in Ansible Tower.

Avoiding the “unresolved module” problem on the Tower controller

When I originally began working on this project, I began by installing the collection locally on the Tower controller using Ansible Galaxy which would typically be the way to install collections. As it turned out, installing the module locally on the controller and then trying to get Ansible Tower to find the collections is difficult or may even be impossible, at least on our version of Tower (3.6.3). For example, you might be tempted to do this on the controller:

ansible-galaxy collection install community.kubernetes

This pulls down the collection to the Tower controller, however if you attempt to launch a template using one of the collection modules you will get an error such as:

ERROR! couldn't resolve module/action 'community.kubernetes.k8s_info'. This often indicates a misspelling, missing collection, or incorrect module path.

Even after locating where Galaxy installed the collections, /home/centos/.ansible/collections on our Tower system, and then putting this path under the collections_paths key in /etc/ansible/ansible.cfg, the modules still could not be located.

It seems like this should have worked, but at least on our version of Tower it did not. The options in the previous section were discovered only after many hours of trying to make this work, so save yourself some time!

Testing that Tower can find the module

Now that we have set things up to allow Tower to successfully find the collection, we can test it with a playbook that uses the collection. The below playbook uses the k8s_info module to gather information about the Kubernetes worker nodes.

---
- name: RETRIEVE WORKER NODE DETAILS FROM KUBERNETES NODE
  hosts: localhost
  gather_facts: no

  collections: 
    - community.kubernetes
  
  tasks:
  - name: GET WORKER NODE DETAILS
    community.kubernetes.k8s_info:
      kind: Node
      namespace: default 

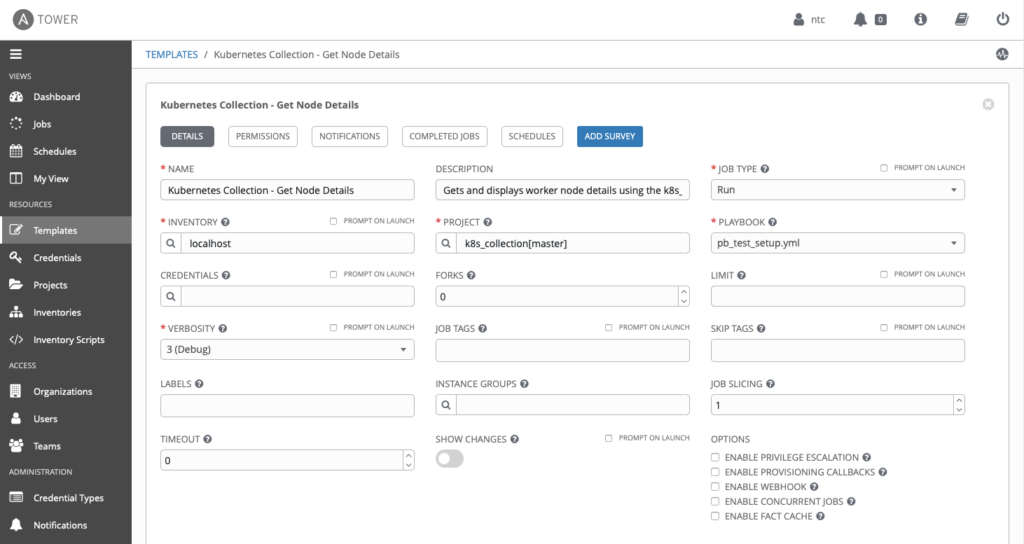
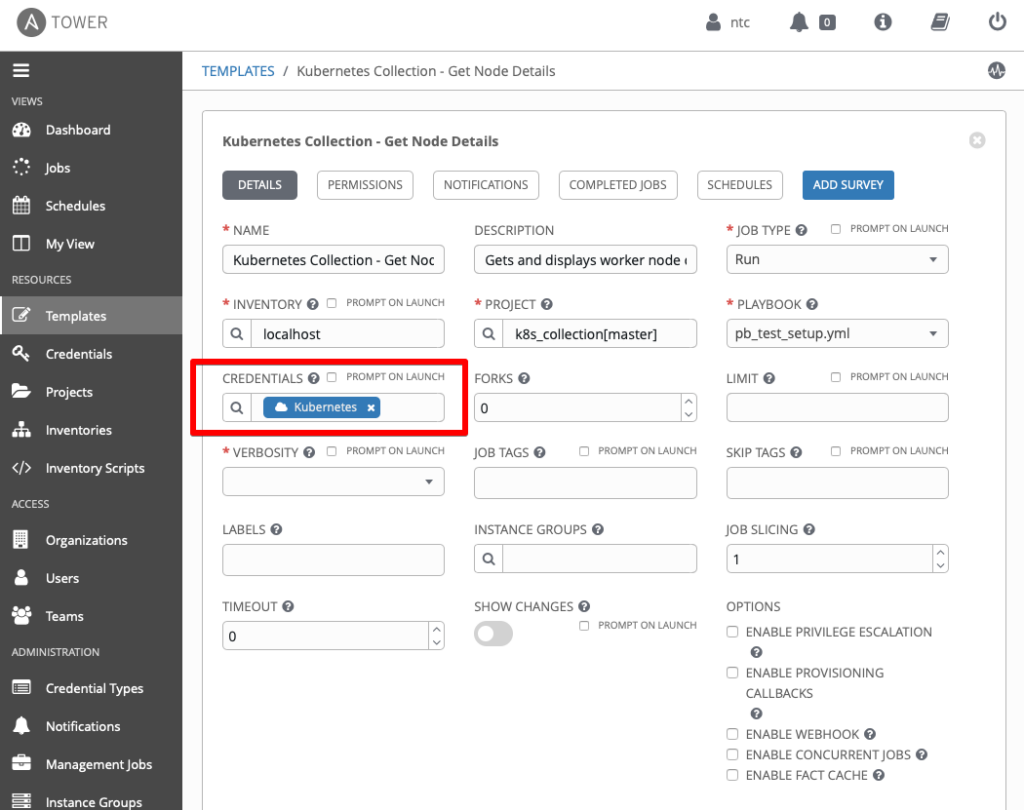
The playbook called pb_test_setup.yml is checked into our GitHub repository, which is set up as a Project in Ansible Tower. It is then referenced in the below Template:

01-tower-template

If we run this playbook from the Tower controller, it will fail because we haven’t yet defined our credentials to access the control plane. A large amount of output will be displayed, but if you scroll up to the beginning of the output for the task GET WORKER NODE DETAILS, it should show the following output:

An exception occurred during task execution. To see the full traceback, use -vvv. The error was: kubernetes.config.config_exception.ConfigException: Invalid kube-config file. No configuration found.

This means that the module has been found, but we cannot connect to the Kubernetes control plane yet because we haven’t defined a kube-config file which provides the credentials to do so. In the next section I’ll show how to do that by defining a Custom Credential in Ansible Tower.

Handling Credentials

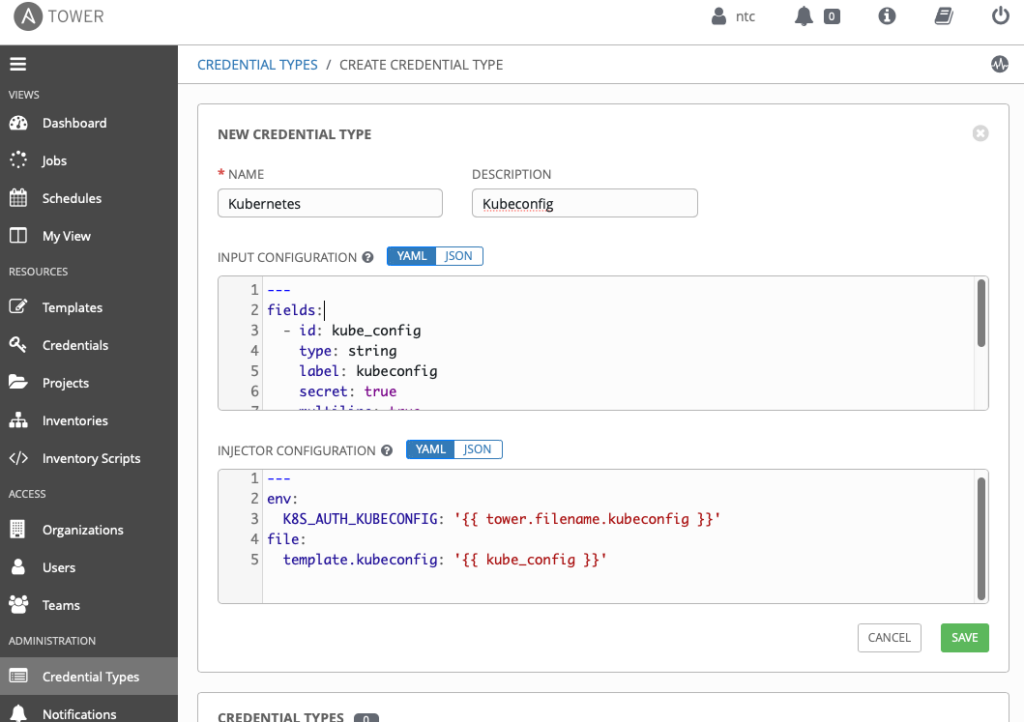
To access the Kubernetes control plane, the credentials are typically stored in a Kubeconfig file which is stored locally on the user workstation in the file ~/.kube/config by default. To securely store the credentials on the Ansible Tower controller, we can load the contents of the Kubeconfig file into a Credential in Ansible Tower. Tower does not currently have a native Kubernetes credential type, but it does provide the ability to create custom Credential Types. The steps below show how to create a Custom Credential Type in Ansible Tower to support storing of the Kubeconfig contents as a Credential. First a Kubernetes Credential Type is created, and then a Credential is created using the new credential type which stores the contents of the Kubeconfig file. We’ll then apply the Credential to the Job Template.

  1. Navigate to Administration > Credential Types and add a new credential type.
  2. Enter the following YAML in the Input Configuration:
---
fields:
  - id: kube_config
    type: string
    label: kubeconfig
    secret: true
    multiline: true
required:
  - kube_config

This defines a single input field in the credential that will be used to store the contents of the Kubeconfig file. Setting secret to true will cause the contents to be hidden in the Tower UI once saved. The label defines a caption for the field, and setting multiline to true causes a text entry field to be created which accepts multiple lines of text.

Enter the below YAML in the Injector Configuration:

---
env:
  K8S_AUTH_KUBECONFIG: "{{ tower.filename.kubeconfig }}"
file:
  template.kubeconfig: "{{ kube_config }}"

The Injector Configuration provides the ability to store the credential data input by the user on the Tower controller system in a way that allows it to be later referenced by an Ansible playbook, such as environment or extra variables. The above Injector Configuration will create a file called kubeconfig on the controller containing the content the user enters in the kube_config field of the Credential. The contents of the kubeconfig file created on the controller are then stored inside an environment variable on the Tower controller. The modules in the community.kubernetes collection by default look for the Kubeconfig in the environment variable K8S_AUTH_KUBECONFIG.

Injector Configuration is described here in the Ansible documentation

When complete the configuration should look similar to the image below:

02-custom-credential-type
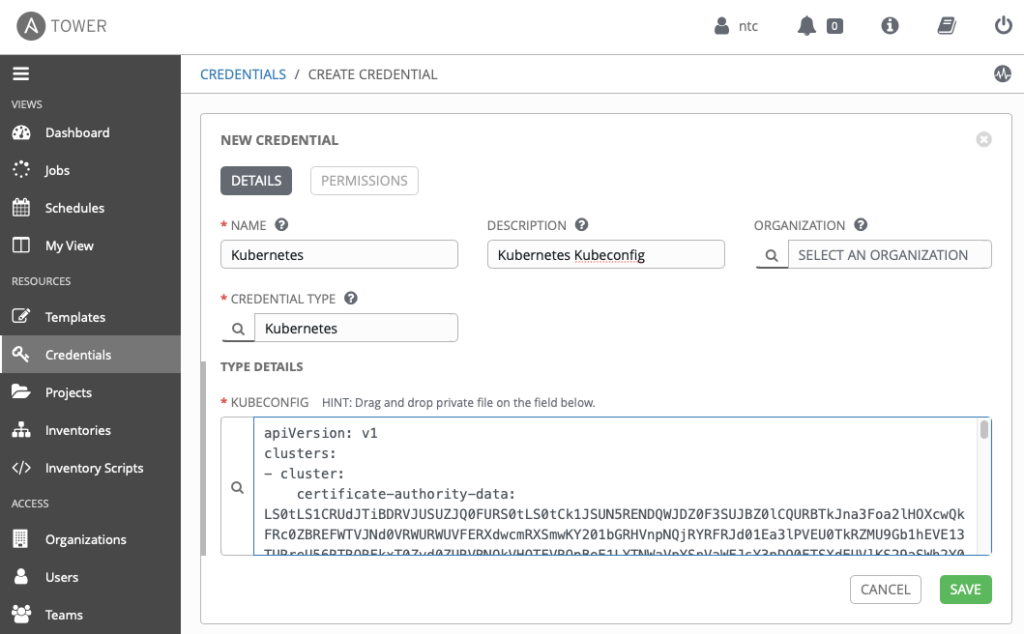
  1. Navigate to Credentials and add a new Credential.
  2. In the Credential Type, select the Kubernetes custom Credential Type that was just created. In the Kubeconfig field, copy/paste the contents of your Kubeconfig file (usually ~/.kube/config). Your configuration should look similar to the following:
03-kubernetes-credential

Once you click Save, notice that the Kubeconfig contents are encrypted

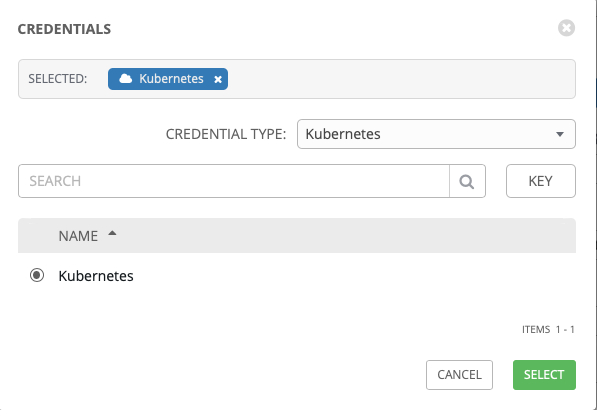
  1. Apply the configuration to the Job Template. Navigate to Resources > Templates and under Credentials search for the Kubernetes credential we just defined. Under Credential Type select Kubernetes.
04-select-credential-type

When finished, your template should look similar to this:

05-template-with-credential

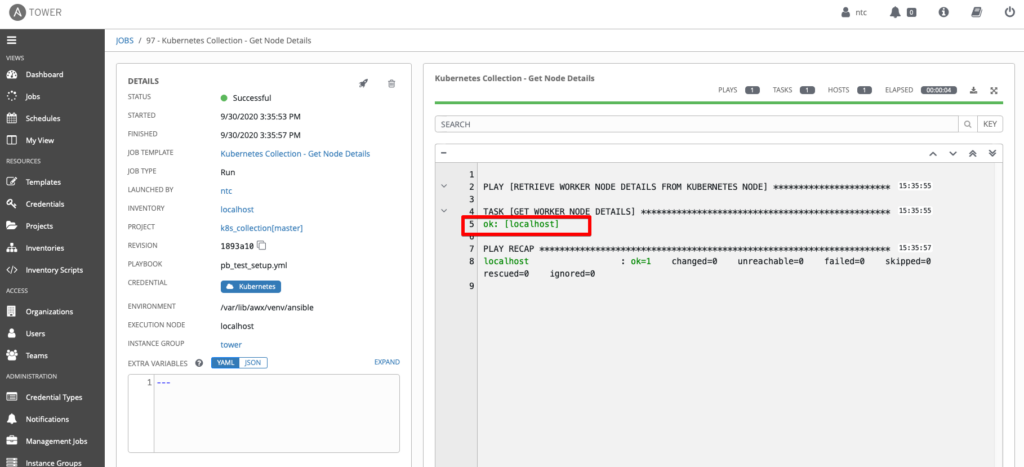
We are now ready to execute the playbook in Tower. If all is working correctly, we should have a successful job completion…

06-get-info-job-success

In the case of our setup we were using Amazon EKS for our Kubernetes cluster, so we also had to install the AWS CLI on the Tower controller, create an AWS credential in Tower containing the AWS API keys, and apply the AWS credential to the job template.

As you can see, the job was successful but it wasn’t very exciting because we aren’t yet displaying any of the information that we collected. In the next section, we’ll look at how to display and parse the output.

Displaying and Parsing Output

In order to display data, we first need to register a variable to store the output of the task and then create a second task using the debug module to display the variable. In the below playbook, I have added the register command to the initial task to store the output of the task in a variable called node_result, and added a debug task below it to display the registered variable.

  tasks:
  - name: GET WORKER NODE DETAILS
    community.kubernetes.k8s_info:
      kind: Node
      namespace: default
    register: node_result

  - name: DISPLAY OUTPUT
    debug:
      msg: "{{ node_result }}"

When the above playbook is run, the debug task will display a large amount of data about the Kubernetes worker node(s).


{
    "msg": {
        "changed": false,
        "resources": [
            {
                "metadata": {
                    "name": "ip-172-17-13-155.us-east-2.compute.internal",
                    "selfLink": "/api/v1/nodes/ip-172-17-31-155.us-east-2.compute.internal",
                    "uid": "27a57359-4019-458e-988f-9d4984e74662",
                    "resourceVersion": "275328",
                    "creationTimestamp": "2020-09-29T18:52:11Z",
                    "labels": {
                        "beta.kubernetes.io/arch": "amd64",
                        "beta.kubernetes.io/instance-type": "t3.medium",
                        "beta.kubernetes.io/os": "linux",
                        "eks.amazonaws.com/nodegroup": "eks-nodegroup",
                        "eks.amazonaws.com/nodegroup-image": "ami-0c619f57dc7e552a0",
                        "eks.amazonaws.com/sourceLaunchTemplateId": "lt-0ac1bb9bae7ecb7f6",
                        "eks.amazonaws.com/sourceLaunchTemplateVersion": "1",
                        "failure-domain.beta.kubernetes.io/region": "us-east-2",
                        "failure-domain.beta.kubernetes.io/zone": "us-east-2a",
                        "kubernetes.io/arch": "amd64",
                        "kubernetes.io/hostname": "ip-172-17-13-155.us-east-2.compute.internal",
                        "kubernetes.io/os": "linux",
                        "node.kubernetes.io/instance-type": "t3.medium",
                        "topology.kubernetes.io/region": "us-east-2",
                        "topology.kubernetes.io/zone": "us-east-2a"
                    },
                    "annotations": {
                        "node.alpha.kubernetes.io/ttl": "0",
                        "volumes.kubernetes.io/controller-managed-attach-detach": "true"
                    }
                },
                "spec": {
                    "providerID": "aws:///us-east-2a/i-0ba92f585eebfae76"
                },
                "status": {
                    "capacity": {
                        "attachable-volumes-aws-ebs": "25",
                        "cpu": "2",
                        "ephemeral-storage": "20959212Ki",
                        "hugepages-1Gi": "0",
                        "hugepages-2Mi": "0",
                        "memory": "3977908Ki",
                        "pods": "17"
                    },
                    "allocatable": {
                        "attachable-volumes-aws-ebs": "25",
                        "cpu": "1930m",
                        "ephemeral-storage": "18242267924",
                        "hugepages-1Gi": "0",
                        "hugepages-2Mi": "0",
                        "memory": "3422900Ki",
                        "pods": "17"
                    },
                    "conditions": [
                        {
                            "type": "MemoryPressure",
                            "status": "False",
                            "lastHeartbeatTime": "2020-09-30T20:24:06Z",
                            "lastTransitionTime": "2020-09-29T18:52:11Z",
                            "reason": "KubeletHasSufficientMemory",
                            "message": "kubelet has sufficient memory available"
                        },
                        {
                            "type": "DiskPressure",
                            "status": "False",
                            "lastHeartbeatTime": "2020-09-30T20:24:06Z",
                            "lastTransitionTime": "2020-09-29T18:52:11Z",
                            "reason": "KubeletHasNoDiskPressure",
                            "message": "kubelet has no disk pressure"
                        },
                        {
                            "type": "PIDPressure",
                            "status": "False",
                            "lastHeartbeatTime": "2020-09-30T20:24:06Z",
                            "lastTransitionTime": "2020-09-29T18:52:11Z",
                            "reason": "KubeletHasSufficientPID",
                            "message": "kubelet has sufficient PID available"
                        },
                        {
                            "type": "Ready",
                            "status": "True",
                            "lastHeartbeatTime": "2020-09-30T20:24:06Z",
                            "lastTransitionTime": "2020-09-29T18:52:31Z",
                            "reason": "KubeletReady",
                            "message": "kubelet is posting ready status"
                        }
                    ],
                    "addresses": [
                        {
                            "type": "InternalIP",
                            "address": "172.17.31.155"
                        },
                        {
                            "type": "ExternalIP",
                            "address": "13.14.131.143"
                        },
                        {
                            "type": "Hostname",
                            "address": "ip-172-17-31-155.us-east-2.compute.internal"
                        },
                        {
                            "type": "InternalDNS",
                            "address": "ip-172-17-31-155.us-east-2.compute.internal"
                        },
                        {
                            "type": "ExternalDNS",
                            "address": "ec2-13-14-131-143.us-east-2.compute.amazonaws.com"
                        }
                    ],
                    "daemonEndpoints": {
                        "kubeletEndpoint": {
                            "Port": 10250
                        }
                    },
                    "nodeInfo": {
                        "machineID": "ec2475ce297619b1bcfe0d56602b5284",
                        "systemUUID": "EC2475CE-2976-19B1-BCFE-0D56602B5284",
                        "bootID": "d591d21a-46de-4011-8941-12d72cb5950e",
                        "kernelVersion": "4.14.193-149.317.amzn2.x86_64",
                        "osImage": "Amazon Linux 2",
                        "containerRuntimeVersion": "docker://19.3.6",
                        "kubeletVersion": "v1.17.11-eks-cfdc40",
                        "kubeProxyVersion": "v1.17.11-eks-cfdc40",
                        "operatingSystem": "linux",
                        "architecture": "amd64"
                    },
                    "images": [
                        {
                            "names": [
                                "ceosimage/4.24.2.1f:latest"
                            ],
                            "sizeBytes": 1768555566
                        },
                        {
                            "names": [
                                "602401143452.dkr.ecr.us-east-2.amazonaws.com/amazon-k8s-cni@sha256:400ab98e321d88d57b9ffd15df51398e6c2c6c0167a25838c3e6d9637f6f5e0c",
                                "602401143452.dkr.ecr.us-east-2.amazonaws.com/amazon-k8s-cni:v1.6.3-eksbuild.1"
                            ],
                            "sizeBytes": 282945379
                        },
                        {
                            "names": [
                                "nfvpe/multus@sha256:9a43e0586a5e6cb33f09a79794d531ee2a6b97181cae12a82fcd2f2cd24ee65a",
                                "nfvpe/multus:stable"
                            ],
                            "sizeBytes": 277329369
                        },
                        {
                            "names": [
                                "602401143452.dkr.ecr.us-east-2.amazonaws.com/eks/kube-proxy@sha256:cbb2c85cbaa3d29d244eaec6ec5a8bbf765cc651590078ae30e9d210bac0c92a",
                                "602401143452.dkr.ecr.us-east-2.amazonaws.com/eks/kube-proxy:v1.17.9-eksbuild.1"
                            ],
                            "sizeBytes": 130676901
                        },
                        {
                            "names": [
                                "602401143452.dkr.ecr.us-east-2.amazonaws.com/eks/coredns@sha256:476c154960a843ac498376556fe5c42baad2f3ac690806b9989862064ab547c2",
                                "602401143452.dkr.ecr.us-east-2.amazonaws.com/eks/coredns:v1.6.6-eksbuild.1"
                            ],
                            "sizeBytes": 40859174
                        },
                        {
                            "names": [
                                "602401143452.dkr.ecr.us-east-2.amazonaws.com/eks/pause@sha256:1cb4ab85a3480446f9243178395e6bee7350f0d71296daeb6a9fdd221e23aea6",
                                "602401143452.dkr.ecr.us-east-2.amazonaws.com/eks/pause:3.1-eksbuild.1"
                            ],
                            "sizeBytes": 682696
                        }
                    ]
                },
                "apiVersion": "v1",
                "kind": "Node"
            }
        ],
        "ansible_facts": {
            "discovered_interpreter_python": "/usr/libexec/platform-python"
        },
        "failed": false
    },
    "_ansible_verbose_always": true,
    "_ansible_no_log": false,
    "changed": false
  }

What if we are only looking for a subset of that data? This is where a handy filter that is available in Ansible called json_query comes in. The json_query filter can be invoked by using the pipe | symbol followed by the json_query command and passing in a query as an argument. A query can be built to parse the JSON output and return specific data that we are looking for. Let’s say we wanted to return only the IP addressing assigned to the worker node. To do this, let’s add another set of tasks to the playbook:

  - name: SET VARIABLE STORING EKS WORKER NODE ADDRESS
    set_fact:
      eks_worker_address: "{{ node_result | json_query(query) }}"
    vars:
      query: "resources[].status.addresses"
  
  - name: DISPLAY EKS WORKER ADDRESS
    debug:
      msg: "{{ eks_worker_address }}"

Here we are using the set_fact module to set another variable called eks_worker_address that will contain our filtered results. The task variable query contains the query syntax that is passed to the json_query filter above. Breaking down the query, in the previous node_result variable output it can be seen that resources is a List containing many elements. The double brackets [] next to resources in the query instructs the filter to return all elements in the list. Next, under resources we have a number of dictionary keys, one of which is the status key. The .status after resources[] will filter the results to only content under the status key. Finally we have .addresses, which is a key that references another list containing all addresses on the worker node. When the task is run, the output should look similar to this:


"msg": [
    [
        {
            "type": "InternalIP",
            "address": "172.17.13.155"
        },
        {
            "type": "ExternalIP",
            "address": "3.14.130.143"
        },
        {
            "type": "Hostname",
            "address": "ip-172-17-13-155.us-east-2.compute.internal"
        },
        {
            "type": "InternalDNS",
            "address": "ip-172-17-13-155.us-east-2.compute.internal"
        },
        {
            "type": "ExternalDNS",
            "address": "ec2-3-14-130-143.us-east-2.compute.amazonaws.com"
        }
    ]
]

What if we wanted to filter this further and just return the External DNS name of our Kubernetes worker node? To accomplish this, we can filter on the type key in the list of addresses for the “ExternalDNS” value. To do this, the query in the task can be modified as shown below:

  - name: SET VARIABLE STORING EKS WORKER NODE ADDRESS
    set_fact:
      eks_worker_address: "{{ node_result | json_query(query) }}"
    vars:
      query: "resources[].status.addresses[?type=='ExternalDNS']"

Now the output is limited to just the ExternalDNS…


{
    "msg": [
        [
            {
                "type": "ExternalDNS",
                "address": "ec2-3-14-130-143.us-east-2.compute.amazonaws.com"
            }
        ]
    ],
    "_ansible_verbose_always": true,
    "_ansible_no_log": false,
    "changed": false
}

This only scratches the surface of what is possible when parsing with the json_query filter. Behind the scenes, Ansible is using a utility called JMESPATH. The query language in JMESPATH is the same syntax that is used for the query argument passed to the json_query filter. Have a look at the documentation to learn more.

Deploying Kubernetes Resources

In this final section, I’ll discuss using the community.kubernetesk8s module to initiate deployment of a Busybox pod in Kubernetes. Busybox is a lightweight utility container that is often used to validate and troubleshoot deployments. The k8s module can be used to deploy resources into Kubernetes by launching them from a Kubernetes definition file. For those familiar with using the kubectl command line utility, this is equivalent to running the command kubectl apply -f [deployment_file]. Given that we will be deploying a pod from a definition file, we must first create the definition file:

apiVersion: v1
kind: Pod
metadata:
  name: busybox
  labels:
    app: busybox
  namespace: default
spec:
  containers:
  - name: busybox
    image: busybox
    command: ['sleep','3600']
    imagePullPolicy: IfNotPresent
  restartPolicy: Always

The above yaml should be saved as busybox.yml. Next we create an Ansible playbook called pb_deploy_busybox.yml that will use the k8s module to apply the definition file.

---
- name: DEPLOY BUSYBOX
  hosts: localhost
  gather_facts: no
  
  tasks:

  - name: DEPLOY BUSYBOX TO KUBERNETES
    community.kubernetes.k8s:
        definition: "{{ lookup('template', 'busybox.yml') | from_yaml }}"
        state: present

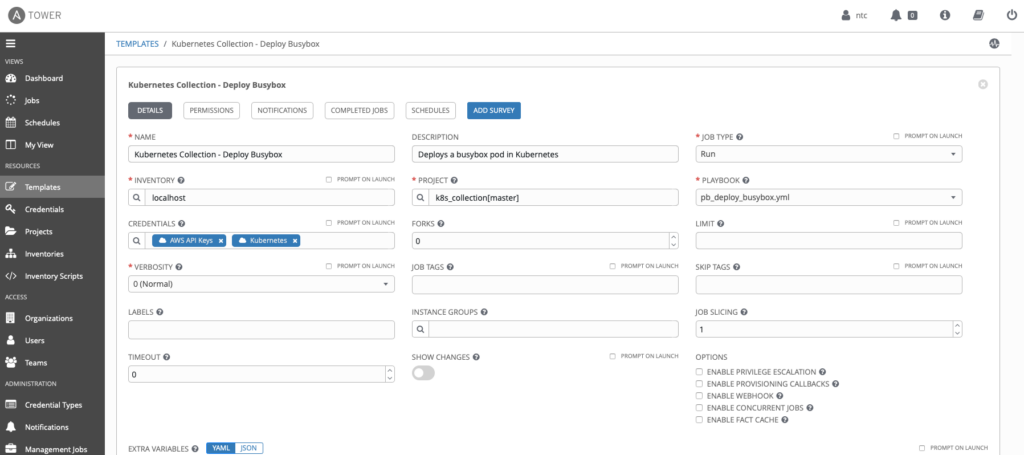
Commit this to the the source control repository, and synchronize the project in Ansible Tower. The Job Template in Ansible Tower should look similar to this:

07-busybox-template

Here’s the output that will be shown when the template is launched in Ansible Tower:

PLAY [DEPLOY BUSYBOX] **********************************************************
09:44:35

TASK [DEPLOY BUSYBOX TO KUBERNETES] ********************************************
09:44:35

changed: [localhost]

PLAY RECAP *********************************************************************
09:44:37

localhost                  : ok=1    changed=1    unreachable=0    failed=0    skipped=0    rescued=0    ignored=0

From the above output we can assume the pod was deployed successfully, and we could confirm from the command line using the kubectl get pod command. However, we can also use a similar output parsing strategy as was used in the previous section to gather information about running pods. Here we’ll use the k8s_info module to report on running Kubernetes pods, and filter the output using the json_query filter. Add another playbook called pb_display_pod_info.yml.

---
- name: RETRIEVE POD DETAILS FROM KUBERNETES
  hosts: localhost
  gather_facts: no
  
  collections: 
    - community.kubernetes

  tasks:
  - name: GET POD DETAILS
    community.kubernetes.k8s_info:
      kind: Pod
      namespace: default
    register: pod_result

  - name: DISPLAY OUTPUT
    debug:
      msg: "{{ pod_result }}"

This once again yields a lot of data, on which we can use json_query to filter the output to what we want to see. Let’s add a few more tasks to filter the output.

  - name: FILTER FOR POD NAME AND STATE
    set_fact:
      filtered_result: "{{ pod_result | json_query(query) }}"
    vars:
      query: "resources[].{name: status.containerStatuses[].name, status: status.containerStatuses[].state}"
 
  - name: DISPLAY FILTERED RESULTS
    debug:
      msg: "{{ filtered_result }}"

This time we are using a slightly different syntax for the query which creates a dictionary containing the values selected from the larger JSON output produced in the previous task, and that is stored in pod_result. Within the curly brackets {}, the name key is what we chose to hold the value retrieved by referencing status.containerStatuses[].name. Similarly, the status key holds the state of the container retrieved from status.containerStatuses[].state. The final output should be similar to below.


{
    "msg": [
        {
            "name": [
                "busybox"
            ],
            "status": [
                {
                    "running": {
                        "startedAt": "2020-10-01T13:44:38Z"
                    }
                }
            ]
        }
    ]


Conclusion

This method of filtering and storing data can be used not only for display purposes, but also to dynamically populate variables that can later be used in sub-sequent Ansible tasks if needed.

That does it for this post, I hope it provides some useful hints to get up and running quickly automating Kubernetes with Ansible Tower!

-Matt


ntc img
ntc img

Contact Us to Learn More

Share details about yourself & someone from our team will reach out to you ASAP!