Scalable Network Automation with Python Generators

Blog Detail

In large-scale network automation, memory management can make or break your workflows when dealing with hundreds or thousands of devices. This post dives into how Python generators can help you handle data more efficiently by processing it on-the-fly instead of loading everything into memory. With examples from real-world network automation tasks and tips for identifying and optimizing memory-heavy code, you’ll see how generators can make your automation code more scalable and robust.

The Challenge of Memory Usage in Large-Scale Automation

When prototyping network automation solutions in Python, it’s not uncommon to develop against a small set of devices—only to find that the code doesn’t scale well when used in large production environments. This is often due to the memory overhead of storing large amounts of data in memory, which can lead to performance issues and even crashes. A common approach to fetching data for multiple devices is to use loops or list comprehensions, which can quickly consume memory when dealing with large datasets.

How Python Generators Can Help

Generators in Python are a special type of iterable, similar to a function that returns a list. But instead of returning all the values at once, they yield one value at a time, allowing for lazy evaluation. This means that the values are generated on-the-fly and only when needed, which can be more memory efficient for large environments.

Example of a Typical Network Automation Task

A common use case for network automation is to retrieve data from a remote system, for example a CMDB (Configuration Management Database) or a network SOT (Source of Truth) such as Nautobot. Let’s consider a scenario where we need to fetch device data using Nautobot’s REST API. A traditional approach might involve fetching all the data at once and storing it in a list, like this:

import requests

TEST_API_HEADERS = {
    "Accept": "application/json",
    "Authorization": "Token aaaaaaaaaaaaaaaaaaaaaaaaaaaaaaaaaaaaaaaa",
}


def get_nautobot_devices():
    data = requests.get(
        "https://demo.nautobot.com/api/dcim/devices",
        headers=TEST_API_HEADERS,
        timeout=60,
    ).json()
    devices = data["results"]
    while data["next"]:
        data = requests.get(data["next"], headers=TEST_API_HEADERS, timeout=60).json()
        devices.extend(data["results"])
    return devices

for device in get_nautobot_devices():
    print(device["name"], device["url"])

In this example, Nautobot will return a paginated list of devices, and we’re fetching all of the data for all devices and storing it in a list. Here’s a sample of the data that’s returned for just one device:

{
    "id": "89b2ac3b-1853-4eeb-9ea6-6a081999bd3c",
    "object_type": "dcim.device",
    "display": "ams01-dist-01",
    "url": "https://demo.nautobot.com/api/dcim/devices/89b2ac3b-1853-4eeb-9ea6-6a081999bd3c/",
    "natural_slug": "ams01-dist-01_nautobot-airports_ams01_netherlands_europe_89b2",
    "face": null,
    "local_config_context_data": null,
    "local_config_context_data_owner_object_id": null,
    "name": "ams01-dist-01",
    "serial": "",
    "asset_tag": null,
    "position": null,
    "device_redundancy_group_priority": null,
    "vc_position": null,
    "vc_priority": null,
    "comments": "",
    "local_config_context_schema": null,
    "local_config_context_data_owner_content_type": null,
    "device_type": {
        "id": "4bf23e23-4eb1-4fae-961c-edd6f8cbaaf1",
        "object_type": "dcim.devicetype",
        "url": "https://demo.nautobot.com/api/dcim/device-types/4bf23e23-4eb1-4fae-961c-edd6f8cbaaf1/"
    },
    "status": {
        "id": "9f38bab4-4b47-4e77-b50c-fda62817b2db",
        "object_type": "extras.status",
        "url": "https://demo.nautobot.com/api/extras/statuses/9f38bab4-4b47-4e77-b50c-fda62817b2db/"
    },
    "role": {
        "id": "40567487-6328-4dac-b7b5-b789d1154bf0",
        "object_type": "extras.role",
        "url": "https://demo.nautobot.com/api/extras/roles/40567487-6328-4dac-b7b5-b789d1154bf0/"
    },
    "tenant": {
        "id": "1f7fbd07-111a-4091-81d0-f34db26d961d",
        "object_type": "tenancy.tenant",
        "url": "https://demo.nautobot.com/api/tenancy/tenants/1f7fbd07-111a-4091-81d0-f34db26d961d/"
    },
    "platform": {
        "id": "aa07ca99-b973-4870-9b44-e1ea48c23cc9",
        "object_type": "dcim.platform",
        "url": "https://demo.nautobot.com/api/dcim/platforms/aa07ca99-b973-4870-9b44-e1ea48c23cc9/"
    },
    "location": {
        "id": "9e39051b-e968-4016-b0cf-63a5607375de",
        "object_type": "dcim.location",
        "url": "https://demo.nautobot.com/api/dcim/locations/9e39051b-e968-4016-b0cf-63a5607375de/"
    },
    "rack": null,
    "primary_ip4": null,
    "primary_ip6": null,
    "cluster": null,
    "virtual_chassis": null,
    "device_redundancy_group": null,
    "software_version": null,
    "secrets_group": null,
    "controller_managed_device_group": null,
    "software_image_files": [],
    "created": "2023-09-21T00:00:00Z",
    "last_updated": "2024-09-24T15:20:12.443339Z",
    "notes_url": "https://demo.nautobot.com/api/dcim/devices/89b2ac3b-1853-4eeb-9ea6-6a081999bd3c/notes/",
    "custom_fields": {
        "demo_custom_field": null
    },
    "tags": [],
    "parent_bay": null
}

If we only needed to retrieve the name and URL for each device, we could modify the get_nautobot_devices function to discard all of the other data. But then we wouldn’t be able to reuse this function for other use cases where we might need a different set of fields. This is a perfect opportunity to convert get_nautobot_devices into a generator.

Example: Scalable Network Data Collection

To turn our example get_nautobot_devices function into a generator, we can simply remove the return statement and add yield statements instead. This will allow us to iterate over the devices one chunk at a time, without storing all of the data in memory at once. Note that since we are yielding from another iterable (a list of “results” in this case), we must use the yield from statement. The yield from statement tells Python to yield all of the values in the provided iterable one by one. In this case, the Nautobot API is returning pages of 50 devices at a time so we are storing the data for at most 50 devices in memory at once. The chunk size may need to be adjusted based on individual use cases.

def get_nautobot_devices():
    data = requests.get(
        "https://demo.nautobot.com/api/dcim/devices",
        headers=TEST_API_HEADERS,
        timeout=60,
    ).json()
    yield from data["results"]  # <-- Yield the first set of devices
    while data["next"]:
        data = requests.get(data["next"], headers=TEST_API_HEADERS, timeout=60).json()
        yield from data["results"]  # <-- Yield the next set of devices

for device in get_nautobot_devices():
    print(device["name"], device["url"])

Comparison

This example was tested against a Nautobot instance with 900 devices. The function that compiled a list of all devices consumed around 5MB of memory, while the generator consumed only 1MB. The generator will generally use the same amount of memory regardless of the number of devices, while the memory consumption of the list will increase linearly with the number of devices.

Code Execution Diagrams

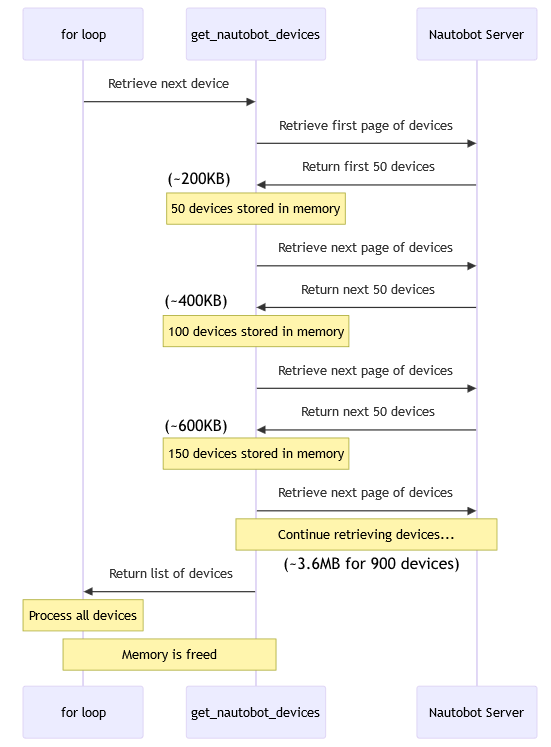
This first diagram illustrates how a “for loop” interacts with the function that returns a list. The list is created once and then the “for loop” iterates over the devices one at a time, fetching the next device from the list each time. You can see how this example has to compile the entire list of devices before the loop can start iterating over them.

nautobote device

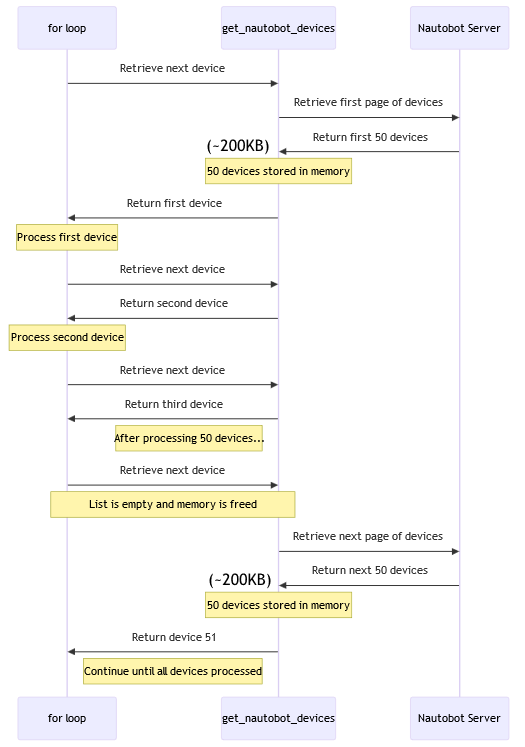
The next diagram illustrates how the loop interacts with the generator. The code switches back and forth between the generator and the “for loop” as it iterates over the devices.

loop

Conclusion

In large-scale network automation, memory management is crucial to maintaining performance and avoiding system crashes. By leveraging Python generators, we can significantly reduce memory consumption when dealing with large datasets, making our automation code more scalable and efficient. The example with Nautobot’s REST API clearly illustrates how generators yield memory savings by fetching data lazily, one page at a time, instead of storing everything in memory.

Identifying Memory-Heavy Code

Before optimizing with generators, it’s important to identify areas of the code that may be causing memory issues. A good starting point is to look for large data structures that are fully loaded into memory, such as lists or dictionaries, especially in loops or recursive calls.

You can use tools like grep to scan the codebase for common patterns that may be good candidates for optimization. For example:

Find loops that call functions: If the called function returns a list, it could potentially be converted into a generator.

grep -rn "^ *for.*():" /path/to/your/code

Find append, extend, or update operations in loops: This is a common pattern where a list or dictionary is incrementally built up, possibly consuming a lot of memory.

grep -rn "\(append\|extend\|update\)(" /path/to/your/code

Pitfalls to Avoid

When using generators, be aware of the following pitfalls:

  • Don’t call the generator multiple times: Each time you call a generator, it will start from the beginning. Calling the generator multiple times will increase the processing time, which may not be necessary.
  • Don’t store the generator’s output in a variable: If you store the output of the generator in a variable (devices = list(get_nautobot_devices())), Python will loop through the entire generator and store its output in a list, negating any potential memory savings. Instead, use the generator directly in a loop or comprehension.

Next Steps

If you identify any memory-heavy areas in your code, consider refactoring functions that return large datasets into generators. This will allow you to process large amounts of data in a more memory-efficient way, as demonstrated in the Nautobot API example.

Incorporating generators into your network automation tools can ensure that your code scales efficiently, even in environments with hundreds or thousands of devices. Consider applying this approach to your own projects and experience firsthand the performance benefits.

Additional Resources

-Gary


ntc img
ntc img

Contact Us to Learn More

Share details about yourself & someone from our team will reach out to you ASAP!

The Not-So-Subtle Art of Debugging

Blog Detail

Debugging is a crucial aspect of software development that ensures the quality and functionality of the final product. In this post, we provide valuable tips and tricks in the context of Nautobot to help streamline the debugging process and maximize efficiency.

Introduction

The development workflow of an app:

  1. Put some code together
  2. Publish
  3. Receive praise for your amazing job

Right?

Well, not really. Programming is a complex task that requires careful planning and, more often than not, some iteration. Even with many controls and care, it will still present challenges along the way. As a Nautobot App developer, you want the tools to understand what is happening in those situations where things are not behaving as expected. Here, we present one of the tools you need in your toolbox as a Nautobot App developer: debugging. What we offer here is not specific to Nautobot, but we want to present it in the context of Nautobot App development and provide some value by reviewing these tools in the proper context for you.

One of the fantastic characteristics of Nautobot is its extension capabilities. This includes custom fields, computed fields, tags, etc. However, its power goes beyond that if you are willing to put some extra code together. Nautobot Apps are a powerful option that has virtually no limit to what you can do. The Developer Guide is an excellent place to start.

While developing your app, you have to spend so many hours with your code that sometimes you receive an error report from a user, or you see an error in a log, and right away, you know where the error is. Sometimes, you can see the actual line of code and the change you need to make just in your head. Other times, you have no idea.

Debugging can be helpful for those cases where you need to investigate what is happening. Programming is sometimes like a puzzle and debugging helps you to figure it out. Here, we want to provide some introductory guidance as well as some practical tips on debugging Nautobot and Nautobot Apps.

What Is Debugging?

Debugging is the process of finding and resolving bugs (i.e., errors in the code). Here, however, we narrow down the conversation to using the debugger, a software tool that allows us to monitor and understand the execution of our code. This is also known as interactive debugging, but we will call it just debugging for simplicity.

The Python ecosystem provides a standard debugger: pdb. This debugger is part of the standard library and will help us navigate through our code. The most important part of the process is the ability to decide where in your code you want to stop and have the possibility to look around. You can, for example, see which variables are available, which values they have, and much more.

Before moving into a more practical section, we just want to emphasize that debugging is one of the tools you need to have under your belt, but it is definitely not the only one. We see many engineers tackling their issues with tools such as loggers, profilers, static code analysis, etc. As always, the right tool for the right problem should be the guiding principle.

For some previous examples on the use of the debugger, you can check our previous post “pdb – How to Debug Your Code Like a Pro”.

Debugging Apps

Regardless of where in your app you are facing a problem, as long as you have Python code, you can just drop a breakpoint() and you are ready to look around. It could be a view, a model, or a test. You have your debugger available at all times.

A nice-to-have tool is pdb++. The standard pdb will give you all you need to work on your troubleshooting, but pdb++ is a drop-in replacement that will support all pdb commands and will give you some extra niceties, such as formatting and a sticky mode so you always know what is happening. There is, of course, the possibility of using an IDE debugging option. Even if that is your preferred choice, remember that it is usually a wrapper around pdb. You will find that in some situations, the IDE tools will not be available. And because they are GUI-based, IDE tools do not have as much flexibility.

You can install pdb++ easily with pip.

pip install pdbpp

Once you have pdb or pdb++ and you insert your breakpoint, you just run your app, and you are there. Let’s see, as an example, some code on the clean() method of a custom model with a breakpoint on the first line.

def clean (self):
    """Validate data key name is unique and it's in snake case."""
    breakpoint()
    super().clean()

    if not is_string_snake_case(self.data_key_name):
        raise ValidationError(
            {
                "data_key_name": "Value must only contain lowercase characters,"
                "words separated by underscore(_), and cannot start with a digit."
            }
    	)

When executing your code, you will have your interactive prompt.

It is recommended to enable the sticky mode if you are using pdb++; that way, the screen auto-refreshes whenever you move.

At this point, it is important to get familiar with the pdb commands. The basic ones include s(step), n(next), j(jump), c(continue). The official documentation of pdb will provide a comprehensive list of commands, but these basic ones can take you a long way down the road.

In the following sections, we will provide practical tips to make debugging easier and more effective in some specific cases.

Debugging Jobs

One typical case when building Nautobot Apps is the creation of jobs. Jobs are incredible tools because you are free to implement any kind of processing that you might need. You can process data within the application, integrate it with other systems, run compliance routines, etc. The important consideration in debugging is understanding that jobs run in a worker process that takes advantage of Celery. This means that, by default, the processing happens outside of the HTTP request lifecycle, which, of course, is what we want when our apps are running in production. However, when trying to understand the code and debug, it would be interesting to have a way to step through the code in the same manner we do it with other parts of our code.

The nautobot_config.py file allows you to add a configuration line that helps you accomplish this in your development environment. Needless to say, we should avoid this in production deployments.

CELERY_TASK_ALWAYS_EAGER=True

After this small configuration change, you can use breakpoint() in your jobs as you can anywhere else in the application.

A common situation when debugging is that you will need to repeat the process a couple of times while you create a mental model of what is happening. To do this with other parts of the application, you usually repeat the process. If you are testing the clean() method of a particular model, for example, you will need to create a couple of objects from the UI before you eventually figure it out. In the case of jobs, you will also execute your debugger multiple times. For this reason, an excellent time-saver option is to run your job from the command line. It might take a couple of minutes to put together the specific command with all the input parameters; but after you have it, you can use it multiple times, and it will give you back some time. The syntax for this is presented in the following command:

nautobot-server run_job <grouping_name>/<module_name>/<JobClassName>

You can also use

nautobot-server run_job --local <grouping_name>/<module_name>/<JobClassName>

The extra argument --local allows you to avoid running on a worker.

Debugging Unit Tests

Projects of significant size with actual stakes require that we follow best software engineering practices. One of those dreaded ones is the utilization of unit tests. We all hate unit tests, but we make peace with the idea because of its importance. Unit tests are essential in order to provide reliable, non-breaking software.

Unit tests are also code, and that means that we face problems similar to those that our app itself presents. Thus, it is not uncommon to have misbehaving unit tests that we need to debug and correct.

In nautobot, we can execute the full battery of tests with one single command:

invoke test

This presents two challenges from a debugging perspective:

  1. It runs it all, when we usually want to analyze one particular problematic test.
  2. It always creates and deletes the database.

These two points result in long waiting times, making the debugging much more cumbersome. Luckily, we have ways to work around this.

First, we can execute a specific unit test using the following syntax:

nautobot-server test nautobot_app_name.tests.test_file.MyTestCase.test_method

This gives us the control to execute only the necessary code, which makes it easier to replicate and reduces waiting time.

Second, most of the time, we can skip the costly process of creating and deleting the database—reducing the time it takes to run our tests. When running our tests, we can accomplish that using the additional flag --keepdb. For example, we can adapt our previous command to look like this:

nautobot-server test --keepdb nautobot_app_name.tests.test_file.MyTestCase.test_method

We usually use these two tips together to reduce the waiting time as much as possible to provide a better debugging experience.

Running all your tests is a must to make sure that your project is working as expected; this will usually also be tested in some CI/CD pipeline. But, regardless of how you run your tests, it is important to run the full battery before your deployment. The two tips we provide in this section are to troubleshoot, but that does not mean that it replaces practices and procedures for deployment.

Making Debugging Easier

Not all code is the same when it comes to debugging. Some patterns are harder and more cumbersome to understand when working with your debugger. You should try to make your code easier to understand from the get-go. The good news is that making your code more amenable for debugging does not require anything that you are not aware of already. It all boils down to following good practices and patterns to have clean code.

We would encourage you to have a couple of things in mind when coding that can make your debugging experience more enjoyable.

  1. Prefer linear flows (debugging multiple nested expressions is cumbersome).
  2. Keep your functions small (being able to see the right context is important when debugging).

These two simple things will help your app in general and are not specific to debugging, but they will make a big difference when you are chasing down those nasty bugs.


Conclusion

We all like coding, particularly building those sweet Nautobot Apps that will tremendously help our organization in its network automation efforts. We will definitely find ourselves in some situations where things go south; and having tools such as a debugger in our toolset could be the difference between rapid and efficient troubleshooting and a big headache. We hope that you feel energized about these tools and that you take these tips with you for the next time you face some coding challenges. This is your quick intro to the not-so-subtle art of debugging.

-Israel Pineda


ntc img
ntc img

Contact Us to Learn More

Share details about yourself & someone from our team will reach out to you ASAP!

Nautobot Apps and Data Model Relationships

Blog Detail

When developing a Nautobot App, there are multiple ways to integrate any new data models belonging to that App with the core data models provided by Nautobot itself. I’m writing to share a few quick tips about which approaches to choose.

Classes of Data Relationships

There are four basic classes of data relationships you might wish to implement in your App:

  1. One to One: Each record of type A relates to at most one record of type B and vice versa. For example, a VirtualChassis has at most one Device serving as the primary for that chassis, and a Device is the primary for at most one VirtualChassis.
  2. One to Many: Each record of type A relates to any number of records of type B, but each record of type B relates to at most one record of type A. For example, a Location may have many Racks, but each Rack has only one Location.
  3. Many to One: The reverse of the previous class. I’m calling it out as a separate item, because in some cases it needs to be handled differently when developing an App.
  4. Many to Many: Any number of records of type A relate to any number of records of type B. For example, a VRF might have many associated RouteTarget records as its import and export targets, and a RouteTarget might be reused across many VRF records.

Options for Implementing Data Relationships in Nautobot

The first, and seemingly easiest, approach to implement would be something like a CharField on your App’s model (or a String-type CustomField added to a core model) that identifies a related record(s) by its nameslug, or similar natural key. I’m including this only for completeness, as really you should never do this. It has many drawbacks, notably in terms of data validation and consistency. For example, there’s no inherent guarantee that the related record exists in the first place, or that it will continue to exist so long as you have a reference to it. Nautobot is built atop a relational database and as such has first-class support for representing and tracking object relationships at the database level. You should take advantage of these features instead!

The next, and most traditional, approach is to represent data relationships using native database features such as foreign keys. This has a lot of advantages, including database validation, data consistency, and optimal performance. In most cases, this will be your preferred approach when developing new data models in your App, but there are a few cases where it isn’t possible.

The final approach, which is specific to Nautobot, is to make use of Nautobot’s Relationship feature, which allows a user or developer to define arbitrary data relationships between any two models. This is an extremely powerful and flexible feature, and is especially useful to a Nautobot user who wishes to associate existing models in a new way, but from an App developer standpoint, it should often be your fallback choice rather than your first choice, because it lacks some of the performance advantages of native database constructs.

Implementing One-to-One Data Relationships

A one-to-one relationship between App data models, or between an App model and a core Nautobot model, should generally be implemented as a Django OneToOneField on the appropriate App data model. This is a special case of a ForeignKey and provides all of the same inherent performance and data consistency benefits. You can use Django features such as on_delete=models.PROTECT or on_delete=models.CASCADE to control how your data model will automatically respond when the other related model is deleted.

An example from the nautobot-firewall-models App:

class CapircaPolicy(PrimaryModel):
    """CapircaPolicy model."""

    device = models.OneToOneField(
        to="dcim.Device",
        blank=True,
        null=True,
        on_delete=models.CASCADE,
        related_name="capirca_policy",
    )

In this example, each CapircaPolicy maps to at most one Device, and vice versa. Deleting a Device will result in its associated CapircaPolicy being automatically deleted as well.

If, and only if, your App needs to define a new relationship between two core Nautobot models, you cannot use a OneToOneField because an App cannot directly modify a core model. In this case, your fallback option would be to create a one-to-one Relationship record as the way of adding this data relationship. This is a pretty rare case, so I don’t have a real-world example to point to, but it would conceptually be implemented using the nautobot_database_ready signal:

def handle_nautobot_database_ready(sender, *, apps, **kwargs):
    Relationship.objects.get_or_create(
        slug="originating_device_to_vrf",
        defaults={
            "name": "Originating Device to VRF",
            "type": RelationshipTypeChoices.TYPE_ONE_TO_ONE,
            "source_type": ContentType.objects.get_for_model(Device),
            "destination_type": ContentType.objects.get_for_model(VRF),
        },
    )

Implementing One-to-Many and Many-to-One Data Relationships

A one-to-many or many-to-one data relationship between two App models should be implemented as a standard Django ForeignKey field from the “many” model to the “one” model. The same approach works for a many-to-one relationship from an App model to a core Nautobot model.

An example from the nautobot-device-lifecycle-mgmt App:

class SoftwareLCM(PrimaryModel):
    """Software Life-Cycle Management model."""

    device_platform = models.ForeignKey(
        to="dcim.Platform",
        on_delete=models.CASCADE,
        verbose_name="Device Platform"
    )

In this example, many SoftwareLCM may all map to a single Platform, and deleting a Platform will automatically delete all such SoftwareLCM records.

Because, again, an App cannot directly modify a core model, this approach cannot be used for a one-to-many relation from an App model to a core model, or between two core models, because it would require adding a ForeignKey on the core model itself. In this case, you’ll need to create a Relationship, as in this example from the nautobot-ssot App’s Infoblox integration:

def nautobot_database_ready_callback(sender, *, apps, **kwargs):
    # ...

    # add Prefix -> VLAN Relationship
    relationship_dict = {
        "name": "Prefix -> VLAN",
        "slug": "prefix_to_vlan",
        "type": RelationshipTypeChoices.TYPE_ONE_TO_MANY,
        "source_type": ContentType.objects.get_for_model(Prefix),
        "source_label": "Prefix",
        "destination_type": ContentType.objects.get_for_model(VLAN),
        "destination_label": "VLAN",
    }
    Relationship.objects.get_or_create(name=relationship_dict["name"], defaults=relationship_dict)

Implementing Many-to-Many Data Relationships

A many-to-many data relationship involving App models should be implemented via a Django ManyToManyField. An example from the nautobot-circuit-maintenance App:

class NotificationSource(OrganizationalModel):
    # ...

    providers = models.ManyToManyField(
        Provider,
        help_text="The Provider(s) that this Notification Source applies to.",
        blank=True,
    )

One NotificationSource can provide notifications for many different Providers, and any given Provider may have multiple distinct NotificationSources.

Once again, the only exception is when a relationship between two core Nautobot models is desired, in which case use of a Relationship would be required. This is another fairly rare case and so I don’t have a real-world example to point to here, but it would follow the similar pattern to the other Relationship examples above.

Conclusion and Summary

Here’s a handy table summarizing which approach to take for various data relationships:

Model AModel BCardinalityRecommended Approach
App modelApp modelOne-to-OneOneToOneField on either model
App modelApp modelOne-to-ManyForeignKey on model B
App modelApp modelMany-to-OneForeignKey on model A
App modelApp modelMany-to-ManyManyToManyField on either model
App modelCore modelOne-to-OneOneToOneField on model A
App modelCore modelOne-to-ManyRelationship definition
App modelCore modelMany-to-OneForeignKey on model A
App modelCore modelMany-to-ManyManyToManyField on model A
Core modelCore modelOne-to-OneRelationship definition
Core modelCore modelOne-to-ManyRelationship definition
Core modelCore modelMany-to-OneRelationship definition
Core modelCore modelMany-to-ManyRelationship definition

Conclusion

I hope you’ve found this post useful. Go forth and model some data!

-Glenn


ntc img
ntc img

Contact Us to Learn More

Share details about yourself & someone from our team will reach out to you ASAP!