Introduction to Structured Data – Part 2

Blog Detail

In Part 1 of the Introduction to Structured Data, David Cole explained what structured data is and why it is important. In Part 2, we’ll take a look at interacting with structured data in a programmatic manner.

To keep the concepts digestible, we’ll utilize the examples provided in Part 1 throughout this blog.

CSV

There are a number of libraries that can interact with Excel, but the easiest way to interact with spreadsheets in Python is to convert the spreadsheet to a CSV file.

The first line of the CSV file is the header line. The subsequent lines are the data that we’ll be working with. The data in each column corresponds with its column header line.

The first two lines of the CSV file are represented below:

Device Name,Manufacturer,Model,Serial Number,Site Name,Address,City,State,Zip,Country,Mgmt IP,Network Domain,Jump Host,Support
HQ-R1,Cisco,ISR 4431,KRG645782,Headquarters,601 E Trade St,Charlotte,NC,28202,USA,192.168.10.2,Access,10.20.5.5,HQ IT 704-123-4444

Below is a simple Python script to convert the CSV contents into a Python dictionary.

import csv

data = []
with open("structured-data.csv") as csv_file:
    rows = csv.reader(csv_file)
    for row in rows:
        data.append(row)

headers = data[0]
data.pop(0)
data_dict = []

for row in data:
    inventory_item = dict()
    for item in range(len(row)):
        inventory_item[headers[item]] = row[item]
    data_dict.append(inventory_item)

When the CSV file is opened and rendered in Python, it’s converted into a list of lists. The first two lines of this representation are below.

[['Device Name', 'Manufacturer', 'Model', 'Serial Number', 'Site Name', 'Address', 'City', 'State', 'Zip', 'Country', 'Mgmt IP', 'Network Domain', 'Jump Host', 'Support'], ['HQ-R1', 'Cisco', 'ISR 4431', 'KRG645782', 'Headquarters', '601 E Trade St', 'Charlotte', 'NC', '28202', 'USA', '192.168.10.2', 'Access', '10.20.5.5', 'HQ IT 704-123-4444']]

As you can see, the first item in the list is a list of the CSV headers. The second list item is a list of the first row of the CSV. This continues until all rows are represented.

The Python script assumes the first row is the headers row, assigns a variable to that list item, and then removes that list item from the overall list. It then iterates through the list and creates a list of dictionaries that utilize the header items as dictionary keys and the row items as their corresponding dictionary values.

The result is a data structure that represents the data from the CSV file.

In [3]: data_dict[0]
Out[3]: 
{'Device Name': 'HQ-R1',
 'Manufacturer': 'Cisco',
 'Model': 'ISR 4431',
 'Serial Number': 'KRG645782',
 'Site Name': 'Headquarters',
 'Address': '601 E Trade St',
 'City': 'Charlotte',
 'State': 'NC',
 'Zip': '28202',
 'Country': 'USA',
 'Mgmt IP': '192.168.10.2',
 'Network Domain': 'Access',
 'Jump Host': '10.20.5.5',
 'Support': 'HQ IT 704-123-4444'}

JSON

JSON is an acronym that stands for “JavaScript Object Notation”. It is a serialization format that represents structured data in a textual format. The structured data that represents the textual string in JSON is essentially a Python dictionary.

This can be seen in the example.

In [4]: import json

In [5]: type(data_dict)
Out[5]: list

In [6]: type(data_dict[0])
Out[6]: dict

In [8]: data_dict[0]

In [8]: data_dict[0]
Out[8]: 
{'Device Name': 'HQ-R1',
 'Manufacturer': 'Cisco',
 'Model': 'ISR 4431',
 'Serial Number': 'KRG645782',
 'Site Name': 'Headquarters',
 'Address': '601 E Trade St',
 'City': 'Charlotte',
 'State': 'NC',
 'Zip': '28202',
 'Country': 'USA',
 'Mgmt IP': '192.168.10.2',
 'Network Domain': 'Access',
 'Jump Host': '10.20.5.5',
 'Support': 'HQ IT 704-123-4444'}

In [12]: json_data = json.dumps(data_dict[0])

In [13]: type(json_data)
Out[13]: str

In [14]: json_data
Out[14]: '{"Device Name": "HQ-R1", "Manufacturer": "Cisco", "Model": "ISR 4431", "Serial Number": "KRG645782", "Site Name": "Headquarters", "Address": "601 E Trade St", "City": "Charlotte", "State": "NC", "Zip": "28202", "Country": "USA", "Mgmt IP": "192.168.10.2", "Network Domain": "Access", "Jump Host": "10.20.5.5", "Support": "HQ IT 704-123-4444"}'

You can convert the entire data_dict into JSON utilizing the same json.dumps() method as well.

In the above example, we took the first list item from data_dict and converted it to a JSON object. JSON objects can be converted into a Python dictionary utilizing the json.loads() method.

In [17]: new_data = json.loads(json_data)

In [18]: type(new_data)
Out[18]: dict

In [19]: new_data
Out[19]: 
{'Device Name': 'HQ-R1',
 'Manufacturer': 'Cisco',
 'Model': 'ISR 4431',
 'Serial Number': 'KRG645782',
 'Site Name': 'Headquarters',
 'Address': '601 E Trade St',
 'City': 'Charlotte',
 'State': 'NC',
 'Zip': '28202',
 'Country': 'USA',
 'Mgmt IP': '192.168.10.2',
 'Network Domain': 'Access',
 'Jump Host': '10.20.5.5',
 'Support': 'HQ IT 704-123-4444'}

JSON is used often in modern development environments. Today, REST APIs generally use JSON as the mechanism to perform CRUD (Create, Read, Update, Delete) operations within software programmatically and to transport data between systems. Nautobot uses a REST API that allows for CRUD operations to be performed within Nautobot. All of the data payloads that are used to the API functions are in a JSON format.

XML

XML is an acronym that stands for eXtensible Markup Language. XML serves the same purpose that JSON serves. Many APIs utilize XML as their method for performing CRUD operations and transporting data between systems. Specifically in the networking programmability arena, XML is used as the method for transporting data while utilizing protocols like NETCONF to configure devices.

Let’s create an XML object based on an example data structure that we’ve utilized.

In [61]: new_data
Out[61]: 
{'Device Name': 'HQ-R1',
 'Manufacturer': 'Cisco',
 'Model': 'ISR 4431',
 'Serial Number': 'KRG645782',
 'Site Name': 'Headquarters',
 'Address': '601 E Trade St',
 'City': 'Charlotte',
 'State': 'NC',
 'Zip': '28202',
 'Country': 'USA',
 'Mgmt IP': '192.168.10.2',
 'Network Domain': 'Access',
 'Jump Host': '10.20.5.5',
 'Support': 'HQ IT 704-123-4444'}
from xml.etree.ElementTree import Element,tostring

site = Element("site")

for k,v in new_data.items():
    child = Element(k)
    child.text = str(v)
    site.append(child)
<span role="button" tabindex="0" data-code="In [72]: tostring(site) Out[72]: b'<site><Device Name>HQ-R1</Device Name><Manufacturer>Cisco</Manufacturer><Model>ISR 4431</Model><Serial Number>KRG645782</Serial Number><Site Name>Headquarters</Site Name><Address>601 E Trade St</Address><City>Charlotte</City><State>NC</State><Zip>28202</Zip><Country>USA</Country><Mgmt IP>192.168.10.2</Mgmt IP><Network Domain>Access</Network Domain><Jump Host>10.20.5.5</Jump Host><Support>HQ IT 704-123-4444</Support>
In [72]: tostring(site)
Out[72]: b'<site><Device Name>HQ-R1</Device Name><Manufacturer>Cisco</Manufacturer><Model>ISR 4431</Model><Serial Number>KRG645782</Serial Number><Site Name>Headquarters</Site Name><Address>601 E Trade St</Address><City>Charlotte</City><State>NC</State><Zip>28202</Zip><Country>USA</Country><Mgmt IP>192.168.10.2</Mgmt IP><Network Domain>Access</Network Domain><Jump Host>10.20.5.5</Jump Host><Support>HQ IT 704-123-4444</Support></site>'

With the XML object created, we can utilize the Python XML library to work with the XML object.

In [96]: for item in site:
    ...:     print(f"{item.tag} |  {item.text}")
    ...: 
Device Name |  HQ-R1
Manufacturer |  Cisco
Model |  ISR 4431
Serial Number |  KRG645782
Site Name |  Headquarters
Address |  601 E Trade St
City |  Charlotte
State |  NC
Zip |  28202
Country |  USA
Mgmt IP |  192.168.10.2
Network Domain |  Access
Jump Host |  10.20.5.5
Support |  HQ IT 704-123-4444

You can also search the XML object for specific values.

In [97]: site.find("Jump Host").text
    ...: 
Out[97]: '10.20.5.5'

YAML

YAML stands for Yet Another Markup Language. Because YAML is easy to learn and easy to read and has been widely adopted, it’s often a network engineer’s first exposure to a programmatic data structure when pursuing network automation. It’s widely used in automation tools like Ansible and Salt. (https://docs.saltproject.io/en/latest/topics/index.html).

YAML is easy to learn and easy to read. Given this, it has been widely adopted.

Let’s create a basic YAML object based on our previous examples.

import yaml

yaml_data = yaml.dump(data_dict)

print(yaml_data[0:2])
- Address: 601 E Trade St
  City: Charlotte
  Country: USA
  Device Name: HQ-R1
  Jump Host: 10.20.5.5
  Manufacturer: Cisco
  Mgmt IP: 192.168.10.2
  Model: ISR 4431
  Network Domain: Access
  Serial Number: KRG645782
  Site Name: Headquarters
  State: NC
  Support: HQ IT 704-123-4444
  Zip: '28202'
- Address: 601 E Trade St
  City: Charlotte
  Country: USA
  Device Name: HQ-R2
  Jump Host: 10.20.5.5
  Manufacturer: Cisco
  Mgmt IP: 192.168.10.3
  Model: ISR 4431
  Network Domain: Access
  Serial Number: KRG557862
  Site Name: Headquarters
  State: NC
  Support: HQ IT 704-123-4444
  Zip: '28202'

With the instance of yaml.dump(data_dict[0:2]), I created a YAML structure from the first two entries of our previous examples. This creates a list of two inventory items that describes their site details.

As you can see, YAML is very easy to read. Out of the programatic data structures that we’ve covered to this point, YAML is the easiest to learn and read.

Usually, as a network automation engineer, you’re not going to be creating YAML data from Python dictionaries. It’s usually the other way around. Usually, the YAML files are created by engineers to describe aspects of their device inventory. You then consume the YAML files and take action on them.

Using the yaml library, we can convert the data into a Python dictionary that we can take action on.

In [19]: yaml.safe_load(yaml_data)
Out[19]: 
[{'Address': '601 E Trade St',
  'City': 'Charlotte',
  'Country': 'USA',
  'Device Name': 'HQ-R1',
  'Jump Host': '10.20.5.5',
  'Manufacturer': 'Cisco',
  'Mgmt IP': '192.168.10.2',
  'Model': 'ISR 4431',
  'Network Domain': 'Access',
  'Serial Number': 'KRG645782',
  'Site Name': 'Headquarters',
  'State': 'NC',
  'Support': 'HQ IT 704-123-4444',
  'Zip': '28202'},
 {'Address': '601 E Trade St',
  'City': 'Charlotte',
  'Country': 'USA',
  'Device Name': 'HQ-R2',
  'Jump Host': '10.20.5.5',
  'Manufacturer': 'Cisco',
  'Mgmt IP': '192.168.10.3',
  'Model': 'ISR 4431',
  'Network Domain': 'Access',
  'Serial Number': 'KRG557862',
  'Site Name': 'Headquarters',
  'State': 'NC',
  'Support': 'HQ IT 704-123-4444',
  'Zip': '28202'}]

Conclusion

I hope that you’ve found this introduction to interacting with different data structures programmatically useful. If you have questions, feel free to join our Slack community and ask questions!

-James


ntc img
ntc img

Contact Us to Learn More

Share details about yourself & someone from our team will reach out to you ASAP!

Introduction to Structured Data – Part 1

Blog Detail

Data is a crucial aspect for all network automation solutions, whether it’s a quick script, or a complex workflow using automation systems. Automated processes need data to drive their outcome by knowing what devices are involved and what actions to take on those devices.

Data can exist in many forms from a simple text file with a few items to a multi-tabbed spreadsheet to a database full of tables and views. Ever make a shopping list? How about storing contact information in your phone? Do you use a calendar to plan your schedule? All of these are examples of real-world structured data that we leverage without really thinking about it.

What Is Structured Data?

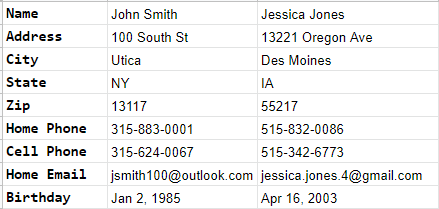
When we mention structured data, we are simply talking about organizing data in a common format so that it can be easily understood and leveraged. Take contact information in your phone as an example. Every time you access your contacts, you see the data in the same format regardless of what contact in your phone you are looking at:

Structured Data

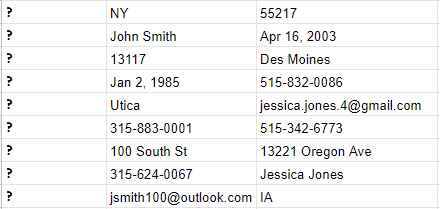
Now, imagine if the contacts in your phone were unstructured. While each of the contact records contain the same data, it’s now displayed in a different order from one person to the next.

Structured Data

How challenging would it be to use this data? Which is the home phone number and which is the cell number? With this basic example you can see why structured data is so important. It keeps things consistent, and easy to use.

One question that comes up is “Are data structures the same as structured data?” They are similar in the fact they both deal with organizing and storing data, but data structures are more closely tied to how a computer program stores and accesses data in memory to minimize compute resource usage and maximize program run time. You can check out this blog Mikhail Yohman wrote on some basic Python data structures to get a better understanding: Intro to Data Structures.

Let’s shift our focus to structured data seen and used by network engineers.

Structured Data in Network Engineering

Structured data exists in a variety of places in the network engineering space, but the most notorious example is…… drum roll ….. the Excel spreadsheet or csv file! An example of a basic spreadsheet a network engineer may come across tracking network asset inventory is seen below. We’ll use this example and data throughout our blog series:

Network Engineering

Network engineers use spreadsheets as a quick and easy way to manage data for various projects quite simply because it works. A tabular format is very easy for humans to interpret, and it can often be imported easily into scripts for programs to use. However, spreadsheets can often contain repetitive data which makes them less than ideal to use, or they can be extremely cumbersome if there are tens or hundreds of thousands of rows and numerous columns.

Inventory information isn’t the only network data stored in spreadsheets. How many of you have seen configuration snippets, or even entire configurations/templates, stored in spreadsheets too? Take a common task of deploying SNMP commands to devices on the network to use as an example. We want to deploy the following commands to all of our devices:

  • snmp-server location {data}
  • snmp-server contact {data}
  • snmp-server chassis-id {data}
  • snmp-server community {data} RO
  • snmp-server community {data} RW

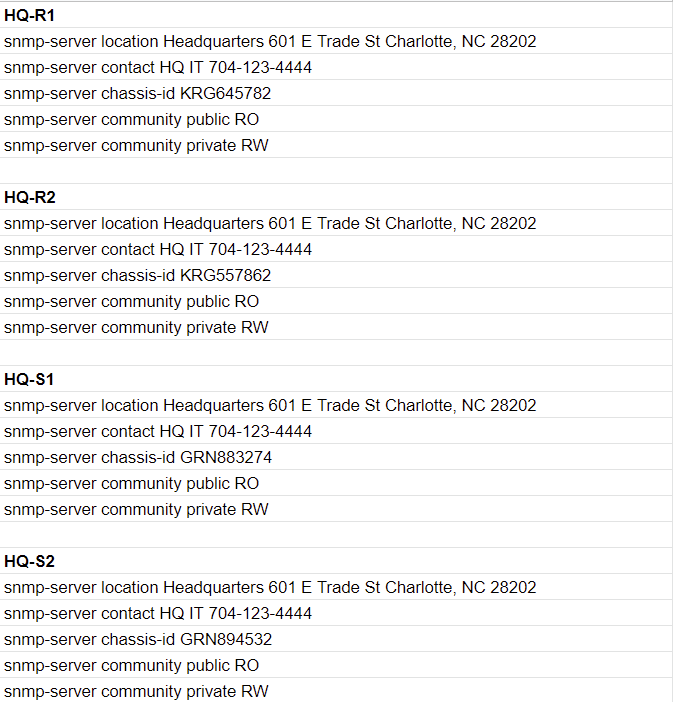
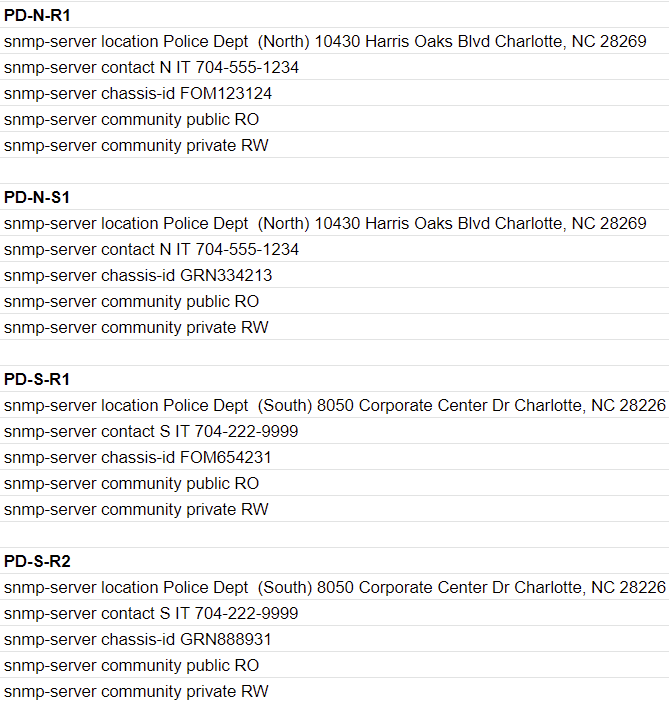
Let’s be honest, the first thing most network engineers will do is take the data from the device inventory and manually apply it to the configuration command formats above to build the configuration per device. This is likely done with a bunch of copying and pasting, using older configs as a template to build out the new config, or for those more savvy, writing a macro or using a formula in the spreadsheet (concatenate, anyone?) to get the results a little quicker. The output would be something like what is seen below, which would then be copied and pasted one at a time into each device during a change window:

Network Engineering
Network Engineering

Is this doable? You bet! But… it’s not ideal. I’d venture to guess most folks reading this have been bitten by the manual entry, or copy/paste, monster at some point in their career and spent time in the wee hours of the morning addressing an outage. There are more effective ways for us to structure the data above for this solution especially if we want to leverage it in a flexible, standardized, automated process.


Conclusion

I cannot stress enough the importance of ensuring your data is both structured and normalized (eliminating redundant data where possible). In the next three parts of this series, we’ll leverage the same spreadsheet data above when we dive into structured data formats regularly seen in network automation solutions: XML, YAML, and JSON. We’ll talk about those specific formats, when/why we may use one over another, how the structured data can be applied to template solutions like Jinja2, and how it all ties together to produce a flexible, standardized automated solution. As always, if you have any questions/comments, we’re here to help! Come join us on the Network to Code Slack.

-Dave


ntc img
ntc img

Contact Us to Learn More

Share details about yourself & someone from our team will reach out to you ASAP!

Hierarchical Configuration Up and Running

Blog Detail

Parsing network device configurations can be a difficult task. Automatically determining a remediation plan by comparing a running configuration to a generated template configuration can be even more difficult. In this blog, I’ll discuss Hierarchical Configuration, hier_config for short, and how it can be leveraged to streamline a business’s configuration compliance needs.

What Is Hierarchical Configuration?

Hier_config is a Python library that is able to consume a running configuration of a network device, compare it against its intended templated configuration, and build the remediation steps necessary to bring a device into spec with its intended configuration. Hier_config has been used extensively on Cisco IOS, NX-OS, IOS XR, IOS XE, and Arista EOS devices. However, any network operating system that utilizes a CLI syntax that is structured in a similar fashion to IOS should work mostly out of the box.

The biggest advantage that I’ve seen of hier_config vs other attempts at configuration compliance is that hier_config has a built-in understanding of parent / child relationships within a configuration.

For example:

router bgp 65000
  neighbor 192.0.2.1 remote-as 65001
  address-family ipv4 unicast
    neighbor neighbor 192.0.2.1 activate

router bgp 65000 is the parent object for the above configuration snippet. neighbor 192.0.2.1 remote-as 65001 and address-family ipv4 unicast are children of router bgp 65000. Finally neighbor neighbor 192.0.2.1 activate is a child of address-family ipv4 unicast.

Hier_config understands those relationships within the configuration, whereas most products do not. This makes hier_config a very powerful configuration compliance tool when it comes to defining remediation steps. Instead of rewriting the entire parent / child hierarchy of objects, hier_config can be defined to only remediate the specific child steps as necessary.

Another advantage is the ability for hier_config to understand what commands are idempotent, require negation, and when to negate a command. Take updating a description of an interface. You don’t need to negate an existing interface description to apply another description. You just update the description on the interface and move on. Another example could be updating logging or snmp servers on a configuration. You very likely want to continue sending logging and snmp updates to the old servers until the new servers have been applied. Therefore, the correct order to apply the commands would be to add the new servers and then remove the old servers. Being able to define these nuances will be covered in the Hierarchical Configuration Options section.

How Can Hierarchical Configuration Be Installed?

Hier_config requires a minimum Python version of 3.8.

There are two methods of installing hier_config. The first method is to install it from PyPI via pip.

  • pip install hier_config

The second method is to install it from GitHub.

  • Install Poetry
  • Clone the repository: git clone https://github.com/netdevops/hier_config.git
  • Install hier_config: cd hier_config && poetry install

Hierarchical Configuration Basics

Many examples have references to files. Those files are publicly available in the ./tests/fixtures folder of the GitHub repository.

The very basic usage of hier_config is very easy. Let’s break down the below sample script.

#!/usr/bin/env python3

# Import the hier_config Host library
from hier_config import Host

# Create a hier_config Host object
host = Host(hostname="aggr-example.rtr", os="ios")

# Load a running configuration from a file
host.load_running_config_from_file("./tests/fixtures/running_config.conf")

# Load an intended configuration from a file
host.load_generated_config_from_file("./tests/fixtures/generated_config.conf")

# Create the remediation steps
host.remediation_config()

# Display the remediation steps
print(host.remediation_config_filtered_text(include_tags={}, exclude_tags={}))

With six lines of code, you can automatically create the remediation steps to bring a device into spec with its intended or generated configuration. Those steps are:

  1. Import the hier_config Host object.
  2. Create a Host object.
  3. Load the running configuration into the Host object.
  4. Load the generated configuration into the Host object.
  5. Initialize the remediation.
  6. Display the remediation steps.

The output of the remediation steps for the above example is:

vlan 3
  name switch_mgmt_10.0.3.0/24
vlan 4
  name switch_mgmt_10.0.4.0/24
interface Vlan2
  mtu 9000
  ip access-group TEST in
  no shutdown
interface Vlan3
  description switch_mgmt_10.0.3.0/24
  ip address 10.0.3.1 255.255.0.0
interface Vlan4
  mtu 9000
  description switch_mgmt_10.0.4.0/24
  ip address 10.0.4.1 255.255.0.0
  ip access-group TEST in
  no shutdown

The actual differences between the two configurations are:

<span role="button" tabindex="0" data-code="% diff ./tests/fixtures/running_config.conf ./tests/fixtures/generated_config.conf 9a10,12 > name switch_mgmt_10.0.3.0/24 > ! > vlan 4 12a16 > mtu 9000 15c19,20
% diff ./tests/fixtures/running_config.conf ./tests/fixtures/generated_config.conf
9a10,12
>  name switch_mgmt_10.0.3.0/24
> !
> vlan 4
12a16
>  mtu 9000
15c19,20
<  shutdown
---
>  ip access-group TEST in
>  no shutdown
18a24,30
>  description switch_mgmt_10.0.3.0/24
>  ip address 10.0.3.1 255.255.0.0
>  ip access-group TEST in
>  no shutdown
> !
> interface Vlan4
>  mtu 9000

At its core, that is the most very basic example of hier_config.

Lineage Rules Explained

Lineage rules are rules that are written in YAML. They allow users to seek out very specific sections of configurations or even seek out very generalized lines within a configuration. For example, suppose you just wanted to seek out interface descriptions. Your lineage rule would look like:

- lineage:
  - startswith: interface
  - startswith: description

In the above example, a start of a lineage is defined with the – lineage: syntax. From there the interface is defined with the – startswith: interface syntax under the – lineage: umbrella. This tells hier_config to search for any configuration that starts with the string interface as the parent of a configuration line. When it finds an interface parent, it then looks at any child configuration line of the interface that starts with the string description.

With lineage rules, you can get as deep into the children or as shallow as you need. Suppose you want to inspect the existence or absence of http, ssh, snmp, and logging within a configuration. This can be done with a single lineage rule, like so:

- lineage:
  - startswith:
    - ip ssh
    - no ip ssh
    - ip http
    - no ip http
    - snmp-server
    - no snmp-server
    - logging
    - no logging

Or suppose, you want to inspect whether BGP IPv4 AFIs are activated. You can do this with the following:

- lineage:
  - startswith: router bgp
  - startswith: address-family ipv4
  - endswith: activate

In the above example, I utilized a different keyword to look for activated BGP neighbors. The keywords that can be utilized within lineage rules are:

  • startswith
  • endswith
  • contains
  • equals
  • re_search

You can also put all of the above examples together in the same set of lineage rules like so:

- lineage:
  - startswith: interface
  - startswith: description
- lineage:
  - startswith:
    - ip ssh
    - no ip ssh
    - ip http
    - no ip http
    - snmp-server
    - no snmp-server
    - logging
    - no logging
- lineage:
  - startswith: router bgp
  - startswith: address-family ipv4
  - endswith: activate

When hier_config consumes the lineage rules, it consumes them as a list of lineage rules and processes them individually.

Tagging Configuration Sections

With a firm understanding of lineage rules, more complex use cases become available within hier_config. A powerful use case is the ability to tag specific sections of configuration and only display remediations based on those tags. This becomes very handy when you’re attempting to execute a maintenance that only targets low risk configuration changes or isolate the more risky configuration changes to scrutinize their execution during a maintenance.

Tagging expands on the use of the lineage rules by creating an add_tags keyword to a lineage rule.

Suppose you had a running configuration that had an ntp configuration that looked like:

ntp server 192.0.2.1 prefer version 2

However, your intended configuration utilized a publicly available NTP server on the internet:

ip name-server 1.1.1.1
ip name-server 8.8.8.8
ntp server time.nist.gov

You could create a lineage rule that targeted that specific remediation like this:

- lineage:
  - startswith:
    - ip name-server
    - no ip name-server
    - ntp
    - no ntp
  add_tags: ntp

Now we can modify the script above to load the tags and create a remediation of the said tags:

#!/usr/bin/env python3

# Import the hier_config Host library
from hier_config import Host

# Create a hier_config Host object
host = Host(hostname="aggr-example.rtr", os="ios")

# Load the tagged lineage rules
host.load_tags_from_file("./tests/fixtures/tags_ios.yml")

# Load a running configuration from a file
host.load_running_config_from_file("./tests/fixtures/running_config.conf")

# Load an intended configuration from a file
host.load_generated_config_from_file("./tests/fixtures/generated_config.conf")

# Create the remediation steps
host.remediation_config()

# Display the remediation steps for only the "ntp" tags
print(host.remediation_config_filtered_text(include_tags={"ntp"}, exclude_tags={}))

In the script, we made two changes. The first change is to load the tagged lineage rules: host.load_tags_from_file("./tests/fixtures/tags_ios.yml"). And the second is to filter the remediation steps by only including steps that are tagged with ntp via the include_tags argument.

The remediation looks like:

no ntp server 192.0.2.1 prefer version 2
ip name-server 1.1.1.1
ip name-server 8.8.8.8
ntp server time.nist.gov

Hierarchical Configuration Options

There are a number of options that can be loaded into hier_config to make it better conform to the nuances of your network device. By default, hier_config loads a set of sane defaults for Cisco IOS, IOS XE, IOS XR, NX-OS, and Arista EOS.

Below are the configuration options available for manipulation.

base_options: dict = {
    "style": None,
    "sectional_overwrite": [],
    "sectional_overwrite_no_negate": [],
    "ordering": [],
    "indent_adjust": [],
    "parent_allows_duplicate_child": [],
    "sectional_exiting": [],
    "full_text_sub": [],
    "per_line_sub": [],
    "idempotent_commands_blacklist": [],
    "idempotent_commands": [],
    "negation_default_when": [],
    "negation_negate_with": [],
}

The default options can be completely overwritten and loaded from a yaml file, or individual components of the options can be manipulated to provide the functionality that is desired.

Here is an example of manipulating the built-in options.

# Import the hier_config Host library
from hier_config import Host

# Create a hier_config Host object
host = Host(hostname="aggr-example.rtr", os="ios")

# Create an NTP negation ordered lineage rule
ordered_negate_ntp = {"lineage": [{"startswith": ["no ntp"], "order": 700}]}

# Update the hier_config options "ordering" key.
host.hconfig_options["ordering"].append(ordered_negate_ntp)

Here is an example of completely overwriting the default options and loading in your own.

# import YAML
import yaml

# Import the hier_config Host library
from hier_config import Host

# Load the hier_config options into memory
with open("./tests/fixtures/options_ios.yml") as f:
    options = yaml.load(f.read(), Loader=yaml.SafeLoader)

# Create a hier_config Host object
host = Host(hostame="aggr-example.rtr", os="ios", hconfig_options=options)

In the following sections, I’ll cover the most common options.

style

The style defines the os family. Such as iosiosxr, etc.

Example:

style: ios

ordering

Ordering is one of the most useful hier_config options. This allows you to use lineage rules to define the order in which remediation steps are presented to the user. For the ntp example above, the ntp server was negated (no ntp server 192.0.2.1) before the new ntp server was added. In most cases, this wouldn’t be advantageous. Thus, ordering can be used to define the proper order to execute commands.

All commands are assigned a default order weight of 500, with a usable order weight of 1 – 999. The smaller the weight value, the higher on the list of steps a command is to be executed. The larger the weight value, the lower on the list of steps a command is to be executed. To create an order in which new ntp servers are added before old ntp servers are removed, you can create an order lineage that weights the negation to the bottom.

Example:

ordering:
- lineage:
  - startswith: no ntp
  order: 700

With the above order lineage applied, the output of the above ntp example would look like:

ip name-server 1.1.1.1
ip name-server 8.8.8.8
ntp server time.nist.gov
no ntp server 192.0.2.1 prefer version 2

sectional_exiting

Sectional exiting features configuration sections that have a configuration syntax that defines the end of a configuration section. Examples of this are RPL (route policy language) configurations in IOS XR or peer policy and peer session configurations in IOS BGP sections. The sectional exiting configuration allows you to define the configuration syntax so that hier_config can render a remediation that properly exits those configurations.

An example of sectional exiting is:

sectional_exiting:
- lineage:
  - startswith: router bgp
  - startswith: template peer-policy
  exit_text: exit-peer-policy
- lineage:
  - startswith: router bgp
  - startswith: template peer-session
  exit_text: exit-peer-session

sectional_overwrite_no_negate

The sectional overwrite with no negate hier_config option will completely overwrite sections of configuration without negating them. This option is often used with the RPL sections of IOS XR devices that require that the entire RPL be re-created when making modifications to them, rather than editing individual lines within the RPL.

An example of sectional overwrite with no negate is:

sectional_overwrite_no_negate:
- lineage:
  - startswith: as-path-set
- lineage:
  - startswith: prefix-set
- lineage:
  - startswith: route-policy
- lineage:
  - startswith: extcommunity-set
- lineage:
  - startswith: community-set

sectional_overwrite

Sectional overwrite is just like sectional overwrite with no negate, except that hier_config will negate a section of configuration and then completely re-create it.

full_text_sub

Full text sub allows for substitutions of a multi-line string. Regular expressions are commonly used and allowed in this section. An example of this would be:

full_text_sub:
- search: "banner\s(exec|motd)\s(\S)\n(.*\n){1,}(\ 2)"
  replace: ""

This example simply searches for a banner message in the configuration and replaces it with an empty string.

per_line_sub

Per line sub allows for substitutions of individual lines. This is commonly used to remove artifacts from a running configuration that don’t provide any value when creating remediation steps.

An example is removing lines such as:

Building configuration...

Current configuration : 3781 bytes

Per line sub can be used to remove those lines:

per_line_sub:
- search: "Building configuration.*"
  replace: ""
- search: "Current configuration.*"
  replace: ""

idempotent_commands

Idempotent commands are commands that can just be overwritten and don’t need negation. Lineage rules can be created to define those commands that are idempotent.

An example of idempotent commands are:

idempotent_commands:
- lineage:
  - startswith: vlan
  - startswith: name
- lineage:
  - startswith: interface
  - startswith: description

The lineage rules above specify that defining a vlan name and updating an interface description are both idempotent commands.


Conclusion

Hierarchical Configuration is a very powerful configuration compliance tool for building and executing upon rendered remediation configurations. There is also an Ansible Collection that can greatly simplify remediation work. If you have any questions, comments, or issues, please feel free to reach out on the Network to Code Slack on #hier_config or open a GitHub issue.

-James


ntc img
ntc img

Contact Us to Learn More

Share details about yourself & someone from our team will reach out to you ASAP!