Introduction to Work Intake – Part 3

Blog Detail

Welcome back to the final exciting chapter in our three-part series on Work Intake. Throughout the past two blogs, we’ve used dialogue with our requestor to help form a more thorough understanding of the true “ask” from us. In Part 1, we used an anchor chart to gather preliminary details from the original brief description. In Part 2, we reviewed the workflow details along with considerations for parameters and outcomes.

Before diving into today’s section, let’s quickly review what we’ve gathered thus far from the three different use cases, as we’ll be referencing them in the next section.

New infrastructure at a remote branch location

  • Who: Remote branch users
  • What: Site build-out of a firewall, switch, and wireless access point
  • When: October 31st
  • Where: Burbank remote location
  • Why: Company is expanding to meet customer demand.
  • How: Physical build-out of new location to include placement in SoT (Source of Truth) and monitoring
  • New or Existing: New
  • Frequency: One-time
  • Steps: 51 to 99
  • People: 4 to 10 People
  • Approvals: Yes, 3 to 5
  • Dependencies: Yes, 3 to 5
  • Locations & Environments: Internal production
  • Methods & Access: SSH-CLI with a User account
  • Change Management: Higher risk change: impacts production with new routing changes
  • Business Value: New location provides opportunities to reach new customers for better growth and market share.
  • Acceptance Criteria: When onsite staff are able to use the new equipment to access the main Data Centers.

Migrating from SNMPv2 to v3

  • Who: Monitoring Team
  • What: Remediate the 100+ network devices
  • When: Risk closure by November 1st per Security Team
  • Where: All locations (35 sites)
  • Why: New security standard due to an internal audit
  • How: Device configurations moved to the new standard
  • New or Existing: Existing
  • Frequency: One-time
  • Steps: 4 to 10
  • People: 4 to 10 People
  • Approvals: Yes, 3 to 5
  • Dependencies: Yes, 1 to 2
  • Locations & Environments: Internal production
  • Methods & Access: SSH-CLI with a User account
  • Change Management: Involves a couple of teams which would require a regular weekend change request
  • Business Value: Security & audit compliance, able to close out the Risk item
  • Acceptance Criteria: When the Security team is able to resolve the audit item.

Create automation for the provisioning of Data Center access ports

  • Who: Network Implementation Team
  • What: Provide deployment of ports for new server build-outs
  • When: Servers to arrive October 1st
  • Where: Brownfield DC
  • Why: Implementation team is overwhelmed with requests
  • How: Automation to deploy the access port configuration
  • New or Existing: Existing
  • Frequency: Weekly
  • Steps: 4 to 10
  • People: 1 to 3 People
  • Approvals: Yes, 1 to 2
  • Dependencies: Yes, 1 to 2 Dependencies on the required server-side information prior to starting
  • Locations & Environments: Internal production
  • Methods & Access: SSH-CLI with a User account
  • Change Management: Standard change as it is repeatable work effort
  • Business Value: Cost save associated with reduction of person hours & reduced manual error
  • Acceptance Criteria: When the engineer can feed a list of Brownfield ports to the automation

We will begin our discussion on the topic of assumptions related to complexity and effort (aka duration). For assumption values we’ll use estimations as opposed to more concrete answers that were used earlier in the series. As with estimations, we need to remember that these are projections which can skew too low or even go too high. Even if these values don’t hit the mark, they are still useful and a valuable part of the process. It’s also important to note that over time these estimations will steadily improve, thereby making future estimations more realistic, meaningful, and most of all, impactful to your team.

Complexity

Complexity can been represented from multiple angles ranging from the number of systems or integrations, upstream or downstream dependencies, to engaging multiple teams or even environments (dev versus prod). Here is where we will start to analyze and interpret the data we’ve worked hard to obtain via the last two blogs. Items for consideration from said data gathering could include Steps, People, Approvals, Dependencies, and Locations & Environments, though Methods & Access as well as Change Management could potentially play a role as well.

There are a few different options at our disposal for the complexity scoring. One example is using a range of “Low-Medium-High” with Low rating involving only a single system or integration as well as limited amounts of other criteria. A Medium rating could contain mixed amounts of middle-of-the-road values, while reserving High for when workflow involves multiple systems, lots of moving pieces (integrations or services), people, dependencies, etc.

Another rating option is the Fibonacci scale commonly used with Agile Story Points. The Fibonacci scale is a sequence consisting of adding the two preceding numbers together starting with 0 and 1. An example of the sequence would be 0, 1, 2, 3, 5, 8, 13, 21, with lower numerical values associated with less complexity and higher values with larger, more complex items.

Choose an option that works best for you and your environment. However, we do want to be consistent in the type of scoring, so down the road we can refer back to previous examples.

New infrastructure at a remote branch location

  • Complexity: High
    • Within this deployment, there will be a significant number of steps to be performed along with multiple people and processes, as well as dependencies. There is also a greater potential for risk as the production environment would be affected with the introduction of new routing changes taking place.

Migrating from SNMPv2 to v3

  • Complexity: Medium
    • The previous request for new infrastructure as well as this request for SNMP migration have a single deployment frequency, however, the SNMP migration has noticeable reductions in other areas. Interpreting the data we gathered, there is a significant reduction in the overall number of steps to be performed and small reductions in the number of dependencies and type of work being performed on the change request (meaning it’s less risky). Taking these requirements into consideration, this request would be marked as “Medium”.

Create automation for the provisioning of Data Center access ports

  • Complexity: Low
    • As we start to review the last use case, we see the case as a smaller number of steps, people, approvals, and dependencies. It’s also worth noting that change management allows for a standard approval window for implementing the changes.

Work Effort/Duration

In terms of work effort or duration, we will focus the estimation around the amount of work our team will be on point to represent or work. Sometimes large-scale projects can include multiple teams and timelines that could have longer overall project timelines. However, we want to focus solely on the delivery from our team.

For the work effort, we’ll use a different type of estimation from complexity to offer a more unique value. We’ll categorize this work effort using a common yet familiar methodology by using a T-shirt size.

Extra Small (XS)<3 months
Small (S)3 to 6 months
Medium (M)6 to 12 months
Large (L)12 to 18 months
Extra Large (XL)18 to 24 months

New infrastructure at a remote branch location

  • Work Effort: Large
    • A new build-out may have a series of planning and estimation prior to approvals as part of a procurement process. Along with lead times for receiving new equipment there is a potential for timeline dependencies outside of our teams’ control, such as a new construction project. For these reasons, as well as the large number of staging and preparation steps, we will estimate this as a Large effort.

Migrating from SNMPv2 to v3

  • Work Effort: Medium
    • The SNMP migration would require a couple teams working together as part of the overall effort. Our team would support creating and testing the new network configurations in lab. When ready for the migration, our team would deploy the new configuration, engage the monitoring team for their updates, and work with the security team for their validation sign-off.

Create automation for the provisioning of Data Center access ports

  • Work Effort: Small
    • As we saw in the previous example, the automation for provisioning ports has a lower level of complexity. With narrower scope, the development and testing work for this new automated workflow could be performed in a smaller window of time as our team has created similar workflows in the past. Therefore, this work could performed in 3 to 6 months.

Putting It All Together

We’ve now completed the gathering of requirements as well as estimations, so we can establish where our next commitments or sprints will be directed. We did not include escalations as part of these efforts, as we wanted to maintain a steady state in the evaluations.

From the analysis of the three examples above for potential placement within our backlog of work, we would be working towards offerings with a higher return in value while spending a lower amount of effort.

As we look for potential placement within our backlog of work, we want to lean towards offerings with a higher return in value while having to spend a lower amount of effort. From the analysis of the three examples above, our backlog would be the following:

  • Create automation for the provisioning of Data Center access ports
  • Migrating from SNMPv2 to v3
  • New infrastructure at a remote branch location

The creation of automation for provisioning is a request that is smaller in nature yet having a fixed parameter, allowing for a quicker delivery (lower effort) as well as reducing repeatable recurring manual workload and future use cases (high rate of return).

The SNMP migration would be second, as there is a defined amount of volume in the number of devices impacted. As this is a one-time remediation, there is a lower rate of return associated with the request; however, value of the new SNMPv3 would be applied to future devices via golden configuration updates.

The new infrastructure at a remote branch provides our business staff a higher value, though the longer lead times and procurement timelines lead to a much larger amount of effort. This last use case presents a future opportunity whereby the larger project could be broken down into smaller standardized sub-components. These smaller components could potentially lead to smaller efforts with larger rates of return.


Conclusion

In this blog post, we analyzed the data gathered from the previous blogs to establish our assumptions for complexity and work effort. With the completion of our work intake process, we reviewed our 3 use cases for order placement into our backlog for future work. With the work intake process, we are helping convey the true “ask” from the requestor while developing tangible outputs of requirements and assumptions for your engineering team.

From the gathered requirements, we began to extrapolate useable assumptions from our use cases for complexity and work duration. The introduction of these values will provide insight to the engineering team with their planning for team resources and helping establish higher value work efforts. However, these can also provide external feedback for the requestors in the form of more accurate delivery timelines along with a greater overall visibility and transparency of the process.

Work intake is helping create a “win-win” value in the request process for both the requestor and your team. We hope that you’ve found this introduction to work intake fun, different and useful. If you have any questions, feel free to join our Network to Code Slack community and ask questions!

-Kyle


ntc img
ntc img

Contact Us to Learn More

Share details about yourself & someone from our team will reach out to you ASAP!

Setting Up Nautobot ChatOps with Microsoft Teams – Fall 2022

Blog Detail

NOTE: This blog post is an updated copy of previous ones from April 2021November 2021, and March 2022. It has been updated with the latest process changes within Microsoft Azure and Teams due to certain original processes being deprecated or modified significantly over time, both on the Microsoft Azure side as well as the Microsoft Teams side.

Network to Code has released a number of amazing apps for Nautobot—one of which, adding ChatOps functionality, can be found here on GitHub. This application adds ChatOps capabilities directly into your existing ChatOps client, in the form of a chatbot, and supports four of the more popular services available right now. The four services currently supported are Slack, Microsoft Teams, Webex, and Mattermost.

If this is your first time hearing about ChatOps or this app (plugin), you can watch the ChatOps demo on YouTube or join slack.networktocode.com and try it out for yourself in the #nautobot-chat channel.

Today, I’ll be going over how to get this app working in Nautobot and how to get a chatbot up and running for Microsoft Teams. The process is fairly different from the other three providers listed, and slightly more complex, but the end results are amazing. Let’s dive right in!

Getting Started

With any ChatOps service, getting the ChatOps plugin working has two main parts: configuring it on the ChatOps service directly, and installing and configuring it on your Nautobot server. Microsoft Teams splits the first part into two sections: creating the service in Azure, and installing the app in the Teams client.

For simplicity, I will assume you already have the base Nautobot server installed and working. If not, you can find the full documentation over on our new Nautobot Documentation site, or join our public Slack channel #nautobot at slack.networktocode.com and ask for assistance.

Part 1: Configuring Microsoft Teams SaaS

Azure and Permissions

To start off, I will be configuring a brand-new bot for Microsoft Teams from scratch. Microsoft runs their bots differently from Slack, Webex, or Mattermost, in that their bot service runs on Azure. If you don’t have a Microsoft Azure account, you will need to create one or get access to it through your company before continuing.

According to the Microsoft docs, you will need “Contributor access either in the subscription or in a specific resource group. A user with the Contributor role in a resource group can create a new bot in that specific resource group. A user in the Contributor role for a subscription can create a bot in a new or existing resource group.”

Configuring Azure

The three main parts to configuring a bot in Azure:

  1. Create an Azure Bot Service and Resource Group
  2. Configure the Azure Bot Channel
  3. Create a Client Secret for the Azure Bot

I’ll break down each part individually, with step-by-step instructions and screenshots along the way.

1 – Create an Azure Bot and Resource Group

First, log into the Azure Portal at https://portal.azure.com.

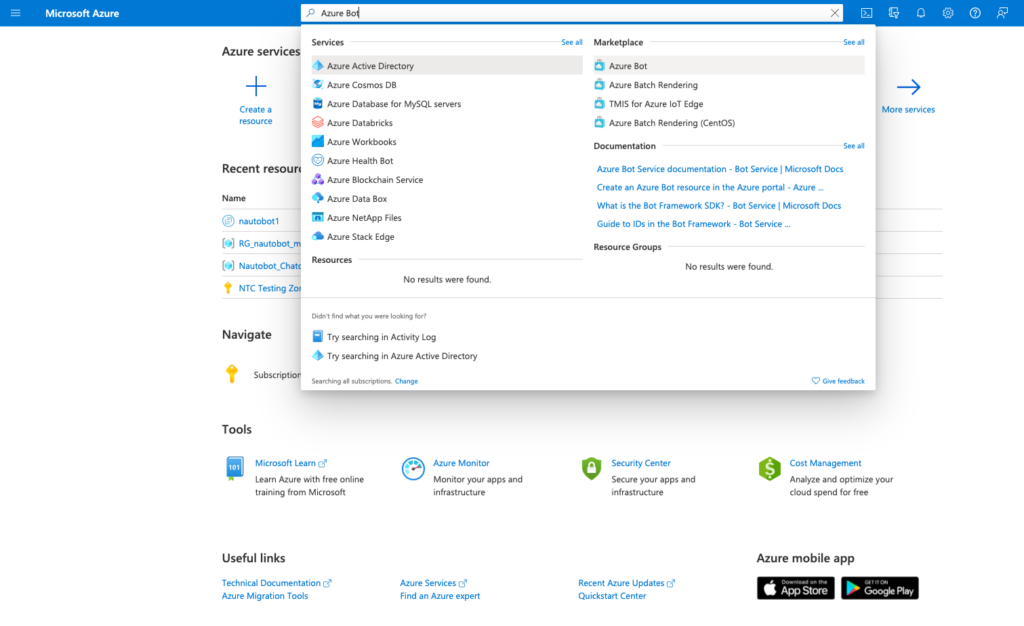
At the top of the screen is a search bar. Search for “Azure Bot”, then select the option with the same name under “Marketplace” on the right side. This will take you to the page to create a new Azure Bot.

NOTE: You may need to activate this service first within your company’s Azure subscription, which is not covered in this post.

A few key fields to fill out when creating a new Azure Bot are:

  • Bot Handle – What you want your bot handle to be. This is not what your bot is called in the MS Teams client, or how users will interact with your bot, but it is unique (case-insensitive) within the overall Azure Bot Framework.
  • Subscription – The Azure billing subscription your bot will use for any charges.
  • Resource Group – If there’s an existing one you want to use, select it. Otherwise, select the “Create new” link and create a new resource group. In this example, I’m creating a new Resource Group called “RG_nautobot_ntcblog”.
  • New Resource Group Location – Choose whichever location works best for you.
  • Data Residency – If this preview option is present, leave it set as “Global”.
  • Pricing Tier – This defaults to “Standard”, which will incur costs. For demo/development purposes, I changed this to the “Free” tier.
  • Type of App – For the purposes of this blog post, selecting “Multi Tenant” works best here to allow the Bot access to different resources.

For Creation Type, leave the default option selected: Create a new Microsoft App ID and click the Review + create button at the bottom.

Note: Tags are optional, but feel free to experiment with them later.

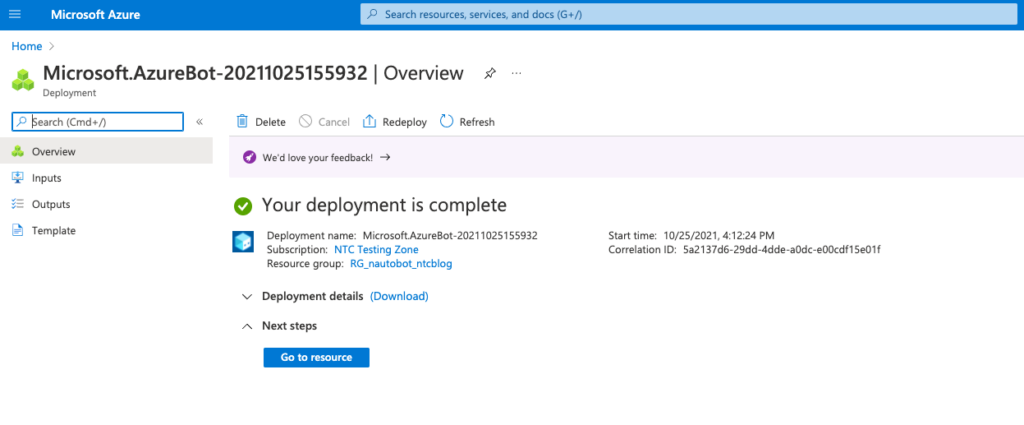
After Azure validates your settings, the Create button will be enabled. Click it to initiate the deployment process in Azure. This may take a few minutes, but it will let you know once the deployment is complete.

Once complete, go to the newly created resource by selecting the Go to resource button. You can also monitor its progress in the upper right of the Azure dashboard, under the alerts icon (looks like a bell).

2 – Configure the Azure Bot Channel

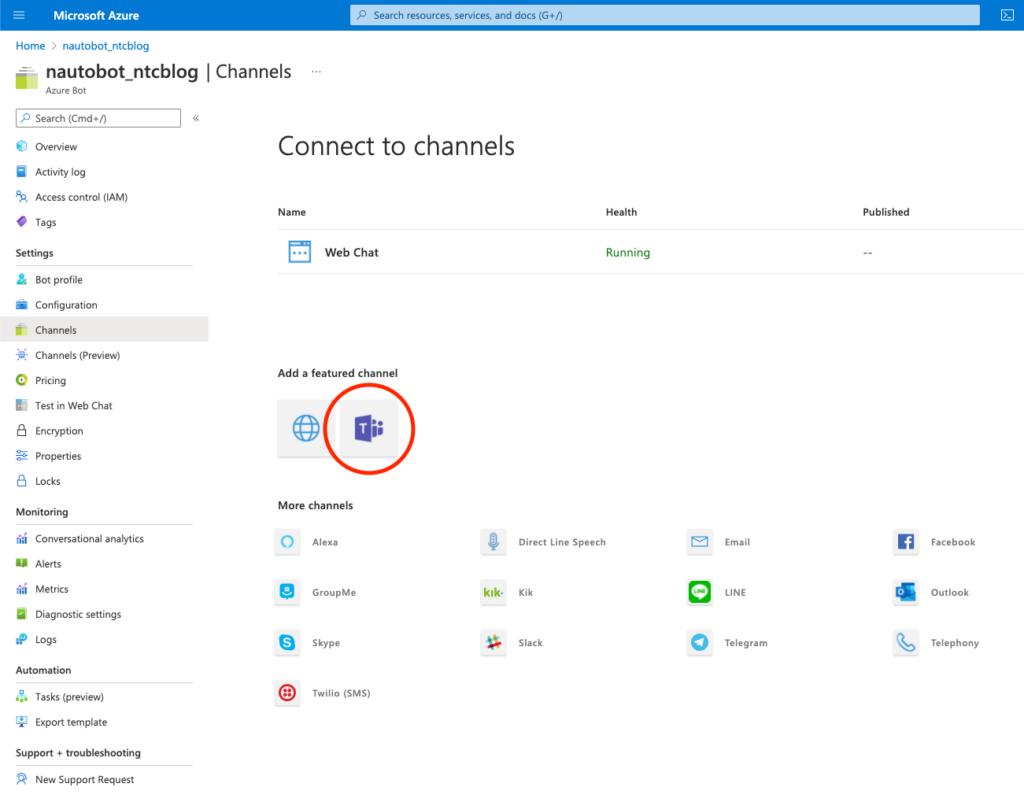
On the main resource page for the new Azure Bot, on the left main bar, select Channels under the Settings section. Then select the Microsoft Teams client icon, as circled in the screenshot below.

A small window may pop up asking you to accept the Terms of Service. If so, review and select “Agree” to continue.

All of the options on the next Configure Microsoft Teams page should be okay when left to default, but should be reviewed anyway for your specific use case.

Once done, click Save at the bottom of the page, and review and Agree to any ToS pop-ups.

3 – Configure the Messaging Endpoint

Next, on the left sidebar, select Configuration under the Settings section.

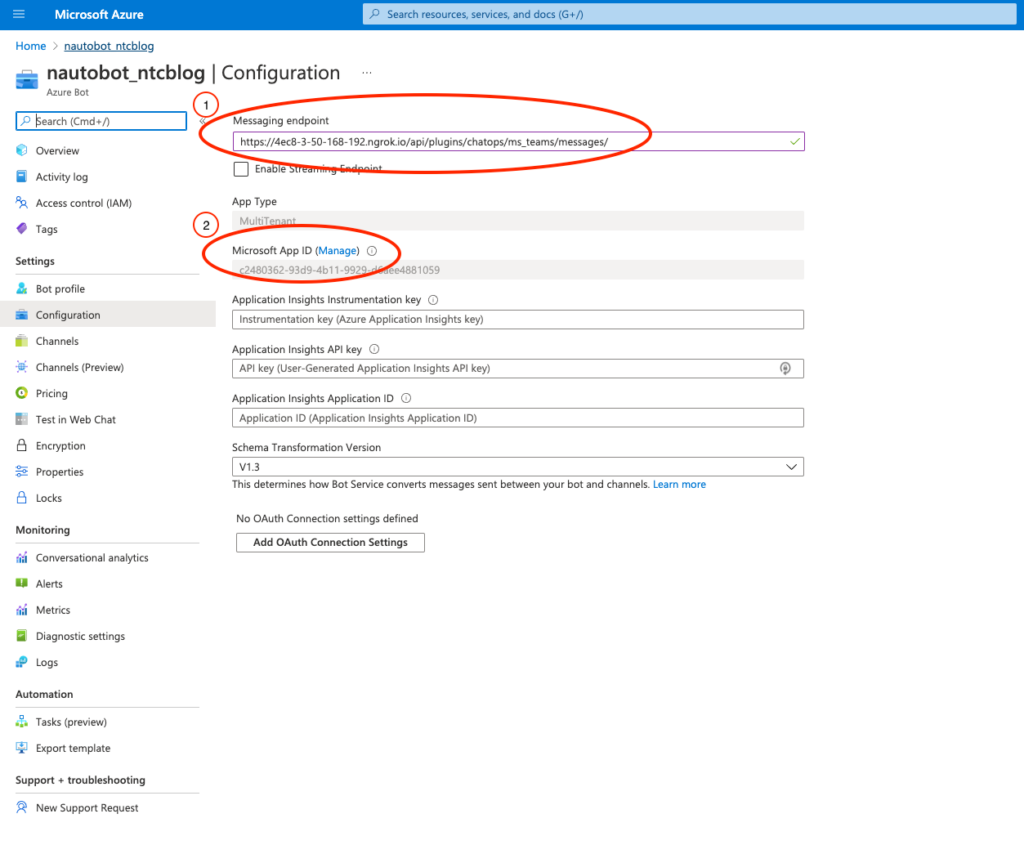
For the Messaging Endpoint, enter your Nautobot service URL in this format: https://<server>/api/plugins/chatops/ms_teams/messages/.

In this demo example, I’m using the Ngrok service. For a production Nautobot server, you would enter in the publicly facing DNS endpoint for inbound webhooks into your Nautobot server.

Also take note of the read-only Microsoft App ID listed on your screen. This will be needed later on in the setup process.

Click Apply to save the changes.

4 – Create a Client Secret for the Azure Bot

On this same Configuration page, select the “Manage” link directly above the App ID.

This will take you to the Certificates & Secrets page.

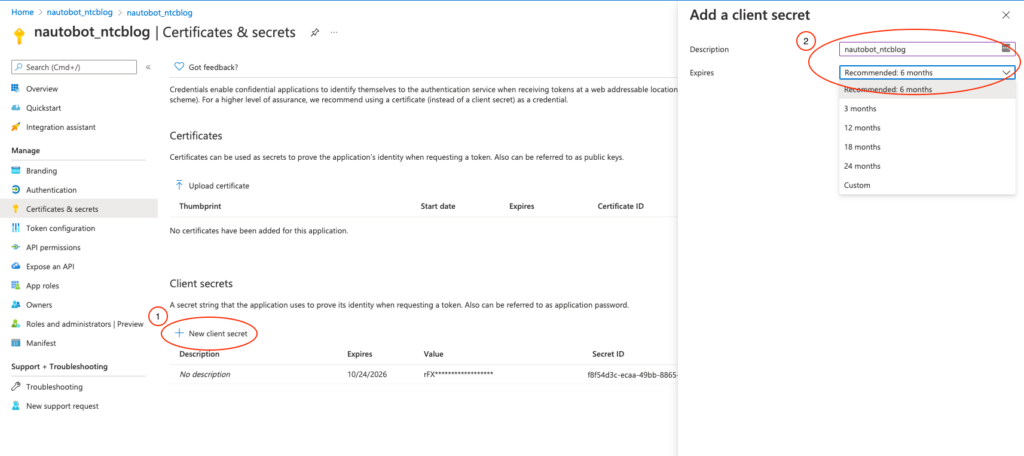
Click New client secret. Name it something descriptive, configure the expiration setting as necessary, and click Add.

Once it’s created, it will appear in the Client Secrets table at the bottom of the page. Copy and save the newly generated secret for later, as there’s no way to recover it once you leave the page.

NOTE: If you lose the key or copy it incorrectly, you will have to return to this page and generate a new secret.

Azure Recap

At this point, the Nautobot ChatOps plugin is fully set up within Azure. You should have two pieces of information for later use: the App ID and the Client Secret.

Part 2: Installing and Configuring the Nautobot ChatOps App (Plugin)

Note: The terms plugin and app are being used interchangeably in this post.

Next, you must install and configure the Nautobot ChatOps plugin on your Nautobot server. Luckily, the fine folks at Network to Code have made this process incredibly simple!

Installing the Plugin

First, log into your Nautobot server and change to the user account Nautobot is running as. From there, it’s as simple as installing the plugin via a pip install command.

$ sudo -iu nautobot
$ pip3 install nautobot-chatops

Once the package is installed, the plugin will need to be enabled in your nautobot_config.py. If Nautobot was originally set up according to the default installation docs, this file will be located at /opt/nautobot/nautobot_config.py. In this file, add in the name of the plugins to the PLUGINS variable, then configure the required settings in the PLUGINS_CONFIG variable below it.

<span role="button" tabindex="0" data-code="PLUGINS = ["nautobot_chatops"] PLUGINS_CONFIG = { "nautobot_chatops": { "enable_ms_teams": True, "microsoft_app_id": "<app_id>", "microsoft_app_password": "
PLUGINS = ["nautobot_chatops"]

PLUGINS_CONFIG = {
    "nautobot_chatops": {
        "enable_ms_teams": True,
        "microsoft_app_id": "<app_id>",
        "microsoft_app_password": "<client_secret>"
    }
}

Make sure to replace <app_id> and <client_secret> with the App ID and Client Secret saved from Azure in the previous steps. Then save the file and restart the NGINX and Nautobot services.

sudo systemctl restart nginx
sudo systemctl restart nautobot-worker.service

Configuring the Plugin in Nautobot

Next, we need to configure the plugin in Nautobot to accept commands. For most deployments, open and unrestricted access to the bot from any chat account is undesirable. Therefore, access to the chatbot defaults to “deny all” when initially installed. Permissions for individual organizations, channels, and users must be set up here. For the purposes of this blog post, we will grant all access.

First, log into your Nautobot server. If this is the first plugin installed, a new menu option called Plugins will appear at the top. Under it, in section Nautobot ChatOps, select Access Grants.

Select the Add button to create a new access grant.

  • Command – You can specify permissions on a command-by-command basis, or specify all commands with an asterisk * as a wildcard. Example commands: nautobot or clear
  • Subcommand – You can specify permissions for subcommands as well, or all subcommands with an asterisk *. Example subcommands: get-devices or help
  • Grant Type – You need to create permissions for all three options: Organization, Channel, and User.
    • Organization – This is for permissions specific to your organization. This is good for configuring allowed/blocked commands organization-wide.
    • Channel – This is for configuring permissions on a per-channel basis.
    • User – This is for configuring permissions on a per-user basis.
  • Name – The corresponding name of the organization, channel, or user. This is used more like a description, whereas the value below is used when interacting with the MS Teams SaaS API on the back end.
  • Value – Corresponding ID value to grant access to. Enter an asterisk * to grant access to all organizations, channels, or users.

Once all three permissions are created, the plugin is done being set up in Nautobot. The minimum amount of permissions required are three. You can allow everyone in your organization access to all commands (not recommended) by using wildcards for organization, channel, and user permissions.

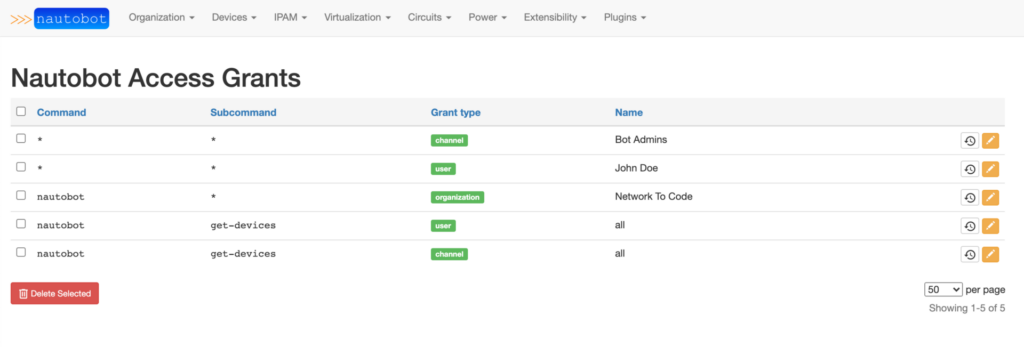
In the above example, here’s how I’ve set it up:

  • Organization – The org has access only to the nautobot command. It does not have access to clear, or any future commands the plugin may end up supporting.
  • User – Anyone can run just the nautobot get-devices command, however user John Doe can run any command. Note that he cannot run clear, as that is restricted at the Organization permission above.
  • Channel – Anyone can access the bot from any channel, but again, only the nautobot get-devices command. However, anyone in channel bot-admins can access any command available to them.

To summarize, anyone can run nautobot get-devices, whereas John Doe and anyone in the channel Bot Admins can run any nautobot subcommand. Nobody can run clear or any command that doesn’t start with nautobot.

The last step is configuring the Microsoft Teams client.

Part 3: Installing and Configuring the App in Teams

The last main step needed is uploading and installing the app into your Microsoft Teams web portal for use within your organization.

Before continuing, you need to download a single ZIP file from the ChatOps plugin repo, found here. This will be used later for ease of configuring your app for your organization.

The ZIP file contains three files:

  1. manifest.json – Preconfigured information for the bot
  2. color.png – Icon to use for the bot
  3. outline.png – Transparent image to use for the bot

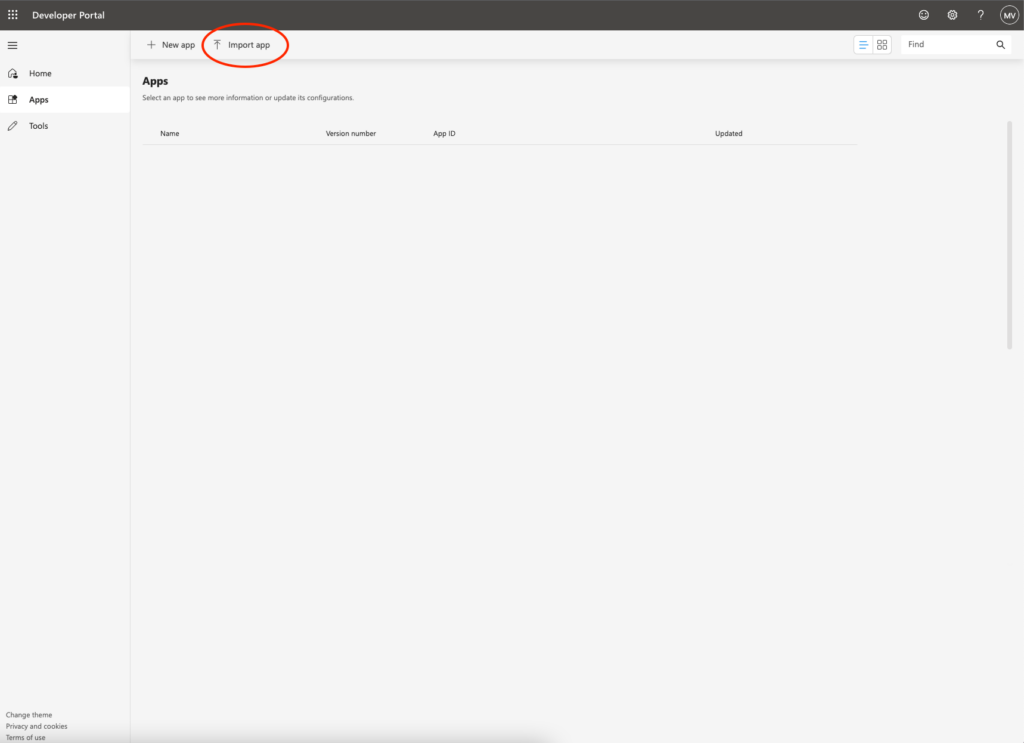
First, log into the Microsoft Developer Portal. Select Apps from the left menu bar, then Import App at the top of the screen. Select the Nautobot_ms_teams.zip file you downloaded earlier to import.

Note: You may get the below import error. This can be safely ignored, as we want the root ID it references to be auto-generated _after import. Click the blue Import button to ignore this error and complete the import._

Once imported, the Edit an app page will appear, allowing you to configure the settings for the bot.

Required Setting Changes

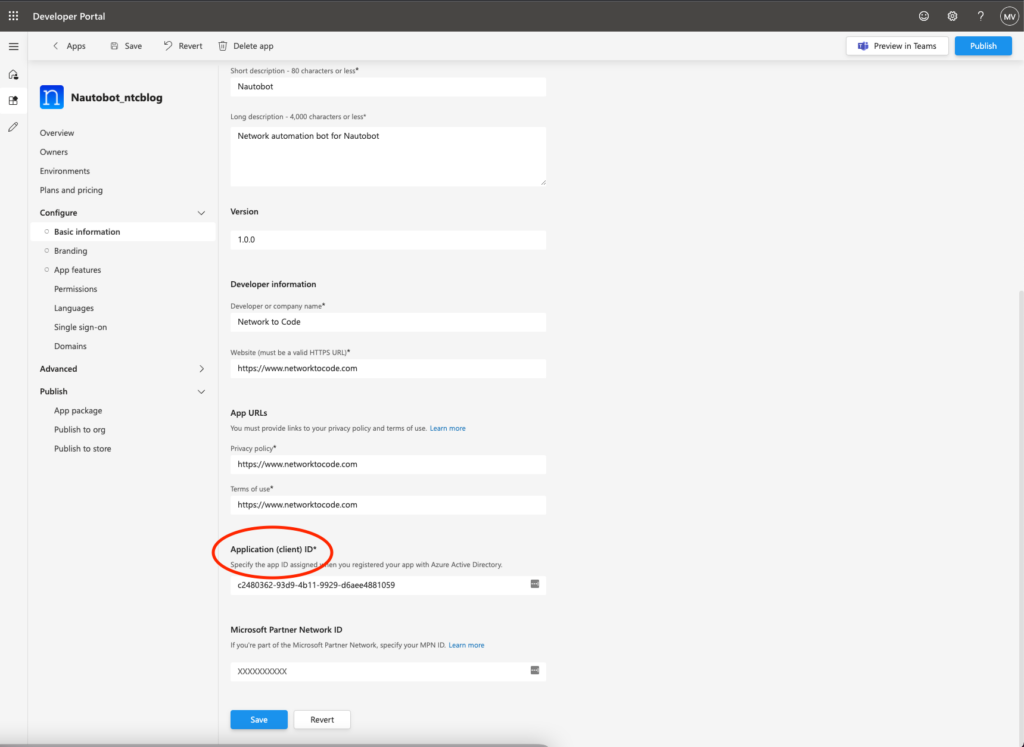
There are two settings that must be modified for the Azure Bot Application ID. This is the same App ID that was copied out of Azure earlier in the setup process.

First, scroll to the bottom of the Basic Information page under the Configure section. In the field Application (client) ID, paste in the application ID you copied out earlier from Azure. Then click Save at the bottom.

Next, click on App Features under the same Configure section. Near the top will be one or more tiles. Select the ... for Bot, then select Edit.

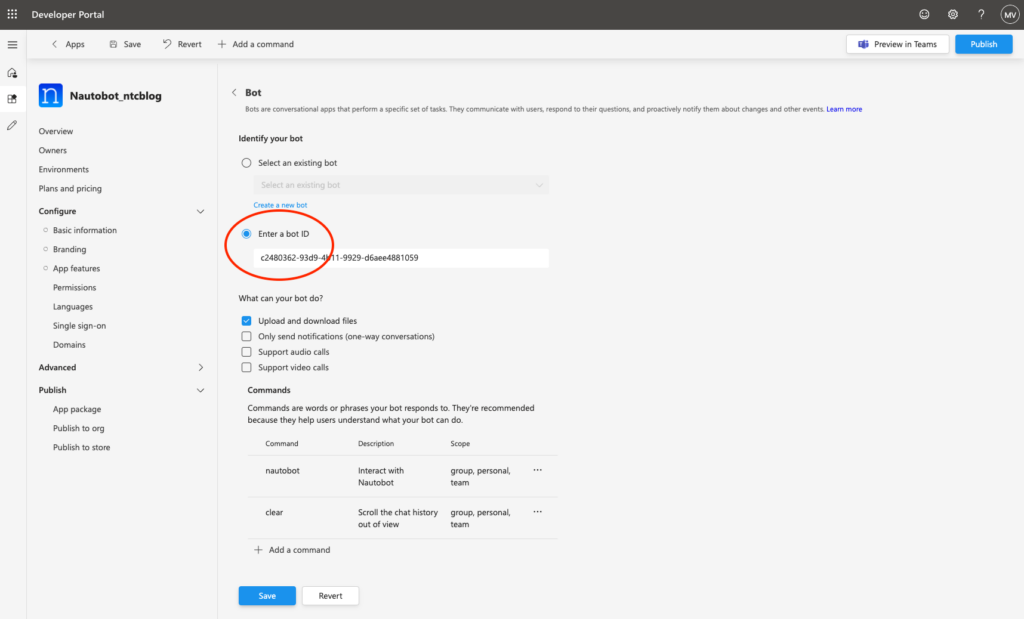
On the next screen, under Identify your bot, select the existing Bot ID from the drop-down list. If it doesn’t show up (as in the below screenshot), you can select Enter a bot ID and copy in the Bot ID from Azure manually. Then click Save.

All other settings are preconfigured as necessary, but you are welcome to adjust them as needed.

Submit Bot App for Organizational Use

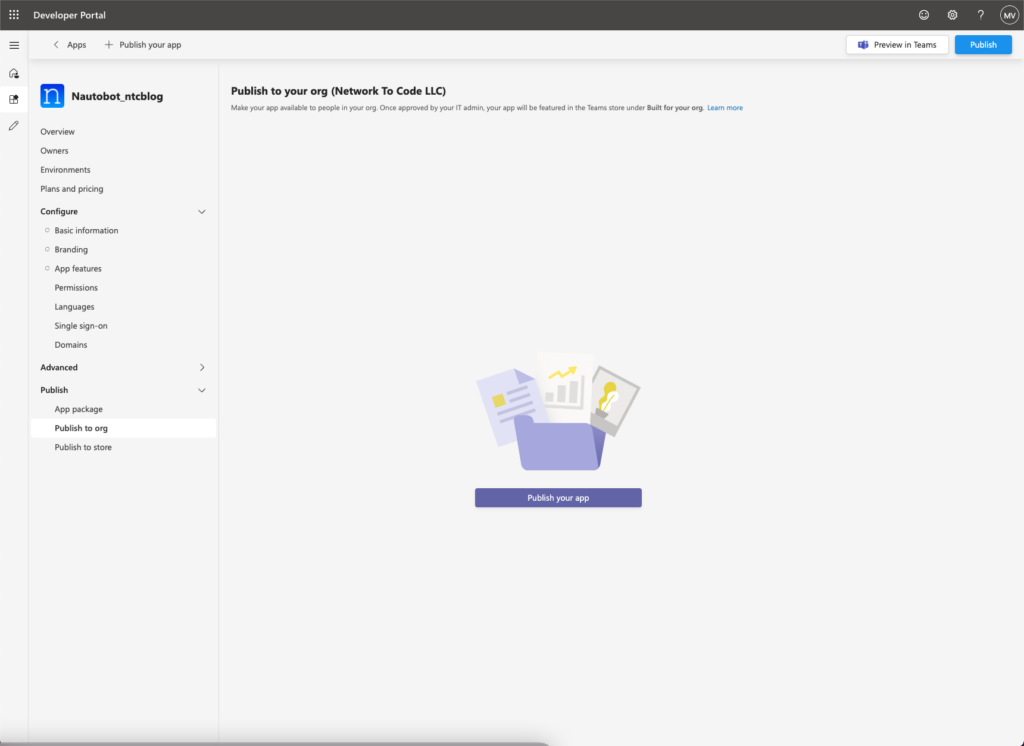
Once you are ready, under the Publish section select Publish to org and select the blue Publish your app button.

It will then be submitted for approval by your MS Teams administrators.

Once approved, the status will change from Submitted to Published, and you can find the app in your MS Teams client. However, we still need to activate it first.

Note: I had to wait approximately 30 minutes and restart my client before the app appeared in this section. If it doesn’t show up right away, you may have to wait up to a few hours.

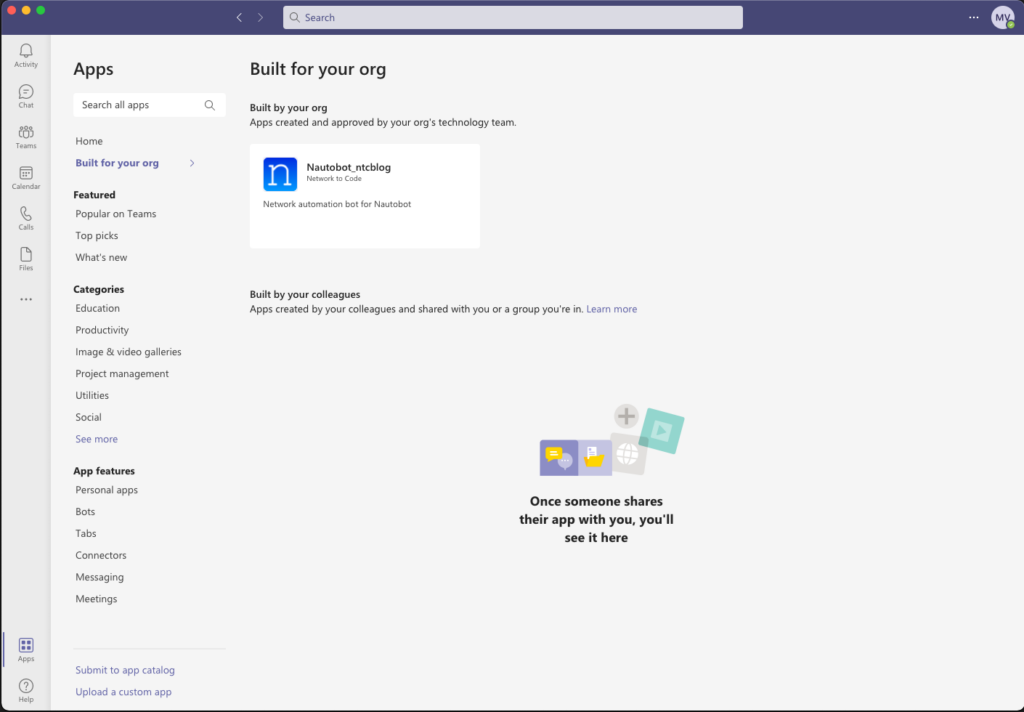
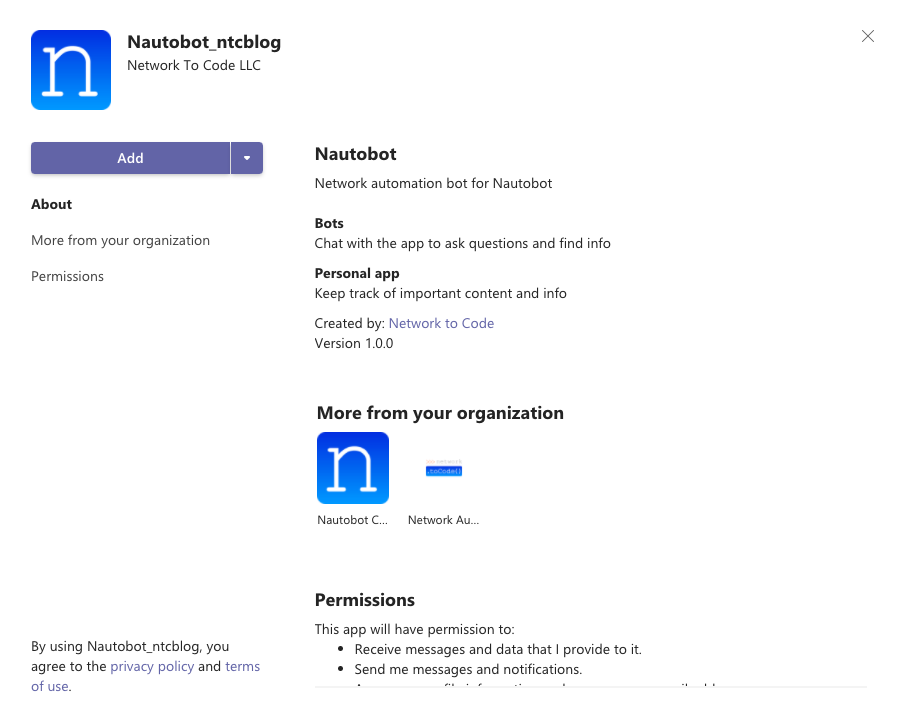
Open your MS Teams client and select Apps at the bottom of the left-side menu. Select “Built for your org” to see the new Nautobot app. Select the new app and click the blue Add button.

Done

That’s it! Your new Nautobot ChatOps plugin should now be installed for your Microsoft Teams client and usable by anyone with the appropriate permissions (configured earlier in part 2).

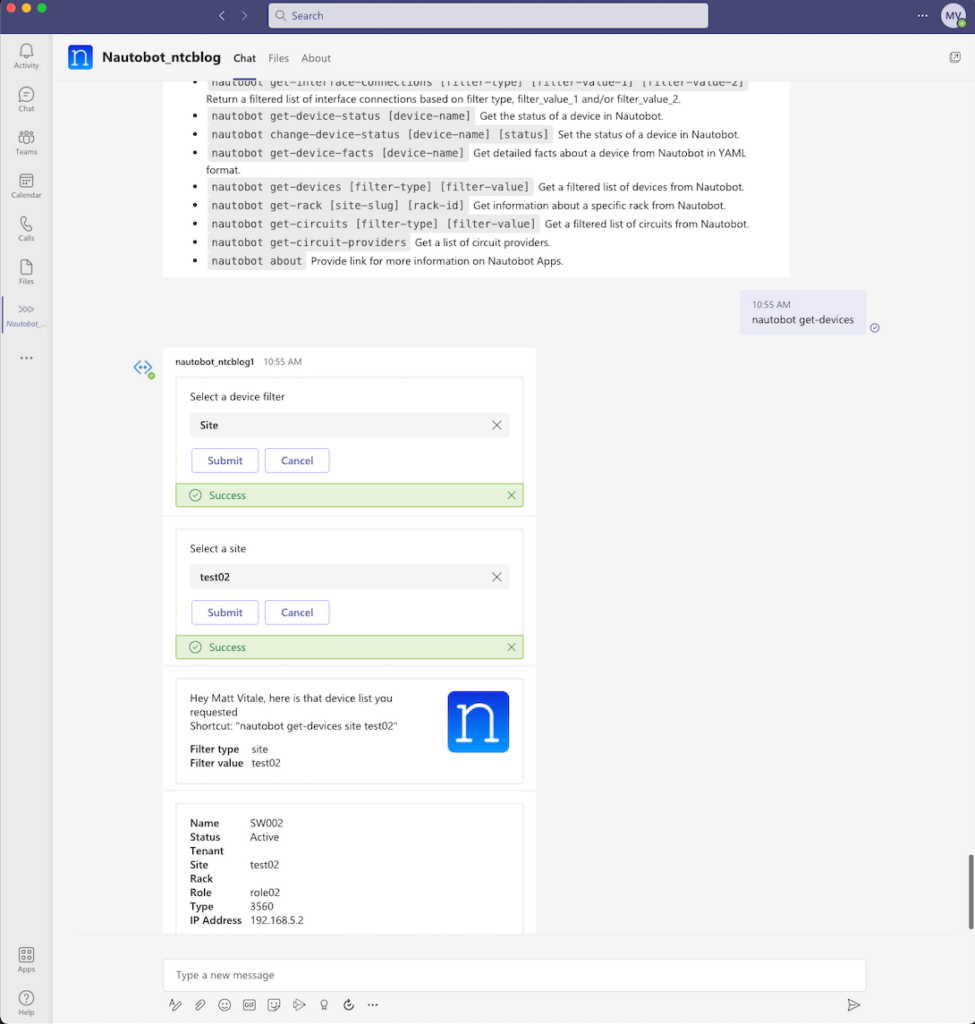
You can do some really cool things with the bot once it’s up and running and you have some data in Nautobot. You can send the message nautobot help to the app (no / forward slash) to see a list of all supported commands.

Interacting with Nautobot in Microsoft Teams

There are currently a couple of ways to interact with the Nautobot plugin by default directly in the Microsoft Teams client, although these can be modified in the app permissions in the same area where you installed the app originally (in part 3). They are:

  1. Chat – In the main left sidebar, select Chat, then search for “Nautobot” (or whatever you renamed the bot to). You can message the bot directly here.
  2. App – In the main left sidebar, select the three dots, then in the pop-out menu, search for “Nautobot” and select it. I recommend right-clicking the icon in the left sidebar once the window opens to pin it for future interactions.

Forward Looking

Here at Network to Code, as we continue developing Nautobot, we will be adding functionality to this ChatOps plugin as well. With the code publicly available here on GitHub, we encourage anyone looking to contribute to do so and join our growing open-source community around Nautobot!


Conclusion

Additionally, there’s a blog post from a few months ago around creating your own custom chat commands within this plugin. If interested, you can read it here.

Thanks for reading, and I hope you enjoy ChatOps as much as I do!

-Matt


ntc img
ntc img

Contact Us to Learn More

Share details about yourself & someone from our team will reach out to you ASAP!

Developing Nautobot Plugins – Part 4

Blog Detail

This is part 4 of the tutorial series on writing Nautobot plugins. Nautobot plugins are a way to extend the base functionality of Nautobot. Plugins can extend the database schema, add custom pages, and even update existing pages within Nautobot; the possibilities are nearly endless. In this blog series, we are developing a plugin for modeling and managing DNS zone data within Nautobot. In the previous posts, we covered setting up a development environment (part 1), creating models, views and navigation (part 2), and creating forms and tables (part 3). In this post, we will create filters used in GUI views and API calls. We will also add a search panel to the GUI list views for our models.

For coding along with this blog post, please clone part 3 of nautobot-example-dns-manager and use that as a starting point.

The completed part 4 version of nautobot-example-dns-manager is also available as a reference.

Defining Filters

To implement filtering of the records used by our plugin we will create FilterSet classes for model classes. FilterSet classes provide a mechanism for searching through database records and returning only those that matched the constraints defined by the operator.

FilterSet classes used by the plugin are placed in the filters.py file. By the Nautobot convention, we name FilterSet classes by appending FilterSet to the name of the model class. For example, filter class for DnsZoneModel will be named DnsZoneModelFilterSet. Note that the internal machinery of Nautobot, including unit test helpers, expects the filter classes to follow this convention.

We will start with the FilterSet class for DnsZoneModel:

class DnsZoneModelFilterSet(NautobotFilterSet):
    """Filter for filtering DnsZoneModel objects."""

    q = SearchFilter(
        filter_predicates={
            "name": "icontains",
            "mname": "icontains",
            "rname": "icontains",
        },
    )
    ttl__gte = django_filters.NumberFilter(field_name="ttl", lookup_expr="gte")
    ttl__lte = django_filters.NumberFilter(field_name="ttl", lookup_expr="lte")

    class Meta:
        model = DnsZoneModel
        fields = "__all__"

Let’s break this code down.

We follow Nautobot’s best practices, defined here, and ask for filters to be generated automatically for all the fields defined on the model:

    class Meta:
        model = DnsZoneModel
        fields = "__all__"

Next, we create an additional filter named q. By convention, the q filter is used for free text search and is placed as the first filter on the list of filters in the GUI. To define this filter we use the SearchFilter helper class provided by Nautobot for this use case.

from nautobot.utilities.filters import SearchFilter

This class expects an argument named filter_predicates, which is a dictionary with keys being field names of the model that we want to be searched. Corresponding key values define the field lookup type that will be applied to the field values when searching. We will use an icontains lookup, which performs a case-insensitive way to see whether any field contains the search term.

Below is the completed code for the q field:

    q = SearchFilter(
        filter_predicates={
            "name": "icontains",
            "mname": "icontains",
            "rname": "icontains",
        },
    )

See Django field lookups docs for a full list of available filter lookups.

We will also add extra filters for ttl field, one for searching ttl equal to or greater than some value, and one for less than or equal to some value.

To do that we explicitly define two new filters, ttl__gte and ttl__lte. These will use the django_filters.NumberFilter type, which is for filtering numeric values. For each field, we need to define which underlying model attribute we are mapping to; in this case it is ttl. We also need to specify the lookup expression that will be applied to each of the filters. This is done by assigning the expression name to the lookup_expr argument. In our case, these expressions are gte and lte.

    ttl__gte = django_filters.NumberFilter(field_name="ttl", lookup_expr="gte")
    ttl__lte = django_filters.NumberFilter(field_name="ttl", lookup_expr="lte")

This completes the FilterForm for the DnsZoneModel:

class DnsZoneModelFilterSet(NautobotFilterSet):
    """Filter for filtering DnsZoneModel objects."""

    q = SearchFilter(
        filter_predicates={
            "name": "icontains",
            "mname": "icontains",
            "rname": "icontains",
        },
    )
    ttl__gte = django_filters.NumberFilter(field_name="ttl", lookup_expr="gte")
    ttl__lte = django_filters.NumberFilter(field_name="ttl", lookup_expr="lte")

    class Meta:
        model = DnsZoneModel
        fields = "__all__"

CNameRecordModel and ARecordModel link to DnsZoneModel via the zone attribute. For the filtering to work correctly for this field we need to make this lookup use the NaturalKeyOrPKMultipleChoiceFilter class. This lookup type needs a queryset argument to know which model instances it should be filtering against. In our case, it is DnsZoneModel; so we provide the queryset that returns all instances of this model.

We also define a label that tells the user this filter takes slug or id.

Finalized filter field for zone attribute:

zone = NaturalKeyOrPKMultipleChoiceFilter(
    queryset=DnsZoneModel.objects.all(),
    label="DNS Zone (slug or ID)",
)

The other fields and definitions replicate the code we wrote for DnsZoneModelFilterSet. Using that code we complete the ARecordModelFilterSet and CNameRecordModelFilterSet classes:

class ARecordModelFilterSet(NautobotFilterSet):
    """Filter for filtering ARecordModel objects."""

    q = SearchFilter(
        filter_predicates={
            "name": "icontains",
        },
    )
    zone = NaturalKeyOrPKMultipleChoiceFilter(
        queryset=DnsZoneModel.objects.all(),
        label="DNS Zone (slug or ID)",
    )
    ttl__gte = django_filters.NumberFilter(field_name="ttl", lookup_expr="gte")
    ttl__lte = django_filters.NumberFilter(field_name="ttl", lookup_expr="lte")

    class Meta:
        model = ARecordModel
        fields = "__all__"
class CNameRecordModelFilterSet(NautobotFilterSet):
    """Filter for filtering CNameRecordModel objects."""

    q = SearchFilter(
        filter_predicates={
            "name": "icontains",
            "value": "icontains",
        },
    )
    zone = NaturalKeyOrPKMultipleChoiceFilter(
        queryset=DnsZoneModel.objects.all(),
        label="DNS Zone (slug or ID)",
    )
    ttl__gte = django_filters.NumberFilter(field_name="ttl", lookup_expr="gte")
    ttl__lte = django_filters.NumberFilter(field_name="ttl", lookup_expr="lte")

    class Meta:
        model = CNameRecordModel
        fields = "__all__"

The final step needed for FilterSet to take effect is to point to the newly defined classes from the UIViewSet classes.

We do this by assigning each of the FilterSet classes to the filterset_class class attribute of the corresponding UIViewSet class.

For example, here we add FilterSet class to the DnsZoneModelUIViewSet view:

class DnsZoneModelUIViewSet(
    view_mixins.ObjectListViewMixin,
    view_mixins.ObjectDetailViewMixin,
    view_mixins.ObjectEditViewMixin,
    view_mixins.ObjectDestroyViewMixin,
    view_mixins.ObjectBulkDestroyViewMixin,
):
    queryset = DnsZoneModel.objects.all()
    table_class = DnsZoneModelTable
    form_class = DnsZoneModelForm
    serializer_class = serializers.DnsZoneModelSerializer
    filterset_class = DnsZoneModelFilterSet

Building Filter Forms

We have completed FilterSet classes, which define the filtering logic. To expose filtering in the GUI, we need to create FilterForm classes for each of our models.

Filter form describes how the form will appear in the GUI and will handle input validation before passing the values to the filtering logic.

By convention, we create FilterForm classes in the forms.py file. The class names should follow the <ModelClassName>FilterForm format. For example, DnsZoneModelFilterForm is the FilterForm class we will define for the DnsZoneModel model.

In the FilterForm class we define the model class the form is meant for. We then define each of the model fields we want to expose in the form. These fields will have to be assigned a form field type that matches the field type defined in the model.

For example, the name field, which is a models.CharField on the model, becomes forms.CharField in the form.

Selecting the correct form field class is important, as it will present the operator with the matching UI field. It will also define the validation logic applied before the entered value is passed to the filter sets.

Form field classes are listed in the Form Fields Django docs.

Let’s define the filter form class for DnsZoneModel, and then we’ll walk through the code.

class DnsZoneModelFilterForm(NautobotFilterForm):
    """Filtering/search form for `DnsZoneModelForm` objects."""

    model = DnsZoneModel

    q = forms.CharField(required=False, label="Search")
    name = forms.CharField(required=False)
    mname = forms.CharField(required=False, label="Primary server")
    rname = forms.EmailField(required=False, label="Admin email")
    refresh = forms.IntegerField(required=False, min_value=300, max_value=2147483647, label="Refresh timer")
    retry = forms.IntegerField(required=False, min_value=300, max_value=2147483647, label="Retry timer")
    expire = forms.IntegerField(required=False, min_value=300, max_value=2147483647, label="Expiry timer")
    ttl = forms.IntegerField(required=False, min_value=300, max_value=2147483647, label="Time to Live")
    ttl__gte = forms.IntegerField(required=False, label="TTL Greater/equal than")
    ttl__lte = forms.IntegerField(required=False, label="TTL Less/equal than")

Form field class initializers take arguments; some are shared across all types, and some are type specific.

We don’t want any fields to be required by default, so we’ll pass the argument required=False to the field initializers.

We will also define custom labels to replace auto-generated ones, which by default use the name of the model field. Labels are provided to the label argument.

For IntegerField fields, it’s a good idea to provide minimum and maximum allowed values if the model defines them. This will provide additional validation of the values at a UI layer. To do that, use min_value and max_value arguments in the IntegerField initializers.

Finally, notice that we included ttl__gte and ttl__lte fields, which match the custom filter fields defined earlier.

Form classes for ARecordModel and CNameRecordModel follow a similar pattern. The one difference is the zone field, which we want to be a multiple-choice field to allow an operator to select one or more DnsZoneModel instances to filter against.

This is done by defining the zone field to be of the DynamicModelMultipleChoiceField type provided by Nautobot in nautobot.utilities.forms. Choices presented in the GUI are provided by the queryset defined in the queryset argument. Here we want all of the DnsZoneModel instances to be available, so we use the DnsZoneModel.objects.all() queryset.

Additionally, we want the value of slug field to be used in the queries. By providing slug as the value to the to_field_name argument, we change the default (which is to use the model’s primary key). It’s important that the value of the field chosen for this purpose is unique for each instance of the model.

With zone form field defined, we complete FilterForm classes for ARecordModel and CNameRecordModel:

class ARecordModelFilterForm(NautobotFilterForm):
    """Filtering/search form for `ARecordModelForm` objects."""

    model = ARecordModel

    q = forms.CharField(required=False, label="Search")
    name = forms.CharField(required=False)
    zone = DynamicModelMultipleChoiceField(required=False, queryset=DnsZoneModel.objects.all(), to_field_name="slug")
    ttl = forms.IntegerField(required=False, min_value=300, max_value=2147483647, label="Time to Live")
    ttl__gte = forms.IntegerField(required=False, label="TTL Greater/equal than")
    ttl__lte = forms.IntegerField(required=False, label="TTL Less/equal than")
class CNameRecordModelFilterForm(NautobotFilterForm):
    """Filtering/search form for `CNameRecordModelForm` objects."""

    model = CNameRecordModel

    q = forms.CharField(required=False, label="Search")
    name = forms.CharField(required=False)
    zone = DynamicModelMultipleChoiceField(required=False, queryset=DnsZoneModel.objects.all(), to_field_name="slug")
    value = forms.CharField(required=False, label="Redirect FQDN")
    ttl = forms.IntegerField(required=False, min_value=300, max_value=2147483647, label="Time to Live")
    ttl__gte = forms.IntegerField(required=False, label="TTL Greater/equal than")
    ttl__lte = forms.IntegerField(required=False, label="TTL Less/equal than")

Once we have our FilterForm classes defined, we need to link them to the corresponding UIViewSet class.

We do it by assigning FilterSet class to the filterset_form_class class attribute of the corresponding UIViewSet class.

UIViewSet classes, including FilterSet and FilterForm references:

class ARecordModelUIViewSet(
    view_mixins.ObjectListViewMixin,
    view_mixins.ObjectDetailViewMixin,
    view_mixins.ObjectEditViewMixin,
    view_mixins.ObjectDestroyViewMixin,
    view_mixins.ObjectBulkDestroyViewMixin,
):
    queryset = ARecordModel.objects.all()
    table_class = ARecordModelTable
    form_class = ARecordModelForm
    serializer_class = serializers.ARecordModelSerializer
    filterset_class = ARecordModelFilterSet
    filterset_form_class = ARecordModelFilterForm
class CNameRecordModelUIViewSet(
    view_mixins.ObjectListViewMixin,
    view_mixins.ObjectDetailViewMixin,
    view_mixins.ObjectEditViewMixin,
    view_mixins.ObjectDestroyViewMixin,
    view_mixins.ObjectBulkDestroyViewMixin,
):
    queryset = CNameRecordModel.objects.all()
    table_class = CNameRecordModelTable
    form_class = CNameRecordModelForm
    serializer_class = serializers.CNameRecordModelSerializer
    filterset_class = CNameRecordModelFilterSet
    filterset_form_class = CNameRecordModelFilterForm
class DnsZoneModelUIViewSet(
    view_mixins.ObjectListViewMixin,
    view_mixins.ObjectDetailViewMixin,
    view_mixins.ObjectEditViewMixin,
    view_mixins.ObjectDestroyViewMixin,
    view_mixins.ObjectBulkDestroyViewMixin,
):
    queryset = DnsZoneModel.objects.all()
    table_class = DnsZoneModelTable
    form_class = DnsZoneModelForm
    serializer_class = serializers.DnsZoneModelSerializer
    filterset_class = DnsZoneModelFilterSet
    filterset_form_class = DnsZoneModelFilterForm

Filtering in GUI

With all the code in place, we start Nautobot in our local dev environment and navigate to the list views for models.

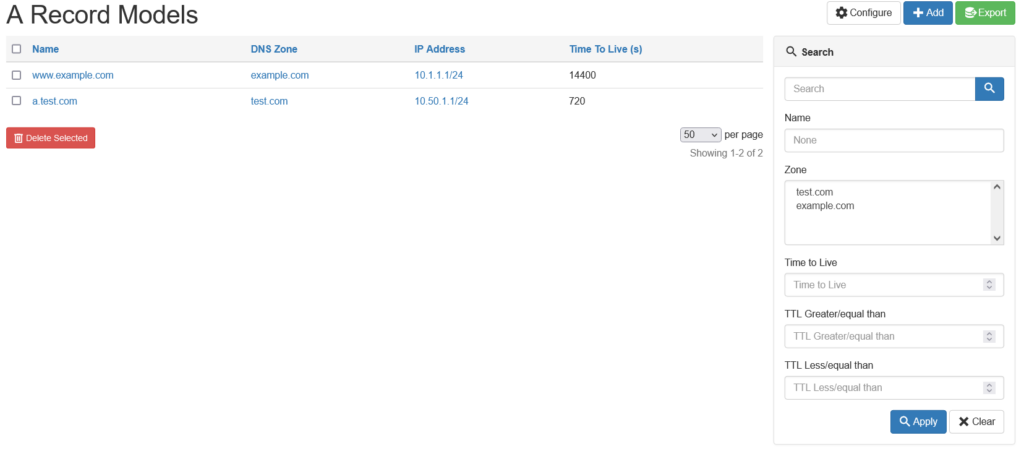
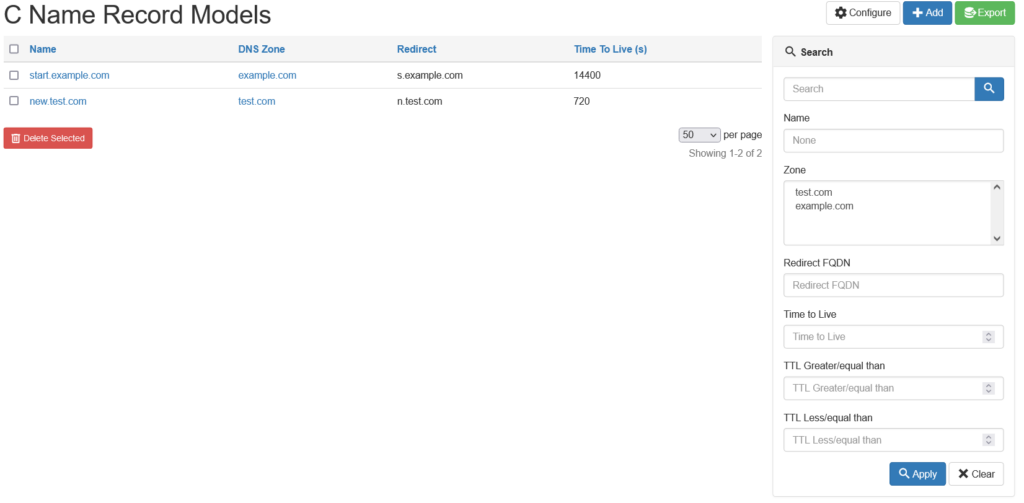
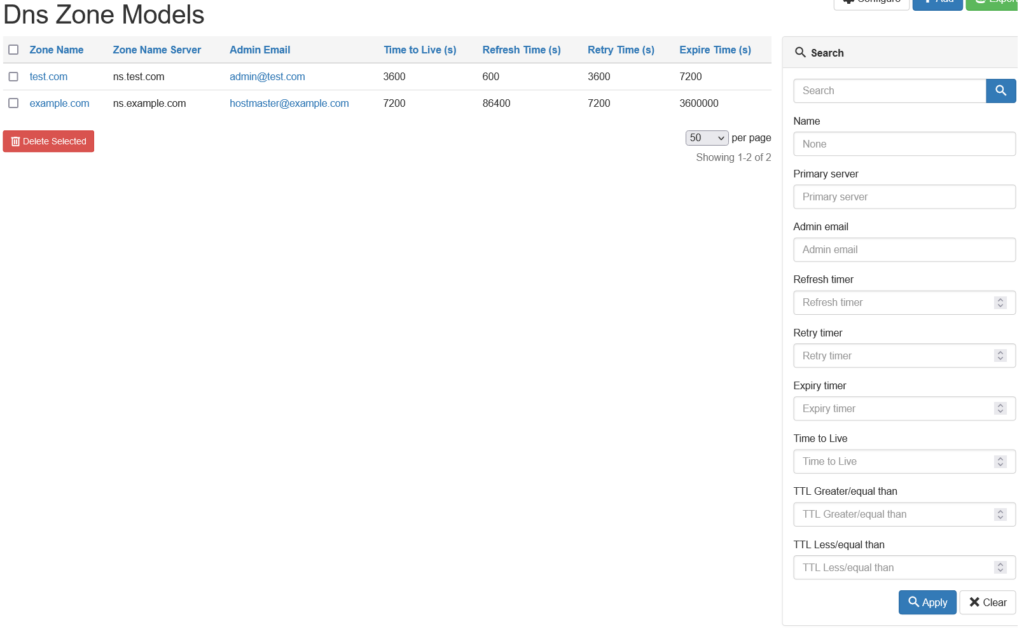
For each of the models, you should see a view similar to the ones below. Notice the search panel on the right-hand side with the fields we defined.

References


Conclusion
In this blog post, we learned how to build filtering logic for models defined in our plugin. We then exposed these filters using the search form displayed in the list view for each of the models. In the next installment of this series, we will learn how to add REST and GraphQL APIs to the plugin.
-Przemek


ntc img
ntc img

Contact Us to Learn More

Share details about yourself & someone from our team will reach out to you ASAP!