Developing Nautobot Plugins – Part 3

Blog Detail

This post is the third installment in a series on how to write plugins for Nautobot. Nautobot plugins are a way to extend the base functionality of Nautobot. Plugins can extend the database schema, add custom pages, and even update existing pages within Nautobot; the possibilities are nearly endless. In this blog series we will be developing a plugin for modeling and managing DNS zone data within Nautobot. In part 1 we covered setting up a development environment, and in part 2 we created models and views.

This post will provide a breakdown of how to use forms and tables inside your plugin. At a high level the purpose of forms and tables is to allow us to easily interact with our new models and perform CRUD (Create, Read, Update, and Delete) operations.

For coding along with this blog post, please clone part 2 of nautobot-example-dns-manager and use that as a starting point.

The completed part 3 version of nautobot-example-dns-manager is also available as a reference.

Forms Are Required to Add Objects

The first thing we want to do with our new DNS models is create some objects. In order to do this we need to create a form that will enable us to create a new DnsZoneModel object. We’ll start with the DNS Zone model since the ARecordModel and CNameRecordModel in our DNS manager plugin will need to be associated with a DNS Zone.

There are two places in the web GUI that give us access to create a new object. The first is a plus button in the navigation bar menu under IPAM > DNS > DNS Zones. The second is an add button that will appear on the table list view for DNS Zone objects. Let’s use the add button in the navigation bar first.
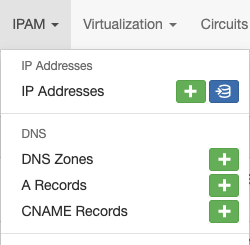
This button is present because in part 2 we included an add button in our navbar in nautobot_example_dns_manager/navigation.py.

The link matches our app name and follows the naming convention plugins:<app_name>:<url_prefix>_add

# nautobot_example_dns_manager/navigation.py

NavMenuItem(
                        link="plugins:nautobot_example_dns_manager:dnszonemodel_list",
                        name="DNS Zones",
                        permissions=[],
                        buttons=(
                            NavMenuAddButton(
                                link="plugins:nautobot_example_dns_manager:dnszonemodel_add",
                                permissions=[],
                            ),
                        ),
                    ),

How do we know what the URL prefix should be? This is set in nautobot_example_dns_manager/urls.py when we register the view as a URL pattern.

# nautobot_example_dns_manager/urls.py
...
router.register("dnszonemodel", views.DnsZoneModelUIViewSet) # "dnszonemodel" is our URL prefix

urlpatterns = []
urlpatterns += router.urls

If we start our development server and click the plus button under IPAM > DNS > DNS Zones, we will get this error.

TypeError at /plugins/example-dns-manager/dnszonemodel/add/
'NoneType' object is not callable

We’re getting this error because our plugin is missing the form class for this model, which is required to create or update objects. Let’s create a form class for this.

Creating the Form Class for DnsZoneModel

Create a new file in nautobot_example_dns_manager/ called forms.py.

At the top of the file include a short description and a couple of imports.

# nautobot_example_dns_manager/forms.py

"""Nautobot Example DNS Manager Forms."""

from nautobot.extras.forms import NautobotModelForm
from nautobot.utilities.forms import SlugField

from .models import DnsZoneModel

NautobotModelForm is the standard form to use when creating a model form, and we also need the SlugField class from nautobot.utilities.forms to use within our form.

Forms depend on models, so we also need to import our DnsZoneModel we created in part 2 from .models.

The form will inherit from NautobotModelForm and should have an instance of SlugField class assigned to the slug class attribute. We also need a Meta class inside our form that will tell Nautobot which model to link the form to and which fields to allow a user to populate.

# nautobot_example_dns_manager/forms.py

class DnsZoneModelForm(NautobotModelForm):
    slug = SlugField()

    class Meta:
        model = DnsZoneModel
        fields = [
            "name",
            "slug",
            "mname",
            "rname",
            "ttl",
            "refresh",
            "retry",
            "expire",
        ]

The next step before we can actually add an item is to assign the form to our view set in nautobot_example_dns_manager/views.py.

First, inside views.py import our new form.

# nautobot_example_dns_manager/views.py

from .forms import DnsZoneModelForm

Next, inside DnsZoneModelUIViewSet assign the form class to our view set.

# nautobot_example_dns_manager/views.py

...
class DnsZoneModelUIViewSet(
    view_mixins.ObjectListViewMixin,
    view_mixins.ObjectDetailViewMixin,
    view_mixins.ObjectEditViewMixin,
    view_mixins.ObjectDestroyViewMixin,
    view_mixins.ObjectBulkDestroyViewMixin,    
):
    queryset = DnsZoneModel.objects.all()
    table_class = DnsZoneModelTable
    form_class = DnsZoneModelForm # Assign our form class to the ViewSet here
...

After saving all changes and restarting the development server, we should now be able to click on the plus button again in the navigation bar for DNS Zones and see a form that allows us to create a new DNS Zone. We can see that the form has automatically added some items from the DnsZoneModel like help text and defaults. If we enter a new zone name, we can also see that the slug field is auto-populated for us. This is because of the line slug = SlugField() in our form class.
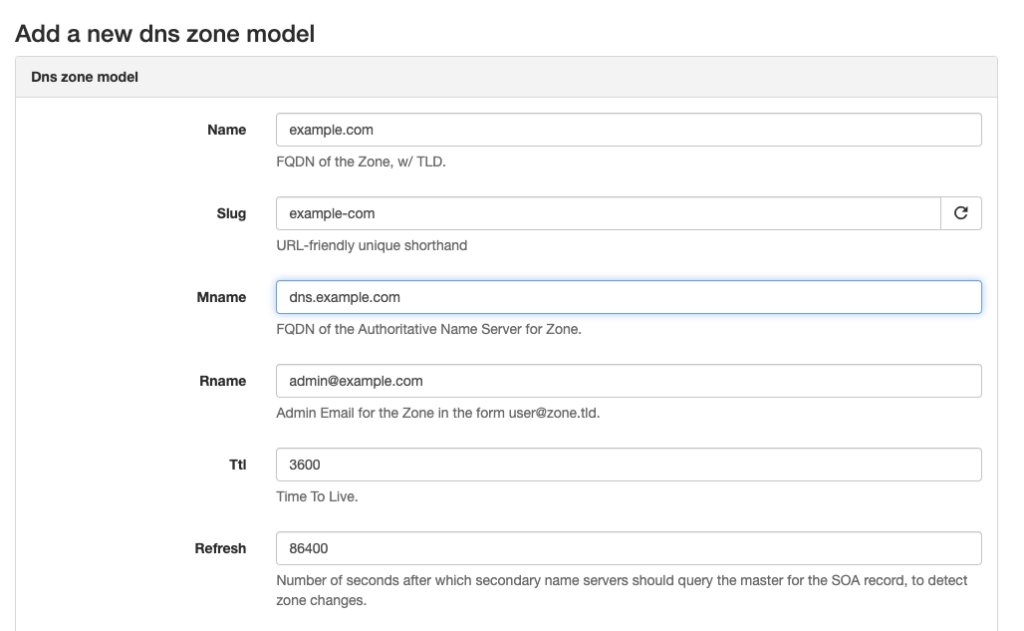
If we try to create the object now, we will get the following error:

AssertionError at /plugins/example-dns-manager/dnszonemodel/example-com
'DnsZoneModelUIViewSet' should either include a `serializer_class` attribute, or override the `get_serializer_class()` method.

Create an API Serializer for Our DnsZoneModel Form

One of the caveats of using Nautobot ViewSets is we must have a serializer class created and defined for the create and update views to be fully functional. The specific purpose and functions of the serializer and api views and urls modules are beyond the scope of this blog post and will be covered later. For now, we will create a very basic api serializer for the DnsZoneModel.

Create the following structure in our project:

└── nautobot_example_dns_manager
    └── api
        ├── __init__.py
        ├── serializers.py
        ├── urls.py
        └── views.py

__init__.py can be a blank file and is present to indicate to Python that the api folder is a package.

serializers.py should contain the following:

# nautobot_example_dns_manager/api/serializers.py

from nautobot.extras.api.serializers import NautobotModelSerializer

from nautobot_example_dns_manager.models import DnsZoneModel


class DnsZoneModelSerializer(NautobotModelSerializer):
    class Meta:
        model = DnsZoneModel
        fields = "__all__"

urls.py should contain the following:

# nautobot_example_dns_manager/api/urls.py

from nautobot.core.api import OrderedDefaultRouter

from . import views

router = OrderedDefaultRouter()
router.register("dnszonemodel", views.DnsZoneModelViewSet)

urlpatterns = router.urls

And views.py should contain the following:

# nautobot_example_dns_manager/api/views.py

from nautobot.extras.api.views import NautobotModelViewSet

from nautobot_example_dns_manager.models import DnsZoneModel
from . import serializers


class DnsZoneModelViewSet(NautobotModelViewSet):
    queryset = DnsZoneModel.objects.all()
    serializer_class = serializers.DnsZoneModelSerializer

The final step is to get the serializer class defined in DnsZoneModelUIViewSet in nautobot_example_dns_manager/views.py.

Import the serializer module:

# nautobot_example_dns_manager/views.py

from .api import serializers

And add the following line to the DnsZoneModelUIViewSet class:

# nautobot_example_dns_manager/views.py

...
class DnsZoneModelUIViewSet(
    view_mixins.ObjectListViewMixin,
    view_mixins.ObjectDetailViewMixin,
    view_mixins.ObjectEditViewMixin,
    view_mixins.ObjectDestroyViewMixin,
    view_mixins.ObjectBulkDestroyViewMixin,
):
    queryset = DnsZoneModel.objects.all()
    table_class = DnsZoneModelTable
    form_class = DnsZoneModelForm
    serializer_class = serializers.DnsZoneModelSerializer # Add our new serializer class to the ViewSet
    ...

The first 20 lines of nautobot_example_dns_manager/views.py should now look like this:

# nautobot_example_dns_manager/views.py

"""Nautobot Example DNS Manager Views."""

from nautobot.core.views import mixins as view_mixins

from .models import DnsZoneModel, ARecordModel, CNameRecordModel
from .tables import DnsZoneModelTable, ARecordModelTable, CNameRecordModelTable
from .forms import DnsZoneModelForm
from .api import serializers


class DnsZoneModelUIViewSet(
    view_mixins.ObjectListViewMixin,
    view_mixins.ObjectDetailViewMixin,
    view_mixins.ObjectEditViewMixin,
    view_mixins.ObjectDestroyViewMixin,
    view_mixins.ObjectBulkDestroyViewMixin,
):
    queryset = DnsZoneModel.objects.all()
    table_class = DnsZoneModelTable
    form_class = DnsZoneModelForm
    serializer_class = serializers.DnsZoneModelSerializer
...

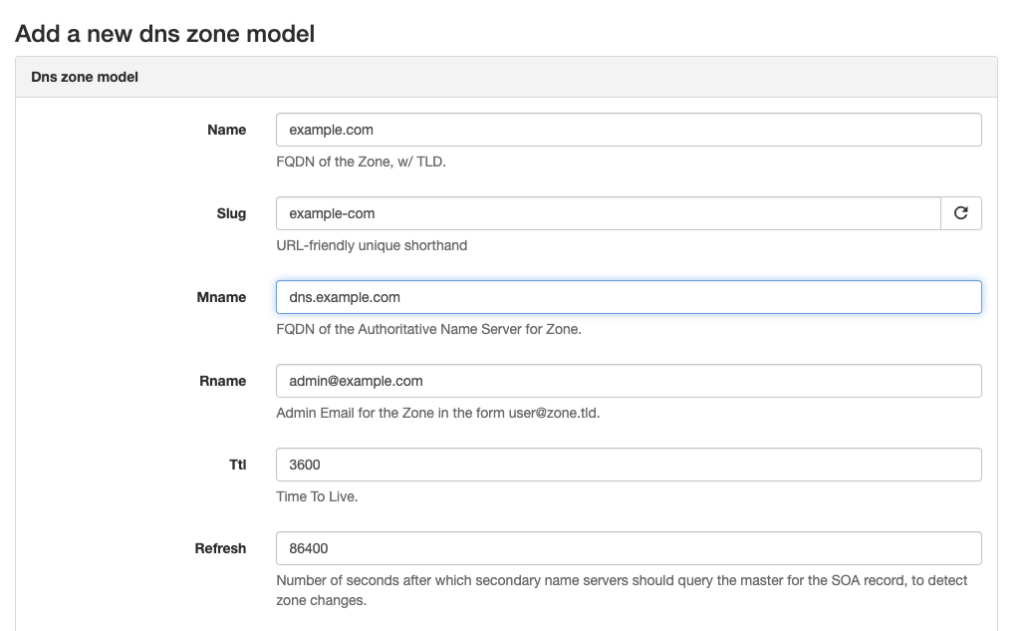
Once these files and changes are in place and the development server has restarted we can create our first DNS Zone object. Well, in this case it’s our second. Even though we were greeted with a traceback earlier when trying to create example.com, our first DNS Zone was actually still created, so we’ll get an error if we try to use the same name.
After clicking Create we will be taken to the object detail view for the object we just created. Since we didn’t create our own template for the object detail view, we will see the rendered version of the generic html templates for object detail. As you can see, there aren’t any fields displayed from our model-specific fields other than the name. There’s an Advanced tab that shows us some metadata, such as the slug and created and updated timestamps.
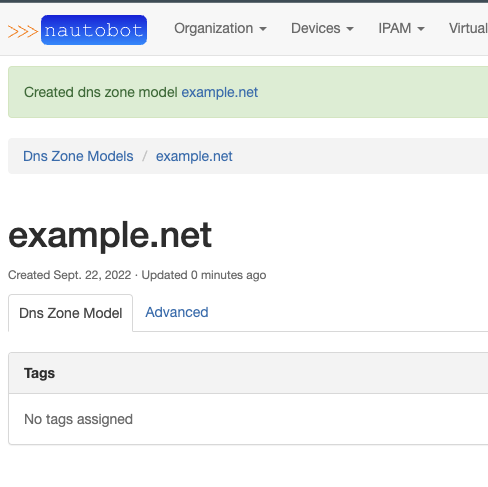
The reason this view is so basic is because we did not create an html template, and it is using the default object detail view template provided by Nautobot. We will need to create our own html template to customize the information displayed here.

Creating a Custom Object Retrieve Template for DnsZoneModel

Create a new directory inside nautobot_example_dns_manager called templates. Inside this directory create another directory also called nautobot_example_dns_manager. Nautobot will automatically search for html templates first in templates/<app name> before falling back to the generic templates. Nautobot will then look for a file in this directory called <model_name>_retrieve.html. By convention the model name can be converted to all lowercase and it will still find the file. Let’s create dnszonemodel_retrieve.html.

The complete file path looks like this:

└── nautobot_example_dns_manager
    └── templates
        └── nautobot_example_dns_manager
            └── dnszonemodel_retrieve.html

The good news is we do not have to create all the html for this template from scratch. Using the Django template language we can build off the generic/object_retrieve.html template and then add our own content.

We do this by using the {% extends %} template tag. We also need to load the helpers using {% load %}.

The first two lines should look like this:

{% extends 'generic/object_retrieve.html' %}
{% load helpers %}

The generic object_retrieve template includes a blank template block called content_left_page where we can put our fields. For more complex models with more fields you might use content_right_page and content_full_width_page as well, but for our project adding a table to content_left_page is enough to display all our model fields.

Let’s start by adding a table with just a single data row:

<span role="button" tabindex="0" data-code="{% extends 'generic/object_retrieve.html' %} {% load helpers %} {% block content_left_page %} <div class="panel panel-default"> <div class="panel-heading"> <strong>DNS Zone Model</strong> </div> <table class="table table-hover panel-body attr-table"> <tr> <td>Zone Name Server</td> <td>{{ object.mname|placeholder }}</td> </tr> </table>
{% extends 'generic/object_retrieve.html' %}
{% load helpers %}

{% block content_left_page %}
        <div class="panel panel-default">
            <div class="panel-heading">
                <strong>DNS Zone Model</strong>
            </div>
            <table class="table table-hover panel-body attr-table">
                <tr>
                    <td>Zone Name Server</td>
                    <td>{{ object.mname|placeholder }}</td>
                </tr>
            </table>
        </div>
{% endblock content_left_page %}

Save the file and restart the development server. Once Nautobot has been initialized we can refresh the object detail page and should now see the Zone’s Name Server as an additional field.
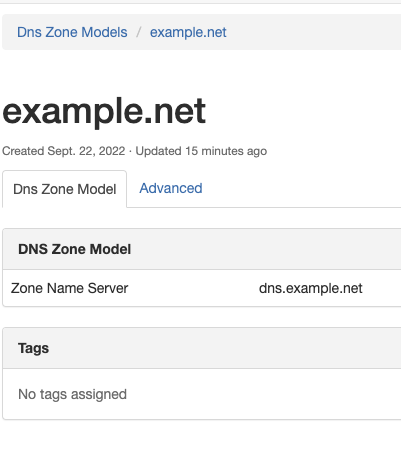
Let’s add the rest of the fields from our DNS Zone Model. The finished html template should look like this:

<span role="button" tabindex="0" data-code="{% extends 'generic/object_retrieve.html' %} {% load helpers %} {% block content_left_page %} <div class="panel panel-default"> <div class="panel-heading"> <strong>DNS Zone Model</strong> </div> <table class="table table-hover panel-body attr-table"> <tr> <td>Zone Name Server</td> <td>{{ object.mname|placeholder }}</td> </tr> <tr> <td>Admin Email</td> <td>{{ object.rname|placeholder }}</td> </tr> <tr> <td>Refresh Time (s)</td> <td>{{ object.refresh|placeholder }}</td> </tr> <tr> <td>Retry Time (s)</td> <td>{{ object.retry|placeholder }}</td> </tr> <tr> <td>Expire Time (s)</td> <td>{{ object.expire|placeholder }}</td> </tr> <tr> <td>Time to Live (s)</td> <td>{{ object.ttl|placeholder }}</td> </tr> </table>
{% extends 'generic/object_retrieve.html' %}
{% load helpers %}

{% block content_left_page %}
        <div class="panel panel-default">
            <div class="panel-heading">
                <strong>DNS Zone Model</strong>
            </div>
            <table class="table table-hover panel-body attr-table">
                <tr>
                    <td>Zone Name Server</td>
                    <td>{{ object.mname|placeholder }}</td>
                </tr>
                <tr>
                    <td>Admin Email</td>
                    <td>{{ object.rname|placeholder }}</td>
                </tr>
                <tr>
                    <td>Refresh Time (s)</td>
                    <td>{{ object.refresh|placeholder }}</td>
                </tr>
                <tr>
                    <td>Retry Time (s)</td>
                    <td>{{ object.retry|placeholder }}</td>
                </tr>         
                <tr>
                    <td>Expire Time (s)</td>
                    <td>{{ object.expire|placeholder }}</td>
                </tr>         
                <tr>
                    <td>Time to Live (s)</td>
                    <td>{{ object.ttl|placeholder }}</td>
                </tr>                                                                                                                 
            </table>
        </div>
{% endblock content_left_page %}

Now when we save the file and refresh the page we get this. Much better!

Editing an Existing Object

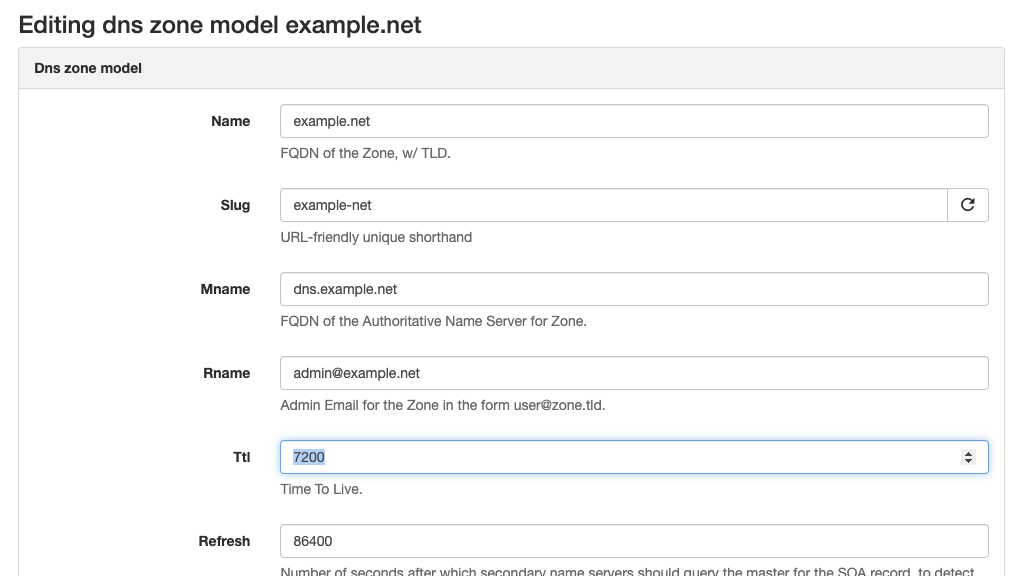
Editing an existing object is easy because we already created the DnsZoneModelForm class in forms.py. We get the update functionality at the same time as the create functionality. On the object detail view we can click the Edit button on the right side and it will take us to the edit page where we can make our changes and then click Update on the bottom of the page.
Creating a Useful Table View for DnsZoneModel

In part 2 of the blog series we created a very basic table view for the DNS Zone Model. Let’s enhance this table view to be more useful and easier to read.

Open nautobot_example_dns_manager/tables.py. You should see three import lines and a table class for each of our three models:

# nautobot_example_dns_manager/tables.py

"""Nautobot Example DNS Manager Tables."""

import django_tables2 as tables

from nautobot.utilities.tables import BaseTable, ToggleColumn

from .models import DnsZoneModel, ARecordModel, CNameRecordModel


class DnsZoneModelTable(BaseTable):
    class Meta(BaseTable.Meta):
        model = DnsZoneModel


class ARecordModelTable(BaseTable):
    class Meta(BaseTable.Meta):
        model = ARecordModel


class CNameRecordModelTable(BaseTable):
    class Meta(BaseTable.Meta):
        model = CNameRecordModel

In order to display only the columns we care about and in the order we want, we need to add a couple of properties to the nested Meta class. The fields property determines which columns are displayed and their order, and default_columns will control which fields are displayed by default.

Let’s add the fields below to our DnsZoneModelTable class:

# nautobot_example_dns_manager/tables.py
... 
class DnsZoneModelTable(BaseTable):

    class Meta(BaseTable.Meta):
        model = DnsZoneModel
        # fields determines which columns are displayed and their order
        fields = (
            "pk",
            "name",
            "mname",
            "rname",
            "ttl",
            "refresh",
            "retry",
            "expire",
        )
        # default_columns determines which columns are displayed by default
        default_columns = (
            "pk",
            "name",
            "mname",
            "rname",
            "refresh",
            "retry",
            "expire",
            "ttl",
        )

After saving, reloading the development server, and refreshing the page our table should look a little better.

However, we can still improve on this. Our column headers aren’t as descriptive as they could be. Also, wouldn’t it be nice to have selection checkboxes for selecting multiple items? Or how about making the Zone Names into clickable links to take us to the single object detail view?

These improvements can be made by assigning column types to the fields and passing in verbose names. This is done directly in the DnsZoneModelTable class and not the Meta class. We can choose which column types to assign to the fields as well as pass in a human-friendly verbose_name for the columns.

Some common column types are

  • Column: Standard default column
  • ToggleColumn: Replaces the field data with a checkbox for selecting items
  • LinkColumn: Turns field into a link to the object’s detail view
  • EmailColumn: Turns field into email link
# nautobot_example_dns_manager/tables.py

...
class DnsZoneModelTable(BaseTable):
    # if fields aren't defined here they will default to type tables.Column()
    pk = ToggleColumn()
    name = tables.LinkColumn(verbose_name="Zone Name")
    mname = tables.Column(verbose_name="Zone Name Server")
    rname = tables.EmailColumn(verbose_name="Admin Email")
    refresh = tables.Column(verbose_name="Refresh Time (s)")
    retry = tables.Column(verbose_name="Retry Time (s)")
    expire = tables.Column(verbose_name="Expire Time (s)")
    ttl = tables.Column(verbose_name="Time to Live (s)")

    class Meta(BaseTable.Meta):
        model = DnsZoneModel
        ...

After saving, reloading the development server, and refreshing the page our table should look even better and more like what we’re used to seeing in the natively supported Nautobot models.

We can now click on the name of a DNS Zone to take us to the detail page for that object.

There is one last thing we should fix on our table view. There is an error message banner above the table informing us we are missing a view for the import action.

Creating the import function for our view is beyond the scope of this blog post, so we can fix this by defining which action buttons we want on our view and making sure it doesn’t include importBy default, action buttons in views includes addimport, and export. For our views we’ll limit this to just have the add button.

In nautobot_example_dns_manager/views.py add an override for action_buttons to our DnsZoneModelUIViewSet view class:

class DnsZoneModelUIViewSet(
    view_mixins.ObjectListViewMixin,
    view_mixins.ObjectDetailViewMixin,
    view_mixins.ObjectEditViewMixin,
    view_mixins.ObjectDestroyViewMixin,
    view_mixins.ObjectBulkDestroyViewMixin,
):
    queryset = DnsZoneModel.objects.all()
    table_class = DnsZoneModelTable
    form_class = DnsZoneModelForm
    serializer_class = serializers.DnsZoneModelSerializer
    action_buttons = ("add",) # Limits our buttons above the table to just an add button. This needs to be a tuple and so includes the comma after the quoted string.

After saving and restarting the development server this error banner should now be gone.

Deleting Objects

There are a couple ways we can allow a user to delete an object. Both of these are already available to us based on mixin classes inherited by the view sets. view_mixins.ObjectDestroyViewMixin adds a delete button to the individual object form and view_mixins.ObjectBulkDestroyViewMixin adds a delete button at the bottom of the table view.

In order for the bulk delete button to work, the table needs to have the pk field assigned as a ToggleColumn, which we did earlier. This allows selection of single or multiple objects on the table view.

If you decide you don’t want a bulk delete button on the table view, you can simply remove view_mixins.ObjectBulkDestroyViewMixin from DnsZoneModelUIViewSet. After saving the changes, restarting the development server, and refreshing the table view we should no longer see a delete button under the table.

Forms, Tables, and Edit Views for the Other DNS Manager Models

The process to complete the forms, tables, and edit views for the rest of our DNS Manager models is very similar to what we just covered for the DNS Zone model. The biggest difference is that the ARecord and CNameRecord models contain a field that links them to the DNS Zone they’re part of. This field is called a ForeignKey relationship. In order to make the item in this column a clickable link, we need to use tables.LinkColumn for the column type.

Let’s quickly create forms, an API serializer, and tables for our ARecord model.

ARecord Forms

The form is going to follow the same format used for the DNS Zone model form. Create a new form in nautobot_example_dns_manager/forms.py called ARecordModelForm that inherits from NautobotModelForm. As before, we’ll assign SlugField() to slug, and add a Meta class. The Meta class needs to specify the model as well as the fields. Make sure to import the model at the top of the file.

# nautobot_example_dns_manager/forms.py 

from .models import DnsZoneModel, ARecordModel
# nautobot_example_dns_manager/forms.py

class ARecordModelForm(NautobotModelForm):
    slug = SlugField()

    class Meta:
        model = ARecordModel
        fields = [
            "name",
            "slug",
            "zone",
            "address",
            "ttl",
        ]

Once the form is created, we need to import it into nautobot_example_dns_manager/views.py and then assign it to the form class attribute inside the ARecordModelUIViewSet.

# nautobot_example_dns_manager/views.py 

from .forms import DnsZoneModelForm, ARecordModelForm
# nautobot_example_dns_manager/views.py 

class ARecordModelUIViewSet(
    view_mixins.ObjectListViewMixin,
    view_mixins.ObjectDetailViewMixin,
    view_mixins.ObjectEditViewMixin,
    view_mixins.ObjectDestroyViewMixin,
    view_mixins.ObjectBulkDestroyViewMixin,
):
    queryset = ARecordModel.objects.all()
    table_class = ARecordModelTable
    form_class = ARecordModelForm
    action_buttons = ("add",)

ARecord API Serializer

Once again, because we are using View Sets we need to provide an API serializer for our forms to work. The process again follows the same pattern as creating the API serializer for the DNS Zone model.

API Serializers

Import our ARecordModel:

# nautobot_example_dns_manager/api/serializers.py

from nautobot_example_dns_manager.models import DnsZoneModel, ARecordModel

Add the ARecordModelSerializer class:

# nautobot_example_dns_manager/api/serializers.py

class ARecordModelSerializer(NautobotModelSerializer):
    class Meta:
        model = ARecordModel
        fields = "__all__"

API Views

Import ARecordModel:

# nautobot_example_dns_manager/api/views.py

from nautobot_example_dns_manager.models import DnsZoneModel, ARecordModel

Add the ARecordModelViewSet class:

# nautobot_example_dns_manager/api/views.py

...
class ARecordModelViewSet(NautobotModelViewSet):
    queryset = ARecordModel.objects.all()
    serializer_class = serializers.ARecordModelSerializer

API URLs

And add a new line to register the arecordmodel URLs:

# nautobot_example_dns_manager/api/urls.py

from nautobot.core.api import OrderedDefaultRouter

from . import views

router = OrderedDefaultRouter()
router.register("dnszonemodel", views.DnsZoneModelViewSet)
router.register("arecordmodel", views.ARecordModelViewSet) # Add this to register our arecordmodel URLs

urlpatterns = router.urls

Once the serializer has been created, we need to import it inside nautobot_example_dns_manager/views.py and assign to serializer_class inside ARecordModelUIViewSet:

# nautobot_example_dns_manager/views.py

class ARecordModelUIViewSet(
    view_mixins.ObjectListViewMixin,
    view_mixins.ObjectDetailViewMixin,
    view_mixins.ObjectEditViewMixin,
    view_mixins.ObjectDestroyViewMixin,
    view_mixins.ObjectBulkDestroyViewMixin,
):
    queryset = ARecordModel.objects.all()
    table_class = ARecordModelTable
    form_class = ARecordModelForm
    serializer_class = serializers.ARecordModelSerializer # Add in our serializer to the ViewSet
    action_buttons = ("add",)

ARecord Tables

This process is also very similar to how we set up tables for DnsZoneModel.

Inside nautobot_example_dns_manager/tables.py add the column types to ARecordModelTable and the fields and default_columns to the nested Meta class:

# nautobot_example_dns_manager/tables.py

...
class ARecordModelTable(BaseTable):
    pk = ToggleColumn()
    name = tables.LinkColumn(verbose_name="Name")
    zone = tables.LinkColumn(verbose_name="DNS Zone")
    address = tables.LinkColumn(verbose_name="IP Address")
    ttl = tables.Column(verbose_name="Time To Live (s)")

    class Meta(BaseTable.Meta):
        model = ARecordModel
        # fields determines the ordering of the columns
        fields = ("pk", "name", "zone", "address", "ttl")
        # default_columns determines which columns are displayed
        default_columns = ("pk", "name", "zone", "address", "ttl")
...

We should now be able to add a new A Record object. Note that you will need an IP address created in Nautobot and an available DNS Zone before creating this object.
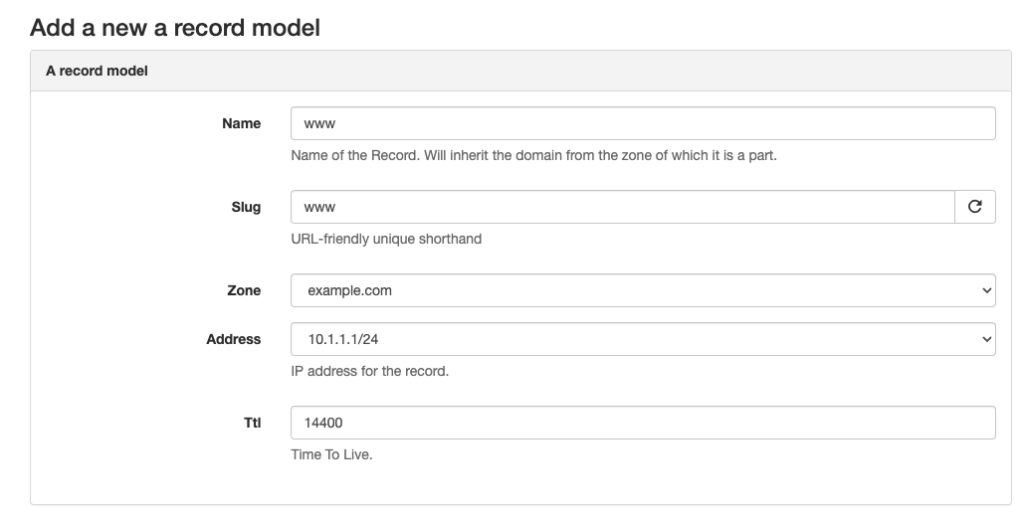
We can also verify our table view is working as expected. Note that because we used LinkColumns we can click on the DNS Zone or IP address to go to that object’s detail page.

As before, we can also create a custom html template for the A record object detail view.

This process can be repeated to create the forms and tables for our CNameRecordModel. That is beyond the scope of this post but has been completed in the corresponding Part 3 version of nautobot-example-dns-manager for your reference.

References

The following list provides some additional information and resources for Nautobot development:


Conclusion

This blog post has only scratched the surface of forms and tables in Nautobot. A ton of customization and additional features is available in forms and tables to suit your particular use case.

For other code examples of how Nautobot ViewSets, forms, and tables work together, check out Nautobot Circuits Source Code.

For more information on developing Nautobot plugins, see the Official Documentation.

Stay tuned for parts 4 and 5 in this blog series where we will cover Filters, REST API, and GraphQL.

-Paul Jorgenson


ntc img
ntc img

Contact Us to Learn More

Share details about yourself & someone from our team will reach out to you ASAP!

Introduction to Work Intake – Part 2

Blog Detail

In this second post in our Work Intake series, we’ll continue to expand on the use cases previously used in Part 1 of the Introduction to Work Intake. Before we begin, let’s quickly recap from Part 1 what work intake is and why it is important. Utilizing an anchor chart of 5 W’s + H, we began to gather preliminary requirement information from three different use cases.

New infrastructure at a remote branch location

  • Who: Remote branch users
  • What: Site build out of a firewall, switch, and AP
  • When: October 31st
  • Where: Burbank remote location
  • Why: Company is expanding to meet customer demand.
  • How: Physical build out of new location to include placement in SoT (Source of Truth) and monitoring

Migrating from SNMPv2 to v3

  • Who: Monitoring Team
  • What: Remediate the 100+ network devices
  • When: Risk closure by November 1st per Security Team
  • Where: All locations (35 sites)
  • Why: New security standard due to an internal audit
  • How: Device configurations moved to the new standard

Create automation for the provisioning of Data Center access ports

  • Who: Network Implementation Team
  • What: Provide deployment of ports for new server build-outs
  • When: Servers to arrive October 1st
  • Where: Brownfield DC
  • Why: Implementation team is overwhelmed
  • How: Automation to deploy the access port configuration

Existing Workflows

After the preliminary information has been gathered, our next step is to determine pre-existing versus ‘net new’ work effort, as it helps further the understanding of the use case. We’ll employ the term “net new” to represent a function or piece of work that hasn’t previously been performed and isn’t being done today. This is regardless of a manual, semi-automated, or even fully automated effort.

To quantify the procedural efforts of this pre-existing work, we’ll use the following functionalities as a means to quantify the significance of the work effort. These functions include:

Frequency

  • How often is this work or function performed?
  • Values: One-time, Hourly, Many times a day, Daily, Weekly, Quarterly

Steps

  • How many different processes or steps does it take to complete the work?
  • Values: 1 to 10 steps, 11 to 20, 21 to 50, 51 to 99, Greater than 99 steps

People

  • How many different people or teams are needed to complete the work?
  • Values: 1 to 3 people, 4 to 10, 11 to 20, 21 to 50, Greater than 50 people

Approvals

  • Are any approvals, either prior or during, needed in order to complete the work?
  • Values: No, Yes (1 to 2), Yes (3 to 5), Yes (6 or more)

Dependencies

  • Are any dependencies, either prior or during, needed in order to complete the work?
  • Values: No, Yes (1 to 2), Yes (3 to 5), Yes (6 or more)

Using this function from above, let’s begin to apply it to our existing three use cases to obtain further insight to them.

New infrastructure at a remote branch location

  • New or Existing: New
  • Frequency: One-time
    • The build out would be a one-time event
  • Steps: 51 to 99
    • There would be numerous steps during within the planning, purchasing, receiving, testing, installation, and finally the actual cut-over to the production environment.
  • People: 4 to 10 People
    • 2x Network Engineers, 1x Cabling Technician
  • Approvals: Yes, 3 to 5
    • As the request involves new equipment, there would be different approvals from finance for the bill of materials, purchasing for the ordering of equipment, as well as change ticket approvals.
  • Dependencies: Yes, 3 to 5
    • New equipment would require certain logical dependencies with creating a bill of materials prior to ordering. Additional dependencies might include lead times from the vendor or supplier for shipping or even receiving at the main office for pre-staging prior to shipping to the remote location.

Migrating from SNMPv2 to v3

  • New or Existing: Existing
  • Frequency: One-time
    • The remediation would be one-time migration
  • Steps: 4 to 10
    • Processes may differ across companies however this will be classified with 10 steps. These include receiving the request, gathering server side details, review of the environment, creating a script, then change management process of writing, submitting, and approval of change. Then implementation & validation of the change, validation to requestor, closing request.
  • People: 4 to 10 People
    • 3x Network Engineers, 2x Monitoring Engineers, Security, Change Mgmt.
  • Approvals: Yes, 3 to 5
    • Multiple approvals from Network, Monitoring, and Security teams.
  • Dependencies: Yes, 1 to 2
    • Dependencies on the company baseline standards and model specific best practices for SNMP v3 settings.

Create automation for the provisioning of Data Center access ports

  • New or Existing: Existing
  • Frequency: Weekly
    • Requests for new access ports come in multiple times a week
  • Steps: 4 to 10
    • Processes may differ across companies however this will be classified with 10 steps: receiving the request, gathering server side details, review of the environment, creating a script, then change management process of writing, submitting, and approval of change. Then implementation & validation of the change, validation to requestor, closing request.
  • People: 1 to 3 People
    • Network Engineer, Server Engineer, Change Mgmt.
  • Approvals: Yes, 1 to 2
    • Change ticket approval
  • Dependencies: Yes, 1 to 2
    • Dependency on the required server-side information prior to starting

The large details that we have gathered thus far will provide critical structure and visibility into understanding the entirety of the request. At this point, we are starting to see our three different use cases begin to take shape.

Additional Parameters

Obtaining these seemingly minor details up front helps paint a better understanding of where this work is taking place, as well as how our engineers will need to interact with the requestor’s environment in order to fulfill the work. Sometimes these items are very well understood for daily work, also known as “Keep the Lights On”; however, other times when multiple teams or systems are being integrated, this level of detail truly stands out.

Locations & Environments

Which regions and/or environments would be a part of this effort?

Examples: Internal, DMZ, Internet

Which domain(s) would be utilized for this effort?

Examples: Production, UAT, Development

Methods & Access

What method(s) would be used to interact with your request?

Examples: SSH/CLI, RestAPI, SOAP, All of the above

What type of account would the engineer use for authentication and access?

Examples: Service account, User account, Local account

Service Management

Some organizations maintain change windows for certain operations. Identifying this up front can reduce obstacles and help establish timelines.

Examples: Standard Network changes are performed every Tuesday from 8pm-2am

Using the parameters from above, let’s proceed to apply them on our existing three use cases.

New infrastructure at a remote branch location

  • Locations & Environments:
    • Internal production
  • Methods & Access:
    • SSH/CLI with a User account
  • Change Management:
    • Higher risk change window as this would introduce new variables to the production environment such as routing changes.

Migrating from SNMPv2 to v3

  • Locations & Environments:
    • Internal production
  • Methods & Access:
    • SSH/CLI with a User account
  • Change Management:
    • Involves multiple teams, so it would require a regular change on a weekend.

Create automation for the provisioning of Data Center access ports

  • Locations & Environments:
    • Internal production
  • Methods & Access:
    • SSH/CLI with a User account
  • Change Management:
    • Standard change window as it is a repeatable work effort

Outcomes

Lastly, outcomes provide us an opportunity to see why the requestor is coming to us. The value of the request will be seen in their eyes. Creating an acceptance criteria may create some dialog to establish a limit on the work effort, though setting these expectations up front can help both the requestor and the Engineering team to work towards the common goal.

Business Value

Business value can be subjective, as it may differ from company to company or even from team to team within an organization. The aim is to capture the positive outcome that the company would receive (using quantify for measurements such as time, and qualify for adjectives such as faster, better, etc.).

Acceptance Criteria

These are typically a list of requirements which would need to be satisfied in order for the requestor to sign off on the completed work. Having these agreed upon up front helps establish what the completed work may look like as well as reduce scope creep.

Using the parameters from above, let’s proceed to apply them on our existing three use cases.

New infrastructure at a remote branch location

  • Business Value: A new location provides opportunities to reach new customers for better company growth and increase in market share.
  • Acceptance Criteria: When onsite staff are able to access the main environment from the new equipment.

Migrating from SNMPv2 to v3

  • Business Value: Security and audit compliance, as we’ll be able to close out this Risk item
  • Acceptance Criteria: When the Security team is able to resolve the audit item.

Create automation for the provisioning of Data Center access ports

  • Business Value: Cost save associated with reduction of person hours & reduced manual error
  • Acceptance Criteria: When the engineer can feed a list of Brownfield ports to the automation

Conclusion

To recap, using our new existing workflow details and parameters, we’ve incorporated an in-depth assessment for these three different use cases. We also reviewed the business value that our requestor will see, along with the criteria established in order for the work to be considered completed.

In our upcoming final blog of the series, we’ll review assumptions and prioritizations for our example use cases as we bring everything together. In the meantime, if there are any questions or comments, we are here to help. So come on, join us on the Network to Code Slack. We’ll see you there!

-Kyle


ntc img
ntc img

Contact Us to Learn More

Share details about yourself & someone from our team will reach out to you ASAP!

Developing Nautobot Plugins – Part 1

Blog Detail

This post is the first installment in a series on how to write plugins for Nautobot. Nautobot plugins are a way to extend the base functionality of Nautobot. Plugins can extend the database schema, add custom pages, and even update existing pages within Nautobot; the possibilities are nearly endless. In this blog series we will be developing a plugin for modeling and managing DNS zone data within Nautobot. We will cover setting up a development environment, creating models and views, and more advanced topics such as query filters and GraphQL integration.

This first post will provide an overview of Nautobot plugins and will cover getting started, including setting up a development environment and creating the basic source code layout for a new plugin.

What Is a Nautobot Plugin

Nautobot is an open-source project that provides a Network Source of Truth (NSOT). While the core Nautobot application provides many, if not most, of the data models needed to manage network automation and resources, no tool set can cover every use case that an organization may encounter. Therefore, Nautobot includes the ability to extend its base data models and views to fit any use case.

One aspect of network data modeling that is not included out of the box is the Domain Name System (DNS) record management. While many organizations have other tools for managing their DNS, smaller organizations may not. In this blog series we will demonstrate how to write a plugin that provides the data models and views for managing DNS records.

Nautobot itself is implemented as a Django web application, and Django is a web framework implemented in Python. Django provides many out-of-the-box features including the concept of “applications”. A Django web application can be composed of many other discrete subapplications. In the case of Nautobot, plugins are essentially implemented as Django applications. However, Nautobot provides many extensions to Django to facilitate the development process.

Before any plugin development can take place, a suitable development environment must first be set up. The next section covers setting up the development environment and launching Nautobot with a basic plugin structure.

Development Environment Prerequisites

For our development environment we will be using Visual Studio Code (VS Code)Poetry, and Docker. Additionally, since Nautobot is written in Python a local installation of Python is necessary, and the minimum required version of Python is 3.7. Follow the linked instructions to install VS CodePython, and Docker.

Poetry is used in the plugin to manage Python dependencies and also to provide a virtual environment for development. Poetry is used in many projects at Network to Code and is often used in Nautobot plugin development. This blog series will use Poetry to manage the dependencies in the demo plugin. Instructions for installing Poetry can be found here.

Once the development tools have been installed, the source code can be loaded into the development environment.

Project Source Code

All of the code for this blog series is located in the GitHub repository. Each article in the series is tagged in the source repository to facilitate diffing the code as the blog progresses. For this installment the source code is tagged part1. In order to clone the source code repo, VS Code will need to be configured for Git and GitHub. Instructions for setting up VS Code for GitHub can be found here.

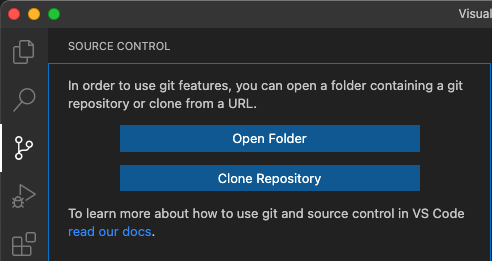
Once VS Code has been set up to use Git and GitHub, select the “Source Control” tab from the Activity Bar and click the “Clone Repository” button.

Paste the repository URL (https://github.com/networktocode-llc/nautobot-example-dns-manager.git) into the URL text box and VS Code will then prompt for a destination folder to store the local copy. Finally, once the repo has been cloned, open the source code by responding when prompted to “Open the cloned repository.”

Once the code has been cloned and opened in VS Code, the local repository will need to be switched to the part1 tag. Open the command palette (Shift+Command+P on Mac or Ctrl+Shift+P on Windows and Linux) and select Git: Checkout to... then select the tag part1. This will switch the local repository to match the code for part 1.

Now that the local git repo is on the correct tag, open a terminal window within VS Code and run the command poetry shell. This command will initialize the Poetry virtual environment within the project. Upon creating the virtual environment, VS Code should provide a prompt to use the newly created virtual environment, click the “yes” button:

If Visual Studio does not prompt you to change the virtual environment, you can manually select the project’s virtual environment from the command palette (Shift+Command+P on Mac or Ctrl+Shift+P on Windows and Linux), select Python: Select Interpreter, and then either enter the path to the virtual environment’s python or select it from the list.

Once the virtual environment has been activated, run the command poetry install to install all of the dependencies. One of the dependencies that will be installed is invokeInvoke is used for managing command line tasks, similar in concept to make and Makefile. The plugin source code includes an invoke tasks.py that includes all the tasks necessary to bootstrap and run a set of Docker images required for the Nautobot application stack. This includes a PostgreSQL database, a Redis server, a Nautobot Celery worker, a Nautobot Celery Beat worker, and a Nautobot application server. A complete discussion of all the components in a Nautobot installation is outside the scope of this tutorial. For additional information please see the Nautobot official documentation.

Several environment variables must be set before the development instance of Nautobot can be started. An example environment file is provided in development/creds.example.env. Before starting the plugin’s development environment, copy the file development/creds.example.env to development/creds.env. Docker will load this file and export the values into the running container as environment variables. On a local development system it is safe to use the defaults in this file. However, never use the example values for any production instance.

Once the environment file has been copied or created, start the application stack by running the command invoke build debug. This command will build the necessary Docker images and start all of the required containers using docker-compose. The debug target instructs invoke to follow the container logs in the running terminal. Note that Docker must be installed and running for this invoke command to succeed. After issuing the invoke command you should see logging messages similar to the following:

$ invoke debug
Starting Nautobot in debug mode...
Running docker-compose command "up"
Creating network "nautobot_example_dns_manager_default" with the default driver
Creating volume "nautobot_example_dns_manager_postgres_data" with default driver
Creating nautobot_example_dns_manager_db_1   ... 
Creating nautobot_example_dns_managerr_redis_1 ... 
Creating nautobot_example_dns_manager_db_1    ... done
Creating nautobot_example_dns_manager_redis_1 ... done
Creating nautobot_example_dns_manager_nautobot_1 ... 
Creating nautobot_example_dns_manager_nautobot_1 ... done
Creating nautobot_example_dns_manager_worker_1   ... 
Creating nautobot_example_dns_manager_worker_1   ... done
Attaching to nautobot_example_dns_manager_db_1, nautobot_example_dns_manager_redis_1, nautobot_example_dns_manager_nautobot_1, nautobot_example_dns_manager_worker_1
...
...
nautobot_1  | Django version 3.2.14, using settings 'nautobot_config'
nautobot_1  | Starting development server at http://0.0.0.0:8080/
nautobot_1  | Quit the server with CONTROL-C.
nautobot_1  |   Nautobot initialized!

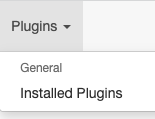
Once you see the message Nautobot initialized! you should be able to navigate to http://127.0.0.1:8080/ and see the Nautobot dashboard. Log in using the admin credentials set in the development/creds.env environment file and click the Plugins menu item, then click Installed Plugins.

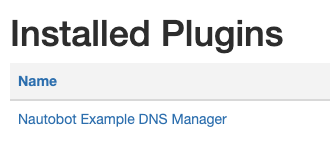
The new plugin should be displayed in the list of installed plugins:

Nautobot Plugin Files

Most Nautobot plugins have very similar directory structures. The minimum structure required for a plugin is a directory matching the plugin’s package name and an __init__.py file containing the plugin configuration. Our plugin will start with the absolute minimum requirements:

├── development/   # Configuration files for the plugin's local Nautobot instance.
|                  # Most of the files in this directory can be left alone
|
├── nautobot_example_dns_manager/
│   └── __init__.py  # Plugin configuration

The file development/nautobot_config.py is a standard config file for Nautobot. Any plugins you intend to use with Nautobot (including the one under development) must be enabled in the config. For instance:

PLUGINS = ["nautobot_example_dns_manager"]

Nautobot will attempt to load the plugin by importing the plugin’s package. Once the package has been imported, Nautobot will look for the variable config within the package. This variable should be assigned a class that extends Nautobot’s PluginConfig class. Our plugin defines the following in the nautobot_example_dns_manager/__init__.py file:

class NautobotExampleDNSManagerConfig(PluginConfig):
    """Plugin configuration for the nautobot_example_dns_manager plugin."""

    name = "nautobot_example_dns_manager"
    verbose_name = "Nautobot Example DNS Manager"
    version = __version__
    author = "Network to Code, LLC"
    description = "Nautobot Example DNS Manager."
    base_url = "example-dns-manager"
    required_settings = []
    min_version = "1.4.0"
    max_version = "1.9999"
    default_settings = {}
    caching_config = {}


config = NautobotExampleDNSManagerConfig

This config class has a number of different attributes. If a plugin depends on a feature introduced in a specific version of Nautobot, then the min_version should reflect that. For instance, Nautobot introduced dynamic groups in version 1.3.0. If a plugin depends on dynamic groups, then the min_version must be set to 1.3.0.

The required_settings and default_settings are two of the more commonly modified attributes. The value of required_settings should be a list of configuration keys that are required to be present in the nautobot_config.py file. Likewise, default_settings is a dictionary that includes default values for the required settings. If required settings are added to the plugin, the nautobot_config.py will need to be updated accordingly:

PLUGINS_CONFIG = {
    'nautobot_example_dns_manager': {
        'setting1': 'value1',
        # ...
    }
}

References

The following list provides some additional information and resources for Nautobot development:


Conclusion

In this blog post we have introduced Nautobot plugins and provided an overview of their use. We’ve setup a working development environment and cloned the source repo to our local development system. We’ve also configured the environment and invoked the Nautobot application stack. At this point, a running instance of Nautobot should be enabled with a new plugin installed.

Now that our development environment is squared away, we can get to writing the core of our plugin with Models, closely followed by Views, URLs, and Navigation. By the end of the next article, the plugin will begin to take shape and we’ll be able to see our changes in the GUI.


ntc img
ntc img

Contact Us to Learn More

Share details about yourself & someone from our team will reach out to you ASAP!