Blog Detail
This week’s Nautobot blog deals with webhooks. In basic terms, a webhook is a method for one web application to programmatically provide information to another web app.
The use case for webhooks is predicated on events: when a certain event happens, another event should happen in response. If that response is an action by a different app, then a webhook can be sent to notify the app that it needs to take action. The webhook can also carry information to that receiving app, including:
- Notification that a specific event happened
- Information about the event
Let’s illustrate this with a practical use case. This post will describe how to create a webhook in Nautobot that will trigger when a new device is created. The webhook will notify Microsoft Teams to post a message about the event in a channel.
Getting a Target URL (MS Teams Example)
A webhook needs a target URL: this is a destination endpoint for the webhook to send its information to.
This example will use MS Teams, but most of the chat platforms have easy methods for creating incoming webhook endpoints.
It’s quite simple to get an incoming webhook URL for MS Teams:
1. In the desired Teams channel, click on the three dots (…) in the top-right corner of the channel.
2. Click on Connectors.
3. Search for incoming webhooks and then click on Add; this action allows you to set webhooks on the channel.
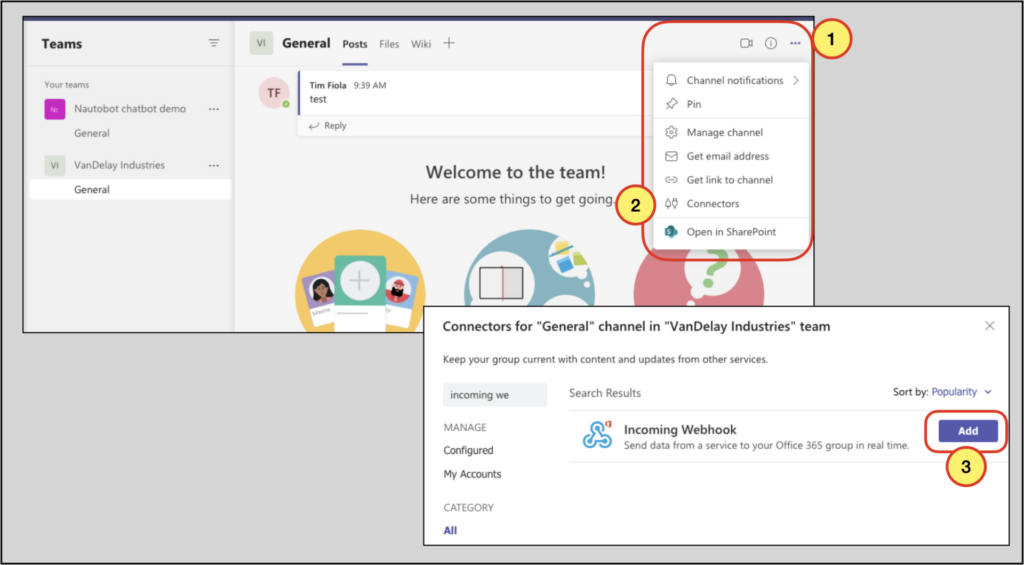
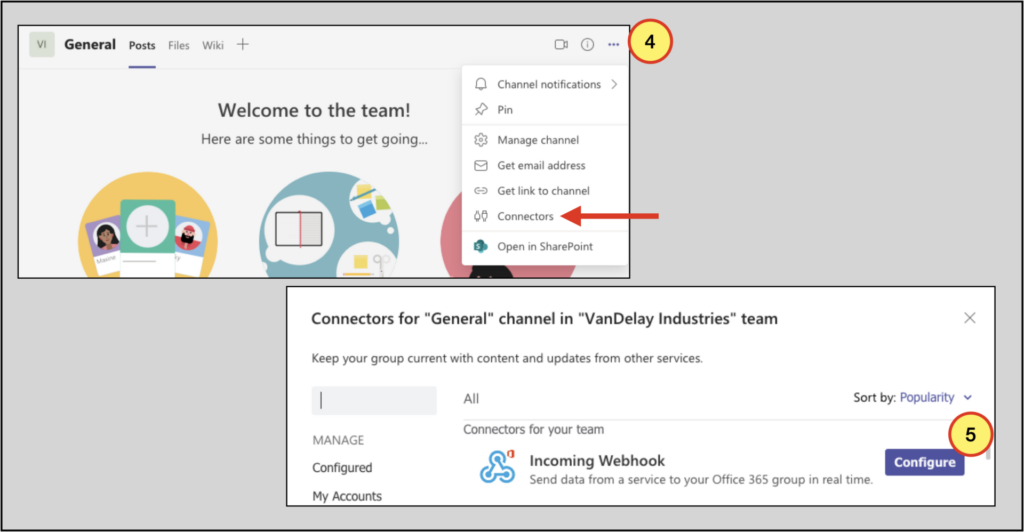
4. To create the webhook, go back to the three dots (…) in the top right of the channel and click on Connectors.
5. You will see Incoming Webhook listed as a connector; click on Configure.
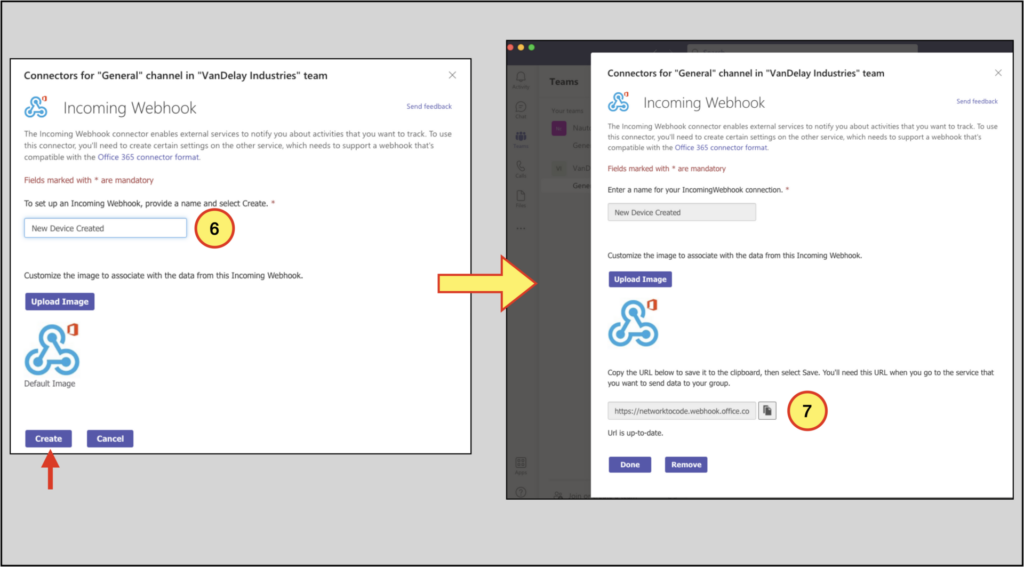
6. On the configuration screen, give the webhook a name and click Create.
7. You will be taken to a new screen that has a webhook URL. Copy that URL: this is the target URL for your webhook you’ll configure in Nautobot.
Configuring the Webhook in Nautobot
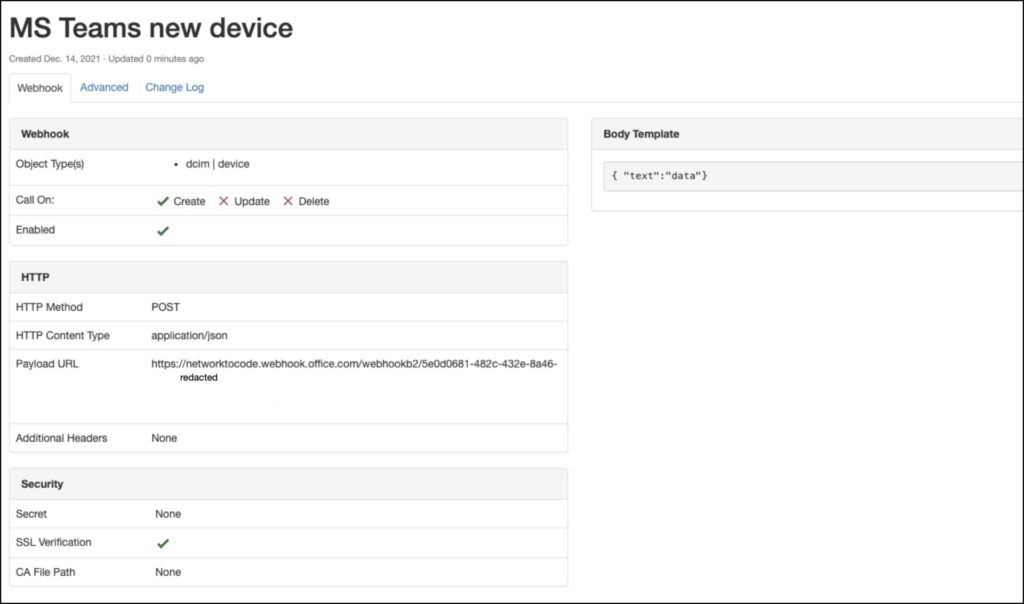
Webhooks are an Extensibility feature in Nautobot, and configuration is quite simple. To create the webhook for this example:
- Navigate to Extensibility –> Webhooks –> +
- Fill out the form, including:
- Name
- Specify the object(s) in the multi-selection drop-down menu (in our example the only object is DCIM | Device)
- Enable the webhook
- Specify the criteria for sending the webhook (create/update/delete) – select create for our example
- Populate the URL section with the target URL that MS Teams gave us
- Populate the Body template section with the JSON { “text”:”data” } for now (a later segment of this article will cover this section in more detail)
- Click Create
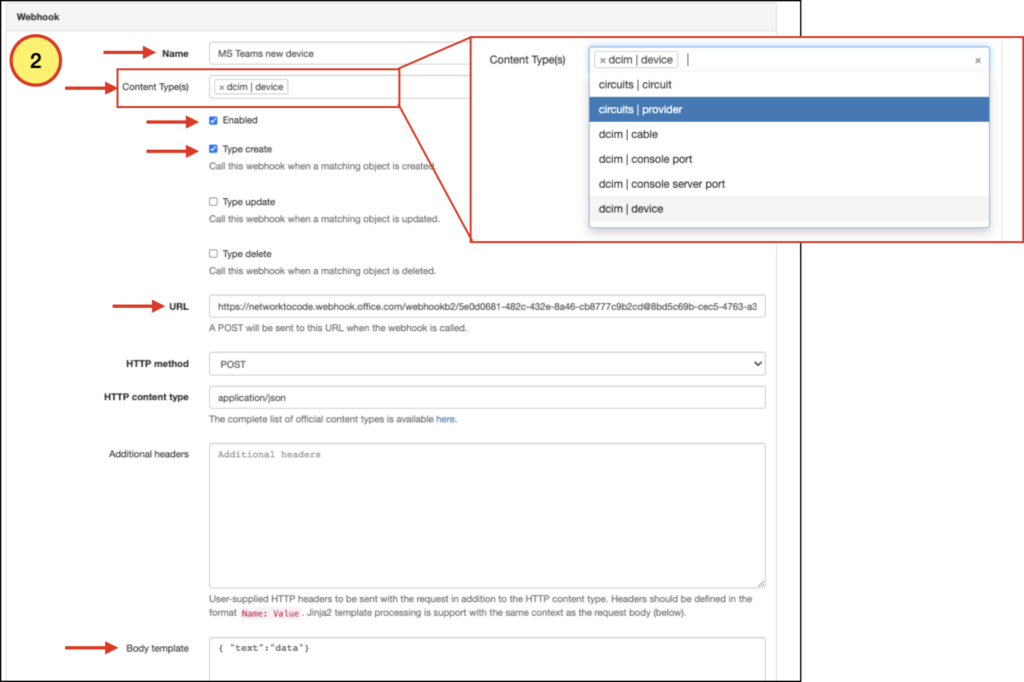
At this point, we have a very simple webhook:
Let’s test it! Create a new device in Nautobot by navigating to Devices –> Devices –> + in the top-level Nautobot menu. Fill out the Add a new device form and click on the Create button. Your MS Teams channel should show a message that looks similar to this:
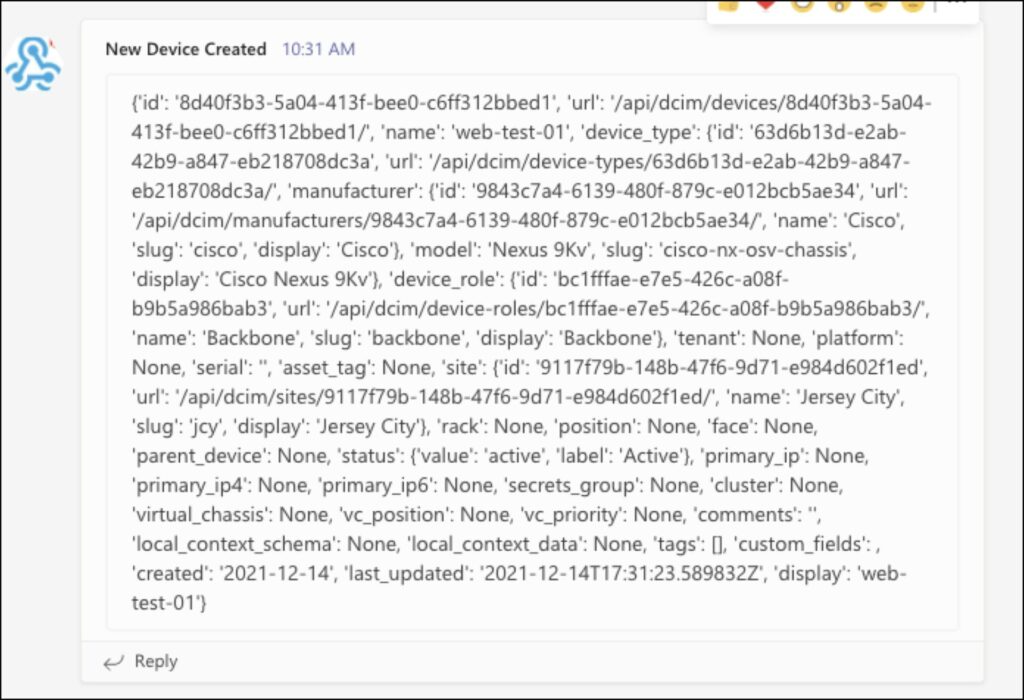
The Full Device Data Appendix has the complete JSON returned by the data context environment variable.
For the Body template section, we just included the data context variable for now, since that contains the richest set of information. The Nautobot documentation has more detailed information on webhook configuration and Jinja2 template support.
Since we sent all the data context variable to MS Teams, the output in our channel is a dump of the JSON within data. This is handy output to start because it gives us a visual of what attributes are present and what we can parse for. The next section digs into this and the notion of context variables a bit more.
TheBody templateSection
Let’s dig a bit deeper into the Body template section. This part of the webhook carries information to the receiving endpoint URL. Nautobot makes several context variables available for use in this section. The available context variables include: event, model, timestamp, username, request_id, and data.
The entire Body template section (as well as the Additional headers section) supports Jinja2 templating. The user can access and parse the context variables via Jinja2 formatting.
If this section is left blank, Nautobot will populate the request body with a raw dump of the webhook context. Many platforms will not accept a pure JSON dump, as they require specific formatting. For example, MS Teams and Slack require the webhook info to be in a key, value pair format, with "text" as the key.
So, as an example, to send MS Teams the device name, and the username that created the device, the body template would be:
{ "text":"{{ data.name }} created by {{ username }}"}
Using info within the data and username context variables, let’s craft a more descriptive message to send to MS Teams:
{ "text":"New device created in Nautobot. Device '{{ data.name }}' created in site '{{ data.site.name }}' with status '{{ data.status.value }}' on '{{ data.created }}' by user '{{ username }}'"}
Update your webhook body template section with this data and create another device in Nautobot; you will see a more informative message in MS Teams:

Webhooks and ChatOps Symmetry
For those familiar with Nautobot’s ChatOps app and for those who may not be yet, I’d like to point out a symmetry here:
- ChatOps allows a user to query Nautobot for information and to initiate other actions within Nautobot from a chat platform (Slack, MS Teams, Webex Teams, Mattermost).
- Nautobot’s webhooks allow Nautobot to proactively communicate to users in their chat platform(s) when specific events happen.
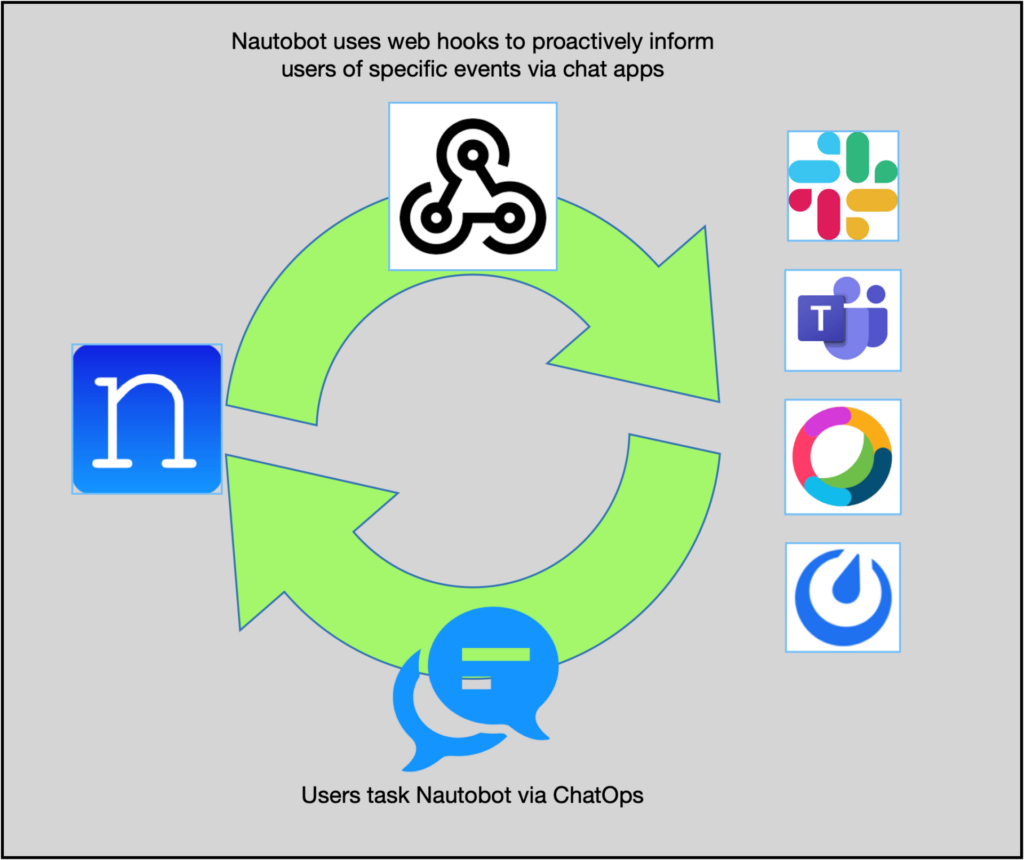
These two actions together form a back-and-forth synergy, making interaction with Nautobot more efficient.
Wrapping Up
Webhooks can play an important role in workflows because they coordinate activities between applications. As a central part of your automation infrastructure, Nautobot’s webhooks feature gives you another option for integration that best suits your environment.
Thank you for your time, and have a Happy New Year!
-Tim Fiola
Developer Advocate
Appendix: Full Device Data
This is the full json output for the newly created device:
{'id': '8d40f3b3-5a04-413f-bee0-c6ff312bbed1',
  'url': '/api/dcim/devices/8d40f3b3-5a04-413f-bee0-c6ff312bbed1/',
  'name': 'web-test-01',
  'device_type': {
    'id': '63d6b13d-e2ab-42b9-a847-eb218708dc3a',
    'url': '/api/dcim/device-types/63d6b13d-e2ab-42b9-a847-eb218708dc3a/',
    'manufacturer': {
      'id': '9843c7a4-6139-480f-879c-e012bcb5ae34',
      'url': '/api/dcim/manufacturers/9843c7a4-6139-480f-879c-e012bcb5ae34/',
      'name': 'Cisco',
      'slug': 'cisco',
      'display': 'Cisco'
    },
    'model': 'Nexus 9Kv',
    'slug': 'cisco-nx-osv-chassis',
    'display': 'Cisco Nexus 9Kv'
  }, 'device_role': {
    'id': 'bc1fffae-e7e5-426c-a08f-b9b5a986bab3',
    'url': '/api/dcim/device-roles/bc1fffae-e7e5-426c-a08f-b9b5a986bab3/',
    'name': 'Backbone',
    'slug': 'backbone',
    'display': 'Backbone'
  },
  'tenant': None,
  'platform': None,
  'serial': '',
  'asset_tag': None,
  'site': {
    'id': '9117f79b-148b-47f6-9d71-e984d602f1ed',
    'url': '/api/dcim/sites/9117f79b-148b-47f6-9d71-e984d602f1ed/',
    'name': 'Jersey City',
    'slug': 'jcy',
    'display': 'Jersey City'
  },
  'rack': None,
  'position': None,
  'face': None,
  'parent_device': None,
  'status': {
    'value': 'active',
    'label': 'Active'
  },
  'primary_ip': None,
  'primary_ip4': None,
  'primary_ip6': None,
  'secrets_group': None,
  'cluster': None,
  'virtual_chassis': None,
  'vc_position': None,
  'vc_priority': None,
  'comments': '',
  'local_context_schema': None,
  'local_context_data': None,
  'tags': [],
  'custom_fields': ,
  'created': '2021-12-14',
  'last_updated': '2021-12-14T17:31:23.589832Z',
'display': 'web-test-01'}Contact Us to Learn More
Share details about yourself & someone from our team will reach out to you ASAP!

