Introducing the Bootstrap Integration for the Nautobot SSoT App
With the v3.2.0 release of the Nautobot SSoT App, a new integration has been added. Presenting Bootstrap, a faster and better way to get Nautobot from 0 to 60.
What is Bootstrap
Bootstrap is a new Single Source of Truth (SSoT) integration that is included with the Nautobot SSoT app (https://github.com/nautobot/nautobot-app-ssot). This app is a home to multiple integrations which allow a user to sync known information from other Systems of Record (SoR) and represent that information in Nautobot. The beauty is when this information can be aggregated from multiple sources and normalized by Nautobot, which then creates a strong launching pad for automation. You can read more about SSoT with Nautobot here (https://networktocode.com/blog/?tag=ssot). The goal of the Bootstrap integration is to take a fresh Nautobot instance and a couple of YAML files, and “bootstrap” Nautobot to a point where a user can begin adding devices. In a fresh Nautobot instance there are a number of things that are required to be implemented before a Device can be created. For example, manufacturer, platform, location, and location type. The primary goal of the Bootstrap SSoT integration is to quickly add these basic components to Nautobot and reduce the administrative burden on the user.
Another use of Bootstrap can be to keep these same set of components synchronized between Nautobot instances. This will be discussed later in more detail, but in a nutshell, if you have development, staging, and production instances of Nautobot and need those same set of objects in each environment, you only have to build the YAML file once, then run the Bootstrap to Nautobot job in each instance to create all the objects.
The final intended use case for Bootstrap is a partial backup of Nautobot data and/or quick creation of local development instances. Ideally, the YAML files should be stored in Git, these can be quickly restored to a fresh installation of Nautobot in the event of database or application corruption. Ideally, device information is stored in another system and a separate SSoT integration can be used to restore that part of the data. The same goes for local development environments and being able to quickly and repeatedly create local environments with actual data instead of creating a bunch of random devices and locations, etc…
What information can be managed with Bootstrap
Currently there are 30 Nautobot models that can be managed with the Bootstrap SSoT integration, with more planned. Each of these models can be enabled/disabled via configuration settings so only what’s needed is processed. As of the writing of this blog (October 2024) here is the list of objects supported:
- Secret
- SecretsGroup
- GitRepository
- DynamicGroup
- ComputedField
- Tag
- GraphQlQuery
- Software
- SoftwareImage
- ValidatedSoftware
- TenantGroup
- Tenant
- Role
- Manufacturer
- Platform
- LocationType
- Location
- Team
- Contact
- Provider
- ProviderNetwork
- CircuitType
- Circuit
- CircuitTermination
- Namespace
- RIR
- VLANGroup
- VLAN
- VRF
- Prefix
Getting started with Bootstrap
There are more detailed instructions within Nautobot Docs https://docs.nautobot.com/projects/ssot/en/latest/admin/integrations/. This overview is intended to be a high level presentation of the basic pieces of the setup. Step one is to get the Nautobot SSoT app installed, environment variables set, and set the configuration in nautobot_config.py since that part requires a reboot of the Nautobot application (for an existing installation). The Nautobot config file should include the following information, modified for your needs. These options should be added to the nautobot_ssot: dictionary under the PLUGINS_CONFIG section of the nautobot_config.py file.
"bootstrap_nautobot_environment_branch": os.getenv("NAUTOBOT_BOOTSTRAP_SSOT_ENVIRONMENT_BRANCH", "develop"),
"bootstrap_models_to_sync": {
   "secret": True,
   "secrets_group": True,
   "git_repository": True,
   "dynamic_group": True,
   "computed_field": True,
   "tag": True,
   "graph_ql_query": True,
   "software": False,
   "software_image": False,
   "validated_software": False,
   "tenant_group": True,
   "tenant": True,
   "role": True,
   "manufacturer": True,
   "platform": True,
   "location_type": True,
   "location": True,
   "team": True,
   "contact": True,
   "provider": True,
   "provider_network": True,
   "circuit_type": True,
   "circuit": True,
   "circuit_termination": True,
   "namespace": True,
   "rir": True,
   "vlan_group": True,
   "vlan": True,
   "vrf": True,
   "prefix": True,
 },
"enable_bootstrap": is_truthy(os.getenv("NAUTOBOT_SSOT_ENABLE_BOOTSTRAP", "false")),
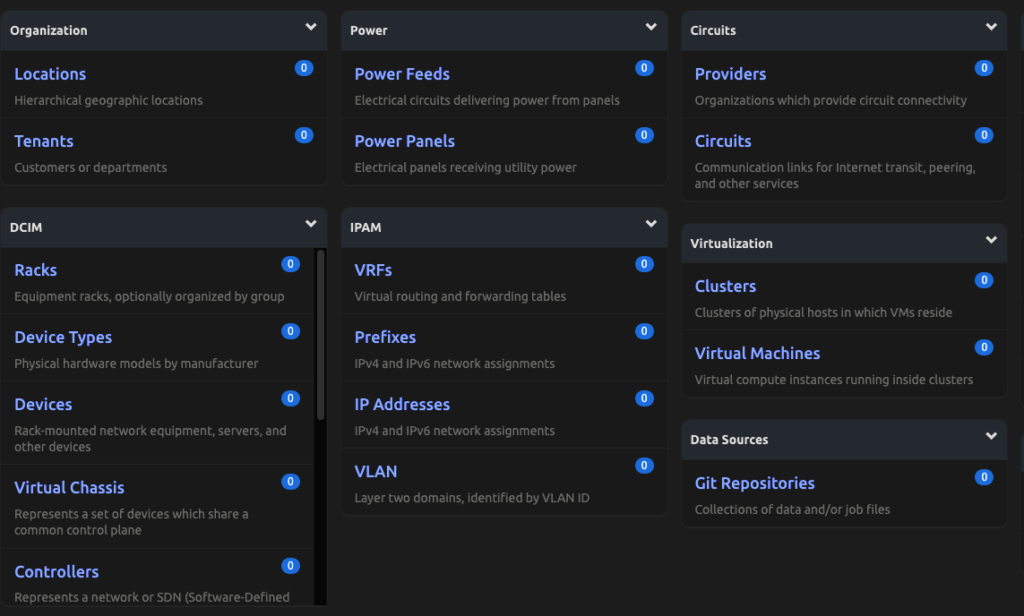
The 2 important environment variables required are NAUTOBOT_BOOTSTRAP_SSOT_ENVIRONMENT_BRANCH and NAUTOBOT_SSOT_ENABLE_BOOTSTRAP. NAUTOBOT_SSOT_ENABLE_BOOTSTRAP should be set to True to enable the integration and NAUTOBOT_BOOTSTRAP_SSOT_ENVIRONMENT_BRANCH should be set to the name of the environment you are deploying (development, staging, production, etc). The value of the environment branch variable will need to match the filename of the environment-specific yaml file, which we will get to in the next section. See Nautobot Docs for instructions on installing apps. We can see here we have a fresh Nautobot instance with no objects created.
The YAML Files
The next step is to create the YAML representation of the data that’s needed within Nautobot. In this example we will look at just a couple of items (see Nautobot Docs for full examples) Locations, Location Types, Git Repositories, and Tenants. These are common items to have created within Nautobot and are some of the prerequisites to create a Device object. It is highly recommended to utilize a Git Repository to manage this data and that is what this example will use. Once your Git Repository is created, we will create 4 files global_settings.yml, development.yml, staging.yml, production.yml. These should be in the root of the repository as follows:
.
├── development.yml
├── global_settings.yml
├── production.yml
└── staging.yml
We’ll start with addressing global_settings.yml, development.yml, staging.yml, production.yml as those are the most simple. They will all be nearly the same as there is currently only one key inside these files which is git_branch:. This key is the default branch name that will be set for any Git Repository objects created in Nautobot using the Bootstrap integration. If the branch: key is set on a Git Repository in global_settings.yml that will override the key from the environment-specific files. For example, the environment-specific files should be set up as follows for our example. These files can be named whatever you’d like, just ensure the environment variable NAUTOBOT_BOOTSTRAP_SSOT_ENVIRONMENT_BRANCH matches the filename (minus the .yml extension) as that is how the App looks up the file to load information.
# development.yml

---
git_branch: "development"
# staging.yml
---
git_branch: "staging"# production.yml
---
git_branch: "production"The next file we will create is the global_settings.yml file. The information we will use for this example will be as follows (see Docs for more examples).
# global_settings.yml

---
location_type:
  - name: "Region"
    parent: ""
    nestable: True
    description: ""
    content_types: []
  - name: "Site"
    parent: "Region"
    nestable: True
    description: ""
    content_types:
      - "dcim.device"
      - "ipam.namespace"
      - "ipam.prefix"
      - "ipam.vlan"
      - "ipam.vlangroup"
      - "circuits.circuittermination"
  - name: "Building"
    parent: "Site"
    nestable: False
    description: ""
    content_types:
      - "dcim.device"
      - "ipam.namespace"
      - "ipam.prefix"
      - "ipam.vlan"
      - "ipam.vlangroup"
      - "circuits.circuittermination"
location:
  - name: "Southeast"
    location_type: "Region"
    parent: ""
    status: "Active"
    facility: ""
    asn:
    time_zone: "US/Eastern"
    description: ""
    tenant: ""
    physical_address: ""
    shipping_address: ""
    latitude:
    longitude:
    contact_name: ""
    contact_phone: ""
    contact_email: ""
    tags: []
- name: "Atlanta"
    location_type: "Site"
    parent: "Southeast"
    status: "Active"
    facility: "AT1"
    asn: 65001
    time_zone: "US/Eastern"
    description: ""
    tenant: ""
    physical_address: |
      180 Peachtree St NE
      FL 2 , FL 3 , FL 6
      Atlanta, GA 30303
      United States
    shipping_address: |
      Example Company
      180 Peachtree St NE
      Loading Dock 1
      Atlanta, GA 30303
      United States
    latitude:
    longitude:
    contact_name: ""
    contact_phone: ""
    contact_email: ""
    tags: []
  - name: "Atlanta4"
    location_type: "Site"
    parent: "Southeast"
    status: "Active"
    facility: "AT4"
    asn: 65004
    time_zone: "US/Eastern"
    description: ""
    tenant: ""
    physical_address: |
      450 Interstate to N PKWY
      Atlanta, GA 30339
      United States
    shipping_address: |
      Example Company
      450 Interstate to N PKWY
      Loading Dock 1
      Atlanta, GA 30339
      United States
    latitude:
    longitude:
    contact_name: ""
    contact_phone: ""
    contact_email: ""
    tags: []
git_repository:
  - name: "Backbone Config Contexts"
    url: "https://github.com/nautobot/backbone-config-contexts.git"
    branch: "main"
    secrets_group_name: "Github_Service_Account"
    provided_data_type:
      - "config contexts"
  - name: "Datacenter Config Contexts"
    url: "https://github.com/nautobot/datacenter-config-contexts.git"
    secrets_group_name: "Github_Service_Account"
    provided_data_type:
      - "config contexts"
  - name: "Metro Config Contexts"
    url: "https://github.com/nautobot/metro-config-contexts.git"
    secrets_group_name:
    provided_data_type:
      - "config contexts"
  - name: "Access Config Contexts"
    url: "https://github.com/nautobot/access-config-contexts.git"
    secrets_group_name:
    provided_data_type:
      - "config contexts"
tenant:
  - name: "Backbone"
    tenant_group: "Group1"
    description: ""
    tags: []
  - name: "Datacenter"
    tenant_group: "Group2"
    description: ""
    tags: []
As you can see from the example data, each object has a key that corresponds to the Nautobot model to be created. Each key is a list of objects with a certain set of attributes. All attributes should be included even if they are blank. Once these 4 files are created, push them into the Git repository and we’ll then add this repository to Nautobot in the next step.
Sync Data
Once the Nautobot SSoT app is installed, the YAML data/Repository is ready, and the Bootstrap integration is enabled, the next step is to create a Git Repository in Nautobot that has the word Bootstrap in the name and has a “Provided Contents Type” of Config Contexts (create and select a secrets group as needed for authentication to the repository).
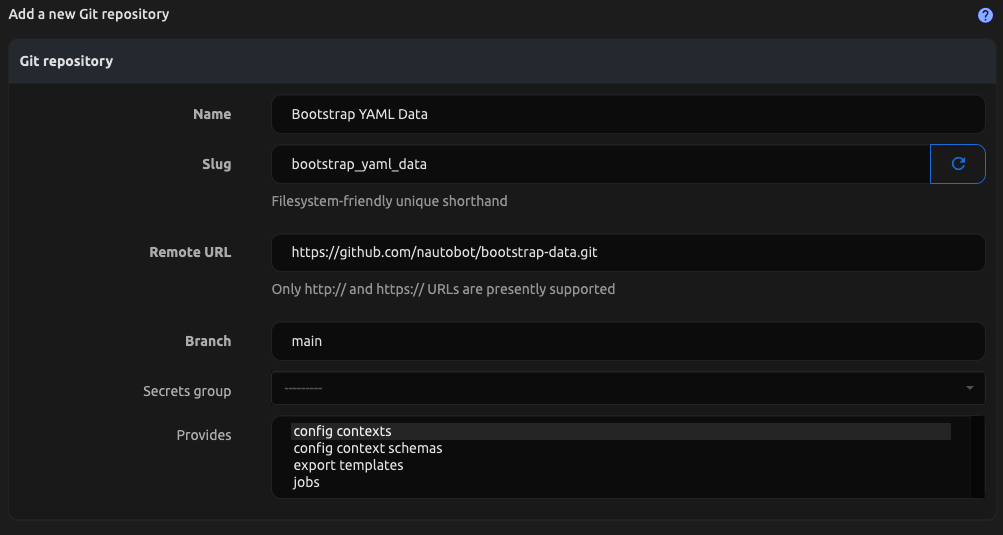
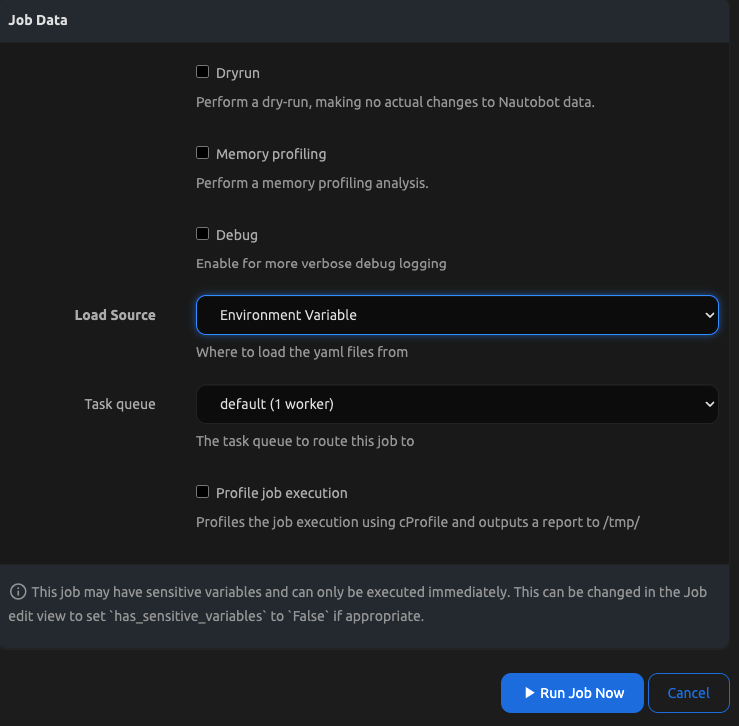
Once the repository has been synchronized, you can go into Jobs > Jobs > Bootstrap to Nautobot and run the job. Select options as necessary. If you leave the Load Source as Environment Variable it will load from file or git based on the environment variable set. Otherwise if you select file or git in the UI it will override the environment variable setting.
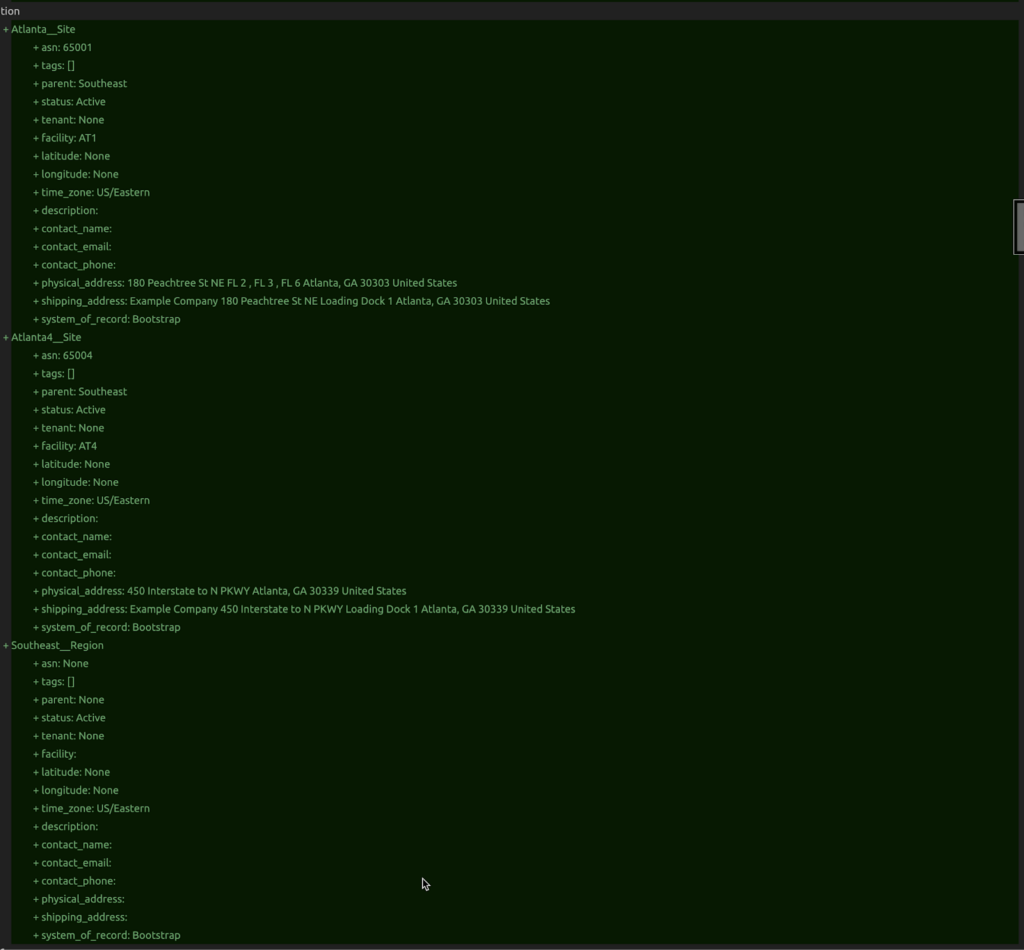
After running the job we see objects created by looking in the SSoT Sync Details in the job results view.
As well as on the Nautobot main dashboard.
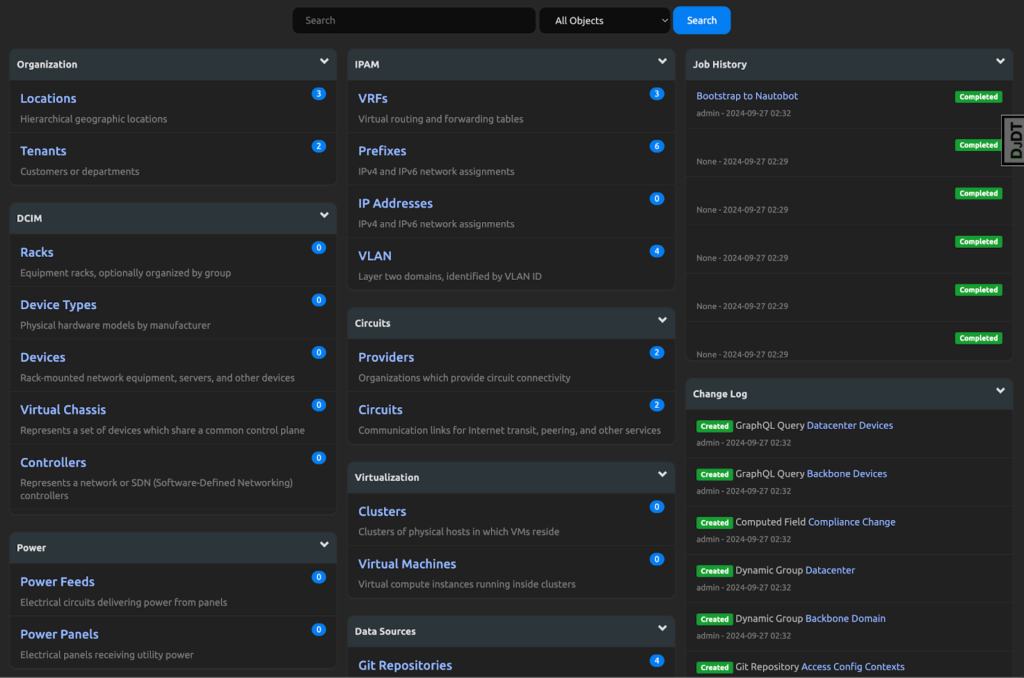
You now have some of the basic objects created in Nautobot in a matter of minutes. Plus, now that you have this data, the same information can be deployed to staging and production systems by just changing the NAUTOBOT_BOOTSTRAP_SSOT_ENVIRONMENT_BRANCH in those deployments, adding the Bootstrap data repository, and running the Bootstrap to Nautobot job. This also goes for creating consistent development environments between engineers or for yourself. Over time new objects can be added or removed and the App will handle keeping those items up to date.
Note: This plugin does not override model inheritance/dependencies, or identifiers within the database itself. For example if you want to remove a Location Type that has Locations assigned to it, you would need to first either delete those locations or assign them to another location type before the App can delete the Location Type.
You should now have a basic understanding of how the new Bootstrap SSoT Integration works within Nautobot and should be able to manage the supported items within your own Nautobot instance.
Conclusion
We welcome feedback and suggestions on future plans for this plugin via Github Pull Requests or Github Issues.
-Zach Biles
Tags :
Contact Us to Learn More
Share details about yourself & someone from our team will reach out to you ASAP!
