Useful documentation is an important component of Nautobot’s usability. To that point, this week’s blog will focus on how the NTC community can contribute new content to the docs or submit corrections for the docs when they find a flaw.
Contributing to the Nautobot project via code or documentation has many benefits:
The development docs state this clearly, but it bears repeating here:
Pull requests are entertained only for accepted issues. If an issue you want to work on hasn’t been approved by a maintainer yet, it’s best to avoid risking your time and effort on a change that might not be accepted.
If you are considering submitting an addition to the docs and/or a correction, be sure to open an issue for the change prior to investing the time to create a PR.
You can open an issue here:
Bug Report if you have found an error in the docsFeature Request if you would like to expand the docs by adding a section or otherwise add contentIn the issue, be sure to describe the edits/adds/deletions you propose and describe why those changes are needed and how they are helpful.
See the Nautobot wiki page on Work Intake & Issue Management for information on what to expect after submitting an issue.
Once your issue is accepted, it’s time to set up your dev environment. You will need to set up a fork of the Nautobot repository, if you don’t have one already.
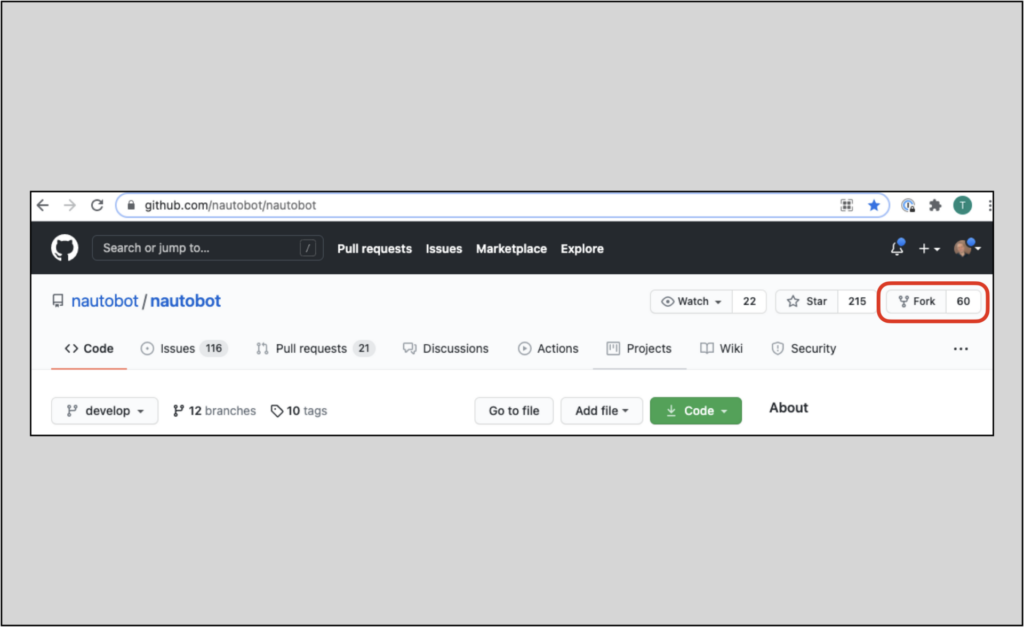
On the main page for the Nautobot repository, look in the top-right corner for the Fork button and click on it. Select which of your accounts you want to place the fork in.
Next, go to your repository page to access the options for how to clone your repository locally. The example below shows selection of the ssh method to retrieve the repository.
Code button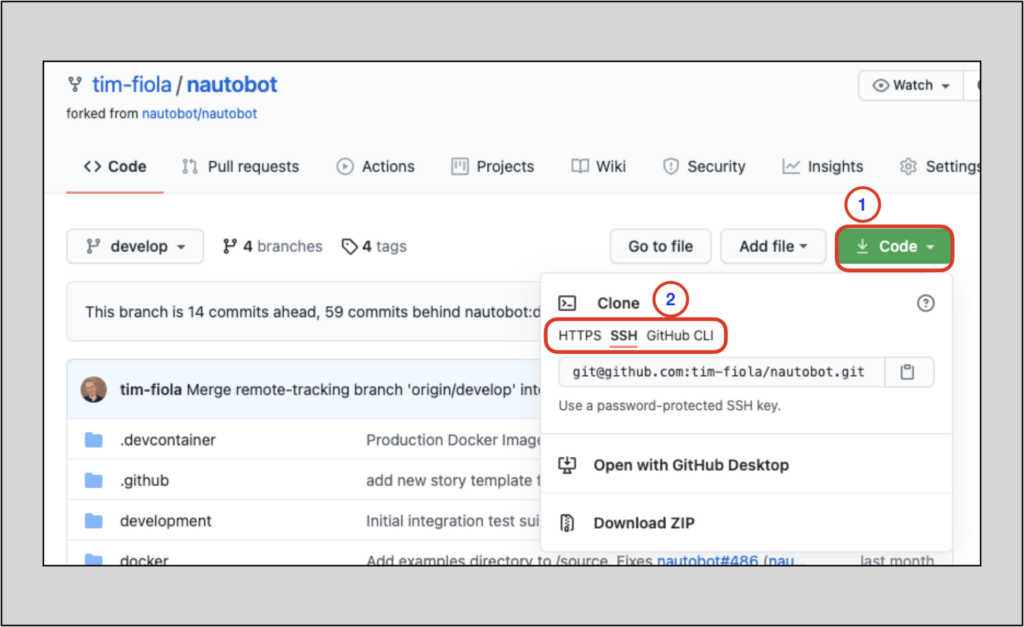
TIP: Instructions to set up SSH keys in your GitHub account, which enables use of the
sshclone method, can be found here.
With your fork ready, go to the CLI (or your favorite IDE) and clone your Nautobot repository fork. The example below shows use of the ssh resource we copied in the picture above.
NOTE: This requires
gitto be installed on your system
%
% git clone git@github.com:tim-fiola/nautobot.git
Cloning into 'nautobot'...
remote: Enumerating objects: 65038, done.
remote: Counting objects: 100% (330/330), done.
remote: Compressing objects: 100% (170/170), done.
remote: Total 65038 (delta 217), reused 262 (delta 160), pack-reused 64708
Receiving objects: 100% (65038/65038), 38.94 MiB | 24.31 MiB/s, done.
Resolving deltas: 100% (51959/51959), done.
%
Once the download is complete, change to the nautobot directory. Do a git remote -v to verify your origin.
% cd nautobot
% git remote -v
origin	git@github.com:tim-fiola/nautobot.git (fetch)
origin	git@github.com:tim-fiola/nautobot.git (push)
%
%
You will also want to track the official Nautobot repository, so you can pull in any changes.
To do this, use the git remote add upstream git@github.com:nautobot/nautobot.git command. This will add the Nautobot respository as the remote upstream.
% git remote add upstream git@github.com:nautobot/nautobot.git
%
% git remote -v
origin	git@github.com:tim-fiola/nautobot.git (fetch)
origin	git@github.com:tim-fiola/nautobot.git (push)
upstream	git@github.com:nautobot/nautobot.git (fetch)
upstream	git@github.com:nautobot/nautobot.git (push)
%
Switch to the develop branch and then pull from the upstream’s develop branch. This will ensure your local develop branch is up to date and lessen the chances of merge conflicts.
%
% git checkout develop
Already on 'develop'
Your branch is up to date with 'origin/develop'.
%
% git pull upstream develop
. . .
----- < snip > -----
. . .
 scripts/cibuild.sh                                    |  5 +++++
 40 files changed, 626 insertions(+), 156 deletions(-)
 create mode 100644 examples/okta/README.md
 create mode 100644 examples/okta/group_sync.py
 delete mode 100644 nautobot/project-static/jquery-ui-1.12.1/package.json
%
Now create your local branch where you will perform your edits.
TIP: The command shown below will create a new branch in your local installation. This new branch will need to be pushed to your origin for tracking; this guide will show that step when the time comes.
%
% git checkout -b tim-fiola-doc-blog
Switched to a new branch 'tim-fiola-doc-blog'
%
Verify your branch is clean:
% git status
On branch tim-fiola-doc-blog
nothing to commit, working tree clean
%
In our example, we created the new branch locally and so the branch does not exist in our origin yet.
We will use git push --set-upstream origin <local-branch-name> to add the branch to our origin. Our local branch will then track this upstream branch.
% git push --set-upstream origin tim-fiola-doc-blog
Enumerating objects: 204, done.
Counting objects: 100% (180/180), done.
Delta compression using up to 12 threads
Compressing objects: 100% (63/63), done.
Writing objects: 100% (120/120), 22.95 KiB | 11.47 MiB/s, done.
Total 120 (delta 91), reused 83 (delta 55), pack-reused 0
remote: Resolving deltas: 100% (91/91), completed with 37 local objects.
remote:
remote: Create a pull request for 'tim-fiola-doc-blog' on GitHub by visiting:
remote:      https://github.com/tim-fiola/nautobot/pull/new/tim-fiola-doc-blog
remote:
To github.com:tim-fiola/nautobot.git
 * [new branch]        tim-fiola-doc-blog -> tim-fiola-doc-blog
Branch 'tim-fiola-doc-blog' set up to track remote branch 'tim-fiola-doc-blog' from 'origin'.
%
Nautobot uses Poetry, which will transparently create a virtualenv for you, automatically install all dependencies required for Nautobot to operate, and also install the nautobot-server CLI command that you will utilize to interact with Nautobot from here on out. More info on Poetry can be found in the Nautobot docs.
Use the following command to install Poetry: curl -sSL https://raw.githubusercontent.com/python-poetry/poetry/master/install-poetry.py | python -
TIP: you may have to use
| python3 -instead of| python -in that curl command, depending on your Python setup.
$ curl -sSL https://raw.githubusercontent.com/python-poetry/poetry/master/install-poetry.py | python3 -
Retrieving Poetry metadata

# Welcome to Poetry!

This will download and install the latest version of Poetry,
a dependency and package manager for Python.

It will add the `poetry` command to Poetry's bin directory, located at:

/home/tim/.local/bin

You can uninstall at any time by executing this script with the --uninstall option,
and these changes will be reverted.

You are installing 1.1.7. When using the current installer, this version does not support updating using the 'self update' command. Please use 1.2.0a1 or later.
Installing Poetry (1.1.7): Done

Poetry (1.1.7) is installed now. Great!

To get started you need Poetry's bin directory (/home/tim/.local/bin) in your `PATH`
environment variable.

Add `export PATH="/home/tim/.local/bin:$PATH"` to your shell configuration file.

Alternatively, you can call Poetry explicitly with `/home/tim/.local/bin/poetry`.

You can test that everything is set up by executing:

`poetry --version`

$
NOTE: As of the writing of this article, Poetry had just switched to a new install script (the one used above). I discovered this when I installed Poetry on my local machine using the now deprecated curl install script (
curl -sSL https://raw.githubusercontent.com/python-poetry/poetry/master/get-poetry.py | python -) and saw the deprecation message. More info on this change can be found here, on the Poetry webpage.
The repository you cloned has a nautobot directory. Open a new shell, and change to that directory.
Execute poetry install from the CLI to install dependencies.
% cd nautobot
% poetry install
Installing dependencies from lock file

Package operations: 102 installs, 0 updates, 0 removals

  • Installing six (1.16.0)
  • Installing certifi (2021.5.30)
  • Installing chardet (4.0.0)
. . .
----- < snip > -----
. . .
Installing the current project: nautobot (1.0.3-beta.1)
%
Your environment is now set up to allow you to edit the documentation. We highly recommend serving the documents locally while you edit. Serving the docs locally allows you to see the fully rendered documents and what your changes will look like.
First, activate Poetry’s virtual environment (venv) by running poetry shell in the nautobot directory:
% pwd                                                                                                                          (tim-fiola-doc-blog)nautobot
/Users/timothyfiola/nautobot_blog/nautobot
% poetry shell                                                                                                                 (tim-fiola-doc-blog)nautobot
Spawning shell within /Users/timothyfiola/Library/Caches/pypoetry/virtualenvs/nautobot-yNEcye0N-py3.8
Restored session: Thu Jul  1 15:39:50 MDT 2021
% . /Users/timothyfiola/Library/Caches/pypoetry/virtualenvs/nautobot-yNEcye0N-py3.8/bin/activate                               (tim-fiola-doc-blog)nautobot
(nautobot-yNEcye0N-py3.8) %
Now, run the mkdocs serve command from within the virtual environment:
(nautobot-yNEcye0N-py3.9)  % mkdocs serve
INFO    -  Building documentation...
WARNING -  Config value: 'python'. Warning: Unrecognised configuration name: python
INFO    -  Cleaning site directory
INFO    -  The following pages exist in the docs directory, but are not included in the "nav" configuration:
  - installation/centos.md
  - installation/selinux-troubleshooting.md
  - installation/ubuntu.md
  - models/circuits/circuit.md
  - models/circuits/circuittermination.md
. . .
----- < snip > -----
. . .
  - release-notes/index.md
WARNING -  Documentation file 'additional-features/jobs.md' contains a link to '../media/admin_ui_run_permission.png' which is not found in the documentation files.
WARNING -  Documentation file 'configuration/required-settings.md' contains a link to '.' which is not found in the documentation files.
WARNING -  Documentation file 'core-functionality/power.md' contains a link to '../media/power_distribution.png' which is not found in the documentation files.
INFO    -  Documentation built in 2.67 seconds
[I 210621 14:32:43 server:335] Serving on http://127.0.0.1:8001
INFO    -  Serving on http://127.0.0.1:8001
[I 210621 14:32:43 handlers:62] Start watching changes
INFO    -  Start watching changes
[I 210621 14:32:43 handlers:64] Start detecting changes
INFO    -  Start detecting changes
Notice the
INFO - Start detecting changesmessage in the terminal. This indicates that the server will detect changes and update the served docs as the changes are detected.
Keep this command running in the terminal. Go to http://127.0.0.1:8001 to view the docs:
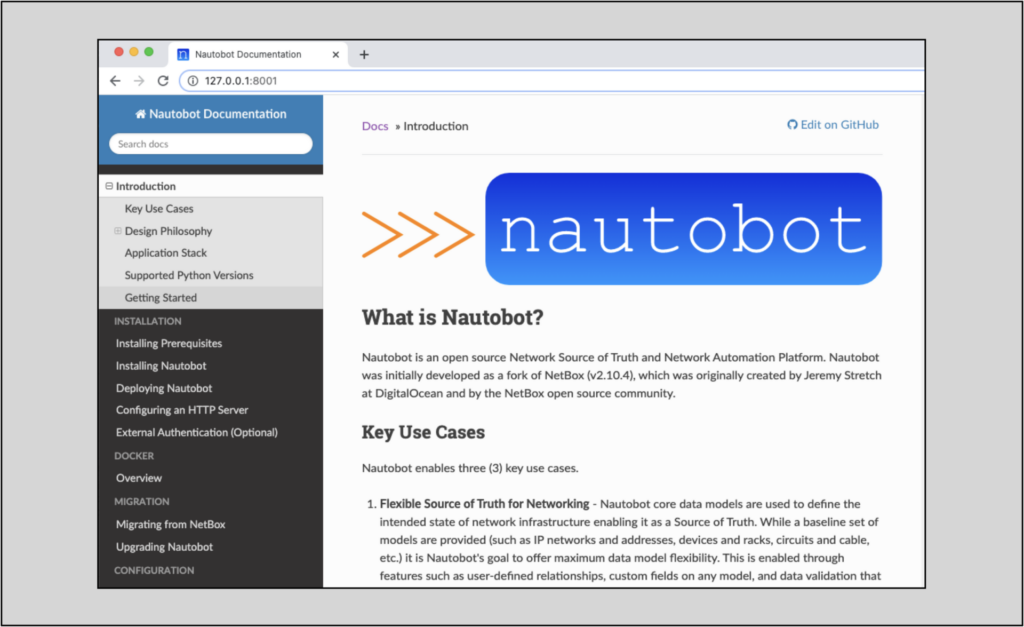
This example will show a fix for a documentation bug for a section in the Development Environment that needs a correction.
NOTE: The Nautobot issue for this correction is #600.
A screenshot of the docs prior to the fix is below, where it mentions invoke createsuperuser. It should also mention that, in a fresh install, it’s necessary to run invoke migrate prior to invoke createsuperuser.
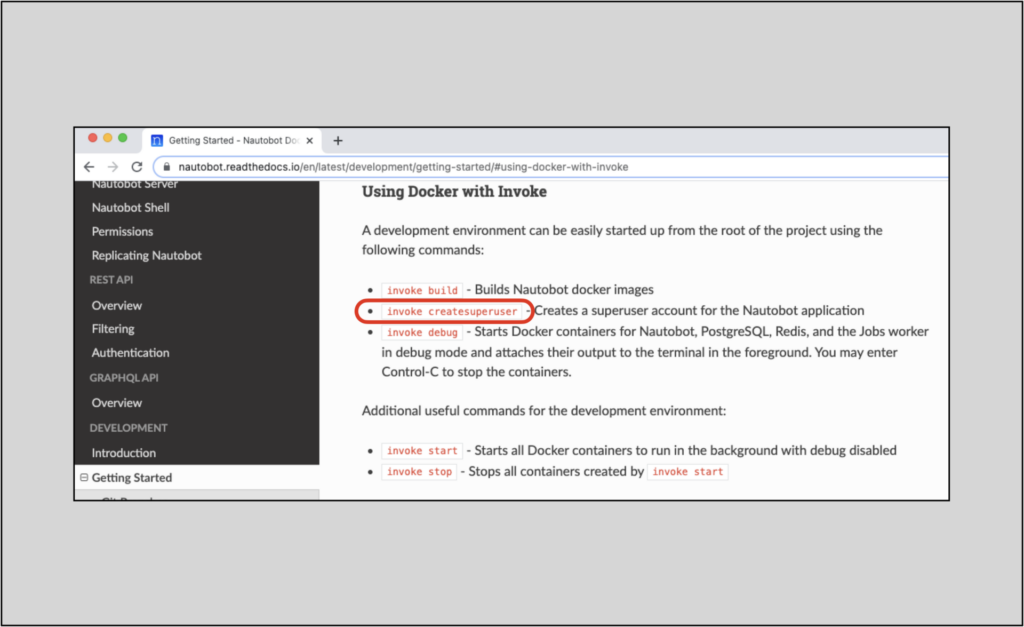
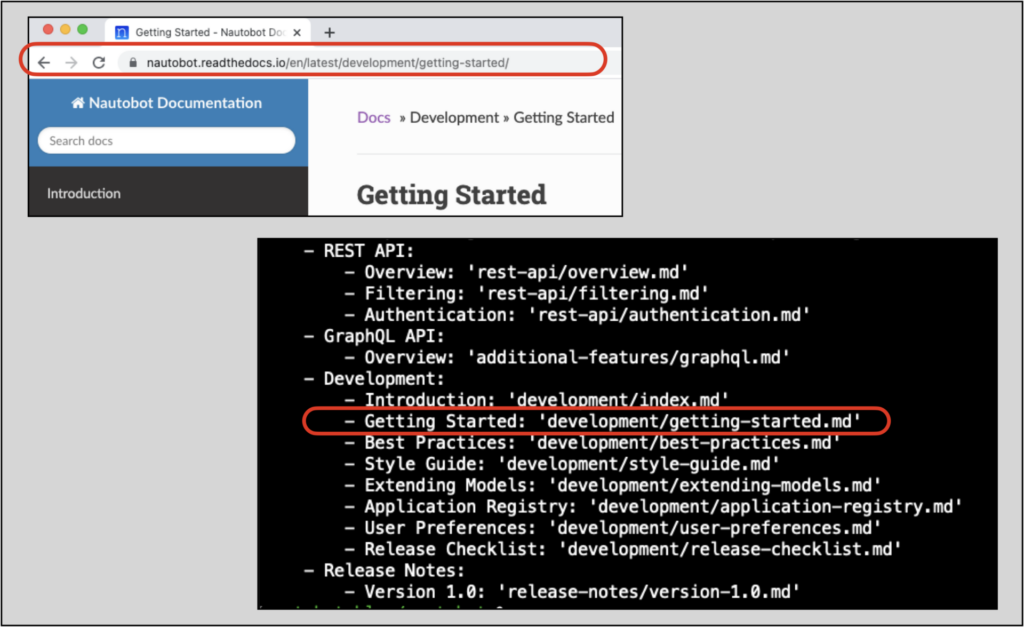
To help locate the file that should be modified, notice the URL for the page we want to modify has a path that ends with development/getting-started https://nautobot.readthedocs.io/en/latest/development/getting-started/
Open another terminal window and go to the nautobot directory (be sure to keep the doc serve process running).
To help see where we can access the page we want to modify, check out the mkdocs.yml page in the nautobot directory:
View the mkdocs.yml file; there will be a top-tier section called nav. Within nav is a section called Development, and beneath that, Getting Started.
 % cat mkdocs.yml
dev_addr: '127.0.0.1:8001'
. . .
----- < snip > -----
. . .
nav:
    - Introduction: 'index.md'
. . .
----- < snip > -----
. . .
    - Development:
        - Introduction: 'development/index.md'
        - Getting Started: 'development/getting-started.md'
        - Best Practices: 'development/best-practices.md'
        - Style Guide: 'development/style-guide.md'
        - Extending Models: 'development/extending-models.md'
        - Application Registry: 'development/application-registry.md'
        - User Preferences: 'development/user-preferences.md'
        - Release Checklist: 'development/release-checklist.md'
    - Release Notes:
        - Version 1.0: 'release-notes/version-1.0.md'
 %
This matches closely to the development/getting-started/ URL path and is likely where we’d want to get started.
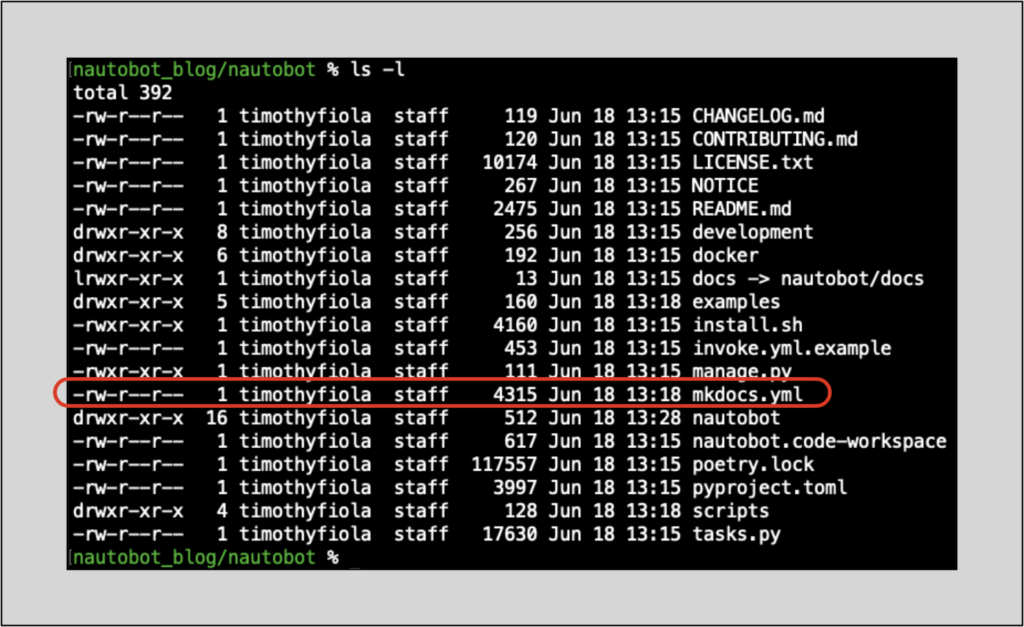
Navigate to the directory docs/development:
% pwd                                                                                                                          (tim-fiola-doc-blog)nautobot
/Users/timothyfiola/nautobot_blog/nautobot
% ls -l
total 392
-rw-r--r--   1 timothyfiola  staff     119 Jun 18 13:15 CHANGELOG.md
-rw-r--r--   1 timothyfiola  staff     120 Jun 18 13:15 CONTRIBUTING.md
-rw-r--r--   1 timothyfiola  staff   10174 Jun 18 13:15 LICENSE.txt
-rw-r--r--   1 timothyfiola  staff     267 Jun 18 13:15 NOTICE
-rw-r--r--   1 timothyfiola  staff    2475 Jun 18 13:15 README.md
drwxr-xr-x   8 timothyfiola  staff     256 Jun 18 13:15 development
drwxr-xr-x   6 timothyfiola  staff     192 Jun 18 13:15 docker
lrwxr-xr-x   1 timothyfiola  staff      13 Jun 18 13:15 docs -> nautobot/docs
drwxr-xr-x   5 timothyfiola  staff     160 Jun 18 13:18 examples
-rwxr-xr-x   1 timothyfiola  staff    4160 Jun 18 13:15 install.sh
-rw-r--r--   1 timothyfiola  staff     453 Jun 18 13:15 invoke.yml.example
-rwxr-xr-x   1 timothyfiola  staff     111 Jun 18 13:15 manage.py
-rw-r--r--   1 timothyfiola  staff    4315 Jun 18 13:18 mkdocs.yml
drwxr-xr-x  16 timothyfiola  staff     512 Jun 18 13:28 nautobot
-rw-r--r--   1 timothyfiola  staff     617 Jun 18 13:15 nautobot.code-workspace
-rw-r--r--   1 timothyfiola  staff  117557 Jun 18 13:15 poetry.lock
-rw-r--r--   1 timothyfiola  staff    3997 Jun 18 13:15 pyproject.toml
drwxr-xr-x   4 timothyfiola  staff     128 Jun 18 13:18 scripts
-rw-r--r--   1 timothyfiola  staff   17630 Jun 18 13:15 tasks.py
% cd docs/development/
docs/development %
We’ll edit the nautobot/docs/development/getting-started.md file, adding a tip admonishment that notifies the user of the requirement:
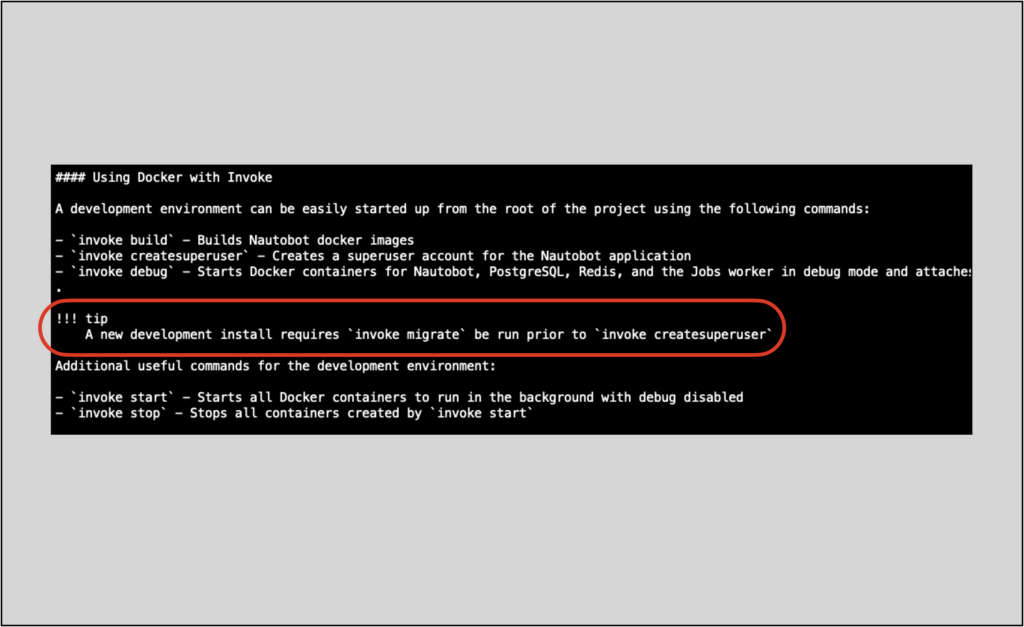
Save the file then go back to your browser, where you are serving the docs locally; you should see the change:
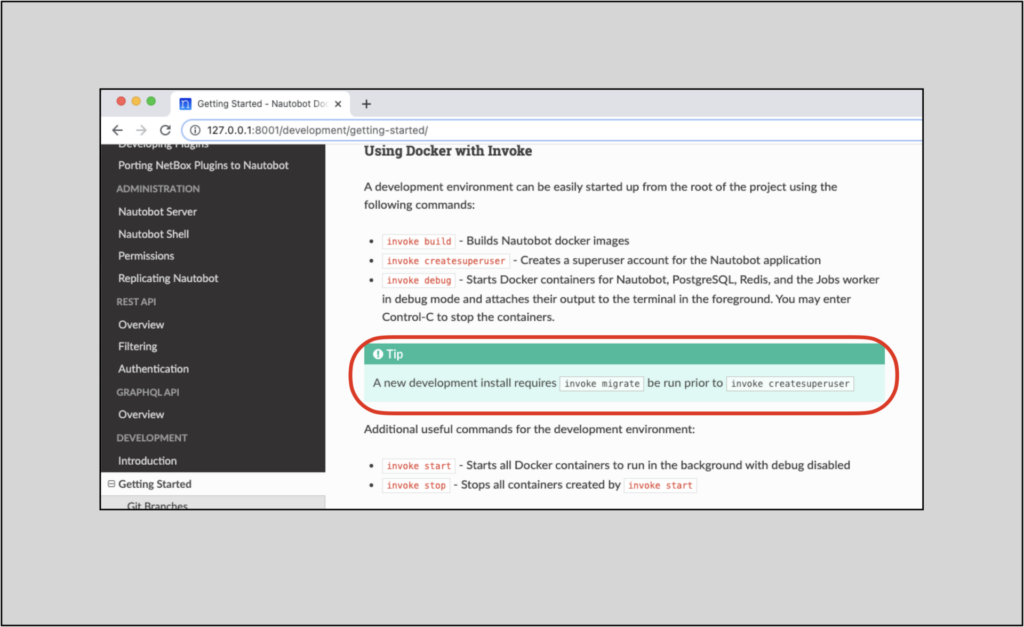
NOTE: You will see the change rendered automatically only if you kept the process that was rendering the docs running in the terminal.
If you look back at your terminal window where you initiated the docs to be served, you’ll see this message in the log after you make the change:
[I 210621 15:09:03 handlers:92] Reload 1 waiters: /Users/timothyfiola/nautobot_blog/nautobot/docs/development/getting-started.md
INFO    -  Reload 1 waiters: /Users/timothyfiola/nautobot_blog/nautobot/docs/development/getting-started.md
This notifies you that the mkdocs server noticed a change in the repository, and so it automatically re-rendered the documentation.
Add the getting-started.md file to your git staging, then make the commit for your change:
% git status
On branch tim-fiola-doc-blog
Changes not staged for commit:
  (use "git add <file>..." to update what will be committed)
  (use "git restore <file>..." to discard changes in working directory)
	modified:   nautobot/docs/development/getting-started.md

no changes added to commit (use "git add" and/or "git commit -a")
% git add nautobot/docs/development/getting-started.md
%
% git status
On branch tim-fiola-doc-blog
Changes to be committed:
  (use "git restore --staged <file>..." to unstage)
	modified:   nautobot/docs/development/getting-started.md

% git commit -m 'made correction in docs'                                                                                                               (tim-fiola-doc-blog)nautobot
[tim-fiola-doc-blog 090cc0c1] made correction in docs
 1 file changed, 3 insertions(+)
%
Now push your change to your origin branch:
% git push
Enumerating objects: 11, done.
Counting objects: 100% (11/11), done.
Delta compression using up to 12 threads
Compressing objects: 100% (6/6), done.
Writing objects: 100% (6/6), 592 bytes | 592.00 KiB/s, done.
Total 6 (delta 5), reused 0 (delta 0), pack-reused 0
remote: Resolving deltas: 100% (5/5), completed with 5 local objects.
To github.com:tim-fiola/nautobot.git
   a9ca3a2b..090cc0c1  tim-fiola-doc-blog -> tim-fiola-doc-blog
%
The commit in the prior section updated the branch in our forked repository. Now it’s time to submit a pull request (PR).
Yours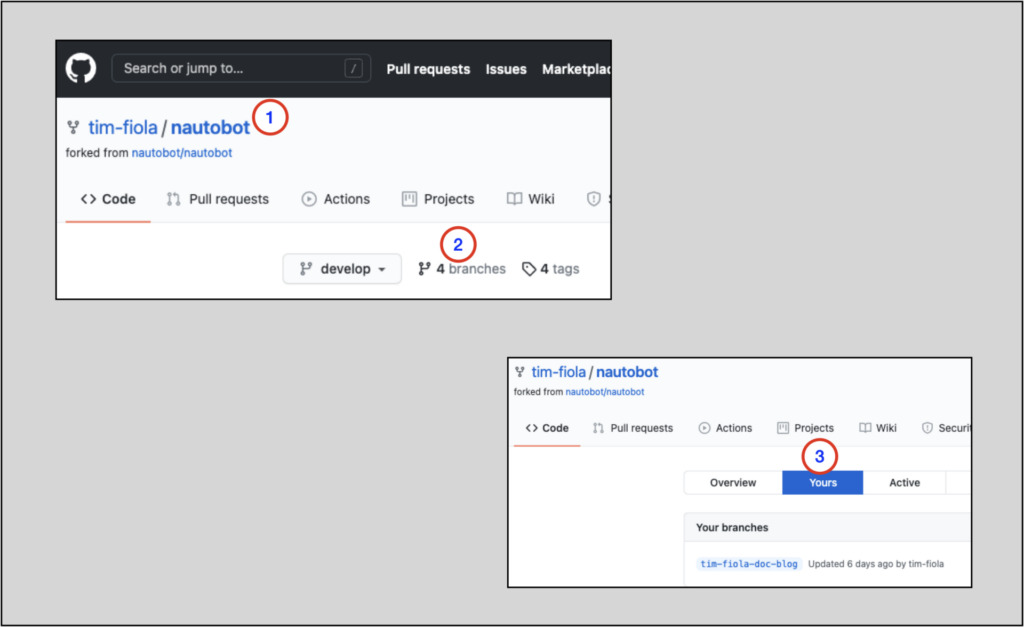
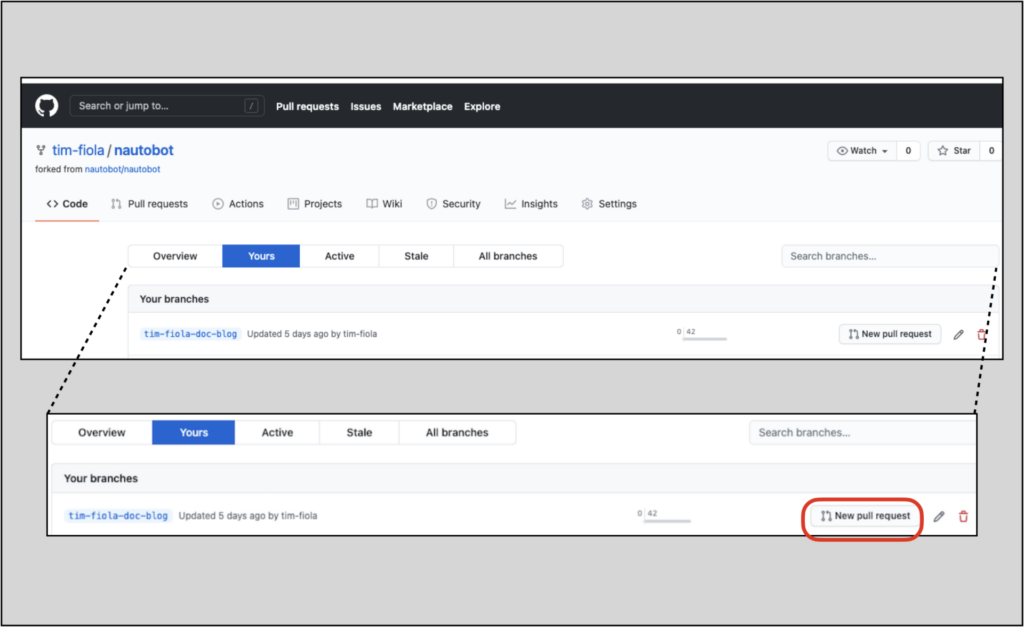
Next, find the branch with your changes in the list and click on the New pull request button next to the branch name.
Fill in the PR form. Be sure to link to the approved issue that your PR is fixing. You can do this by simply adding the issue number after the ### Fixes:# text in the PR form. You will know that the issue reference succeeds when the auto-link shows, as in the picture below:
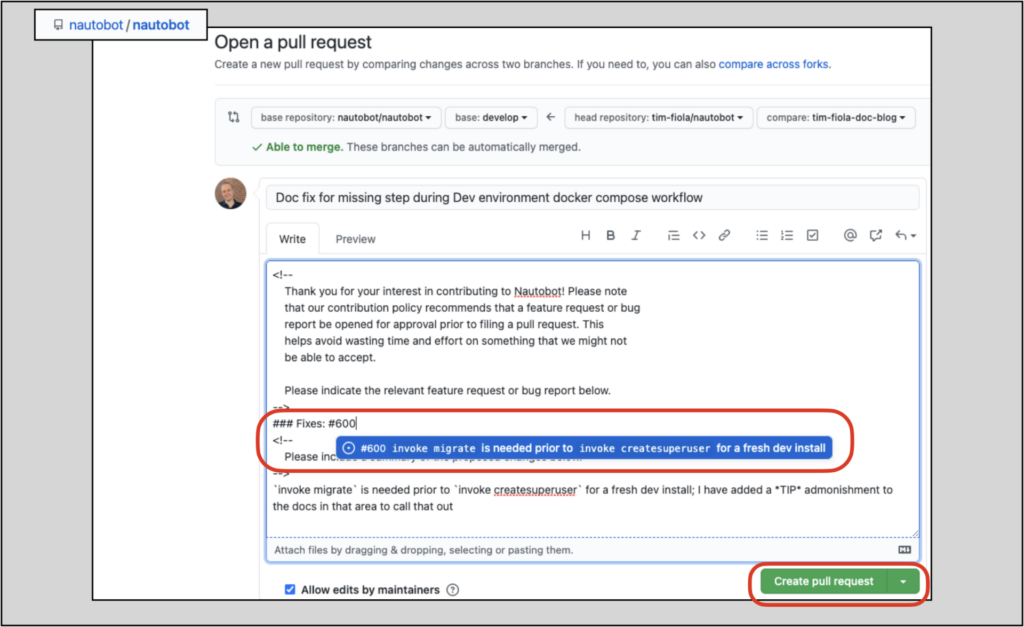
When you have filled out the PR form completely, submit the PR.
Once you submit your PR, you can expect that there will be some conversation within it, including some suggestions from Nautobot’s core Developers. Keep your eyes open for updates to the PR so you can respond accordingly.
Once everything is in order, the PR will be staged for a merge in the next release. The Nautobot Developers, Developer Advocates, and the community will appreciate your help in making Nautobot more usable!
Thank you and have a great day!
-Tim
Share details about yourself & someone from our team will reach out to you ASAP!