Developing Nautobot Plugins – Part 1
This post is the first installment in a series on how to write plugins for Nautobot. Nautobot plugins are a way to extend the base functionality of Nautobot. Plugins can extend the database schema, add custom pages, and even update existing pages within Nautobot; the possibilities are nearly endless. In this blog series we will be developing a plugin for modeling and managing DNS zone data within Nautobot. We will cover setting up a development environment, creating models and views, and more advanced topics such as query filters and GraphQL integration.
This first post will provide an overview of Nautobot plugins and will cover getting started, including setting up a development environment and creating the basic source code layout for a new plugin.
What Is a Nautobot Plugin
Nautobot is an open-source project that provides a Network Source of Truth (NSOT). While the core Nautobot application provides many, if not most, of the data models needed to manage network automation and resources, no tool set can cover every use case that an organization may encounter. Therefore, Nautobot includes the ability to extend its base data models and views to fit any use case.
One aspect of network data modeling that is not included out of the box is the Domain Name System (DNS) record management. While many organizations have other tools for managing their DNS, smaller organizations may not. In this blog series we will demonstrate how to write a plugin that provides the data models and views for managing DNS records.
Nautobot itself is implemented as a Django web application, and Django is a web framework implemented in Python. Django provides many out-of-the-box features including the concept of “applications”. A Django web application can be composed of many other discrete subapplications. In the case of Nautobot, plugins are essentially implemented as Django applications. However, Nautobot provides many extensions to Django to facilitate the development process.
Before any plugin development can take place, a suitable development environment must first be set up. The next section covers setting up the development environment and launching Nautobot with a basic plugin structure.
Development Environment Prerequisites
For our development environment we will be using Visual Studio Code (VS Code), Poetry, and Docker. Additionally, since Nautobot is written in Python a local installation of Python is necessary, and the minimum required version of Python is 3.7. Follow the linked instructions to install VS Code, Python, and Docker.
Poetry is used in the plugin to manage Python dependencies and also to provide a virtual environment for development. Poetry is used in many projects at Network to Code and is often used in Nautobot plugin development. This blog series will use Poetry to manage the dependencies in the demo plugin. Instructions for installing Poetry can be found here.
Once the development tools have been installed, the source code can be loaded into the development environment.
Project Source Code
All of the code for this blog series is located in the GitHub repository. Each article in the series is tagged in the source repository to facilitate diffing the code as the blog progresses. For this installment the source code is tagged part1. In order to clone the source code repo, VS Code will need to be configured for Git and GitHub. Instructions for setting up VS Code for GitHub can be found here.
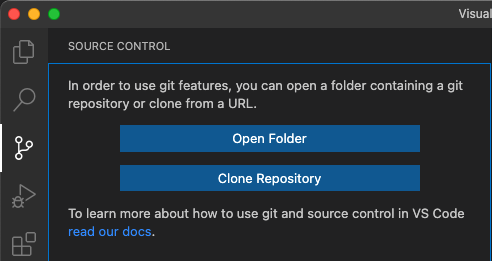
Once VS Code has been set up to use Git and GitHub, select the “Source Control” tab from the Activity Bar and click the “Clone Repository” button.

Paste the repository URL (https://github.com/networktocode-llc/nautobot-example-dns-manager.git) into the URL text box and VS Code will then prompt for a destination folder to store the local copy. Finally, once the repo has been cloned, open the source code by responding when prompted to “Open the cloned repository.”

Once the code has been cloned and opened in VS Code, the local repository will need to be switched to the part1 tag. Open the command palette (Shift+Command+P on Mac or Ctrl+Shift+P on Windows and Linux) and select Git: Checkout to... then select the tag part1. This will switch the local repository to match the code for part 1.
Now that the local git repo is on the correct tag, open a terminal window within VS Code and run the command poetry shell. This command will initialize the Poetry virtual environment within the project. Upon creating the virtual environment, VS Code should provide a prompt to use the newly created virtual environment, click the “yes” button:

If Visual Studio does not prompt you to change the virtual environment, you can manually select the project’s virtual environment from the command palette (Shift+Command+P on Mac or Ctrl+Shift+P on Windows and Linux), select Python: Select Interpreter, and then either enter the path to the virtual environment’s python or select it from the list.
Once the virtual environment has been activated, run the command poetry install to install all of the dependencies. One of the dependencies that will be installed is invoke. Invoke is used for managing command line tasks, similar in concept to make and Makefile. The plugin source code includes an invoke tasks.py that includes all the tasks necessary to bootstrap and run a set of Docker images required for the Nautobot application stack. This includes a PostgreSQL database, a Redis server, a Nautobot Celery worker, a Nautobot Celery Beat worker, and a Nautobot application server. A complete discussion of all the components in a Nautobot installation is outside the scope of this tutorial. For additional information please see the Nautobot official documentation.
Several environment variables must be set before the development instance of Nautobot can be started. An example environment file is provided in development/creds.example.env. Before starting the plugin’s development environment, copy the file development/creds.example.env to development/creds.env. Docker will load this file and export the values into the running container as environment variables. On a local development system it is safe to use the defaults in this file. However, never use the example values for any production instance.
Once the environment file has been copied or created, start the application stack by running the command invoke build debug. This command will build the necessary Docker images and start all of the required containers using docker-compose. The debug target instructs invoke to follow the container logs in the running terminal. Note that Docker must be installed and running for this invoke command to succeed. After issuing the invoke command you should see logging messages similar to the following:
$ invoke debug
Starting Nautobot in debug mode...
Running docker-compose command "up"
Creating network "nautobot_example_dns_manager_default" with the default driver
Creating volume "nautobot_example_dns_manager_postgres_data" with default driver
Creating nautobot_example_dns_manager_db_1   ...
Creating nautobot_example_dns_managerr_redis_1 ...
Creating nautobot_example_dns_manager_db_1    ... done
Creating nautobot_example_dns_manager_redis_1 ... done
Creating nautobot_example_dns_manager_nautobot_1 ...
Creating nautobot_example_dns_manager_nautobot_1 ... done
Creating nautobot_example_dns_manager_worker_1   ...
Creating nautobot_example_dns_manager_worker_1   ... done
Attaching to nautobot_example_dns_manager_db_1, nautobot_example_dns_manager_redis_1, nautobot_example_dns_manager_nautobot_1, nautobot_example_dns_manager_worker_1
...
...
nautobot_1  | Django version 3.2.14, using settings 'nautobot_config'
nautobot_1  | Starting development server at http://0.0.0.0:8080/
nautobot_1  | Quit the server with CONTROL-C.
nautobot_1  |   Nautobot initialized!
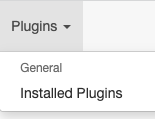
Once you see the message Nautobot initialized! you should be able to navigate to http://127.0.0.1:8080/ and see the Nautobot dashboard. Log in using the admin credentials set in the development/creds.env environment file and click the Plugins menu item, then click Installed Plugins.

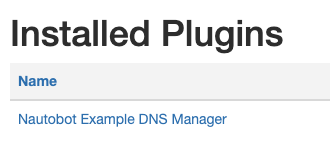
The new plugin should be displayed in the list of installed plugins:

Nautobot Plugin Files
Most Nautobot plugins have very similar directory structures. The minimum structure required for a plugin is a directory matching the plugin’s package name and an __init__.py file containing the plugin configuration. Our plugin will start with the absolute minimum requirements:
├── development/   # Configuration files for the plugin's local Nautobot instance.
|                  # Most of the files in this directory can be left alone
|
├── nautobot_example_dns_manager/
│   └── __init__.py  # Plugin configuration
The file development/nautobot_config.py is a standard config file for Nautobot. Any plugins you intend to use with Nautobot (including the one under development) must be enabled in the config. For instance:
PLUGINS = ["nautobot_example_dns_manager"]
Nautobot will attempt to load the plugin by importing the plugin’s package. Once the package has been imported, Nautobot will look for the variable config within the package. This variable should be assigned a class that extends Nautobot’s PluginConfig class. Our plugin defines the following in the nautobot_example_dns_manager/__init__.py file:
class NautobotExampleDNSManagerConfig(PluginConfig):
    """Plugin configuration for the nautobot_example_dns_manager plugin."""

    name = "nautobot_example_dns_manager"
    verbose_name = "Nautobot Example DNS Manager"
    version = __version__
    author = "Network to Code, LLC"
    description = "Nautobot Example DNS Manager."
    base_url = "example-dns-manager"
    required_settings = []
    min_version = "1.4.0"
    max_version = "1.9999"
    default_settings = {}
    caching_config = {}


config = NautobotExampleDNSManagerConfig
This config class has a number of different attributes. If a plugin depends on a feature introduced in a specific version of Nautobot, then the min_version should reflect that. For instance, Nautobot introduced dynamic groups in version 1.3.0. If a plugin depends on dynamic groups, then the min_version must be set to 1.3.0.
The required_settings and default_settings are two of the more commonly modified attributes. The value of required_settings should be a list of configuration keys that are required to be present in the nautobot_config.py file. Likewise, default_settings is a dictionary that includes default values for the required settings. If required settings are added to the plugin, the nautobot_config.py will need to be updated accordingly:
PLUGINS_CONFIG = {
    'nautobot_example_dns_manager': {
        'setting1': 'value1',
        # ...
    }
}
References
The following list provides some additional information and resources for Nautobot development:
- Nautobot Example Plugin – Basic plugin provided with the official Nautobot source
- Nautobot Developer Documentation – Information about Nautobot core and plugin development
- Django Documentation – Nautobot is built on top of Django, so this documentation is great for reference.
Conclusion
In this blog post we have introduced Nautobot plugins and provided an overview of their use. We’ve setup a working development environment and cloned the source repo to our local development system. We’ve also configured the environment and invoked the Nautobot application stack. At this point, a running instance of Nautobot should be enabled with a new plugin installed.
Now that our development environment is squared away, we can get to writing the core of our plugin with Models, closely followed by Views, URLs, and Navigation. By the end of the next article, the plugin will begin to take shape and we’ll be able to see our changes in the GUI.
Tags :
Contact Us to Learn More
Share details about yourself & someone from our team will reach out to you ASAP!
