Django is a popular open-source Python-based framework enabling quick and easy development of web applications. This post will walk through the initial install and setup of Django in order to develop a simple web front end to run a number of network utilities found in Network to Code’s netutils library.
To get started it is necessary to install the Django python package using pip. As a best practice this example installs Django inside a Python virtual environment, which thus should be activated before running pip install. As shown below, Django has been successfully installed and verified by confirming the installed version of the module.
ntc@ubuntu:~$ source env/bin/activate
(env) ntc@ubuntu:~/django-projects$ python3 -m pip install django
(env) ntc@ubuntu:~/django-projects$ pip freeze | grep Django
Django==3.2.6
Once Django is installed, the first step to get up and running is to create a Django project. Using the django-admin startproject command we can create our first Django project, named network_utilities. In this instance the project has been created in a parent django-projects directory, which was created manually before starting the Django project and not created by Django itself.
(env) ntc@ubuntu:~/django-projects$ django-admin startproject network_utilities
Looking inside this directory we can see that Django automatically created a number of subdirectories and Python files. What has been created is a directory store of our main project settings.
(env) ntc@ubuntu:~/django-projects$ tree
.
└── network_utilities
    ├── manage.py
    └── network_utilities
        ├── asgi.py
        ├── __init__.py
        ├── settings.py
        ├── urls.py
        └── wsgi.py

2 directories, 6 files
Django creates a topmost directory with the same name as our project (i.e., network_utilities) which contains manage.py. This is the Python script most used to interact with Django for functions such as creating Django apps, starting the web server, updating database schema, etc.
In the project parent directory we have a subdirectory that also has the same name as our project. This directory contains a number of Python scripts used to manage and define project settings:
settings.py – Django project settings including declaring installed Django apps, database connections, etc.urls.py – here we can define the urls for our projectasgi.py & wsgi.py – Web server environment settingsDjango’s built-in web server is not suited for production use. When deploying to production you should consider a deployment platform such as wsgi. For the purposes of describing how to get started with Django, the built-in web server will suffice, thus the
asgi.pyandwsgi.pyfiles will not be used.
We can verify the installation by running the Django server using the manage.py script. For this we should be in the parent network_utilities directory.
(env) ntc@ubuntu:~/django-projects/network_utilities$ python manage.py runserver
Watching for file changes with StatReloader
Performing system checks...

System check identified no issues (0 silenced).

You have 18 unapplied migration(s). Your project may not work properly until you apply the migrations for app(s): admin, auth, contenttypes, sessions.
Run 'python manage.py migrate' to apply them.
August 12, 2021 - 16:36:57
Django version 3.2.6, using settings 'network_utilities.settings'
Starting development server at http://127.0.0.1:8000/
Quit the server with CONTROL-C.
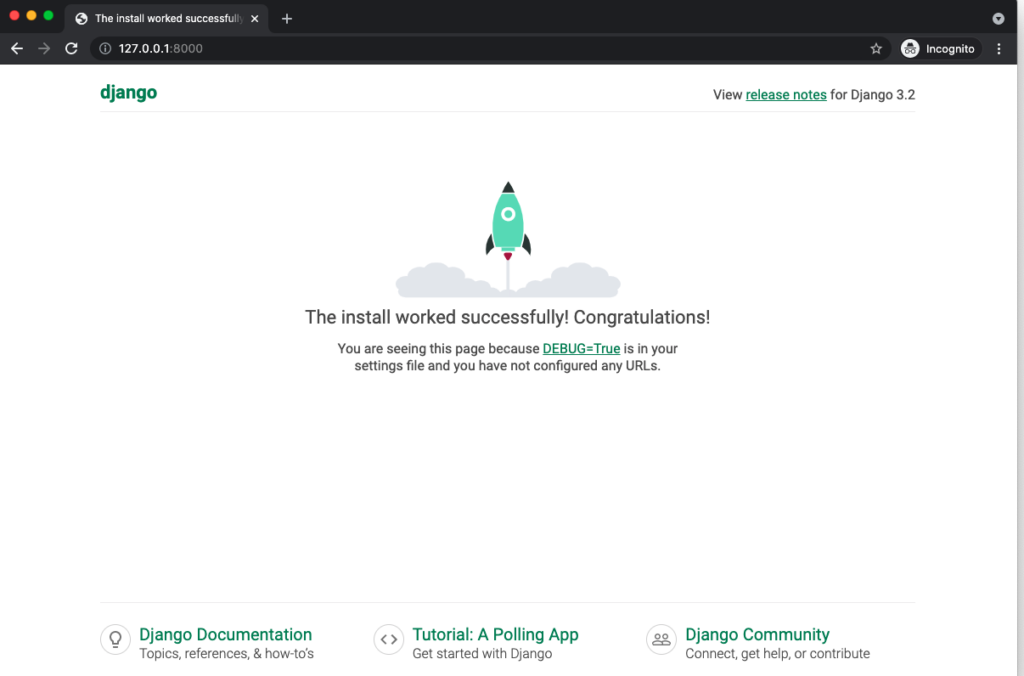
As can be seen from the output, Django has launched on our localhost on TCP port 8000, i.e., http://127.0.0.1:8000. Browsing to this URL verifies Django has been installed correctly. To stop the server we simply send the CONTROL-C command as instructed above.

You may have noticed from the output above there is now a db.sqlite3 file included in the project root directory. This was created when we ran the Django runserver option with the manage.py script.
We were also warned when executing runserver that there are a number of unapplied migrations. One of the built-in features of Django is an Object-Relational Mapper (ORM) allowing you to define and manage database schemas without the need to understand SQL. Django uses models and migrations to manage your database schema.
Models are Python classes used to describe the database schema (i.e. your database table structure), stored in models.py under each Django application. Migrations are Python scripts that modify your database when changes to the models are made. In this post we are not creating our own models, but it is worth noting that Django by default supports a number of databases, including SQLite (the default, being used here), MySQL, and Oracle, and through third-party integrations can support others (configured in settings.pyDATABASES dictionary).
There are a number of Django apps included by default (listed in settings.py under INSTALLED_APPS) which provide “under the hood” Django functionality. The unapplied migrations warning simply states that Django wants to create the necessary database schema for these apps. We can use the manage.py script to apply these initial migrations:
(env) ntc@ubuntu:~/django-projects/network_utilities$ python manage.py migrate
Operations to perform:
  Apply all migrations: admin, auth, contenttypes, sessions
Running migrations:
  Applying contenttypes.0001_initial... OK
  Applying auth.0001_initial... OK
  Applying admin.0001_initial... OK
  Applying admin.0002_logentry_remove_auto_add... OK
  Applying admin.0003_logentry_add_action_flag_choices... OK
  Applying contenttypes.0002_remove_content_type_name... OK
  Applying auth.0002_alter_permission_name_max_length... OK
  Applying auth.0003_alter_user_email_max_length... OK
  Applying auth.0004_alter_user_username_opts... OK
  Applying auth.0005_alter_user_last_login_null... OK
  Applying auth.0006_require_contenttypes_0002... OK
  Applying auth.0007_alter_validators_add_error_messages... OK
  Applying auth.0008_alter_user_username_max_length... OK
  Applying auth.0009_alter_user_last_name_max_length... OK
  Applying auth.0010_alter_group_name_max_length... OK
  Applying auth.0011_update_proxy_permissions... OK
  Applying auth.0012_alter_user_first_name_max_length... OK
  Applying sessions.0001_initial... OK
Django uses the concept of an “application” to provide modularity to our code, one of the built-in advantages of using the framework. A Django app is simply a collection of code that enables a particular function for your web application. When creating the app, a number of Django components are “tied together” within the app, namely:
The view is a Python function with an argument request which handles the requests for the web page we create. There are other optional components, but to get started, we will just define the view and URL within our Django app for our first simple webpage.
Again we use the manage.py script , this time to create our Django app. Here the app we create is called network_tools:
(env) ntc@ubuntu:~/django-projects/network_utilities$ python manage.py startapp network_tools
Django creates a network_tools directory and a number of files, including views.py which we will use to create our first view:
(env) ntc@ubuntu:~/django-projects/network_utilities$ tree
.
├── db.sqlite3
├── manage.py
├── network_tools
│   ├── admin.py
│   ├── apps.py
│   ├── __init__.py
│   ├── migrations
│   │   └── __init__.py
│   ├── models.py
│   ├── tests.py
│   └── views.py
└── network_utilities
    ├── asgi.py
    ├── __init__.py
    ├── __pycache__
    │   ├── __init__.cpython-38.pyc
    │   ├── settings.cpython-38.pyc
    │   ├── urls.cpython-38.pyc
    │   └── wsgi.cpython-38.pyc
    ├── settings.py
    ├── urls.py
    └── wsgi.py

4 directories, 18 files
In order to create our first view it is necessary to declare our Django app in the INSTALLED_APPS list in settings.py (in the network_utilities sub-directory).
network_utilities/settings.py
# Application definition

INSTALLED_APPS = [
    'django.contrib.admin',
    'django.contrib.auth',
    'django.contrib.contenttypes',
    'django.contrib.sessions',
    'django.contrib.messages',
    'django.contrib.staticfiles',
    'network_tools',
]
A simple home page can be created in the views.py file under the network_tools app. Here we create a simple function called home with a single argument, request. This argument will capture the HTTP requests which we will use later. The function returns a welcome message using Django’s HttpResponse, which we import on line 1.
network_tools/views.py
from django.http import HttpResponse

def home(request):
    return HttpResponse("Welcome to NTC netutils Django demo")
Next we must map a URL to this view. Currently we have one urls.py file in the project settings directory i.e. network_utilities/network_utilities. It is possible to declare all our URL’s here but we also have an option to create a per-Django-application urls.py. As well as modularity this approach allows us to have a common prefix for each app. This is the approach we will take allowing us to create a /netutils prefix as we add webpages. We will create this prefix later when adding pages for the netutils utilities, but first we will setup the project and application urls.py for the home page.
In the project urls.py we map the home page URL (signified via a blank path '' ) to our Django app by including network_tools.urls.
network_utilities/urls.py
from django.contrib import admin
from django.urls import path

urlpatterns = [
    path('admin/', admin.site.urls),
    path('', include('network_tools.urls'))
]
We then create a urls.py file in the application directory (network_utilities/network_tools) in order to map the URL to our view, you can see that the path ('') is the same in both files.
network_tools/urls.py
from django.urls import path
from . import views

urlpatterns = [
    path('', views.home, name='home'),
]
Now if we run the Django server again and browse to http://127.0.0.1:8000 we will be presented with the welcome message and we have created our first Django webpage.

Having covered the basics of Django we can build our web frontend for the NTC netutils library (python -m pip install netutils)
So far we have created a simple webpage with a welcome message, now we can use Django templates to write HTML code to develop the page further. The templates support an inheritance model whereby we can ensure that each page we create has a similar look and feel. To start we will create a base.html file, from which all other pages will inherit.
First we must create a templates directory inside our app directory. Django by default will look in this directory for the base.html file. This directory should also have a sub-directory with the same name as the app (network_tools) where HTML files for all the app pages will be stored. Similarly a static directory with a network_tools sub directory is created to store an image that will be displayed on each page inherited from base.html.
(env) network_utilities/network_tools$ tree
├── static
│   └── network_tools
│       └── ntc-logo.png
├── templates
│   ├── base.html
│   └── network_tools
│       └── home.html
The base.html file includes 2 blocks (title and body) which act as placeholders for subsequent pages to display page specific content. The header also includes a PNG image (the Network to Code logo); each page that extends from base.html will display this image. In order to load the image the load static instruction is necessary i.e. line 1.
templates/base.html
{% load static %}
<!DOCTYPE html>
<html lang="en">

<head>
    <meta charset="UTF-8">
    <title>{% block title %}{% endblock %}</title>
    <img src="{% static 'network_tools/ntc-logo.png' %}" width="200px">
</head>

<body>
    {% block body %}
    {% endblock %}
</body>

</html>
We can now update the home page by creating a home.html in the templates/network_tools directory. This HTML file extends from base.html and provides inputs to the title and body blocks.
templates/network_tools/home.html
{% extends "base.html" %}

{% block title %}Welcome{% endblock %}

{% block body %}
<h1> Welcome to NTC netutils Django front end demo</h1>

<body>
    <p>
        This is the webpage for running NTC netutils utilities.
    </p>
</body>
{% endblock %}
In order to utilise these HTML templates we must update our view. The Django render function is now used instead of directly constructing an HttpResponse, and thus we can remove the from django.http import HttpResponse statement.
network_tools/views.py
from django.shortcuts import render

def home(request):
    return render("network_tools/home.html")
We now have a home page which inherits the NTC logo from base.html.

NTC’s netutils Python library is a collection of tools to help with your network automation projects, installed using ‘pip’:
(env) ntc@ubuntu:~/django-projects$ python3 -m pip install netutils
For the purposes of this post we will create a frontend for 2 of the ‘netutils’ tools:
As with our home page, it is necessary to update a number of files in order to create each new page as follows:
ping.html – a new file in the templates/network_tools directoryviews.py – define our view for each pageurls.py – In both the project and application directories allows us to map a URL to our new viewFirst we will create a link on our home page to our new page for the netutils tool. This is configured in home.html we created previously, we have added a sub header and HREF for the “Ping” page to specify a link destination.
templates/network_tools/home.html
{% extends "base.html" %}

{% block title %}Welcome{% endblock %}

{% block body %}
<h1> Welcome to NTC netutils Django front end demo.</h1>

<body>
    <p>
        This is the webpage for running NTC netutils utilities.
    </p>
    <h2> Supported Netutils Functions:</h2>
    <a href="{%url 'ping' %}">Ping</a>
</body>
{% endblock %}
The ping.html template will inherit from base.html as before. We can now complete the page specific details using the 2 blocks declared in base.html, title and body. The title simply labels our browser tab, with ‘TCP Ping’ in this instance. The body block allows us to code the input fields necessary for the netutils TCP Ping utility, note in the body we specify the HTTP method verb which we will use in the view. The netutils ping tool accepts 2 arguments (IP Address and TCP Port number) requiring a form field for each argument, both of which are given a name (“ip” and “number”) which can be referenced in a Django view. We also create a submit button to allow the user to execute the TCP Ping utility.
The HTML code includes input validation on the TCP port to ensure only an integer in the valid TCP port range is accepted. Also a test_result variable is displayed which will be declared in our Django view. A link back to the Home page is added at the bottom of the page.
templates/network_tools/ping.html
{% extends "base.html" %}

{% block title %}TCP Ping{% endblock %}

{% block body %}
<h2> TCP Ping </h2>
<p>
    Verifies whether a TCP port is open on a given IP address
</p>
<form action="/ping/" method="get">
    <label for="">Please enter Host IP Address:</label>
    <input name="ip">
    <div><label for="">Please enter TCP Port:</label>
        <input type="number" name="port" min="0" max="65535">
    </div>
    <div><button type="submit">Submit</button></div>
</form>
<div class="result">{{test_result|linebreaks}}</div>
<a href="{%url 'home' %}">home</a>
{% endblock %}
In views.py we declare a new function to define the code necessary to execute the ping tool. The required functions from the netutils library are imported, as shown on line 2 and 3. The request object contains the data entered by the user, i.e. the ‘ip’ and ‘port’ parameters specified in ping.html.
The “ping” function includes input validation to verify the user input. First it verifies an IP Address has been entered, in this instance we use the get method of the request.GET object to query the 'ip' key. If an IP Address has been entered the netutils is_ip method is used to ensure the IP Address is in a valid format. This input validation is in addition to verification of the TCP port number configured in the HTML template which is enforced by the browser rather than the views.py function.
Having validated the user input, the netutils tcp_ping function is called and the result stored in a test_result dictionary. The function return statement calls Django render to render the ping.html template and passes in the test_result dictionary.
network_tools/views.py
from django.shortcuts import render
from netutils.ping import tcp_ping
from netutils.ip import is_ip, cidr_to_netmask, netmask_to_cidr, is_netmask

def home(request):
    return render("network_tools/home.html")

def ping(request):
    test_result = {}

    if request.GET.get('ip') == '':
        test_result['test_result'] = f'Please enter an IP Address {request.GET}'
    elif 'ip' in request.GET:
        if is_ip(request.GET['ip']) is False:
            test_result['test_result'] = 'Please enter a valid IP Address'
            return render(request, "network_tools/ping.html", test_result)
        host_ip = request.GET['ip']
        host_port = request.GET['port']
        ping_result = tcp_ping(host_ip, host_port)
        if ping_result is True:
            test_result['test_result'] = f"Success: Port {host_port} is Open on host {host_ip}"
        else:
            test_result['test_result'] = f"Failure: Cannot open connection to Port {host_port} on host {host_ip}"

    return render(request, "network_tools/ping.html", test_result)
Finally we must update the project and application urls.py to map a URL to our django view.
In the project urls.py we can now declare a netutils prefix which will be prepended to pages for this Django app.
network_utilities/urls.py
from django.contrib import admin
from django.urls import path, include

urlpatterns = [
    path('admin/', admin.site.urls),
    path('netutils/', include('network_tools.urls'))
]
In the application urls.py we map the URL to the view.
network_tools/urls.py
from django.urls import path
from . import views

urlpatterns = [
    path('', views.home, name="home"),
    path('ping/', views.ping, name="ping"),
]
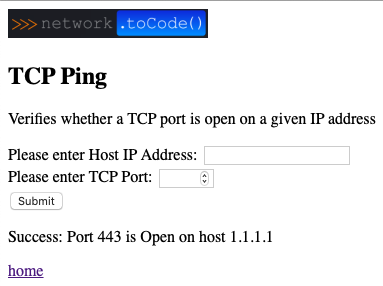
We now have a new webpage allowing the user to validate if an IP Address is listening on a particular TCP port. The input validation configured will ensure a message is displayed if an invalid IP Address or TCP Port number is entered. In the example output below we entered valid details and were returned a ‘Success’ message.

This completes all the necessary steps to enable a Django frontend on one of Network to Code’s netutils functions. In order to create additional pages (e.g. the IP Address utilities) we follow the same process:
1. Add a link to the new page on the home page in home.html.
2. Add an HTML template for our new page, e.g., ip_addresses.html.
3. Define the view in views.py, e.g., an ip_addr(request) function plus necessary code logic.
4. Update the application-specific urls.py to map a url to the new view.
At this stage most of the work is in views.py and the application specific urls.py. Below is shown the changes to these files to add the CIDR/Netmask conversion tool.
templates/network_tools/ip_address.html
{% block body %}
<h2> cidr_to_netmask</h2>
<p>
    Creates a decimal format of a CIDR value.
</p>
<form action="/ip_addr" method="get">
    <div><label for="">Please enter CIDR value:</label>
        <input type="number" name="cidr" min="1" max="32">
    </div>
    <div><button type="submit">Submit</button></div>
</form>
<div class="result">{{netmask_result|linebreaks}}</div>
</div>
<h2> netmask_to_cidr</h2>
<p>
    Creates a CIDR notation of a given subnet mask in decimal format.
</p>
<form action="/ip_addr" method="get">
    <div><label for="">Please enter a netmask value:</label>
        <input name="netmask">
    </div>
    <div><button type="submit">Submit</button></div>
</form>
<div class="result">{{cidr_result|linebreaks}}</div>
</div>
<a href="{%url 'home' %}">home</a>
{% endblock %}
network_tools/views.py
def ip_addr(request):
    test_result = {}

    if request.GET.get('cidr') == '':
        test_result['test_result'] = 'Please a valid CIDR value [1-24]'
    elif 'cidr' in request.GET:
        cidr = int(request.GET['cidr'])
        netmask_result = cidr_to_netmask(cidr)
        test_result['netmask_result'] = f"Netmask for CIDR value {cidr} is {netmask_result}"
    elif 'netmask' in request.GET:
        netmask = request.GET['netmask']
        if is_netmask(netmask) is False:
            test_result['cidr_result'] = 'Please enter a valid Netmask'
            return render(request, "network_tools/ip_address.html", test_result)
        cidr_value = netmask_to_cidr(netmask)
        test_result['cidr_result'] = f"CIDR Value for netmask {netmask} is {cidr_value}"

    return render(request, "network_tools/ip_address.html", test_result)
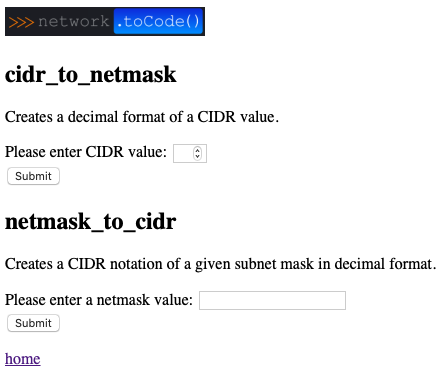
This gives us 2 additional tools to convert CIDR value to Netmask and vice-versa.

We have just scratched the surface of Django, but hopefully this will give you an understanding of how to quickly get started. I hope you find this blog post useful.
-Nicholas Davey
Share details about yourself & someone from our team will reach out to you ASAP!