

This is the second post in a multi-part series that explores web front-end technologies and how they can be used with Django. You can find the inital post here: Django & JavaScript – Introduction.
Requirements
To hit home, I will be mentioning the requirements to satisfy in each blog post no different than mentioned in the previous post.
- Single process to host the UI & API
- Django + Django REST framework
- Overarching web framework from day 1
- Intuitive UI/UX that can be dynamically updated without loading a new page
HTMX
HTMX provides a simplified set of HTML attributes that provide the ability to access modern browser features without having to directly write JavaScript. Behind the scenes, HTMX is a JavaScript-driven package that relies on Ajax for HTTP requests to the underlying host and manipulation of HTML in the DOM. HTMX is built on the concept of server side processing and templating of HTML that is then injected into or replaces HTML elements without writing JavaScript. This provides a lower barrier for entry on developing more responsive modern web experiences, however it’s meant for the server to respond with HTML instead of JSON data. This can have its trade-offs, mainly when taking an approach of every model having a DRF-driven API, in which case there may be additional sets of views to build and manage that support each interactive component as we are performing server side processing of the data. This level of flexibility is a great fit for both single page and multi page applications.
Triggers
By default, triggers are based on the “natural” event for the specific element type. input, textarea, and select elements are triggered from change events; whereas form is triggered on submit, and all others are triggered based off of click events. If there is a need to overload the default behavior, you can set the hx-trigger attribute to some of the following triggers. It is also possible to chain triggers together and to modify a trigger with an event modifier.
load– triggered on loadrevealed– triggered when an element is scrolled into the viewportintersect– fires once when an element first intersects the viewportclick– mouse clickclick[ctrlKey]– click of ctrl key on keyboard, can be any key and can be chained together via&&every 1s– polled interval, must be used with a time declarationkeyup– on key up from typing
Additional triggers can be found in HTMX documentation.
Actions
Actions are the HTTP method for the request, and are set via the hx-<method> with the value being the requested URL.
hx-getIssues aGETrequest to the given URLhx-postIssues aPOSTrequest to the given URLhx-putIssues aPUTrequest to the given URLhx-patchIssues aPATCHrequest to the given URLhx-deleteIssues aDELETErequest to the given URL
Targets
Once the web server responds to the hx-target, it provides the HTML element to swap the HTML. The default target behavior is to interact with the HTML element where the action is trigger, but I find most times that is not fit for my purposes unless I change the swapping behavior. To override the default behavior, the target will accept a CSS selector. In the examples below, the select is based on an element ID. This is represented by hx-target="#<element ID>".
Swapping
Swapping refers to how the HTML is swapped inside the DOM upon receiving the HTTP response. The default behavior is innerHTML but can be overwritten via the hx-swap attribute.
innerHTMLthe default, puts the content inside the target elementouterHTMLreplaces the entire target element with the returned contentafterbeginprepends the content before the first child inside the targetbeforebeginprepends the content before the target in the target’s parent elementbeforeendappends the content after the last child inside the targetafterendappends the content after the target in the target’s parent elementnonedoes not append content from response, but does process the response headers and out of band swaps (see HTMX documentation)
Example 1 – Build DOM from Button Click
Initial Page Without Profile Data

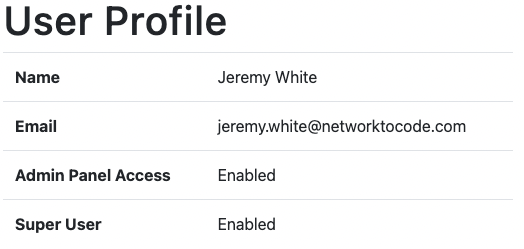
Page with Profile Data
Initial HTML
<div class="container">
  <div class="col" id="dom-container">
    <h1>Waiting to load user profile.</h1>
    <button class="btn btn-primary mt-2"
      hx-get="/user/profile/"
      hx-target="#dom-container">
      Load User Profile
    </button>
  </div>
</div>
User Profile HTML
<h1>User Profile</h1>
<table class="table">
  <tr>
    <th scope="row">Name</th>
    <td>{{ request.user.name }}</td>
  </tr>
  <tr>
    <th scope="row">Email</th>
    <td>{{ request.user.email }}</td>
  </tr>
  <tr>
    <th scope="row">Admin Panel Access</th>
    <td>{% if request.user.is_staff or request.user.is_superuser %}Enabled{% else %}Disabled{% endif %}</td>
  </tr>
  <tr>
    <th scope="row">Super User</th>
    <td>{% if request.user.is_superuser %}Enabled{% else %}Disabled{% endif %}</td>
  </tr>
</table>
Template View
class UserProfileView(TemplateView):
    template_name = "user-profile.html"
In this example we have a simple User Profile page that initially loads without any data. The data will be loaded via the Load User Profile button, which is triggered by a default hx-trigger of click. The action performed is hx-get to /user/profile, which makes a GET call to the URL, and the web server responds with the rendered table. Upon receiving the response, hx-target tells the browser to perform the hx-swap action of swapping the innerHTML of the element with an ID of dom-container.
Example 2 – Input Validation
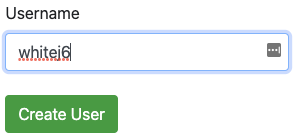
User Does Not Exist
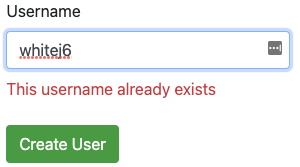
User Does Exist
HTML Form
<form method="POST" action="/create-user/" autocomplete="off">
  <div class="form-group mb-3">
    <label>Username</label>
    <input type="text"
      hx-trigger="keyup"
      hx-target="#user-err"
      hx-post="/check-user-exists/"
      class="form-control"
      name="user">
    <div class="text-danger mt-2" style="color:red;" id="user-err"></div>
  </div>
  <button type="submit" class="btn btn-success mt-2">Create User</button>
</form>
The name attribute will be used on accessing the field from the form in Django. The hx-trigger event in this case is every keyup event in the input field. The action is hx-post to perform a POST via /check-user-exists/. On response from the web server, the browser replaces the innerHTML of the div user-err with the response data, and also uses the default innerHTMLhx-swap.
Simple Function Based View
def check_username(request):
    username = request.POST.get("user")
    if User.objects.filter(username=username).exists():
        return HttpResponse("This username already exists")
    else:
        return HttpResponse("")
In the first screenshot, the expected behavior, user-err div innerHTML, is replaced with an empty string because the queryset returned False when applying .exists() function. In the second, the .exists() function returned True, which replaces the innerHTML with This username already exists.
Conclusion
HTMX is a very powerful and scalable solution from the frontend perspective that has a very low barrier for entry when it comes to JavaScript development. This post barely scratches the surface when it comes to HTMX but is enough to be dangerous. Of the frameworks I have worked with in my past it has be a great breath of fresh air as a Python developer to not have to worry about writing a single line of JavaScript.
~ Jeremy
Tags :
Does this all sound amazing? Want to know more about how Network to Code can help you do this, reach out to our sales team. If you want to help make this a reality for our clients, check out our careers page.
Share :


Contact Us to Learn More
Share details about yourself & someone from our team will reach out to you ASAP!