

Introducing the Nautobot Firewall Models application! A data-model driven solution for modeling layer 4 firewall policies and access lists. This will allow anyone to model policies to drive their network and security automation. Even better, the firewall models are built to take a vendor-agnostic approach; the models are robust to provide maximum flexibility.
The application is currently available for install directly via PyPI as a beta release with the intent to gather feedback from the community and implement a few enhancements to help with the user experience prior to a v1.0.0 release. The app requires Nautobotv1.3.0 or later, as it employs the use of DynamicGroups as an option in Policy assignment.
Setting Up a Development Environment
The application follows the same type of development environment as most apps found in the Nautobot namespace of GitHub from the stance of being built on Poetry, Docker, and PyInvoke. This app does introduce a management command to Nautobot that is very helpful to use in a local development environment OR to just populate a small set of data for use in testing out the app. Management commands are a set of actions that the nautobot-server command has access to. A few common ones you see are createsuperuser or runserver. The management command published by the app is create_test_firewall_data. This command uses the same set of data used in running unittests to populate a set of test data. To follow a similar pattern for the other common management command, in the development environment you can run invoke testdata to wrap running the nautobot-server command. Why does this matter? If you’re using the local development environment, the invoke command is easiest. But if you are not using local development for the deployment, nautobot-server create_test_firewall_data is available.
Example Local Setup Commands
➜  plugins git clone git@github.com:nautobot/nautobot-plugin-firewall-models.git
➜  plugins cd nautobot-plugin-firewall-models
➜  nautobot-plugin-firewall-models git:(develop) poetry install
➜  nautobot-plugin-firewall-models git:(develop) poetry shell
➜  nautobot-plugin-firewall-models git:(develop) cp development/creds.example.env development/creds.env
➜  nautobot-plugin-firewall-models git:(develop) invoke build
## I like running migrate, but it can be skipped as called by start.
➜  nautobot-plugin-firewall-models git:(develop) invoke migrate
➜  nautobot-plugin-firewall-models git:(develop) invoke start
## To do a one-time load of data, migrations must have finished.
➜  nautobot-plugin-firewall-models git:(develop) invoke testdata
Running docker-compose command "ps --services --filter status=running"
Running docker-compose command "exec nautobot nautobot-server create_test_firewall_data"
Attempting to populate dummy data.
Successfully populated dummy data!
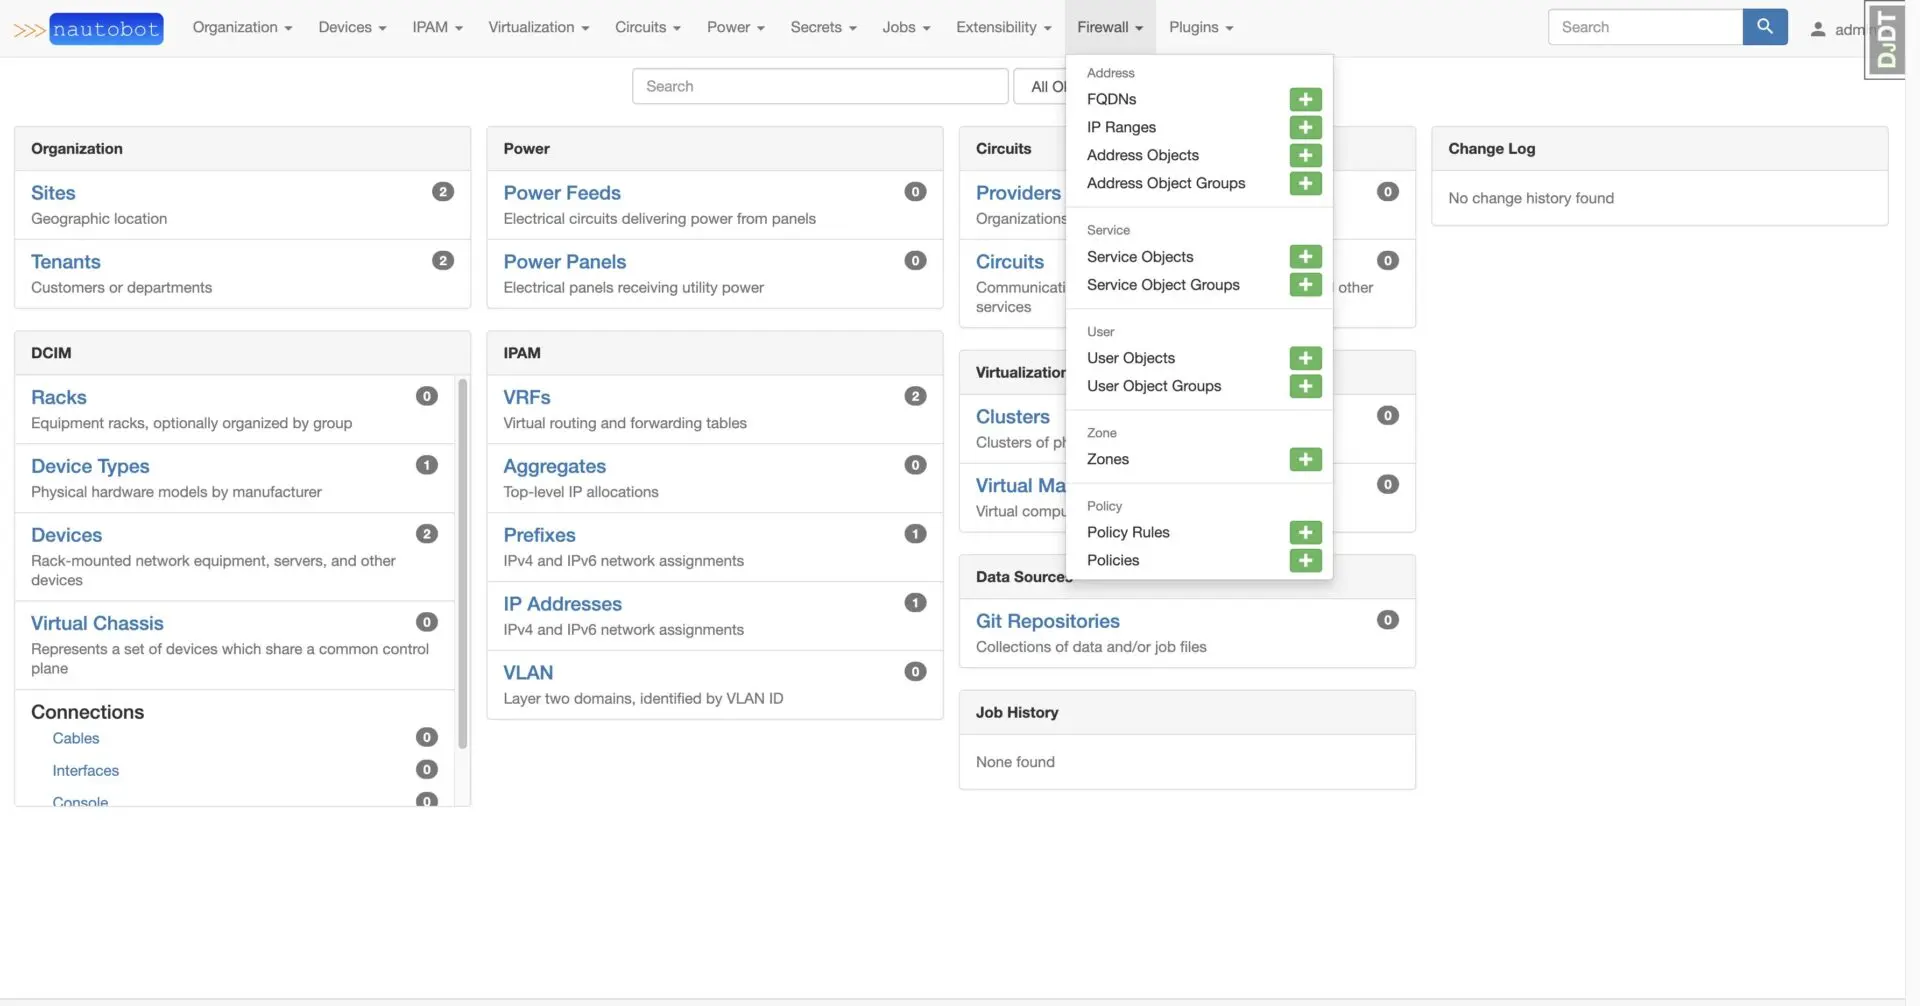
Navigating the UI
Navigating the app is done via the Firewall nav bar dropdown.
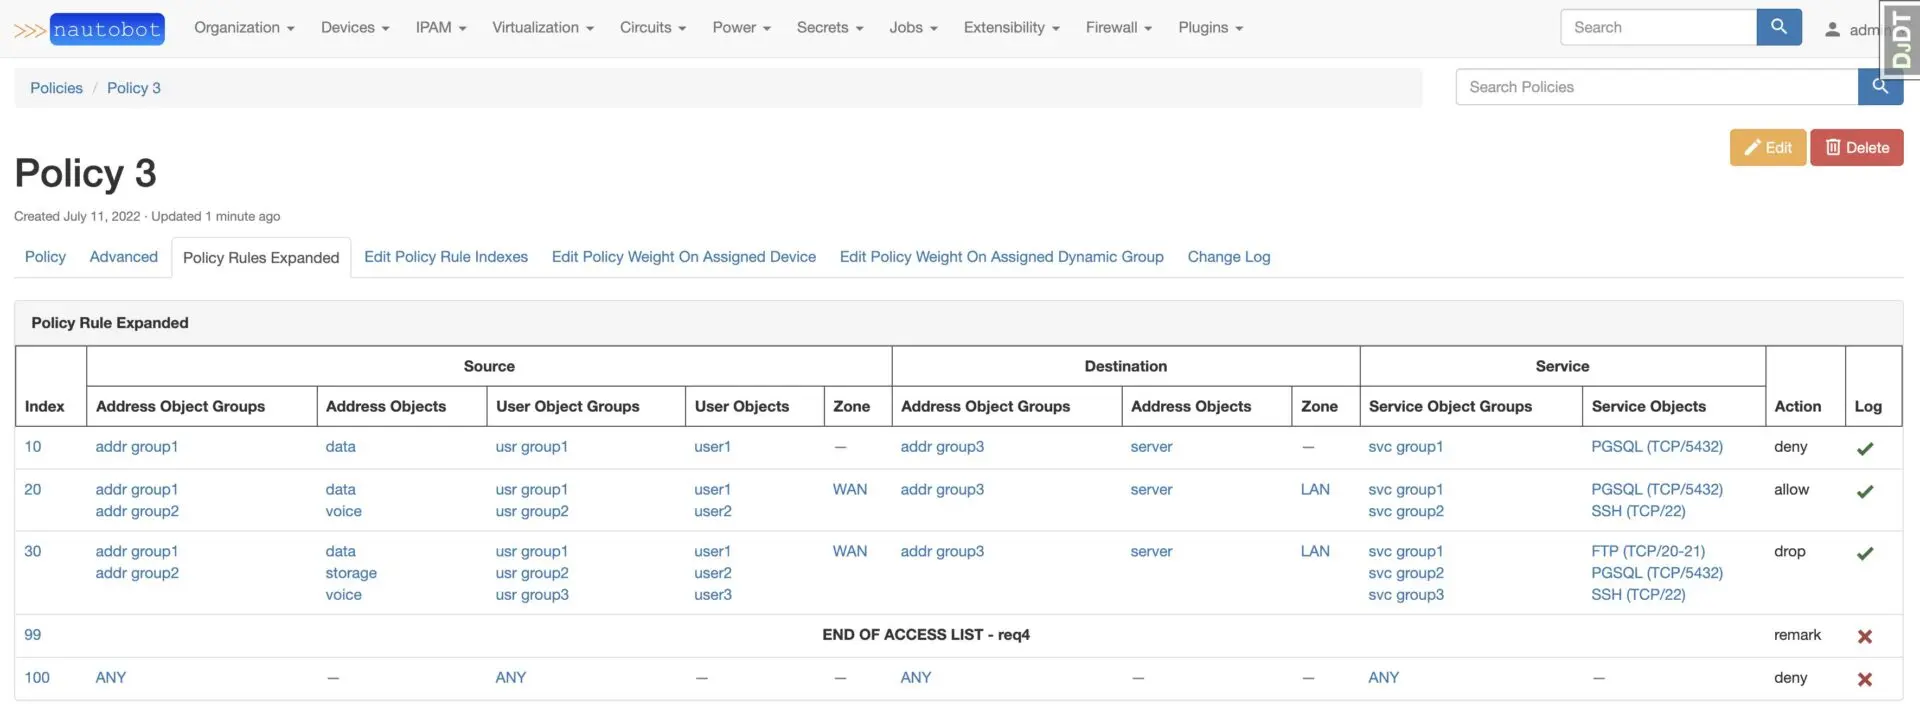
Reviewing a Policy with Rules
After selecting Policy from navmenu, select a Policy from the list. To get more detail on the rule assigned to the Policy, click on Policy Rules Expanded.
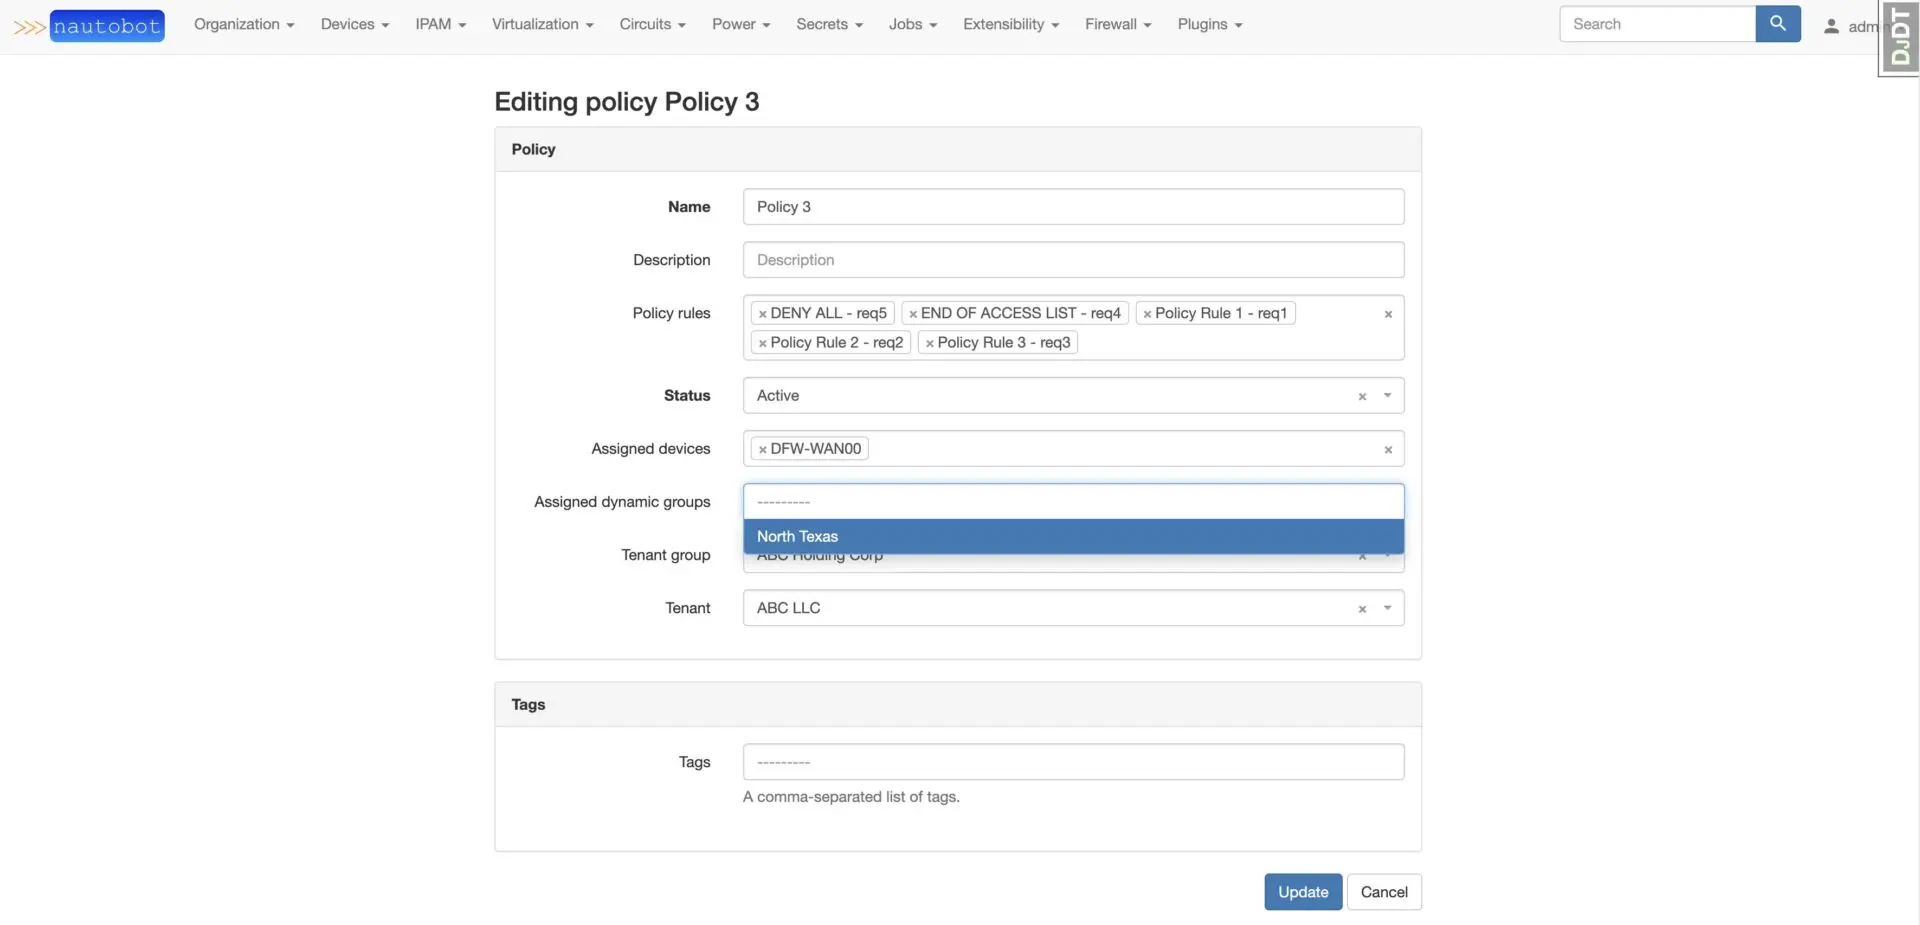
Assigning the Policy to a Device OR DynamicGroup can be done via the Edit menu.
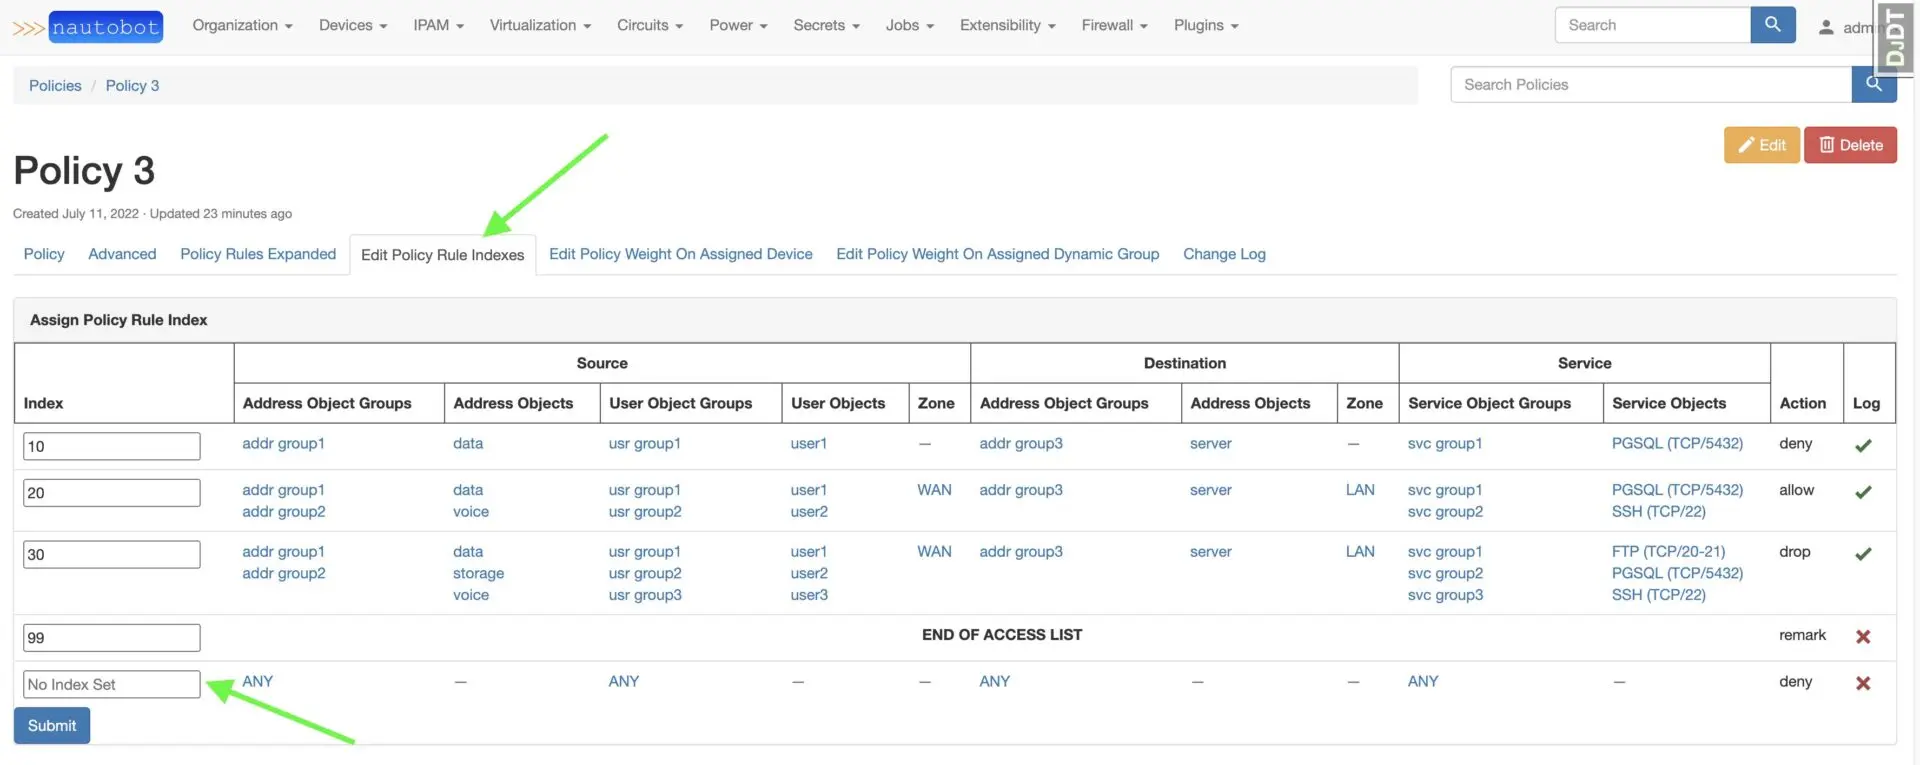
When initially assigning a PolicyRule to a Policy, the index of the relationship is not set. To set the index, click Edit Policy Rule Indexes and you will see No Index Set for the newly added PolicyRule. You can adjust multiple indexes at once and hit Submit.
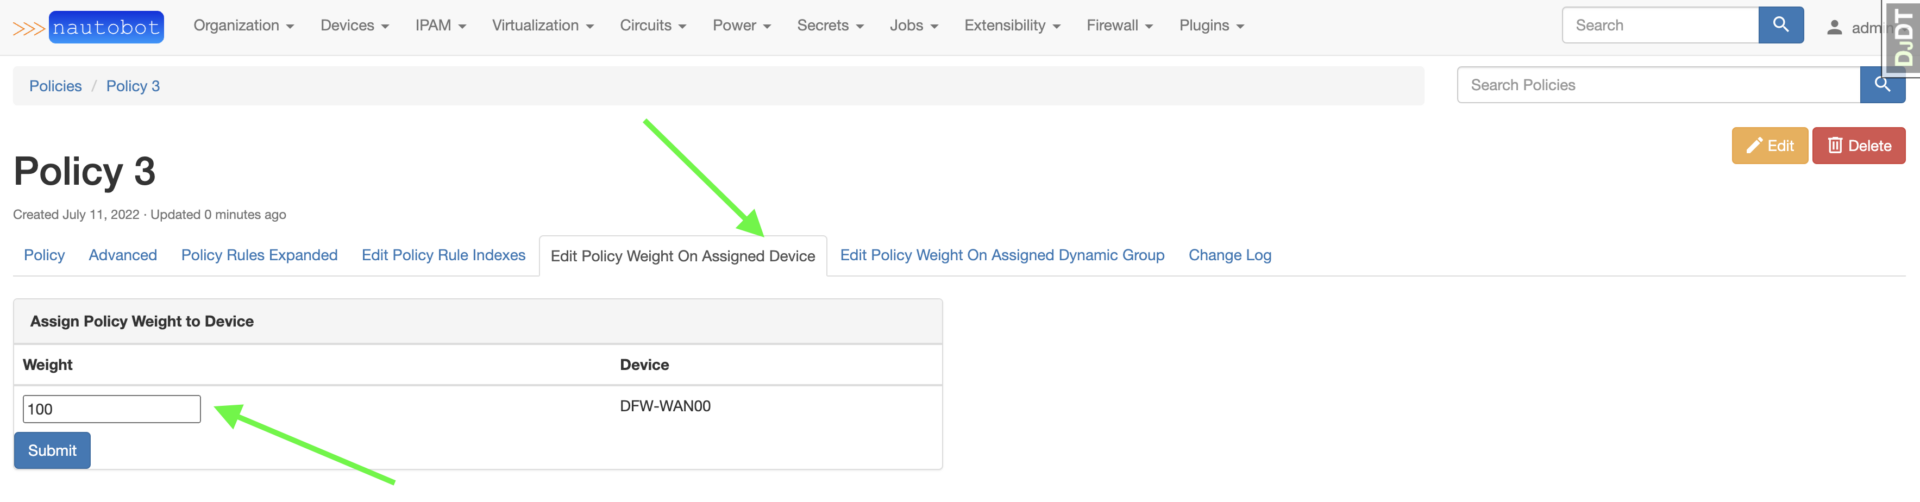
The weight for assigned Devices or DynamicGroups is edited similarly to editing a PolicyRule index, however the weight does default to 100 on the initial assignment.
Building a Simple Policy
Use the following steps to create a small Policy that has one PolicyRule: to allow HTTP/HTTPS access from an IPRange to an FQDN then an implicit deny.
- Create an
IPRangewith a starting address of10.0.0.1and ending address of10.0.0.100. - Create an
FQDNnameddemo.nautobot.com. - Create an
AddressObjectnamedUser Workstationswith the10.0.0.1-10.0.0.100IPRange assigned. - Create a second
AddressObjectnamedNautobot Demo FQDNwith thedemo.nautobot.comFQDN assigned. - Since we have two ServiceObjects to target AND they are both created by the initial migrations, create a
ServiceObjectGroupnamedWeb Serviceswith both theHTTP (TCP/80)andHTTPS (TCP/443)ServiceObjects assigned. - Create a
PolicyRulewith the following attributes assigned:- name =
Allow Users to Nautobot Demo - Source Address Objects =
User Workstations - Destination Address Objects =
Nautobot Demo FQDN - Service Object Groups =
Web Services - Action = allow
- Status = Active
- Leave the remaining attributes blank.

- name =
- Create a second
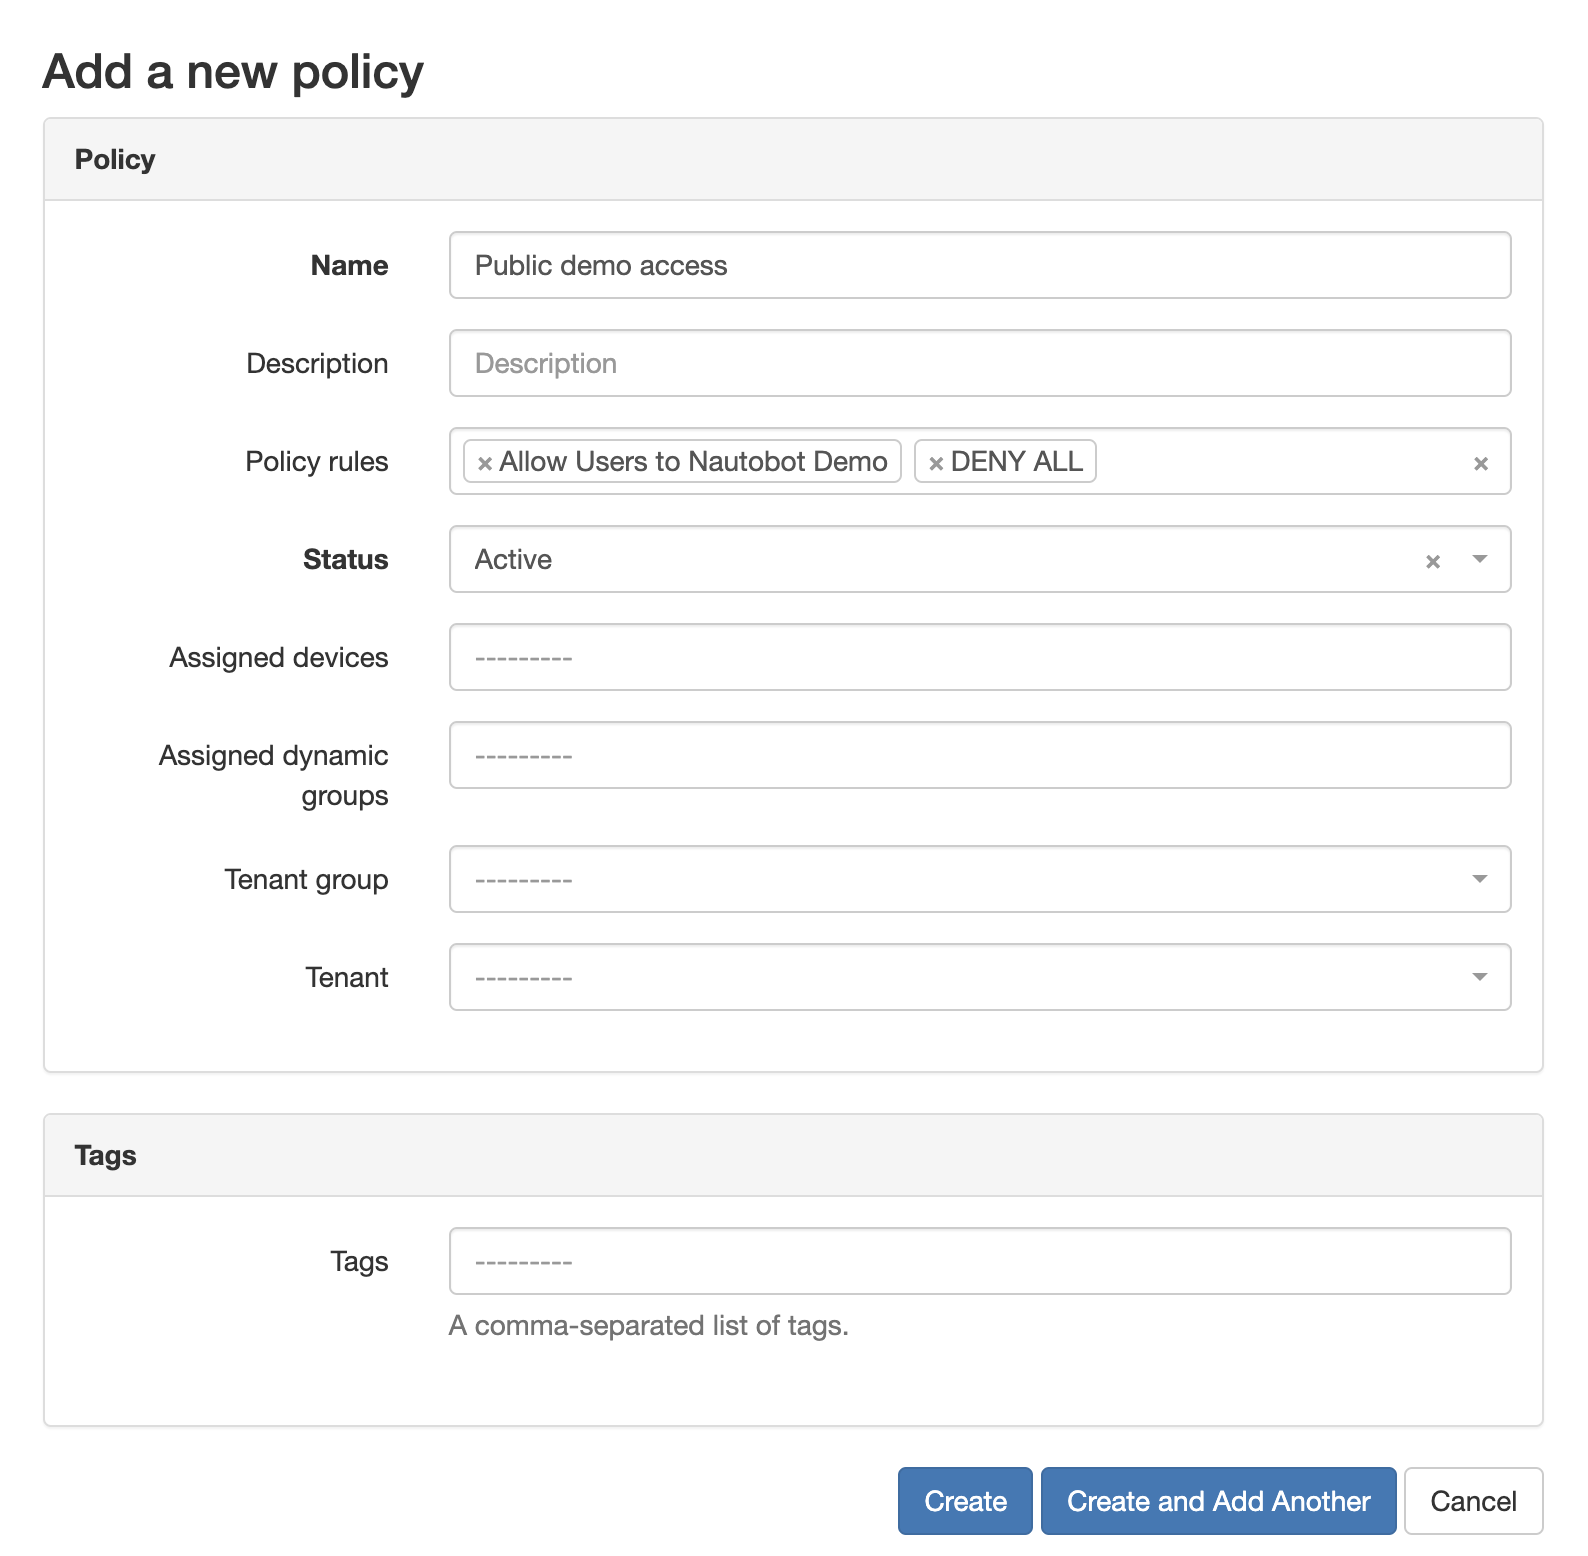
PolicyRulewith only the name set toDENY ALLand action set todeny. - Create a
PolicynamedPublic demo accessand assign both newly createdPolicyRules.
- Last, click
Edit Policy Rule Indexesand assign the allowed rule an index of10and the deny rule an index of100.

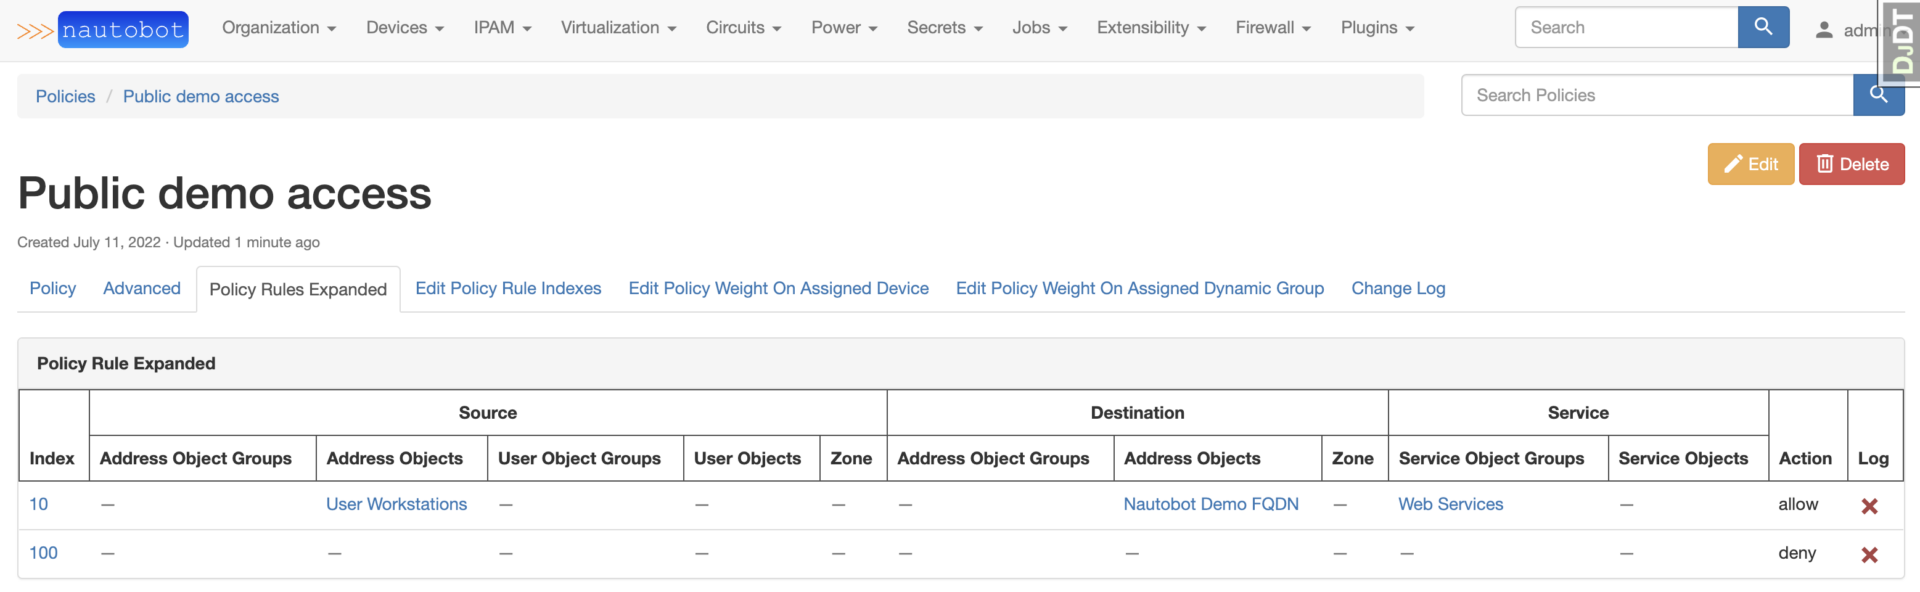
Although this process does require navigating through a few views, all objects are backed by a full REST API and can be fully created and maintained via the API.
Conclusion
- To help with ingesting existing rules, one of the first items on the roadmap is to create an ingestion job that leverages ntc-templates to parse an existing CLI output and create the underlying objects to model the Policy. This will be part of several UI/UX enhancements that will be prioritized based on community feedback.
- For translating a
Policyobject to a network device configuration, Ken Celenza is currently prototyping the use of capirca for generating the configuration. - Ability to create a single
PolicyRuleon one page without navigating to additional pages to create the nested objects.
For questions along the way, feel free to check out the #nautobot channel in NTC Slack and create issues or discussion on the GitHub Repo.
-Jeremy White
Does this all sound amazing? Want to know more about how Network to Code can help you do this, reach out to our sales team. If you want to help make this a reality for our clients, check out our careers page.
Share :


Contact Us to Learn More
Share details about yourself & someone from our team will reach out to you ASAP!