HomeBlogSetting Up Nautobot ChatOps with Microsoft Teams
UPDATE October 2022 Since this post was originally created, there have been multiple updates on both the Microsoft Azure and Microsoft Teams side for setting up ChatOps bots. You can reference our updated blog post here, as this post includes outdated information for setting up Azure and the Teams client.
Network to Code has released a number of amazing plugins for Nautobot. One of which, adding ChatOps functionality, can be found here on GitHub. This plugin adds ChatOps capabilities directly into your existing ChatOps client, in the form of a chat bot, and supports four of the more popular services available right now. The four services currently supported are Slack, Microsoft Teams, Webex Teams, and Mattermost.
If this is your first time hearing about ChatOps or this plugin, you can see the ChatOps demo on YouTube or join slack.networktocode.com and try it out for yourself in the #nautobot-chat channel.
Today, I’ll be going over how to get this plugin working in Nautobot and how to get a chat bot up and running for Microsoft Teams. The process is fairly different from the other three providers listed, and slightly more complex, but the end results are amazing. Let’s dive right in!
Getting Started
There are two main parts to getting the ChatOps plugin working with any ChatOps service: configuring it on the ChatOps service directly, and installing and configuring it on your Nautobot server. Microsoft Teams splits the first part into two sections: creating the service in Azure, and installing the app in the Teams client.
For simplicity, I will assume you already have the base Nautobot server installed and working. If not, you can find the full documentation over on our new Nautobot Documentation site, or join our public Slack channel #nautobot at slack.networktocode.com and ask for assistance.
Part 1: Configuring Microsoft Teams SaaS
Azure and Permissions
To start off, I will be configuring a brand-new bot for Microsoft Teams from scratch. Microsoft runs their bots differently from Slack, Webex Teams, or Mattermost, in that their bot service runs on Azure. If you don’t have a Microsoft Azure account, you will need to create one or get access to it through your company before continuing.
According to the Microsoft docs, you will need “Contributor access either in the subscription or in a specific resource group. A user with the Contributor role in a resource group can create a new bot in that specific resource group. A user in the Contributor role for a subscription can create a bot in a new or existing resource group.”
Configuring Azure
There are three main parts to configuring a bot in Azure:
1) Create a Bot Service and Resource Group
2) Configure the Bot Service channel
3) Create a Client Secret for the Bot Service
I’ll break down each part individually, with step-by-step instructions and screenshots along the way.
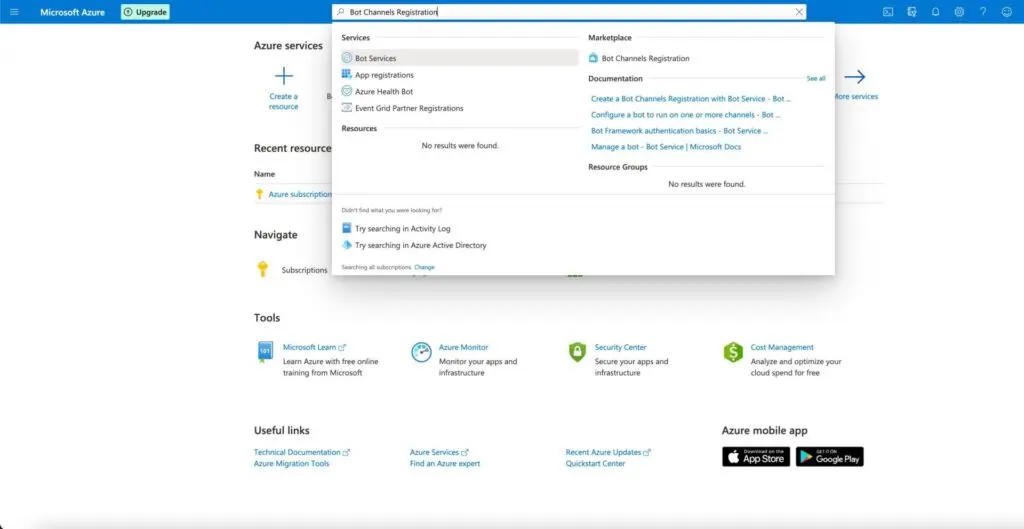
At the top of the screen is a search bar. Search for “Bot Channels Registration”, then select the option with the same name under “Marketplace” on the right side. This will take you to the page to create a new Bot Service.
NOTE: You may need to activate this service first within your company’s Azure subscription, which is not covered in this post.
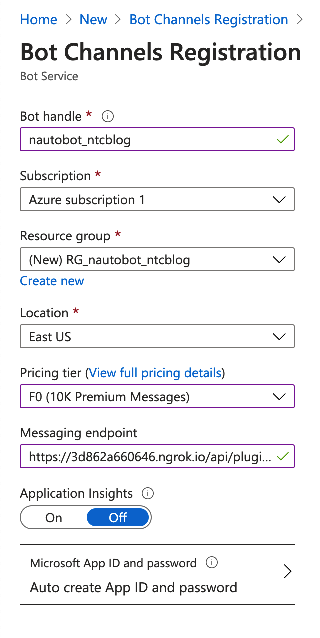
A few key fields to fill out when creating a new Bot Service are:
Bot Handle – What you want your bot handle to be. This is not what your bot is called in the MS Teams client, or how users will interact with your bot, but it is unique (case-insensitive) within the overall Azure Bot Framework.
Resource Group – If there’s an existing one you want to use, select it. Otherwise, select the “Create new” link and create a new resource group. In this example, I’m creating a new Resource Group called “RG_nautobot_ntcblog”.
Pricing Tier – I’m using F0, which is Azure’s basic free tier.
Messaging Endpoint – Enter your Nautobot service URL in this format: https://<server>/api/plugins/chatops/ms_teams/messages/.
In this demo example, I’m using the Ngrok service. For a production Nautobot server, you would enter in the publicly facing DNS endpoint for inbound webhooks into your Nautobot server.
Subscription, Location, and Application Insights – Use whatever is appropriate for your company and situation.
Once this is all filled out, select the Create button at the bottom of the screen.
Wait until the deployment is done and successful before continuing. You can monitor its progress in the upper right of the Azure dashboard, under the alerts icon (looks like a bell).
2 – Configure the Bot Service Channel
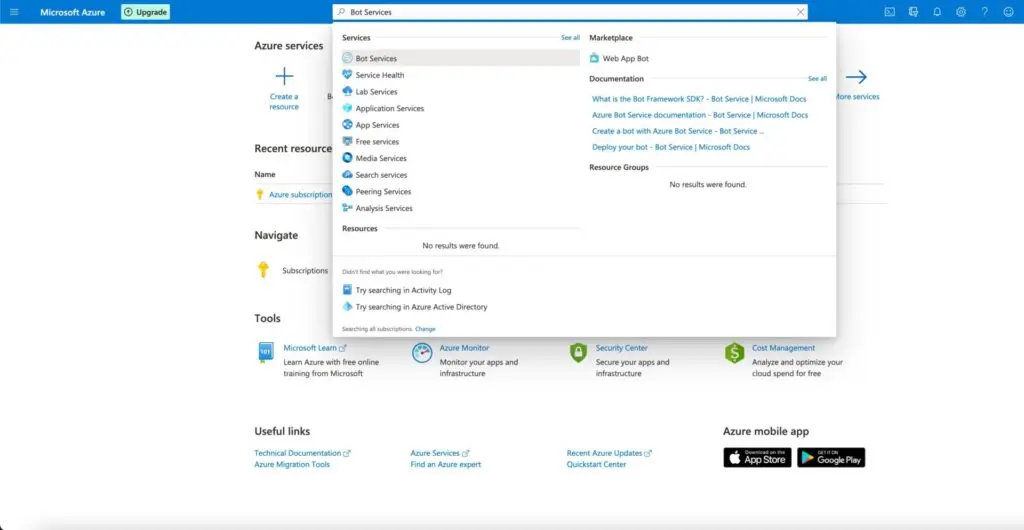
Back on the Azure Portal homepage, in the main search bar, search for “Bot Services”, then click on the corresponding link under the Services section on the left side.
Select the name of the bot handle you just created.
Select the Microsoft Teams client icon, as circled in the screenshot below.
All of the options on the next Configure Microsoft Teams page should be ok when left to default, but should be reviewed anyway for your specific use case.
Once done, click Save at the bottom of the page, and review and Agree to any ToS popups.
3 – Create a Client Secret for the Bot Service
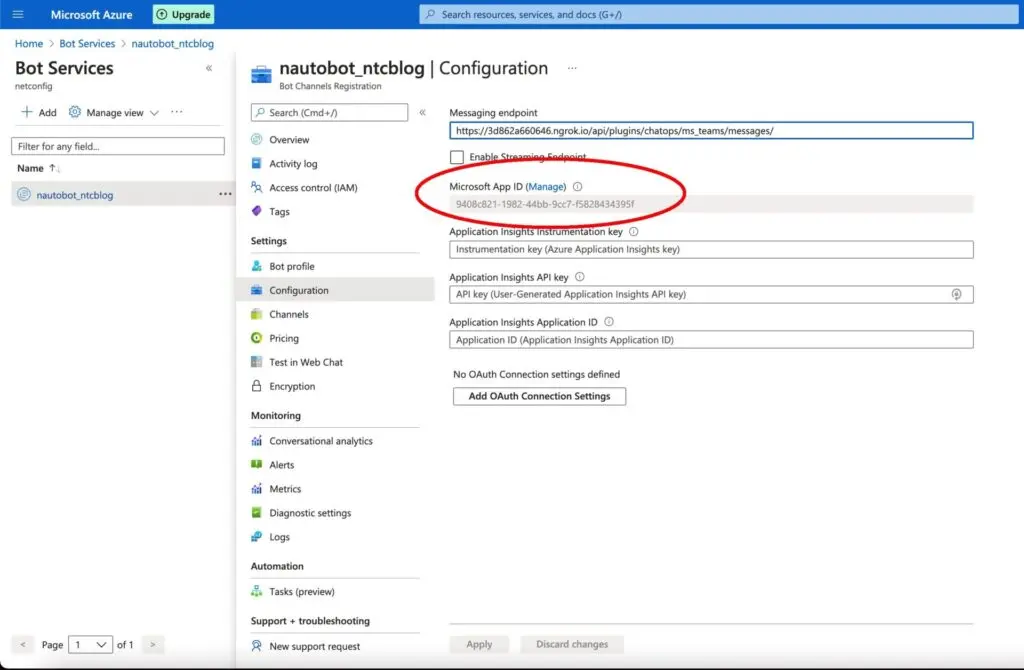
Next, on the left sidebar, select Configuration under the Settings section. Save the Microsoft App ID somewhere else, as you’ll need this later.
Select the “Manage” link directly above the App ID.
This will take you to the Certificates & Secrets page.
Click New client secret. Name it something descriptive, configure the expiration setting as necessary, and click Add.
Once it’s created, it will appear in the Client Secrets table at the bottom of the page. Copy and save the newly generated secret for later, as there’s no way to recover it once you leave the page.
NOTE: If you lose the key or copy it incorrectly, you will have to return to this page and generate a new secret.
Azure Recap
At this point, the Nautobot ChatOps plugin is fully set up within Azure. You should have two pieces of information for later use: the App ID and the Client Secret.
Part 2: Installing and Configuring the Nautobot ChatOps Plugin
Next, you must install and configure the Nautobot ChatOps plugin on your Nautobot server. Luckily, the fine folks at Network to Code have made this process incredibly simple!
Installing the Plugin
First, log into your Nautobot server and change to the user account Nautobot is running as. From there, it’s as simple as installing the plugin via a pip install command.
Once the package is installed, the plugin will need to be enabled in your nautobot_config.py. If Nautobot was originally set up according to the default installation docs, this file will be located at /opt/nautobot/nautobot_config.py. In this file, add in the name of the plugins to the PLUGINS variable, then configure the required settings in the PLUGINS_CONFIG variable below it.
Make sure to replace <app_id> and <client_secret> with the App ID and Client Secret saved from Azure in the previous steps. Then save the file and restart the Nginx and Nautobot services.
Next, we need to configure the plugin in Nautobot to accept commands. For most deployments, open and unrestricted access to the bot from any chat account is undesirable. Therefore, access to the chatbot defaults to “deny all” when initially installed. Permissions for individual organizations, channels, and users must be set up here. For the purposes of this blog post, we will grant all access.
First, log into your Nautobot server. If this is the first plugin installed, a new menu option will appear at the top called Plugins. Under it, in section Nautobot ChatOps, select Access Grants.
Select the Add button to create a new access grant.
Command – You can specify permissions on a command-by-command basis, or specify all commands with an asterisk * as a wildcard. Example commands: nautobot or clear
Subcommand – You can specify permissions for subcommands as well, or all subcommands with an asterisk *. Example subcommands: get-devices or help
Grant Type – You need to create permissions for all three options: Organization, Channel, and User.
Organization – This is for permissions specific to your organization. This is good for configuring allowed/blocked commands organization-wide.
Channel – This is for configuring permissions on a per-channel basis.
User – This is for configuring permissions on a per-user basis.
Name – The corresponding name of the organization, channel, or user. This is used more like a description, whereas the value below is used when interacting with the MS Teams SaaS API on the backend.
Value – Corresponding ID value to grant access to. Enter an asterisk * to grant access to all organizations, channels, or users.
Once all three permissions are created, the plugin is done being set up in Nautobot. The minimum amount of permissions required are three. You can allow everyone in your organization access to all commands (not recommended) by using wildcards for organization, channel, and user permissions.
In the above example, here’s how I’ve set it up:
Organization – The org only has access to the nautobot command. It does not have access to clear, or any future commands the plugin may end up supporting.
User – Anyone can run just the nautobot get-devices command, however user John Doe can run any command. Note that he cannot run clear, as that is restricted at the Organization permission above.
Channel – Anyone can accss the bot from any channel, but again, only the nautobot get-devices command. However, anyone in channel bot-admins can access any command available to them.
To summarize, anyone can run nautobot get-devices, whereas John Doe and anyone in the channel Bot Admins can run any nautobot subcommand. Nobody can run clear or any command that doesn’t start with nautobot.
The last step is configuring the Microsoft Teams client.
Part 3: Installing and Configuring the App in Teams
The last main step needed is uploading and installing the app into your Microsoft Teams client for use within your organization.
Before continuing, you need to download a single ZIP file from the ChatOps plugin repo, found here. This will be used later for ease of installing the app into the client.
The ZIP file contains three files:
1) manifest.json – Pre-configured information for the bot
2) color.png – Image to use for the bot
3) outline.png – Transparent image to use for the bot
Open up your Microsoft Teams desktop client and log in if you haven’t already.
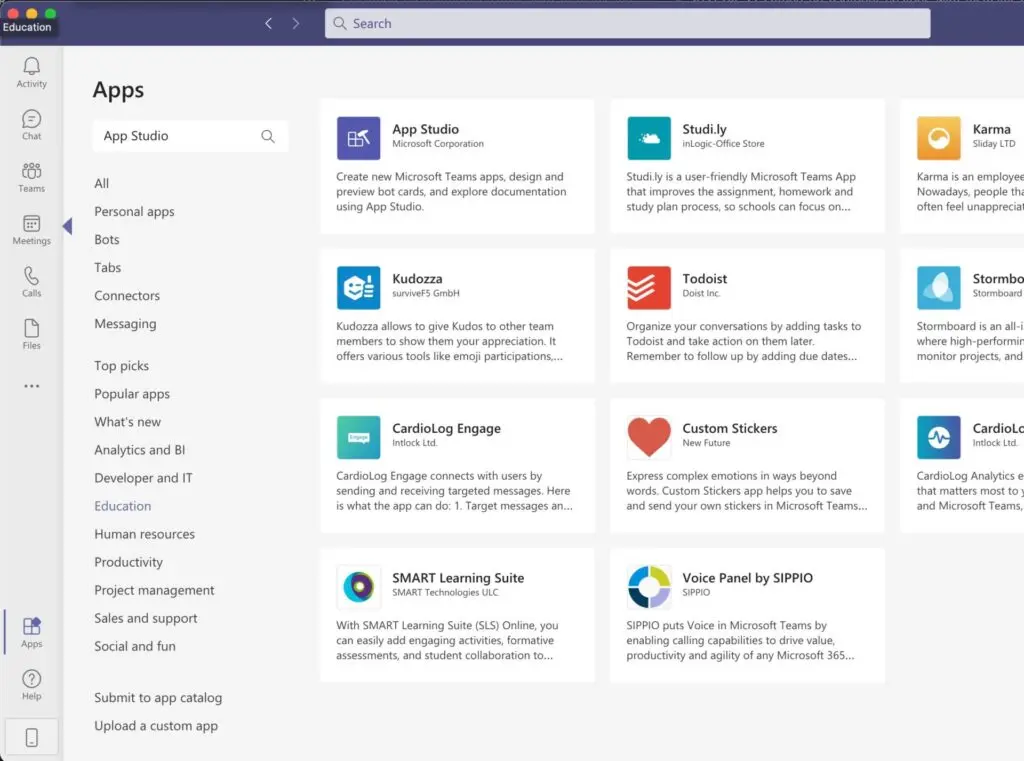
On the left sidebar and select Apps. Use the Apps search bar to search for “App Studio”, then select the tile and click Open to open the App Studio. If it isn’t currently installed, install it first, then open it.
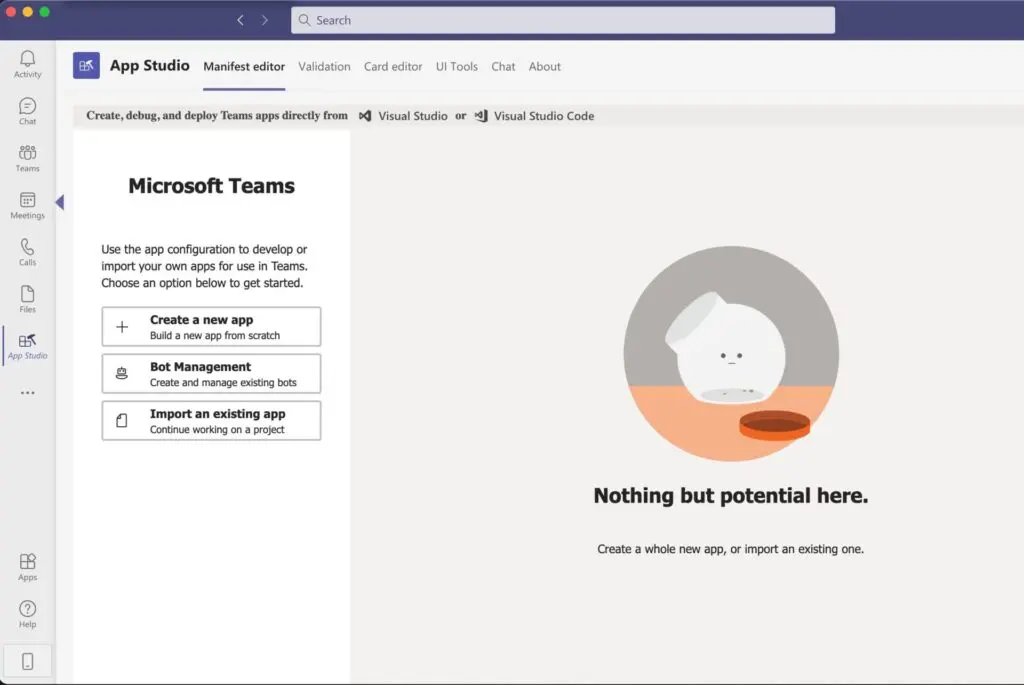
If not already selected, select Manifest Editor on the top horizontal menu bar, then select Import an existing app. Upload the Nautobot_ms_teams.zip file that you downloaded earlier.
Once imported, the Edit an app page will appear, allowing you to configure the settings for the bot.
Required Setting Changes
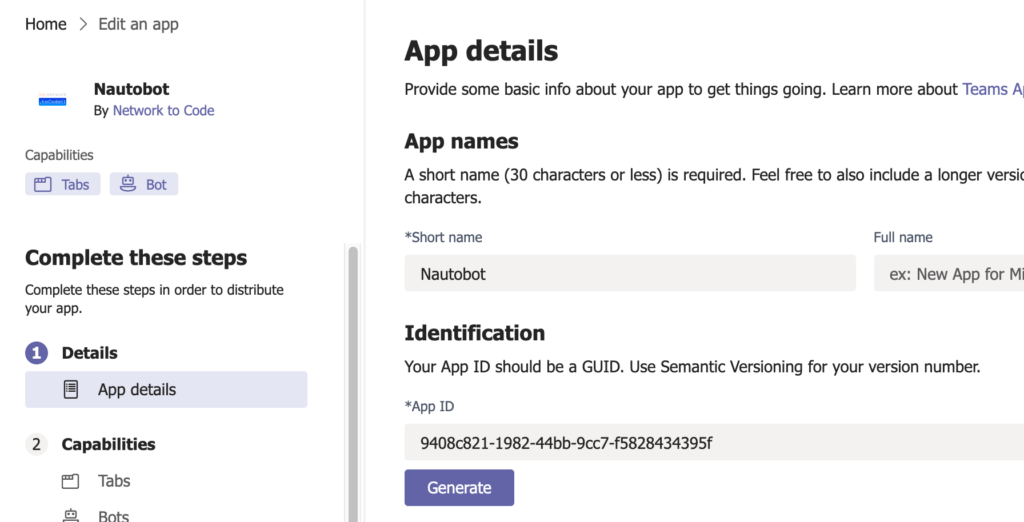
The App ID setting must be updated in two different locations. This ZIP file comes pre-loaded with an example App ID, but it must be replaced with the one for your specific bot, as created and saved from Azure in the previous steps. All other settings can be left as is, but feel free to review them as desired.
1) Under section 1 Details, select App details. Update the App ID to the value that you saved from Azure earlier.
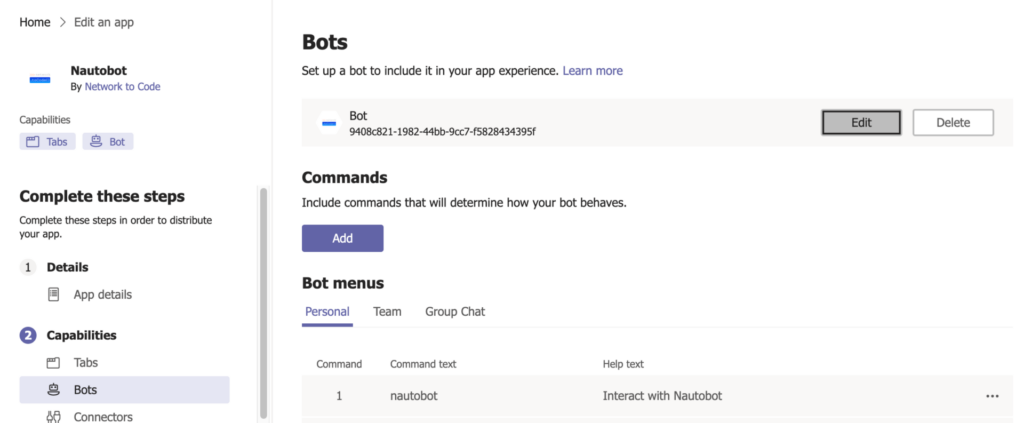
2) Under section 2 Capabilities, select page Bots. Select the Edit button next to the Bot at the top. In the pop-out window, in the field Connect to a different bot id, update the App ID to the value that you saved from Azure earlier. Then click Save.
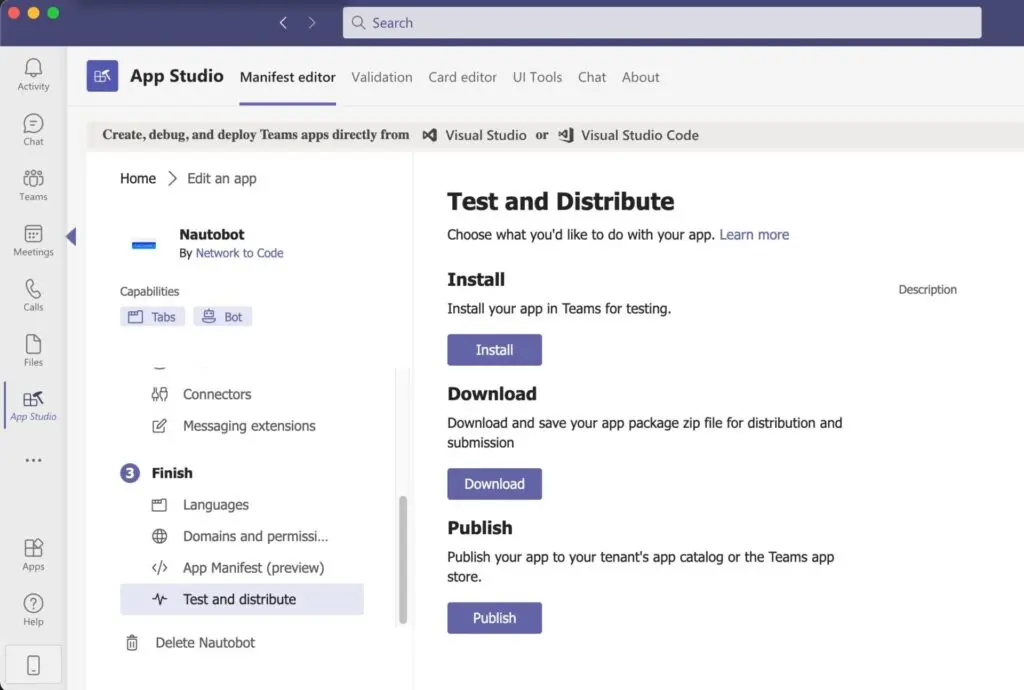
3) Under section 3 Finish, select page Test and distribute. Select the Download button to download the app as a .zip file to your computer.
NOTE: You can attempt to Install the app instead of downloading it and re-uploading it in step 4, however it requires permissions to do so, which I had trouble with even when I was the administrator of the Microsoft Teams environment (e.g. in my free-tier personal environment).
4) The app, with the now-updated App ID’s, will download to the ~/Downloads folder (or equivalent) on your computer. The file should be named Nautobot.zip (or, if you changed the name of the bot in the manifest, the name you gave it).
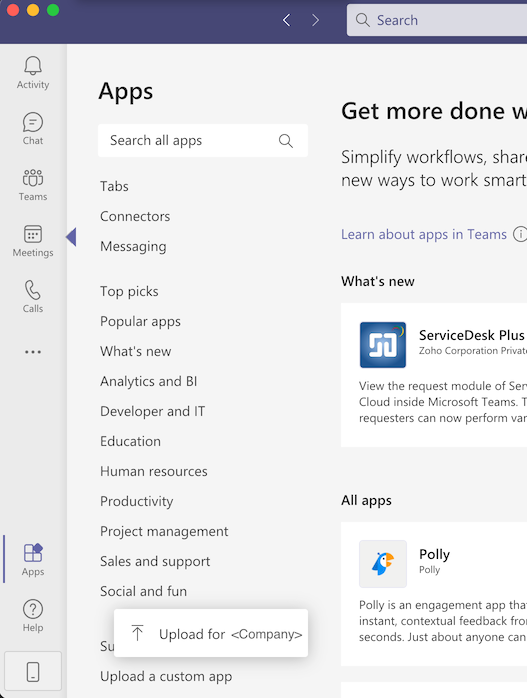
Once downloaded, select Apps on the bottom of the left-hand sidebar, then scroll to the bottom and select Upload a Custom App. If your company requires approval of custom apps, it will be submitted for approval before being installed.
5) The app package will then upload into MS Teams as an install app, and you’ll be taken to the Apps page with the bot (app) listed under Built by your org. Select the bot/app tile, then click the blue Add button.
Done!
That’s it! Your new Nautobot ChatOps plugin should now be installed for your Microsoft Teams client, and usable by anyone with the appropriate permissions (configured earlier in part 2).
You can do some really cool things with the bot once it’s up and running, and you have some data in Nautobot. You can send the message nautobot help to the app (no / forward slash) to see a list of all supported commmands.
Interacting with Nautobot in Microsoft Teams
There are currently a couple of ways to interact with the Nautobot plugin by default directly in the Microsoft Teams client, although these can be modified in the app permissions in the same area where you installed the app originally (in part 3). They are:
1) Chat – In the main left sidebar, select Chat, then search for “Nautobot” (or whatever you renamed the bot to). You can message the bot directly here.
2) App – In the main left sidebar, select the three dots, then in the pop-out menu, search for “Nautobot” and select it. I recommend right-clicking the icon in the left sidebar once the window opens to pin it for future interactions.
Conclusion
Here at Network to Code, as we continue developing Nautobot, we will be adding functionality to this ChatOps plugin as well. With the code publicly available here on GitHub, we encourage anyone looking to contribute to do so and join our growing open-source community around Nautobot!
Additionally, there’s a blog post from earlier this month around creating your own custom chat commands within this plugin. If interested, you can read it here.
Thanks for reading, and I hope you enjoy ChatOps as much as I do!
Does this all sound amazing? Want to know more about how Network to Code can help you do this, reach out to our sales team. If you want to help make this a reality for our clients, check out our careers page.