

Welcome to Part 3 of our blog series “Writing Your First Nautobot Job.” The goal of this series is to provide Nautobot users with everything they need to start writing Nautobot Jobs from scratch.
This blog assumes you have read Part 1 and Part 2, have a basic understanding of the Python programming language, and have Nautobot up and running in your environment. The first entry in this series reviewed fundamental topics, such as the Django ORM and Django data models. In Part 2, we explored the individual components of a job. Now we put everything together and write our first Nautobot Job.
Introduction
After a quick overview of the different ways to install Nautobot Jobs, you will walk through writing a Nautobot Job step-by-step. The steps will not identically match what you need to do in your environment, but will provide some insights to help guide you as you attempt the same in your environment.
TL;DR: How to Write Your First Nautobot Job (Pt. 3)
In this post you’ll learn how to:
- Define inputs and outputs for a Nautobot Job
- Use ObjectVars and MultiObjectVars
- Store and Register Jobs in Git Repositories
- Run and Monitor Jobs using Nautobot’s UI
Plus, you’ll get a complete Job code example
Designing Your Nautobot Job
First, come up with a high level design for your Nautobot Job. Start by defining the requirements to include desired results, inputs, outputs, integrations, and dependencies.
Defining the Requirements
For the sake of this blog, I’m going to make up a scenario where my boss asks me: As the Lead Network Engineer, determine how many available access ports we have at Site ABC. This is the third time in the last few weeks that my boss has asked for this type of information about a specific site, and so I ask him if he’d like to be able to generate a report for any site on demand? He replied with “That would be great”.
After this exchange, I can infer that the functional requirements are going to be:
- The Job output should display the total number of ports, the number of used ports, the number of available ports, and the overall percentage of available ports.
- The Job should allow the user to select a single existing Location in Nautobot for the report to be run on.
- The Nautobot Job should allow the user to select multiple existing Device Roles to filter which Devices are included.
There are many strategies for determining functional requirements and designing solutions. With this being an informal request and my true objective being to enable my boss to generate his own reports, we can take some liberties with defining the requirements.
With the requirements defined, let’s confirm what the inputs and outputs of our Job are going to be.
Determine the Inputs and Outputs
From the list of requirements, you can infer the inputs and outputs naturally.
Since our boss typically gives us a specific site and expects us to report back the number of available ports at that site, the first input is the unique identifier of the site, which could be its name, address, site code, or even a global unique identifier used across the company.
Luckily for us, we already have all of our sites in Nautobot, so we can dynamically list out all of the options by using an ObjectVar to query the Location model and return the available options.
Now, if we take a deeper look at the request, we notice that our boss asks for “available access ports”, which implies that we are only worried about devices that would have some type of host directly connected. From this, we can narrow down which devices are in scope by the Role assigned to the device or, even better, by the Role of the interfaces themselves.
Determining what information is in the output and what it should look like is trickier. We typically see the following three iterations when determining what the output should be:
- What they say they want
- What we think they said they wanted
- What they actually wanted
It’s always a journey to discover the final version, but generally, it is best to just implement “the version you think they said they want” to expedite an arrival at “the version they actually wanted”. So with that, our output is going to be:
The current interface capacity of {location_name} is:
- Total = {total_intf_count}
- Used = {used_intf_count}({used_intf_percentage})
- Unused = {unused_intf_count}({unused_intf_percentage}).
Other Considerations
This Job is shaping up to be fairly straightforward, given the minimal number of inputs required and simple output format. In more advanced use cases, we would have to consider other factors, such as mechanisms for accessing external data sources, the availability of secrets for authenticating to external endpoints, and the general flow of data between Nautobot and the other systems.
When writing any Job, critically consider the user experience. If the job takes a significant amount of time to execute, then it may be good to log informational messages at specific points in the Job code so the user running the Job knows what actions are currently taking place. A Job that takes an hour to run with no log messages telling them what they should expect will lead to uncertainty and a subpar user experience.
How to Implement a Nautobot Job (Step-by-Step)
Most of the information in this section can also be found in the Jobs Developer Guide.
Nautobot is a flexible and extensible platform, so naturally, there are a variety of ways to install or register Jobs that you have developed. The actual structure of the Job code won’t change, but the way it is organized and where we register the Job may. Jobs may be installed in one of three ways: JOBS_ROOT, Git Repositories, and packaged as an App.
You will notice that we use the terms installed and registered frequently in this section:
- Installed means the Job code has been imported into Nautobot and can be called (similar to when you import code in Python)
- Registered is slightly different, this means that the Nautobot Worker (The service that actually executes the Job code) sees the Job as a task it can run.
1. JOBS_ROOT
JOBS_ROOT is an optional configuration setting within Nautobot that is used to automatically install any jobs found in the specified directory. In the example directory structure below, Jobs defined in both jobs.py and my_jobs_module.py will be installed. The jobs are loaded and registered during Nautobot’s startup process.
$NAUTOBOT_ROOT
└── jobs
    ├── jobs.py
    └── my_job_module.py
This approach is less popular than the others because any changes to the job code require running the nautobot-server post_upgrade to take effect.
2. Git Repositories
Nautobot has a Git as a Data Source feature that allows data to be synced in from remote git repositories on demand. Enabling Jobs to be loaded into Nautobot without any changes to the operational state of Nautobot itself.
The main requirement for Jobs installed via a Git repo is that there must be an __init__.py file at the root of the directory. This allows Nautobot to treat it as a Python module that can be imported. Jobs in Git repos have to be explicitly registered using register_jobs().
Single jobs module
The following is an example of a directory structure where all of our Job code is stored in a single jobs.py.
.
├── __init__.py
└── jobs.py
The __init__.py file can be left blank and everything can be done in jobs.py.
from nautobot.apps.jobs import Job, register_jobs

class MyJob(Job):
    ...

register_jobs(MyJob)
As the number of Jobs in the repo increases, we often want to store Jobs in separate Python files to ensure readability and maintainability. To do this we will need to create submodules and initialize them correctly.
Multiple submodules
In this example, there are multiple submodules inside a jobs module. This is useful when you have many jobs and want to break them up by function or type.
.
├── __init__.py
└── jobs
    ├── __init__.py
    ├── my_job_module_1.py
    └── my_job_module_2.py
However, this means you need to import each of the custom Job classes from the submodules into the __init__.py inside the jobs directory and register them there.
# ./jobs/my_job_module_1.py
from nautobot.apps.jobs import Job

class MyJobOne(Job):
    ...
# ./jobs/my_job_module_2.py
from nautobot.apps.jobs import Job
class MyJobTwo(Job):
...# ./jobs/__init__.py
from nautobot.apps.jobs import register_jobs
from .my_job_module_1 import MyJobOne
from .my_job_module_2 import MyJobTwo
register_jobs([MyJobOne, MyJobTwo])Here’s an example repo with finished job code: Link
3. Packaged as an App
The third option is to package Jobs as part of an Nautobot App. This is out of scope for this exercise, but in general, it follows the same patterns as option 2 with additional customizable options. Here is the documentation to develop a Nautobot App from your Job.
When installing Jobs alongside Nautobot or packaged as an App, if you have a compile error in your Job code, it can prevent Nautobot from starting. However, when it is installed as a Git repository, there are guardrails in place that prevent these errors from impacting Nautobot.
For this example, we are going to use option #2 from above and create our job in a git repository. I will be using GitHub to store my repository, but the process is similar for GitLab or Bitbucket. The repo will only contain an empty __init__.py and a jobs.py file that will contain our Nautobot Job code. An example repo with the finished job code can be found here.
Basic Job Template
First, let’s start off with creating a template that contains the bare minimum code to get a job up and running, and put some comments in as placeholders for additional components.
# jobs.py
# Nautobot Job imports (Job class, input vars, etc)
from nautobot.apps.jobs import Job, register_jobs

# Nautobot Core imports (models, helper functions, etc)

# Python packages (json, pandas, netmiko, etc)

# Job Grouping Name
name = "My Example Jobs"

# Nautobot Job Class Definition
class MyExampleJob(Job):
    # Input Variables

    # Job Class Metadata
    class Meta:
        description = "My first Nautobot job"
        # Add other job settings here

    # Required Job.run() method
    def run(self):
        # Job logic
        pass

# Register custom jobs
register_jobs(MyExampleJob)
Add Input Variables
From our functional requirements, you know that two input variables are needed. First, you need to be able to select a single existing location. Locations are modeled in Nautobot with a Location model, so you can select specific Location Objects using an ObjectVar with the model attribute set to Location. Let’s import the ObjectVar class and Location model.
# Nautobot Job imports (Job class, input vars, etc)
from nautobot.apps.jobs import Job, register_jobs, ObjectVar

# Nautobot Core imports (models, helper functions, etc)
from nautobot.dcim.models import Location

# Python packages (json, pandas, netmiko, etc.)
Now, add the ObjectVar input variable to the Input Variables section of our template, referring to the Location model.
# Nautobot Job Class Definition
class MyExampleJob(Job):
    # Input Variables
    location = ObjectVar(
        model=Location,
    )
The next input is a set of device roles that we want included in the report. This allows us to filter out all of the non-switch devices or limit the results to only “Access” or “Leaf” switches. The Role model can be filtered by the specific ContentTypes that are associated with the role. In this case, you’re going to filter for roles that are associated with devices (dcim.device).
# Nautobot Job imports (Job class, input vars, etc)
from nautobot.apps.jobs import Job, register_jobs, ObjectVar, MultiObjectVar

# Nautobot Core imports (models, helper functions, etc)
from nautobot.dcim.models import Location
from nautobot.extras.models import Role  #<-------- Add this line

# Python packages (json, pandas, netmiko, etc)
# Nautobot Job Class Definition
class MyExampleJob(Job):
    # Input Variables
    location = ObjectVar(
        model=Location,
    )
    roles = MultiObjectVar(
        model=Role,
        query_params={
            "content_types": "dcim.device",
        },
    )
Add Job Logic in the run() Method
Now that our inputs are functional, you can start writing the Job logic to generate the utilization report. As we discussed in Part 2, The run() method is the core of every Job and is required. It receives user-supplied inputs as keyword arguments. Inside this method, you define the logic that the Job will execute. The method can return a value, which will be saved in the JobResult and displayed in the UI and API. Our first step is going to be to query for all the devices that are in scope for the report.
# Nautobot Core imports (models, helper functions, etc.)
from nautobot.dcim.models import Location, Device, Interface
from nautobot.extras.models import Role
# Required Job.run() method
def run(self, location, roles):
# Job logic
devices = Device.objects.filter(location=location, role__in=roles)
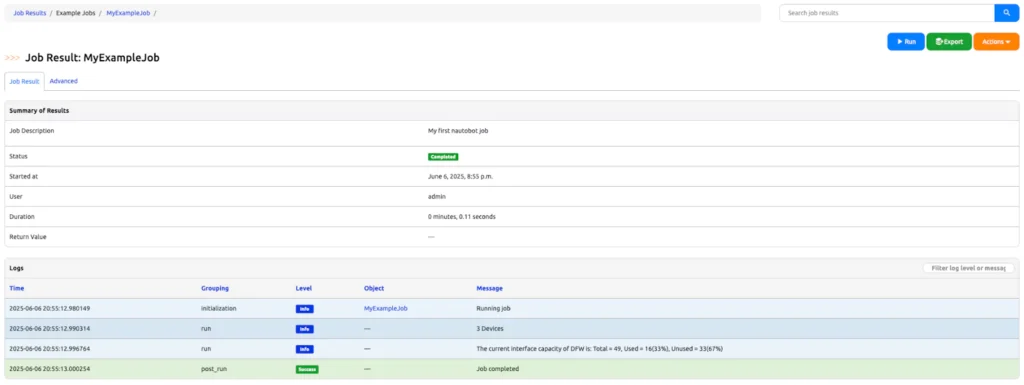
self.logger.info("%d Devices", devices.count())
interfaces = Interface.objects.filter(device__in=devices)
total_intf = interfaces.count()
used_intf = interfaces.filter(
status__name__in=["Active", "Failed", "Maintenance"]
).count()
unused_intf = interfaces.filter(
status__name__in=["Decommissioning", "Planned"]
).count()
self.logger.info(
f"The current interface capacity of {location.name} is: Total = {total_intf}, Used = {used_intf}({int(round(used_intf/total_intf, 2)*100)}%), Unused = {unused_intf}({int(round(unused_intf/total_intf, 2)*100)}%)"
)For your reference, this is the complete Job that you have set up and that’s ready to be imported and executed in your Nautobot environment.
Finished Job
"""Blog Example Jobs."""

# Nautobot Job imports (Job class, input vars, etc)
from nautobot.apps.jobs import Job, ObjectVar, MultiObjectVar, register_jobs

# Nautobot Core imports (models, helper functions, etc)
from nautobot.dcim.models import Location, Device, Interface
from nautobot.extras.models import Role

# Python packages (json, pandas,4 netmiko, etc)

# Job Grouping Name
name = "Example Jobs"


# Nautobot Job Class Definition
class MyExampleJob(Job):
    # Input Variables
    location = ObjectVar(
        model=Location,
        query_params={
            "content_type": "dcim.device",
        },
    )
    roles = MultiObjectVar(
        model=Role,
        query_params={
            "content_types": "dcim.device",
        },
    )

    # Job Class Metadata
    class Meta:
        description = "My first Nautobot job"
        # Add other job settings here

    # Required Job.run() method
    def run(self, location, roles):
        # Job logic
        devices = Device.objects.filter(location=location, role__in=roles)
        self.logger.info("%d Devices", devices.count())
        interfaces = Interface.objects.filter(device__in=devices)
        total_intf = interfaces.count()
        used_intf = interfaces.filter(
            status__name__in=["Active", "Failed", "Maintenance"]
        ).count()
        unused_intf = interfaces.filter(
            status__name__in=["Decommissioning", "Planned"]
        ).count()
        self.logger.info(
            f"The current interface capacity of {location.name} is: Total = {total_intf}, Used = {used_intf}({int(round(used_intf/total_intf, 2)*100)}%), Unused = {unused_intf}({int(round(unused_intf/total_intf, 2)*100)}%)"
        )

register_jobs(MyExampleJob)
After finishing the Job definition, save the file, commit your changes, and push your commit to the remote git repository. The next steps will guide you through making it ready to use in your Nautobot instance.
Installing and Running a Nautobot Job
Set up Nautobot (optional)
The quickest and simplest way to get Nautobot up and running is by using our Nautobot Docker Compose Repo. Follow the instructions in the Getting Started section of the README.md. Be sure to complete the Super User Account section as well, or you won’t be able to log in to the Web UI.
Install Python Dependencies (optional)
In this example, we do not have any additional Python dependencies that need to be installed for the Nautobot Job to run successfully. However, I do want to point out that if the Job did rely on a Python package that was not installed already, then you would need to install it before syncing the git repository into Nautobot. How to install a Python package so it can be leveraged in your Nautobot Job will depend on how you deployed Nautobot. For Nautobot instances running in a container, you typically will need to build the container image with the package installed.
Access Requirements (optional)
If the GitHub repo that you are going to push your code to is a private repo, then you will need to generate a PAT (Personal Access Token) in GitHub and create a Nautobot Secret that contains the PAT. As of the writing of this blog, you can find instructions for creating a PAT on the common git platforms here. In general, the PAT needs to be able to read and write to your repositories.
Once you have the PAT, you will need to add it as a Nautobot Secret. Nautobot Secrets can reference secrets provided by (in preferred order) Nautobot Secrets Provider App, environment variables, or a text file stored in the same environment that Nautobot is running in. For more info about Nautobot Secrets, please see the documentation.
Set up Git Repo in Nautobot
- Log in to your Nautobot instance UI.
- Navigate to Extensibility in the main navigation menu.
- Click on Git Repositories.
- Click the + Add button in the upper right corner.
- Fill in the required fields:
- Name: Give your repository a descriptive name (e.g., my-nautobot-jobs).
- Remote URL: Enter the URL of your Git repository.
- Branch: Specify a branch if you’re not using the default.
- (Optional) Secret: If your repository is private, select the Nautobot Secret containing your PAT.
- Provides: jobs will need to be selected.
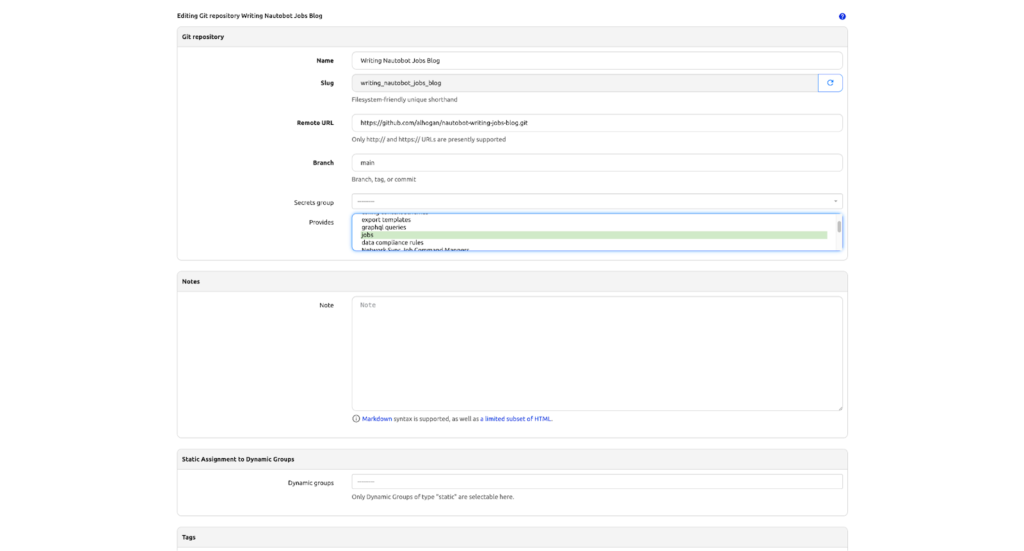
- Click Create, which will run a system job to sync the git repository to the path specified by the Nautobot config setting GIT_ROOT.
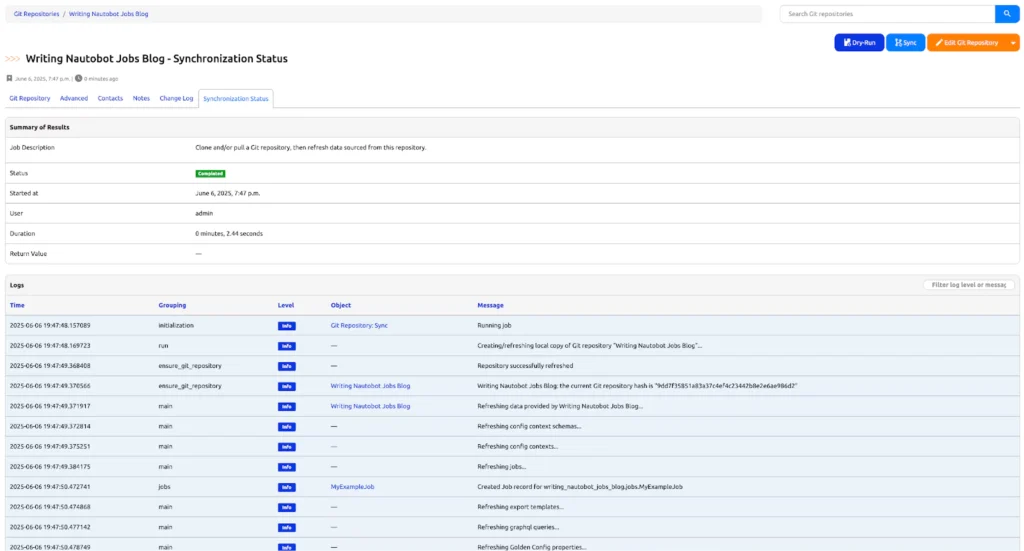
- Click the MyExampleJob link in the job results table to go to the job’s settings.
- Click Edit Job.
- Click the checkbox next to Enabled.
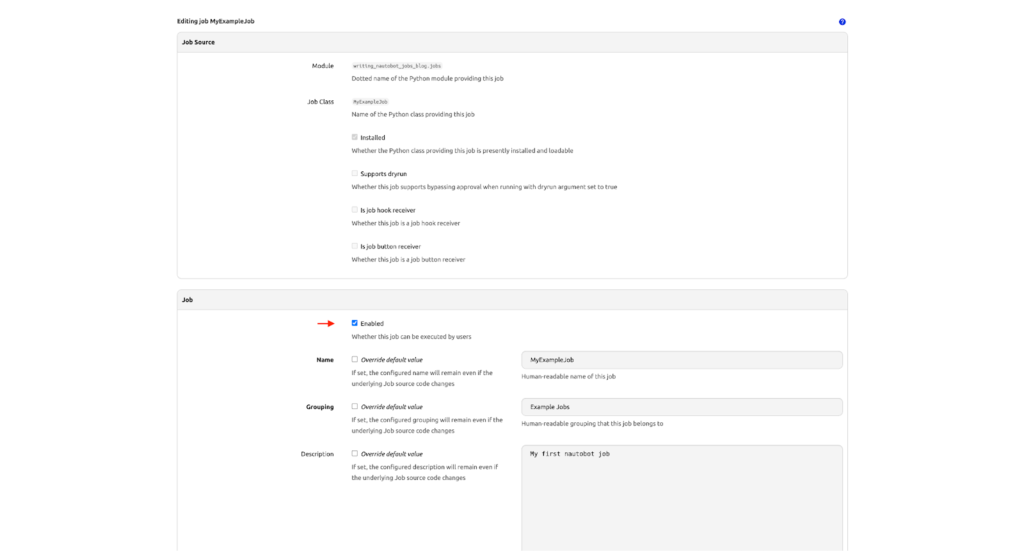
- Scroll down and click Update
Run Job
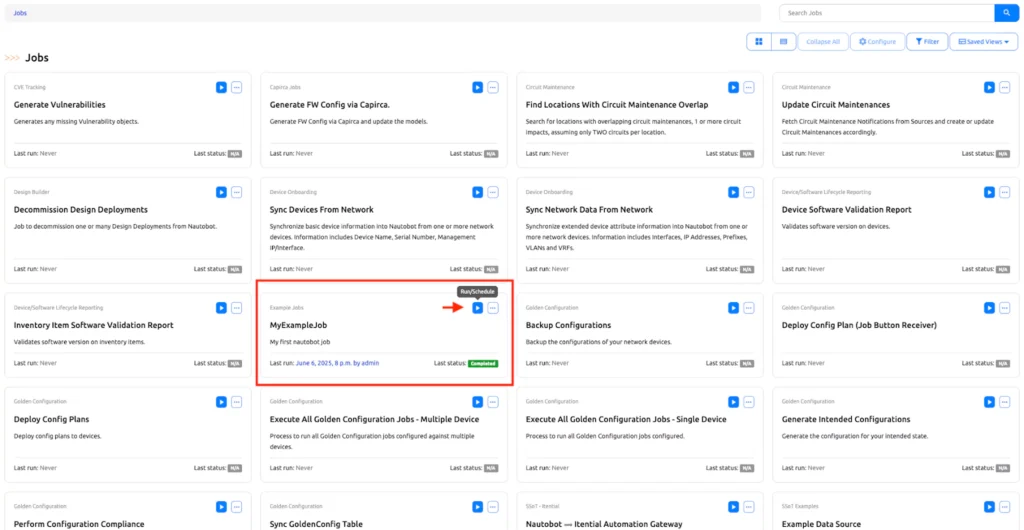
- Navigate to Extensibility -> Jobs.
- Find the “MyExampleJob” entry.
- Click the Run button (it usually looks like a play icon).
- You will be presented with the job’s input form.
- Select a Location from the dropdown menu.
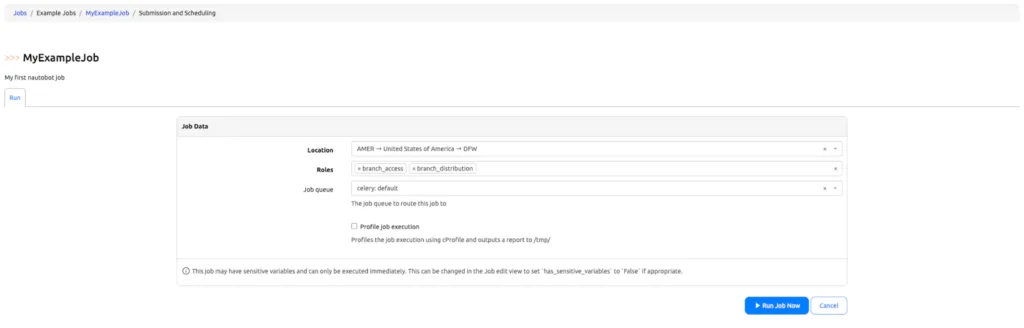
- Select one or more Device Roles from the multi-select widget.
- Click the Run Job button at the bottom of the form.
- You will be redirected to the Job Results page, where you can monitor the progress and view the output of your job. Check the logs for the output message you defined in the run() method.
Improving and Testing your Nautobot Jobs with Iterative Development
You have successfully developed, installed, and executed your first Nautobot Job.
Congratulations!
Now, you can challenge yourself by adding additional requirements to meet your specific needs. For example, you may want to add one or more of the following:
- The output of the Nautobot Job must be a CSV with the columns “Site, Total Interfaces, Used Interfaces, Free Interfaces,…”
- The Nautobot Job must allow users to select multiple locations and generate a report for each location individually or combined.
- The Nautobot Job must also identify the number of used ports that have cables attached, have no description, are disabled, etc.
- Use a testing framework to test the functionality of your job.
Conclusion
Final Thoughts on Writing Nautobot Jobs
I hope you have enjoyed this series and found it to be a practical introduction to writing Nautobot Jobs. You now have a working example, a foundational understanding of how Jobs are structured, and a few ideas for how to expand them for your own use cases.
More Example Jobs can be found inside the Example Nautobot App included in Nautobot Core here. These cover a range of features and techniques supported by the jobs framework.
If you would like to challenge yourself even more, the 100 Days of Nautobot Challenge is a self-directed, guided journey for community members who are committed to learning about network automation using Nautobot.
Lastly, be sure to join our upcoming Nautobot Next webinar on writing Nautobot Jobs, or watch it later on YouTube at your convenience. It’s a great opportunity to see real-world examples and engage with the experts.
-Allen
Tags :
Does this all sound amazing? Want to know more about how Network to Code can help you do this, reach out to our sales team. If you want to help make this a reality for our clients, check out our careers page.


