

Do you have a network device or server that can only be reached behind a jumphost? This is not an uncommon scenario, as security best practice often requires such. This can cause some challanges. However, as long as you have access to the jumphost, you may be able to use an ssh tunnel to mimic being directly connected to a network with access to the otherwise inaccessible hosts.
An ssh tunnel aka ssh port forwarding, allows an encrypted tunnel to be established over an untrusted network between an SSH Client and SSH server. You specify a local port for SSH to listen on, such as 4001, and all connections destined for port 4001 will be tunneled via SSH to a specified remote port, such as 22.
ssh username@172.18.50.100 -Nf -p 20622 -L 127.0.0.1:4001:192.168.20.10:22
Let’s break this down:
ssh is the command we are using for our ssh tunnel.username is the username to log into the jump host.172.18.50.100 is the SSH server that we will be connecting to. This is the jump server-p 20622 is optional. It tells ssh to establish the tunnel on the remote port (destination port) 20622. Typically, this will be 22, however there could be some security controls in place that do not allow SSH on the common port. This option is not always necessary.-L 127.0.0.1:4001:192.168.20.10:22 tells ssh to listen locally on port 4001. Any connections to 127.0.0.1 on port 4001 will be forwarded to 192.168.20.10 on port 22 through the SSH tunnel. You could also use localhost in place of 127.0.0.1, assuming you haven’t modified that entry in your /etc/hosts file.-N is optional, tells ssh to not execute a remote command. This is useful for just forwarding ports.-f is optional, requests ssh to go to background just before command execution. This is useful if ssh is going to ask for passwords or passphrases, but the user wants it in the background.If you are curious about what your system is doing from a network perspective, open a separate terminal and run the following command before you create the SSH tunnel:
watch 'netstat -abn | grep 4001'
This will run the command every 2 seconds and print the output to the screen. Observe the output:
Every 2.0s: netstat -abn | grep 4001              My-Cool-Macbook..local: Mon Sep 16 16:18:48 2019

tcp4       0      0  127.0.0.1.4001         *.*                    LISTEN               0          0
Now, connect to 192.168.20.10 using the following command:
username@127.0.0.1 -p 4001
Notice the netstat output:
Every 2.0s: netstat -abn | grep 4001                     My-Cool-Macbook.local: Mon Sep 16 16:08:03 2019

tcp4       0      0  127.0.0.1.4001         127.0.0.1.64356        ESTABLISHED       3877          0
tcp4       0      0  127.0.0.1.64356        127.0.0.1.4001         ESTABLISHED       3683          0
tcp4       0      0  127.0.0.1.4001         *.*                    LISTEN               0          0
The SSH client is forarding traffic over local port 4001 to randomly selected open local port 64356 which is then sent over the SSH tunnel, which eventually lands at 192.168.20.10 port 22. This allows for multiple connections to be forwarded through port 4001. So if you were to make another connection, you will see an additional netstat entry with another local port generated for the second connection.
To terminate the ssh tunnel, run ps aux | grep ssh, search for the correct tunnel and PID, and then run kill 12345 replacing 12345 with the PID on your machine.
Another cool feature enabled on many systems is SOCKS. This allows you to proxy application traffic and send it to a jump host. This is useful for browsing to a website that is normally not directly accessible. You can use this technique to access internal websites that remain only accessible behind a jump host. Multiple SOCKS proxies can be created, meaning multiple endpoints can be configured to proxy your local machine’s traffic.
Let’s say we wanted to use the same jump host in the example above and send our web traffic to the jumphost to access a website hosted behind it on an internal network. In this example, we will set up a local SOCKS proxy and SSH tunnel. The SOCKS proxy will send traffic via the SSH tunnel to the jump host. We will be using Firefox, however many other browsers such as Google Chrome support SOCKS5.
At the command-line, run the following: ssh -D 4000 -C -N -q -f username@192.168.20.10 -p 64356
Let’s break this down:
-D 4000 is used for dynamic application-level port forwarding. This will open a SOCKS proxy on port 4000. Ensure that this port is not already being used on your local machine.C optional, is used to compress data in the tunnel to conserve bandwidth.q optional, this is for quiet mode.N optional, directs ssh to not execute remote commands.username is the username for the jump host.192.168.20.10 is the jump host IP address.-p 20622 is optional, it tells ssh to establish the tunnel on the remote port 20622. Typically, this will be 22, however there could be some security controls in place that do not allow SSH on the common port. This option is not always necessary.f is optional, requests ssh to go to background just before command execution. This is useful if ssh is going to ask for passwords or passphrases, but the user wants it in the background.Now head over to your browser:
Preferences.General tab if not already there and scroll all the way down to Network Settings > Settings...Manual Proxy configuration radio button and enter 127.0.0.1 with port 4000, and ensure SOCKS v5 is selected.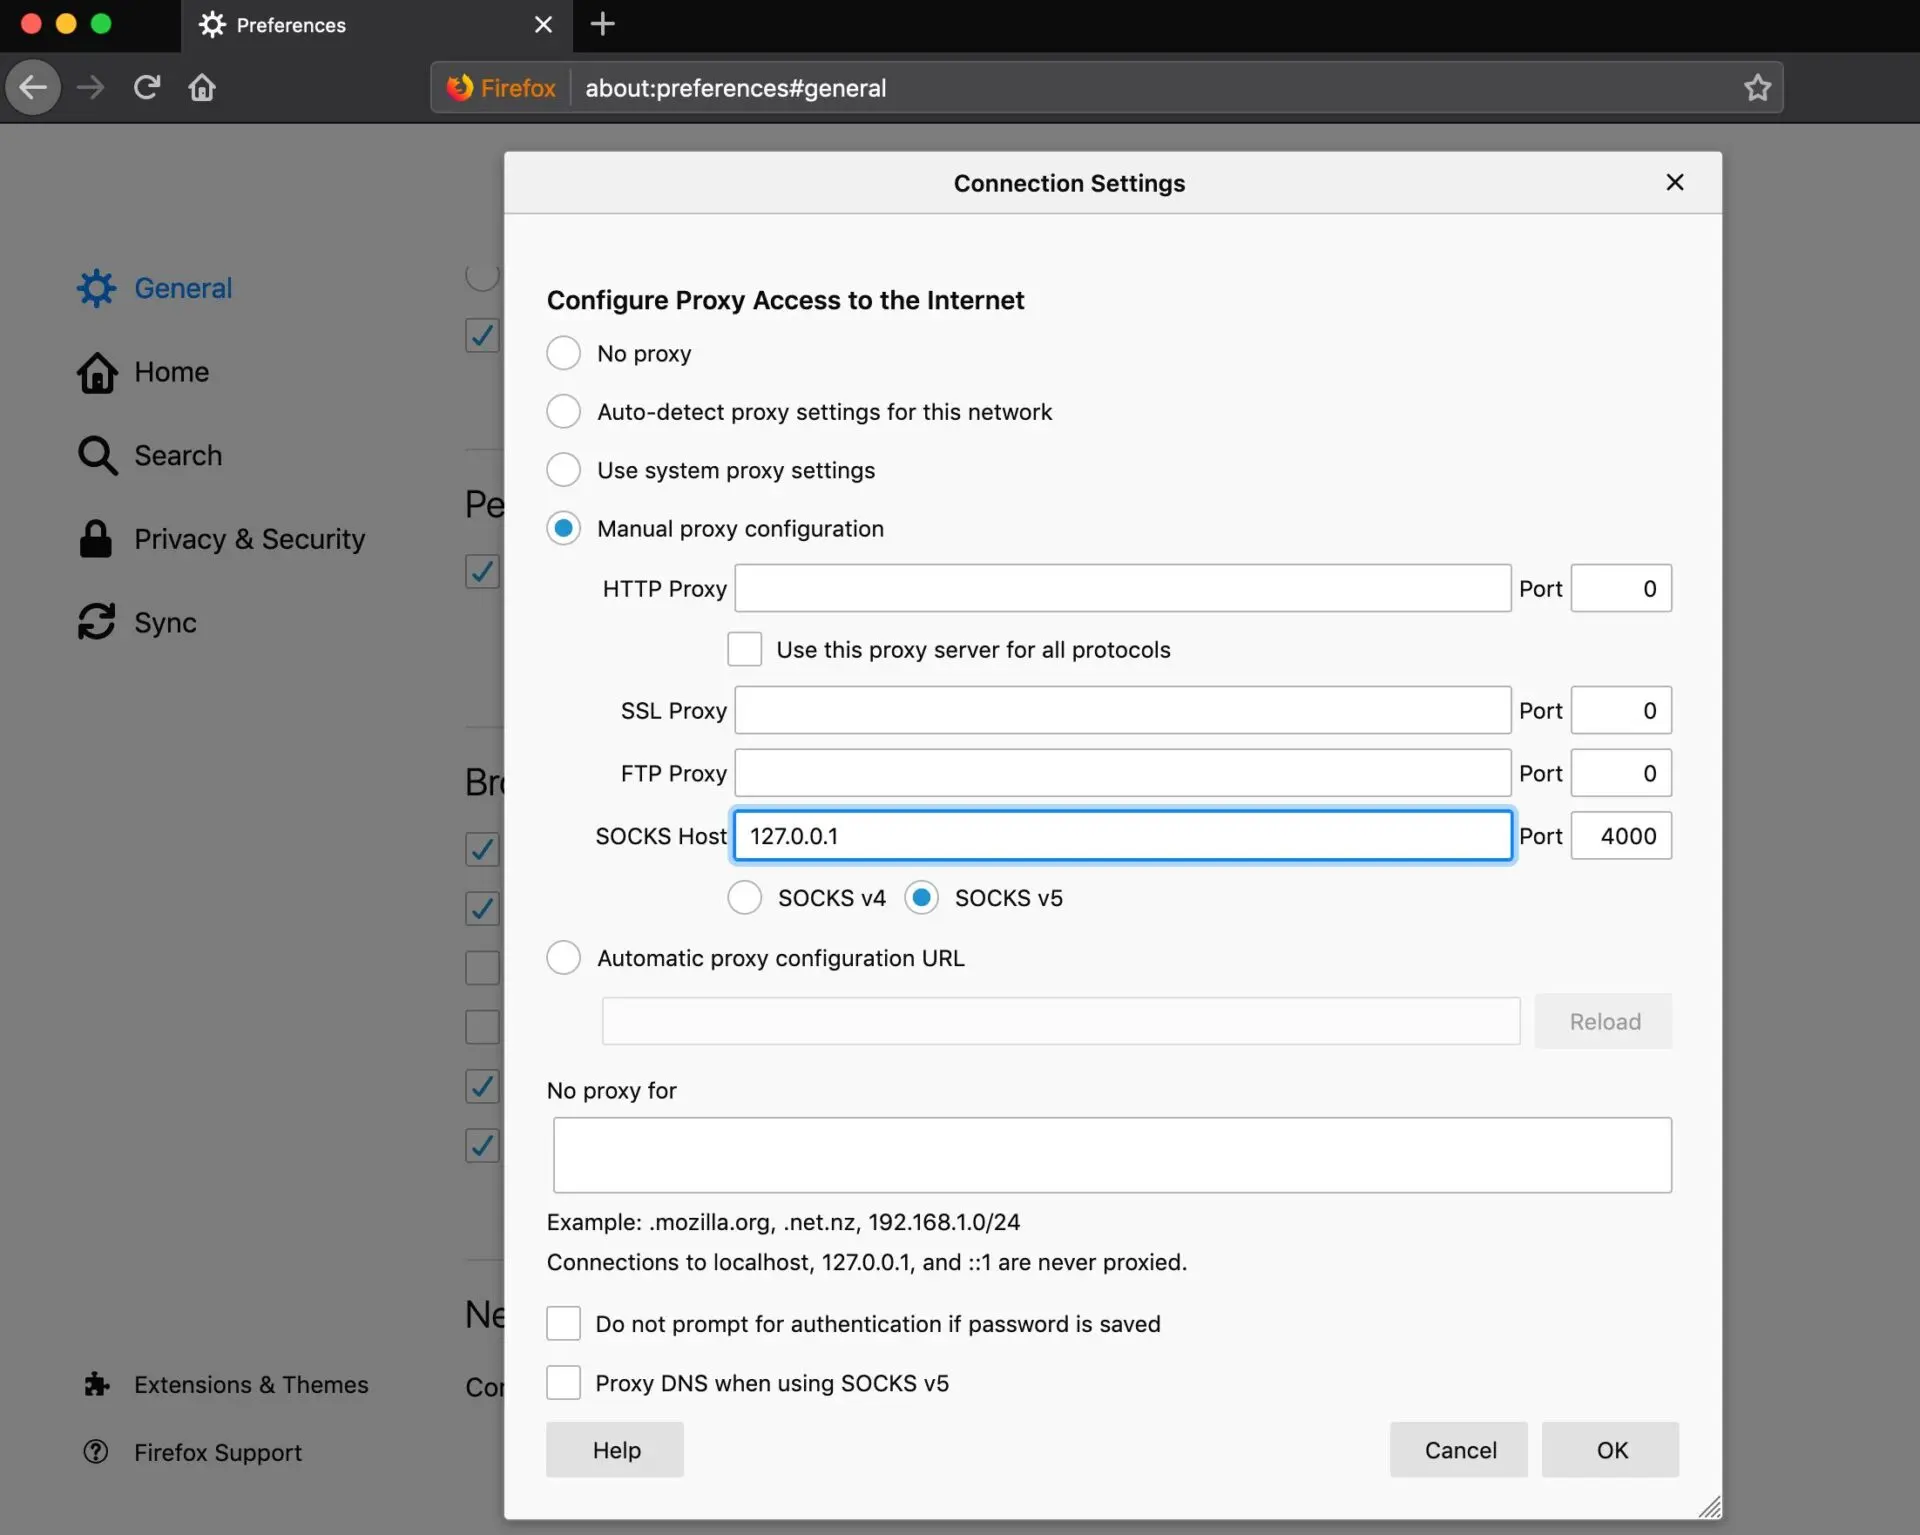 Firefox SOCKS Proxy Configuration Screenshot
Once you click OK you should now be proxying your web connections and should be able to access internal websites. To kill the SSH tunnel, thus the SOCKS proxy connection, search for the PID and kill the process.
This is not an exaustive list of cool things you can do with SSH tunnels, but are some of the most common methods. We hope this article was informative to you, Happy coding!
-Kenny B
Does this all sound amazing? Want to know more about how Network to Code can help you do this, reach out to our sales team. If you want to help make this a reality for our clients, check out our careers page.


Share details about yourself & someone from our team will reach out to you ASAP!