What’s New with Nautobot Lab

Blog Detail

Nautobot Lab has not seen many updates over the past year. However, I wanted to call out some recent updates that have improved Nautobot Lab. In this blog post, I’ll cover what has changed.

What is Nautobot Lab? Check out Getting Nautobot Up and Running in the Lab.

First, the mock data is gone. It became apparent early on that it wasn’t going to be a maintainable solution. This is because in the back end, the mock data was just a SQL dump from Postgres. As database models changed in Nautobot and the ability to add plugins became a priority, the solution became infeasible. After a lot of thought, it was decided to remove it. There are some alternatives in the form of plugins that I’ll cover shortly.

The plugins installed in Nautobot Lab that should make importing data easier are:

  1. Device Onboarding Application: Allows you to incorporate your devices into Nautobot.
  2. Welcome Wizard Application: Facilitates quick data definition and import.
  3. Nautobot SSoT Application: Enables the import of devices from another Nautobot instance into your Nautobot Lab instance.

The Nautobot SSoT application is currently equipped with an example SSoT data source and target app. A known issue with the current version of the example job exists, but the bug has been addressed in the main branch of Nautobot SSoT. The fix should be available in the next release of Nautobot SSoT.

Second, a CI/CD solution has been implemented to keep the Nautobot Lab container in Docker Hub up to date with the current release of Nautobot. Within 24 hours of a Nautobot release, Docker Hub should reflect an updated version of Nautobot Lab. We’re doing this by comparing the version of the latest Nautobot release in GitHub with the latest tag version of Nautobot Lab in Docker Hub. This will ensure that Nautobot Lab is updated as frequently as Nautobot so that you can ensure that your lab environment is up to date with the latest release.

Third, a number of Nautobot plugins / applications have been added to Nautobot Lab by default. The current plugins installed by default are:

Almost all plugins from the Nautobot GitHub organization have been included. The only real plugins that were excluded were plugins such as ChatOps or specific SSoT plugins that require users to configure extra parameters in nautobot_config.py. If you want Nautobot Lab to access network devices directly, you can set the NAPALM_USERNAME and NAPALM_PASSWORD environment variables before starting up your Nautobot Lab instance.

docker run -itd --name nautobot -p 8000:8000 \
  --env NAPALM_USERNAME="demouser" \
  --env NAPALM_PASSWORD="demopass" \
  networktocode/nautobot-lab:latest

Lastly, a default superuser account is now created when building the container. It uses the username of demo and the password of nautobot, just like our online demo instance. If you choose to build your own container, this default account can be modified by setting the NAUTOBOT_USERNAMENAUTOBOT_EMAILNAUTOBOT_PASSWORD, and NAUTOBOT_TOKEN environment variables when building the container.

The default username is demo and password is nautobot.

export NAUTOBOT_USERNAME="demo"
export NAUTOBOT_EMAIL="opensource@networktocode.com"
export NAUTOBOT_PASSWORD="nautobot123"
export NAUTOBOT_TOKEN="aaaaaaaaaaaaaaaaaaaaaaaaaaaaaaaaaaaaaaaa"

docker build -t nautobot-lab:latest .

Conclusion

These constitute the major updates to Nautobot Lab. Although much has changed, these modifications are designed to improve Nautobot Lab’s maintainability and utility, particularly for individuals wanting to test beyond the basic Nautobot installation. If you have any questions or comments, feel free to reach out on the Network to Code Slack. You can also open issues on GitHub, where we can discuss your concerns further!

-James


Tags :

ntc img
ntc img

Contact Us to Learn More

Share details about yourself & someone from our team will reach out to you ASAP!

Introduction to Structured Data – Part 4

Blog Detail

Through this series of blogs (123) on structured data, we’ve talked about what it is, how you’re probably using it today (possibly without realizing it), and how it can be used in automation. Today, we’ll talk about storing that data in a Source of Truth, instead of using spreadsheets.

You can easily follow along with the examples in this blog by using demo.nautobot.com or by using Nautobot Lab.

Historically, network engineers have kept records about their network in spreadsheets. This has worked well, as long as the networks were simple and small. As networks grow and the data requirements grow, spreadsheets can quickly become cumbersome to maintain. This is where a source of truth comes in. A source of truth is a database that maintains the records that you require. For instance, in the first structured data blog, David gave an example of a small network in a spreadsheet. It’s small and simple to maintain, but as soon as he wanted more relational information, that spreadsheet would be difficult to maintain. What if David wanted to keep information about interface configuration, cross-connects, circuits, providers, vlans, network prefixes, access lists, route policies, advertised networks? Some of those individual items would be easy to keep on the existing spreadsheet, but all of that information together would become a burdensome task. A source of truth simplifies the relationships of this data and its maintenance.

To demonstrate this, I’ve set up the same data from the first blog into Nautobot.

Example spreadsheet from first structured data blog. 

Structured Data Spreadsheet Example

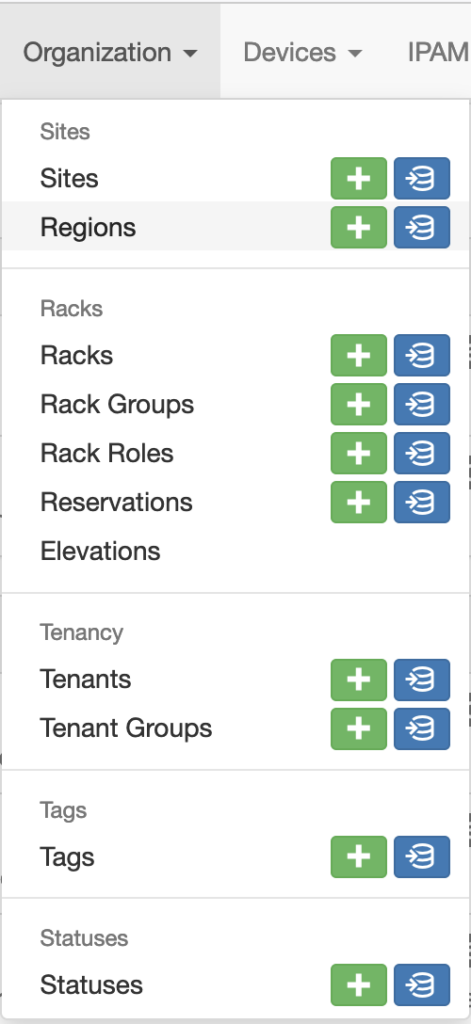
Within Nautobot, I created a region called “North Carolina”. Then I created three sites: Headquarters, Police Department (North), and Police Department (South).

sites

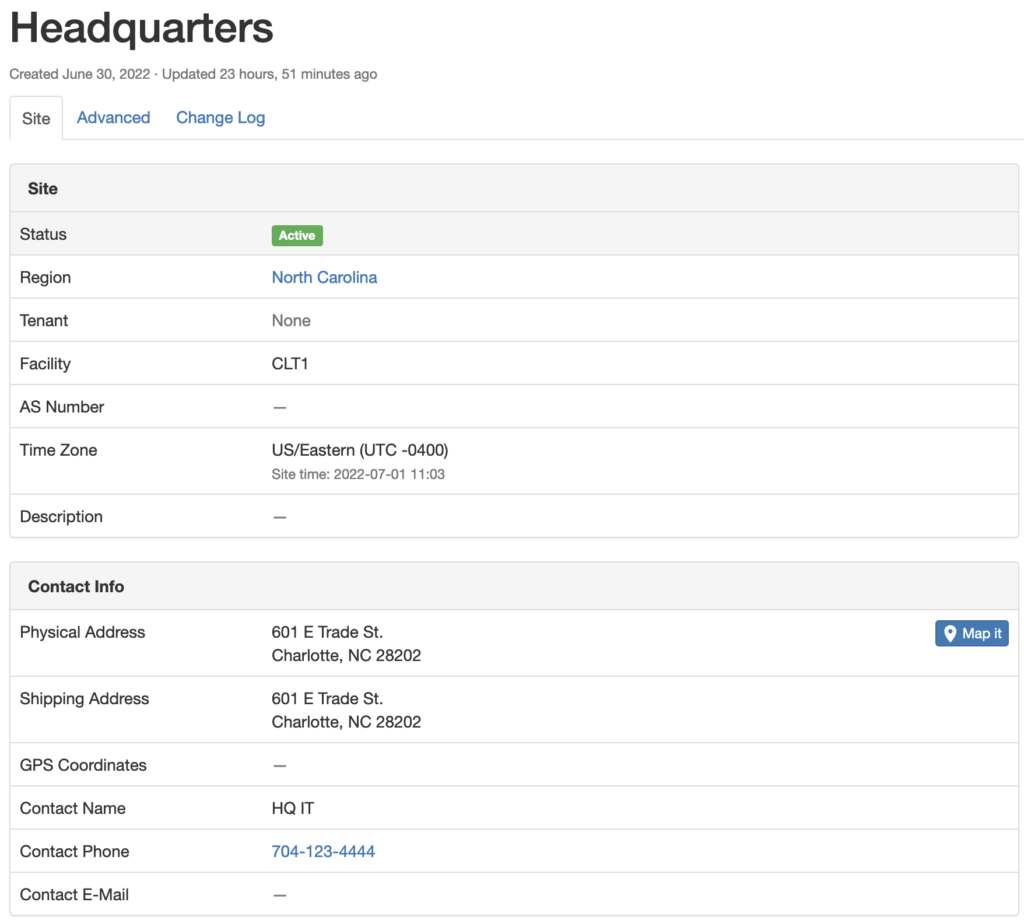
Each site has the address and contact information that was listed in the spreadsheet.

headquarters

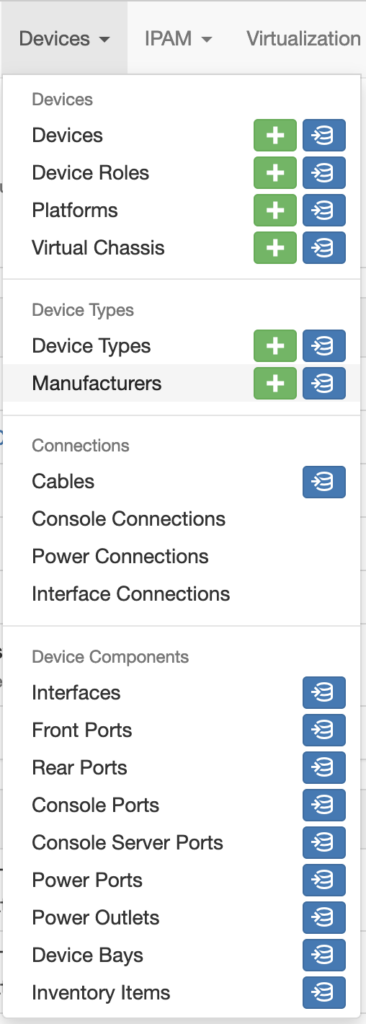
Once the sites were created, I created a manufacturer object, the device types, and the device roles.

device types
device types

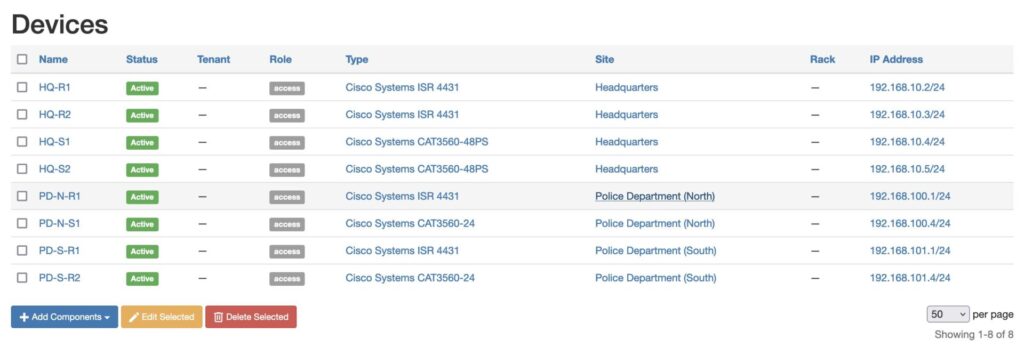
Now that all of that is entered, we’re ready to create the devices. Instead of creating the devices individually, I opted to do a bulk import by modifying the CSV file to match the fields that Nautobot would be looking for.

name,manufacturer,device_type,serial,site,device_role,status
HQ-R1,Cisco Systems,ISR 4431,KRG645782,Headquarters,access,active
HQ-R2,Cisco Systems,ISR 4431,KRG557862,Headquarters,access,active
HQ-S1,Cisco Systems,CAT3560-48PS,GRN883274,Headquarters,access,active
HQ-S2,Cisco Systems,CAT3560-48PS,GRN894532,Headquarters,access,active
PD-N-R1,Cisco Systems,ISR 4431,FOM123124,Police Department (North),access,active
PD-N-S1,Cisco Systems,CAT3560-24,GRN334213,Police Department (North),access,active
PD-S-R1,Cisco Systems,ISR 4431,FOM654231,Police Department (South),access,active
PD-S-R2,Cisco Systems,CAT3560-24,GRN888931,Police Department (South),access,active
import

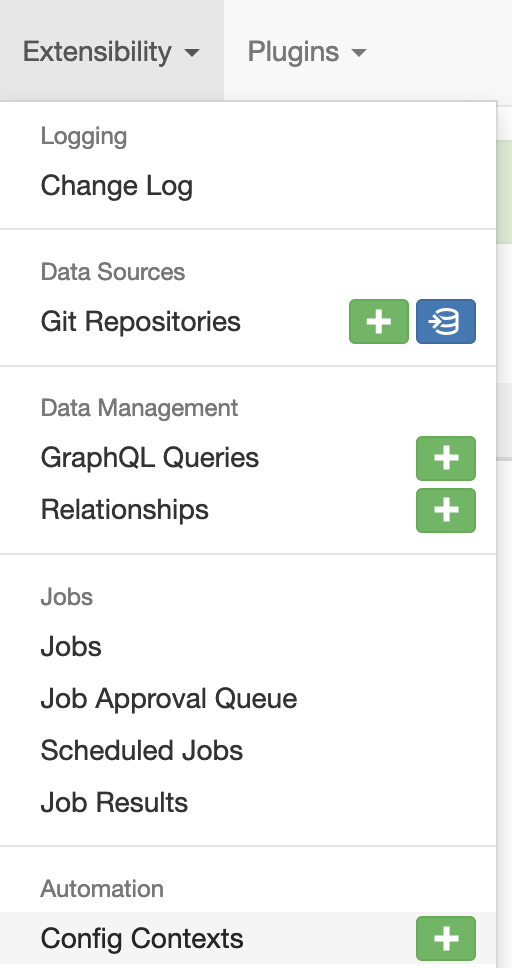
With the devices imported, the only two attributes left from the spreadsheet are the jumphost and management ip address. The jumphost attributes can be achieved by creating a config context. From the extensibility menu, select the + button next to config context.

extensibility

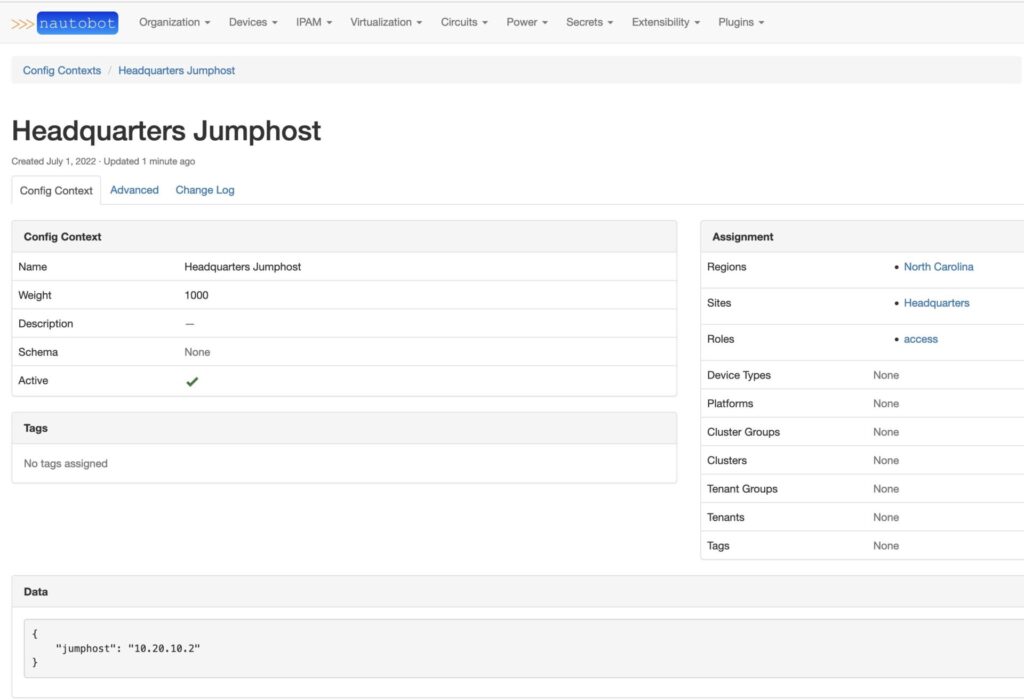
Within the “Add a new config context” menu, we can create config contexts that will be automatically assigned to devices that match the attributes that we assign. For example, we can assign the Regions to “North Carolina”, the Sites to “Headquarters”, and the Roles to “access”. Give the config context a name, such as “Headquarters jumphost”. The Data field accepts JSON-formatted data. Add the jumphost for the Headquarters site in the Data field.

{"jumphost": "10.20.10.2"}

Then press the “Create and Add Another” button. From here, you can add the jumphosts for the remaining sites following the same steps.

jumphosts

At this point, the config context for jumphosts will automatically be assigned to the devices. This can be checked by pulling up a device and selecting the “Config Context” tab.

Config Context

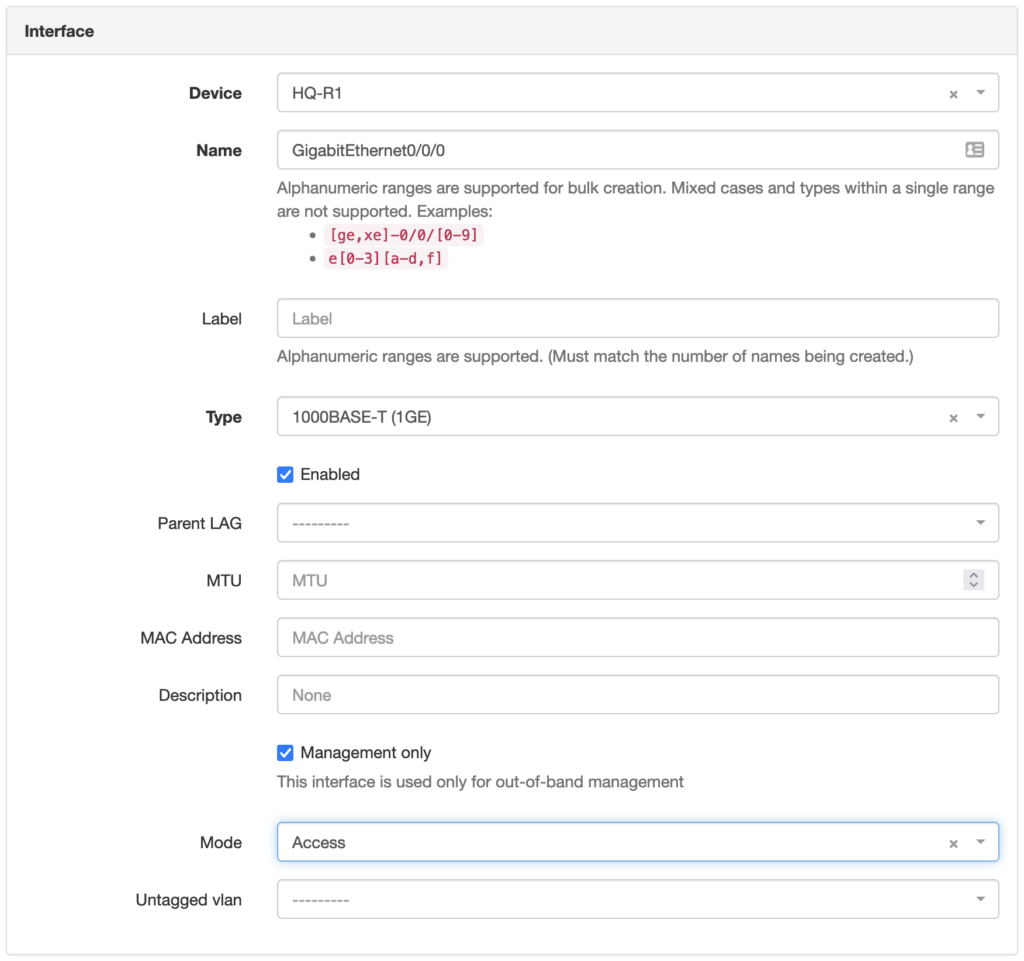
To abstract the final attribute, we also need to create interfaces to associate with the management ip address. To do this, go to a device, drop down the “+ Add Components” menu, and select interfaces.

Components

Add the name of the interface, drop down the menu and select the interface type, select the “enabled” and “management only” check boxes, select an interface mode, and press the “Create” button.

interface

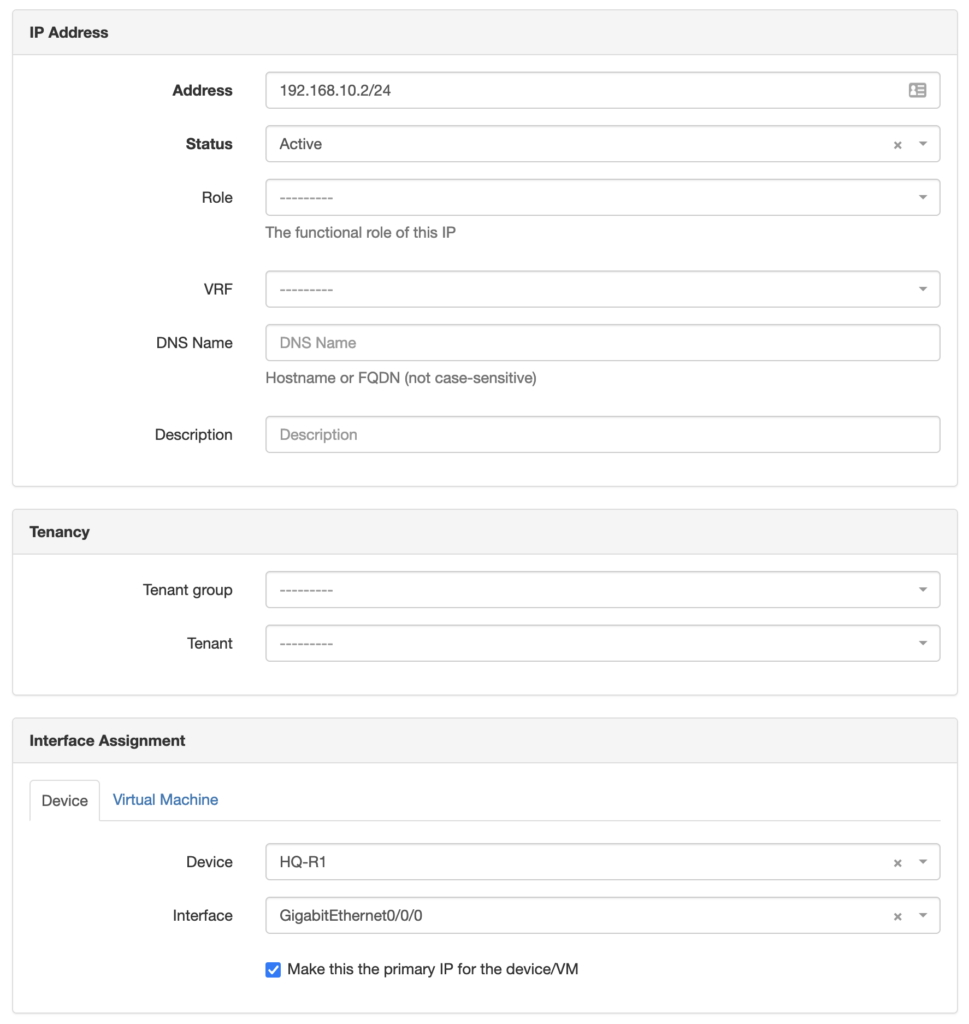
At this point, you will be taken to the interfaces tab of the device page. The newly created interface will be in the list of interfaces. At this point, you can assign a management ip address to the interface by pressing the “+” button.

management

From the “Add IP Address” page, give the device a management ip address, select the status, check the “Make this the primary IP for the device/VM” checkbox, and press the “Create” button.

primary IP for the device

With that, every bit of data from the first blog spreadsheet has been captured in the source of truth. We’ve even added an extra data point by associating the management ip address with a specific interface on each device.

specific interface

With this data loaded into Nautobot, it becomes much easier to start associating other data with devices and networks. Data attributes related to routing, interfaces, access lists, route policies, and so forth can all be incorporated. Having all this data at your fingertips also creates the foundation for network automation.

network automation

Conclusion

Building and deploying networks is a data-intensive job. Using a source of truth platform, such as Nautobot, enables network engineers to define network architectures that are cohesive, consistent, and that enable automation. If you have any questions, feel free to reach out on the Network to Code Slack.

-James


ntc img
ntc img

Contact Us to Learn More

Share details about yourself & someone from our team will reach out to you ASAP!

Introduction to Structured Data – Part 2

Blog Detail

In Part 1 of the Introduction to Structured Data, David Cole explained what structured data is and why it is important. In Part 2, we’ll take a look at interacting with structured data in a programmatic manner.

To keep the concepts digestible, we’ll utilize the examples provided in Part 1 throughout this blog.

CSV

There are a number of libraries that can interact with Excel, but the easiest way to interact with spreadsheets in Python is to convert the spreadsheet to a CSV file.

The first line of the CSV file is the header line. The subsequent lines are the data that we’ll be working with. The data in each column corresponds with its column header line.

The first two lines of the CSV file are represented below:

Device Name,Manufacturer,Model,Serial Number,Site Name,Address,City,State,Zip,Country,Mgmt IP,Network Domain,Jump Host,Support
HQ-R1,Cisco,ISR 4431,KRG645782,Headquarters,601 E Trade St,Charlotte,NC,28202,USA,192.168.10.2,Access,10.20.5.5,HQ IT 704-123-4444

Below is a simple Python script to convert the CSV contents into a Python dictionary.

import csv

data = []
with open("structured-data.csv") as csv_file:
    rows = csv.reader(csv_file)
    for row in rows:
        data.append(row)

headers = data[0]
data.pop(0)
data_dict = []

for row in data:
    inventory_item = dict()
    for item in range(len(row)):
        inventory_item[headers[item]] = row[item]
    data_dict.append(inventory_item)

When the CSV file is opened and rendered in Python, it’s converted into a list of lists. The first two lines of this representation are below.

[['Device Name', 'Manufacturer', 'Model', 'Serial Number', 'Site Name', 'Address', 'City', 'State', 'Zip', 'Country', 'Mgmt IP', 'Network Domain', 'Jump Host', 'Support'], ['HQ-R1', 'Cisco', 'ISR 4431', 'KRG645782', 'Headquarters', '601 E Trade St', 'Charlotte', 'NC', '28202', 'USA', '192.168.10.2', 'Access', '10.20.5.5', 'HQ IT 704-123-4444']]

As you can see, the first item in the list is a list of the CSV headers. The second list item is a list of the first row of the CSV. This continues until all rows are represented.

The Python script assumes the first row is the headers row, assigns a variable to that list item, and then removes that list item from the overall list. It then iterates through the list and creates a list of dictionaries that utilize the header items as dictionary keys and the row items as their corresponding dictionary values.

The result is a data structure that represents the data from the CSV file.

In [3]: data_dict[0]
Out[3]: 
{'Device Name': 'HQ-R1',
 'Manufacturer': 'Cisco',
 'Model': 'ISR 4431',
 'Serial Number': 'KRG645782',
 'Site Name': 'Headquarters',
 'Address': '601 E Trade St',
 'City': 'Charlotte',
 'State': 'NC',
 'Zip': '28202',
 'Country': 'USA',
 'Mgmt IP': '192.168.10.2',
 'Network Domain': 'Access',
 'Jump Host': '10.20.5.5',
 'Support': 'HQ IT 704-123-4444'}

JSON

JSON is an acronym that stands for “JavaScript Object Notation”. It is a serialization format that represents structured data in a textual format. The structured data that represents the textual string in JSON is essentially a Python dictionary.

This can be seen in the example.

In [4]: import json

In [5]: type(data_dict)
Out[5]: list

In [6]: type(data_dict[0])
Out[6]: dict

In [8]: data_dict[0]

In [8]: data_dict[0]
Out[8]: 
{'Device Name': 'HQ-R1',
 'Manufacturer': 'Cisco',
 'Model': 'ISR 4431',
 'Serial Number': 'KRG645782',
 'Site Name': 'Headquarters',
 'Address': '601 E Trade St',
 'City': 'Charlotte',
 'State': 'NC',
 'Zip': '28202',
 'Country': 'USA',
 'Mgmt IP': '192.168.10.2',
 'Network Domain': 'Access',
 'Jump Host': '10.20.5.5',
 'Support': 'HQ IT 704-123-4444'}

In [12]: json_data = json.dumps(data_dict[0])

In [13]: type(json_data)
Out[13]: str

In [14]: json_data
Out[14]: '{"Device Name": "HQ-R1", "Manufacturer": "Cisco", "Model": "ISR 4431", "Serial Number": "KRG645782", "Site Name": "Headquarters", "Address": "601 E Trade St", "City": "Charlotte", "State": "NC", "Zip": "28202", "Country": "USA", "Mgmt IP": "192.168.10.2", "Network Domain": "Access", "Jump Host": "10.20.5.5", "Support": "HQ IT 704-123-4444"}'

You can convert the entire data_dict into JSON utilizing the same json.dumps() method as well.

In the above example, we took the first list item from data_dict and converted it to a JSON object. JSON objects can be converted into a Python dictionary utilizing the json.loads() method.

In [17]: new_data = json.loads(json_data)

In [18]: type(new_data)
Out[18]: dict

In [19]: new_data
Out[19]: 
{'Device Name': 'HQ-R1',
 'Manufacturer': 'Cisco',
 'Model': 'ISR 4431',
 'Serial Number': 'KRG645782',
 'Site Name': 'Headquarters',
 'Address': '601 E Trade St',
 'City': 'Charlotte',
 'State': 'NC',
 'Zip': '28202',
 'Country': 'USA',
 'Mgmt IP': '192.168.10.2',
 'Network Domain': 'Access',
 'Jump Host': '10.20.5.5',
 'Support': 'HQ IT 704-123-4444'}

JSON is used often in modern development environments. Today, REST APIs generally use JSON as the mechanism to perform CRUD (Create, Read, Update, Delete) operations within software programmatically and to transport data between systems. Nautobot uses a REST API that allows for CRUD operations to be performed within Nautobot. All of the data payloads that are used to the API functions are in a JSON format.

XML

XML is an acronym that stands for eXtensible Markup Language. XML serves the same purpose that JSON serves. Many APIs utilize XML as their method for performing CRUD operations and transporting data between systems. Specifically in the networking programmability arena, XML is used as the method for transporting data while utilizing protocols like NETCONF to configure devices.

Let’s create an XML object based on an example data structure that we’ve utilized.

In [61]: new_data
Out[61]: 
{'Device Name': 'HQ-R1',
 'Manufacturer': 'Cisco',
 'Model': 'ISR 4431',
 'Serial Number': 'KRG645782',
 'Site Name': 'Headquarters',
 'Address': '601 E Trade St',
 'City': 'Charlotte',
 'State': 'NC',
 'Zip': '28202',
 'Country': 'USA',
 'Mgmt IP': '192.168.10.2',
 'Network Domain': 'Access',
 'Jump Host': '10.20.5.5',
 'Support': 'HQ IT 704-123-4444'}
from xml.etree.ElementTree import Element,tostring

site = Element("site")

for k,v in new_data.items():
    child = Element(k)
    child.text = str(v)
    site.append(child)
<span role="button" tabindex="0" data-code="In [72]: tostring(site) Out[72]: b'<site><Device Name>HQ-R1</Device Name><Manufacturer>Cisco</Manufacturer><Model>ISR 4431</Model><Serial Number>KRG645782</Serial Number><Site Name>Headquarters</Site Name><Address>601 E Trade St</Address><City>Charlotte</City><State>NC</State><Zip>28202</Zip><Country>USA</Country><Mgmt IP>192.168.10.2</Mgmt IP><Network Domain>Access</Network Domain><Jump Host>10.20.5.5</Jump Host><Support>HQ IT 704-123-4444</Support>
In [72]: tostring(site)
Out[72]: b'<site><Device Name>HQ-R1</Device Name><Manufacturer>Cisco</Manufacturer><Model>ISR 4431</Model><Serial Number>KRG645782</Serial Number><Site Name>Headquarters</Site Name><Address>601 E Trade St</Address><City>Charlotte</City><State>NC</State><Zip>28202</Zip><Country>USA</Country><Mgmt IP>192.168.10.2</Mgmt IP><Network Domain>Access</Network Domain><Jump Host>10.20.5.5</Jump Host><Support>HQ IT 704-123-4444</Support></site>'

With the XML object created, we can utilize the Python XML library to work with the XML object.

In [96]: for item in site:
    ...:     print(f"{item.tag} |  {item.text}")
    ...: 
Device Name |  HQ-R1
Manufacturer |  Cisco
Model |  ISR 4431
Serial Number |  KRG645782
Site Name |  Headquarters
Address |  601 E Trade St
City |  Charlotte
State |  NC
Zip |  28202
Country |  USA
Mgmt IP |  192.168.10.2
Network Domain |  Access
Jump Host |  10.20.5.5
Support |  HQ IT 704-123-4444

You can also search the XML object for specific values.

In [97]: site.find("Jump Host").text
    ...: 
Out[97]: '10.20.5.5'

YAML

YAML stands for Yet Another Markup Language. Because YAML is easy to learn and easy to read and has been widely adopted, it’s often a network engineer’s first exposure to a programmatic data structure when pursuing network automation. It’s widely used in automation tools like Ansible and Salt. (https://docs.saltproject.io/en/latest/topics/index.html).

YAML is easy to learn and easy to read. Given this, it has been widely adopted.

Let’s create a basic YAML object based on our previous examples.

import yaml

yaml_data = yaml.dump(data_dict)

print(yaml_data[0:2])
- Address: 601 E Trade St
  City: Charlotte
  Country: USA
  Device Name: HQ-R1
  Jump Host: 10.20.5.5
  Manufacturer: Cisco
  Mgmt IP: 192.168.10.2
  Model: ISR 4431
  Network Domain: Access
  Serial Number: KRG645782
  Site Name: Headquarters
  State: NC
  Support: HQ IT 704-123-4444
  Zip: '28202'
- Address: 601 E Trade St
  City: Charlotte
  Country: USA
  Device Name: HQ-R2
  Jump Host: 10.20.5.5
  Manufacturer: Cisco
  Mgmt IP: 192.168.10.3
  Model: ISR 4431
  Network Domain: Access
  Serial Number: KRG557862
  Site Name: Headquarters
  State: NC
  Support: HQ IT 704-123-4444
  Zip: '28202'

With the instance of yaml.dump(data_dict[0:2]), I created a YAML structure from the first two entries of our previous examples. This creates a list of two inventory items that describes their site details.

As you can see, YAML is very easy to read. Out of the programatic data structures that we’ve covered to this point, YAML is the easiest to learn and read.

Usually, as a network automation engineer, you’re not going to be creating YAML data from Python dictionaries. It’s usually the other way around. Usually, the YAML files are created by engineers to describe aspects of their device inventory. You then consume the YAML files and take action on them.

Using the yaml library, we can convert the data into a Python dictionary that we can take action on.

In [19]: yaml.safe_load(yaml_data)
Out[19]: 
[{'Address': '601 E Trade St',
  'City': 'Charlotte',
  'Country': 'USA',
  'Device Name': 'HQ-R1',
  'Jump Host': '10.20.5.5',
  'Manufacturer': 'Cisco',
  'Mgmt IP': '192.168.10.2',
  'Model': 'ISR 4431',
  'Network Domain': 'Access',
  'Serial Number': 'KRG645782',
  'Site Name': 'Headquarters',
  'State': 'NC',
  'Support': 'HQ IT 704-123-4444',
  'Zip': '28202'},
 {'Address': '601 E Trade St',
  'City': 'Charlotte',
  'Country': 'USA',
  'Device Name': 'HQ-R2',
  'Jump Host': '10.20.5.5',
  'Manufacturer': 'Cisco',
  'Mgmt IP': '192.168.10.3',
  'Model': 'ISR 4431',
  'Network Domain': 'Access',
  'Serial Number': 'KRG557862',
  'Site Name': 'Headquarters',
  'State': 'NC',
  'Support': 'HQ IT 704-123-4444',
  'Zip': '28202'}]

Conclusion

I hope that you’ve found this introduction to interacting with different data structures programmatically useful. If you have questions, feel free to join our Slack community and ask questions!

-James


ntc img
ntc img

Contact Us to Learn More

Share details about yourself & someone from our team will reach out to you ASAP!