Hierarchical Configuration Up and Running

Blog Detail

Parsing network device configurations can be a difficult task. Automatically determining a remediation plan by comparing a running configuration to a generated template configuration can be even more difficult. In this blog, I’ll discuss Hierarchical Configuration, hier_config for short, and how it can be leveraged to streamline a business’s configuration compliance needs.

What Is Hierarchical Configuration?

Hier_config is a Python library that is able to consume a running configuration of a network device, compare it against its intended templated configuration, and build the remediation steps necessary to bring a device into spec with its intended configuration. Hier_config has been used extensively on Cisco IOS, NX-OS, IOS XR, IOS XE, and Arista EOS devices. However, any network operating system that utilizes a CLI syntax that is structured in a similar fashion to IOS should work mostly out of the box.

The biggest advantage that I’ve seen of hier_config vs other attempts at configuration compliance is that hier_config has a built-in understanding of parent / child relationships within a configuration.

For example:

router bgp 65000
  neighbor 192.0.2.1 remote-as 65001
  address-family ipv4 unicast
    neighbor neighbor 192.0.2.1 activate

router bgp 65000 is the parent object for the above configuration snippet. neighbor 192.0.2.1 remote-as 65001 and address-family ipv4 unicast are children of router bgp 65000. Finally neighbor neighbor 192.0.2.1 activate is a child of address-family ipv4 unicast.

Hier_config understands those relationships within the configuration, whereas most products do not. This makes hier_config a very powerful configuration compliance tool when it comes to defining remediation steps. Instead of rewriting the entire parent / child hierarchy of objects, hier_config can be defined to only remediate the specific child steps as necessary.

Another advantage is the ability for hier_config to understand what commands are idempotent, require negation, and when to negate a command. Take updating a description of an interface. You don’t need to negate an existing interface description to apply another description. You just update the description on the interface and move on. Another example could be updating logging or snmp servers on a configuration. You very likely want to continue sending logging and snmp updates to the old servers until the new servers have been applied. Therefore, the correct order to apply the commands would be to add the new servers and then remove the old servers. Being able to define these nuances will be covered in the Hierarchical Configuration Options section.

How Can Hierarchical Configuration Be Installed?

Hier_config requires a minimum Python version of 3.8.

There are two methods of installing hier_config. The first method is to install it from PyPI via pip.

  • pip install hier_config

The second method is to install it from GitHub.

  • Install Poetry
  • Clone the repository: git clone https://github.com/netdevops/hier_config.git
  • Install hier_config: cd hier_config && poetry install

Hierarchical Configuration Basics

Many examples have references to files. Those files are publicly available in the ./tests/fixtures folder of the GitHub repository.

The very basic usage of hier_config is very easy. Let’s break down the below sample script.

#!/usr/bin/env python3

# Import the hier_config Host library
from hier_config import Host

# Create a hier_config Host object
host = Host(hostname="aggr-example.rtr", os="ios")

# Load a running configuration from a file
host.load_running_config_from_file("./tests/fixtures/running_config.conf")

# Load an intended configuration from a file
host.load_generated_config_from_file("./tests/fixtures/generated_config.conf")

# Create the remediation steps
host.remediation_config()

# Display the remediation steps
print(host.remediation_config_filtered_text(include_tags={}, exclude_tags={}))

With six lines of code, you can automatically create the remediation steps to bring a device into spec with its intended or generated configuration. Those steps are:

  1. Import the hier_config Host object.
  2. Create a Host object.
  3. Load the running configuration into the Host object.
  4. Load the generated configuration into the Host object.
  5. Initialize the remediation.
  6. Display the remediation steps.

The output of the remediation steps for the above example is:

vlan 3
  name switch_mgmt_10.0.3.0/24
vlan 4
  name switch_mgmt_10.0.4.0/24
interface Vlan2
  mtu 9000
  ip access-group TEST in
  no shutdown
interface Vlan3
  description switch_mgmt_10.0.3.0/24
  ip address 10.0.3.1 255.255.0.0
interface Vlan4
  mtu 9000
  description switch_mgmt_10.0.4.0/24
  ip address 10.0.4.1 255.255.0.0
  ip access-group TEST in
  no shutdown

The actual differences between the two configurations are:

<span role="button" tabindex="0" data-code="% diff ./tests/fixtures/running_config.conf ./tests/fixtures/generated_config.conf 9a10,12 > name switch_mgmt_10.0.3.0/24 > ! > vlan 4 12a16 > mtu 9000 15c19,20
% diff ./tests/fixtures/running_config.conf ./tests/fixtures/generated_config.conf
9a10,12
>  name switch_mgmt_10.0.3.0/24
> !
> vlan 4
12a16
>  mtu 9000
15c19,20
<  shutdown
---
>  ip access-group TEST in
>  no shutdown
18a24,30
>  description switch_mgmt_10.0.3.0/24
>  ip address 10.0.3.1 255.255.0.0
>  ip access-group TEST in
>  no shutdown
> !
> interface Vlan4
>  mtu 9000

At its core, that is the most very basic example of hier_config.

Lineage Rules Explained

Lineage rules are rules that are written in YAML. They allow users to seek out very specific sections of configurations or even seek out very generalized lines within a configuration. For example, suppose you just wanted to seek out interface descriptions. Your lineage rule would look like:

- lineage:
  - startswith: interface
  - startswith: description

In the above example, a start of a lineage is defined with the – lineage: syntax. From there the interface is defined with the – startswith: interface syntax under the – lineage: umbrella. This tells hier_config to search for any configuration that starts with the string interface as the parent of a configuration line. When it finds an interface parent, it then looks at any child configuration line of the interface that starts with the string description.

With lineage rules, you can get as deep into the children or as shallow as you need. Suppose you want to inspect the existence or absence of http, ssh, snmp, and logging within a configuration. This can be done with a single lineage rule, like so:

- lineage:
  - startswith:
    - ip ssh
    - no ip ssh
    - ip http
    - no ip http
    - snmp-server
    - no snmp-server
    - logging
    - no logging

Or suppose, you want to inspect whether BGP IPv4 AFIs are activated. You can do this with the following:

- lineage:
  - startswith: router bgp
  - startswith: address-family ipv4
  - endswith: activate

In the above example, I utilized a different keyword to look for activated BGP neighbors. The keywords that can be utilized within lineage rules are:

  • startswith
  • endswith
  • contains
  • equals
  • re_search

You can also put all of the above examples together in the same set of lineage rules like so:

- lineage:
  - startswith: interface
  - startswith: description
- lineage:
  - startswith:
    - ip ssh
    - no ip ssh
    - ip http
    - no ip http
    - snmp-server
    - no snmp-server
    - logging
    - no logging
- lineage:
  - startswith: router bgp
  - startswith: address-family ipv4
  - endswith: activate

When hier_config consumes the lineage rules, it consumes them as a list of lineage rules and processes them individually.

Tagging Configuration Sections

With a firm understanding of lineage rules, more complex use cases become available within hier_config. A powerful use case is the ability to tag specific sections of configuration and only display remediations based on those tags. This becomes very handy when you’re attempting to execute a maintenance that only targets low risk configuration changes or isolate the more risky configuration changes to scrutinize their execution during a maintenance.

Tagging expands on the use of the lineage rules by creating an add_tags keyword to a lineage rule.

Suppose you had a running configuration that had an ntp configuration that looked like:

ntp server 192.0.2.1 prefer version 2

However, your intended configuration utilized a publicly available NTP server on the internet:

ip name-server 1.1.1.1
ip name-server 8.8.8.8
ntp server time.nist.gov

You could create a lineage rule that targeted that specific remediation like this:

- lineage:
  - startswith:
    - ip name-server
    - no ip name-server
    - ntp
    - no ntp
  add_tags: ntp

Now we can modify the script above to load the tags and create a remediation of the said tags:

#!/usr/bin/env python3

# Import the hier_config Host library
from hier_config import Host

# Create a hier_config Host object
host = Host(hostname="aggr-example.rtr", os="ios")

# Load the tagged lineage rules
host.load_tags_from_file("./tests/fixtures/tags_ios.yml")

# Load a running configuration from a file
host.load_running_config_from_file("./tests/fixtures/running_config.conf")

# Load an intended configuration from a file
host.load_generated_config_from_file("./tests/fixtures/generated_config.conf")

# Create the remediation steps
host.remediation_config()

# Display the remediation steps for only the "ntp" tags
print(host.remediation_config_filtered_text(include_tags={"ntp"}, exclude_tags={}))

In the script, we made two changes. The first change is to load the tagged lineage rules: host.load_tags_from_file("./tests/fixtures/tags_ios.yml"). And the second is to filter the remediation steps by only including steps that are tagged with ntp via the include_tags argument.

The remediation looks like:

no ntp server 192.0.2.1 prefer version 2
ip name-server 1.1.1.1
ip name-server 8.8.8.8
ntp server time.nist.gov

Hierarchical Configuration Options

There are a number of options that can be loaded into hier_config to make it better conform to the nuances of your network device. By default, hier_config loads a set of sane defaults for Cisco IOS, IOS XE, IOS XR, NX-OS, and Arista EOS.

Below are the configuration options available for manipulation.

base_options: dict = {
    "style": None,
    "sectional_overwrite": [],
    "sectional_overwrite_no_negate": [],
    "ordering": [],
    "indent_adjust": [],
    "parent_allows_duplicate_child": [],
    "sectional_exiting": [],
    "full_text_sub": [],
    "per_line_sub": [],
    "idempotent_commands_blacklist": [],
    "idempotent_commands": [],
    "negation_default_when": [],
    "negation_negate_with": [],
}

The default options can be completely overwritten and loaded from a yaml file, or individual components of the options can be manipulated to provide the functionality that is desired.

Here is an example of manipulating the built-in options.

# Import the hier_config Host library
from hier_config import Host

# Create a hier_config Host object
host = Host(hostname="aggr-example.rtr", os="ios")

# Create an NTP negation ordered lineage rule
ordered_negate_ntp = {"lineage": [{"startswith": ["no ntp"], "order": 700}]}

# Update the hier_config options "ordering" key.
host.hconfig_options["ordering"].append(ordered_negate_ntp)

Here is an example of completely overwriting the default options and loading in your own.

# import YAML
import yaml

# Import the hier_config Host library
from hier_config import Host

# Load the hier_config options into memory
with open("./tests/fixtures/options_ios.yml") as f:
    options = yaml.load(f.read(), Loader=yaml.SafeLoader)

# Create a hier_config Host object
host = Host(hostame="aggr-example.rtr", os="ios", hconfig_options=options)

In the following sections, I’ll cover the most common options.

style

The style defines the os family. Such as iosiosxr, etc.

Example:

style: ios

ordering

Ordering is one of the most useful hier_config options. This allows you to use lineage rules to define the order in which remediation steps are presented to the user. For the ntp example above, the ntp server was negated (no ntp server 192.0.2.1) before the new ntp server was added. In most cases, this wouldn’t be advantageous. Thus, ordering can be used to define the proper order to execute commands.

All commands are assigned a default order weight of 500, with a usable order weight of 1 – 999. The smaller the weight value, the higher on the list of steps a command is to be executed. The larger the weight value, the lower on the list of steps a command is to be executed. To create an order in which new ntp servers are added before old ntp servers are removed, you can create an order lineage that weights the negation to the bottom.

Example:

ordering:
- lineage:
  - startswith: no ntp
  order: 700

With the above order lineage applied, the output of the above ntp example would look like:

ip name-server 1.1.1.1
ip name-server 8.8.8.8
ntp server time.nist.gov
no ntp server 192.0.2.1 prefer version 2

sectional_exiting

Sectional exiting features configuration sections that have a configuration syntax that defines the end of a configuration section. Examples of this are RPL (route policy language) configurations in IOS XR or peer policy and peer session configurations in IOS BGP sections. The sectional exiting configuration allows you to define the configuration syntax so that hier_config can render a remediation that properly exits those configurations.

An example of sectional exiting is:

sectional_exiting:
- lineage:
  - startswith: router bgp
  - startswith: template peer-policy
  exit_text: exit-peer-policy
- lineage:
  - startswith: router bgp
  - startswith: template peer-session
  exit_text: exit-peer-session

sectional_overwrite_no_negate

The sectional overwrite with no negate hier_config option will completely overwrite sections of configuration without negating them. This option is often used with the RPL sections of IOS XR devices that require that the entire RPL be re-created when making modifications to them, rather than editing individual lines within the RPL.

An example of sectional overwrite with no negate is:

sectional_overwrite_no_negate:
- lineage:
  - startswith: as-path-set
- lineage:
  - startswith: prefix-set
- lineage:
  - startswith: route-policy
- lineage:
  - startswith: extcommunity-set
- lineage:
  - startswith: community-set

sectional_overwrite

Sectional overwrite is just like sectional overwrite with no negate, except that hier_config will negate a section of configuration and then completely re-create it.

full_text_sub

Full text sub allows for substitutions of a multi-line string. Regular expressions are commonly used and allowed in this section. An example of this would be:

full_text_sub:
- search: "banner\s(exec|motd)\s(\S)\n(.*\n){1,}(\ 2)"
  replace: ""

This example simply searches for a banner message in the configuration and replaces it with an empty string.

per_line_sub

Per line sub allows for substitutions of individual lines. This is commonly used to remove artifacts from a running configuration that don’t provide any value when creating remediation steps.

An example is removing lines such as:

Building configuration...

Current configuration : 3781 bytes

Per line sub can be used to remove those lines:

per_line_sub:
- search: "Building configuration.*"
  replace: ""
- search: "Current configuration.*"
  replace: ""

idempotent_commands

Idempotent commands are commands that can just be overwritten and don’t need negation. Lineage rules can be created to define those commands that are idempotent.

An example of idempotent commands are:

idempotent_commands:
- lineage:
  - startswith: vlan
  - startswith: name
- lineage:
  - startswith: interface
  - startswith: description

The lineage rules above specify that defining a vlan name and updating an interface description are both idempotent commands.


Conclusion

Hierarchical Configuration is a very powerful configuration compliance tool for building and executing upon rendered remediation configurations. There is also an Ansible Collection that can greatly simplify remediation work. If you have any questions, comments, or issues, please feel free to reach out on the Network to Code Slack on #hier_config or open a GitHub issue.

-James


ntc img
ntc img

Contact Us to Learn More

Share details about yourself & someone from our team will reach out to you ASAP!

Parsing Strategies – TTP Parser

Blog Detail

The Parsing Strategies blog post series continues with the introduction of TTP Parser. TTP is a relatively new Python library that has gained some adoption within the Network Automation community. It provides a simple way to parse text into structured data with an approach similar to TextFSM but, in my opinion, has a lot more to offer such as output modifiers, macros, built-in functions, results formatting, and many other features that will be discussed throughout the blog. Join the TTP (#ttp-template-text-parser) Slack channel in our Networktocode Slack if you are interested in joining the conversation.

This blog post will provide an overview of TTP. If you are looking for some basic instructions on how to get started using parsers with Ansible (NTC-Templates, TTP, etc.), start here: Ansible Parsers

What is TTP?

TTP is a Python library which uses implied RegEx patterns to parse data, but it is also incredibly flexible. This parsing strategy provides a way to process data at runtime, as opposed to post-processing by using built-in functions, custom macros, and output formatters while parsing. We will dive deeper into this in a later section. The use of macros (Python functions) to manipulate data and generate desired output is one of my favorite features of the library, thus being my go to parsing strategy of choice when it comes to any hierarchical configuration output. TTP provides a series of output formatters to transform data into YAML, JSON, Table, CSV, and more. TTP can be used as a CLI utility, Python library or available with Netmiko and Ansible.

Groups

Capture groups are declared by using XML group tags, which allows nesting of other groups to generate a hierarchy. Any match inside a group is appended to a list of results. Groups have several attributes that can be set, but only the ‘name’ attribute is required. An important attribute to highlight is the “method” value, which can be set to “group” or “table.” When parsing CLI output, it’s recommended to set the method to table. This tells the parser to consider every line as the start of capturing for the group. Otherwise, setting the “start” indicator per match will be required if you have a variation of regular expressions to capture in the group. Although groups use XML group tags, TTP Templates have a deeper resemblance to Jinja templates and share similar characteristics.

Group Example:

<group name="some_group" method="table">
data to parse
    <group name="nested">
    more data to parse
    </group>
</group>

RegEx Indicator Patterns

TTP offers the ability to specify RegEx patterns to capture within a match variable. If we take a look at the source code, we can review the exact RegEx patterns that are being applied to capture a data. It’s important to understand what the regular expression pattern is before applying it, to ensure you properly capture variables.

Patterns

PHRASE = r"(\S+ {1})+?\S+"
ROW = r"(\S+ +)+?\S+"
ORPHRASE = r"\S+|(\S+ {1})+?\S+"
DIGIT = r"\d+"
IP = r"(?:[0-9]{1,3}\.){3}[0-9]{1,3}"
PREFIX = r"(?:[0-9]{1,3}\.){3}[0-9]{1,3}/[0-9]{1,2}"
IPV6 = r"(?:[a-fA-F0-9]{1,4}:|:){1,7}(?:[a-fA-F0-9]{1,4}|:?)"
PREFIXV6 = r"(?:[a-fA-F0-9]{1,4}:|:){1,7}(?:[a-fA-F0-9]{1,4}|:?)/[0-9]{1,3}"
_line_ = r".+"
WORD = r"\S+"
MAC = r"(?:[0-9a-fA-F]{2}(:|\.|\-)){5}([0-9a-fA-F]{2})|(?:[0-9a-fA-F]{4}(:|\.|\-)){2}([0-9a-fA-F]{4})"

Macros

As the documentation states, “Macros are python code within a macro tag. This code can contain a number of function definitions, these functions can be referenced within TTP templates.” This allows us to process data during parsing by sending the captured output from our template into a function and return a processed result. This helps eliminate the need for post-processing of the values after the data has been parsed. TTP offers the ability to use these macro functions within match variables, groups, output, and input data. Below, we will review a couple examples of using macros on matched variables.

Macro Example:

<macro>
def subscription_level(data):
    data = data.replace('"','').split()
    if len(data) >= 3:
        return {"card-type": data[0], "subscription-level": data[2]}
    return data[0]
</macro>

Structuring Output (Data Modeling)

Another awesome feature of TTP is the ability to manipulate how the data is structured and represented back to us. I won’t go into all the details and capabilities, but you can see from our example below that we have a list of neighbors under our BGP results for the IPV4 Address Family. However, under our peering neighbors, we have generated a dictionary with the key of the neighbor that was found in the subsequent result. Can you find the differences in the way the parser was structured to accomplish the different data structures? There is an ‘Awesome’ hint under the Dynamic Path example!

Simple List:

<group name="neighbor">
neighbor {{ neighbor }} {{ activate | macro("to_bool") }}
neighbor 10.1.0.1 send-community {{ send-community }}
neighbor 10.1.0.1 route-map {{ route-map }} {{ route-map-direction }}
</group>

Result Snippet:

"neighbor": [
{
    "activate": true,
    "neighbor": "10.1.0.1",
    "route-map": "PL-EBGP-PE1-OUT",
    "route-map-direction": "out",
    "send-community": "both"
},
{
    "activate": true,
    "neighbor": "10.1.0.5",
    "route-map": "PL-EBGP-PE2-OUT",
    "route-map-direction": "out",
    "send-community": "both"
}

Dynamic Path:

<group name="neighbor.{{ neighbor }}">  <------ Awesome!
neighbor {{ neighbor }} remote-as {{ remote-as }}
neighbor 10.1.0.1 update-source {{ update-source }}
</group>

Result Snippet:

"neighbor": {
    "10.1.0.1": {
        "remote-as": "65000",
        "update-source": "GigabitEthernet2.1001"
    },
    "10.1.0.5": {
        "remote-as": "65000",
        "update-source": "GigabitEthernet3.1001"
    }

There are several other techniques to format structure, and I highly encourage you to review the documentation to get the most out of the Forming Results Structure feature.

Parsing Hierarchical Configuration

Let’s get right to it! I know you can’t wait for the good stuff. Here is an example of using groups, macros, specified RegEx indicators ( ORPHRASE & DIGIT ), path formatters, and match variable indicators (‘start’, ‘end’, ‘ignore’) to parse a Nokia 7750 card configuration.

#--------------------------------------------------
echo "Card Configuration"
#--------------------------------------------------
    card 1
        card-type "iom-1" level cr
        fail-on-error
        mda 1
            mda-type "me6-100gb-qsfp28"
            ingress-xpl
                window 10
            exit
            egress-xpl
                window 10
            exit
            fail-on-error
            no shutdown
        exit
        no shutdown
    exit

TTP Template:

<macro>
def subscription_level(data):
    data = data.replace('"','').split()
    return {"card-type": data[0], "subscription-level": data[2]}
</macro>

#-------------------------------------------------- {{ ignore }}
echo "Card Configuration" {{ _start_ }}
#-------------------------------------------------- {{ ignore }}
    <group name="configure.card">
    card {{ slot-number | DIGIT }}
        card-type {{ card-type | ORPHRASE  | macro('subscription_level') }}
        fail-on-error {{fail-on-error | set(true) }}
        <group name="mda">
        mda {{ mda-slot }}
            shutdown {{ admin-state | set(false) }}
            mda-type {{ mda-type | replace('"', '') }}
            <group name="ingress-xpl">
            ingress-xpl {{ _start_ }}
                window {{ window }}
            exit {{ _end_ }}
            </group>
            <group name="egress-xpl">
            egress-xpl {{ _start_ }}
                window {{ window }}
            exit {{ _end_ }}
            </group>
            fail-on-error {{ fail-on-error | set(true) }}
            no shutdown {{ admin-state | set(true) }}
        </group>
        exit {{ ignore }}
    </group>
#-------------------------------------------------- {{ _end_ }}

Result:

[
   {
      "configure":{
         "card":{
            "card-type":{
               "card-type":"iom-1",
               "subscription-level":"cr"
            },
            "fail-on-error":true,
            "mda":{
               "admin-state":true,
               "egress-xpl":{
                  "window":"10"
               },
               "fail-on-error":true,
               "ingress-xpl":{
                  "window":"10"
               },
               "mda-slot":"1",
               "mda-type":"me6-100gb-qsfp28"
            },
            "slot-number":"1"
         }
      }
   }
]

Awesome! But what exactly is happening with our “subscription_level” macro? Our template includes the following match variable:

"card-type {{ card-type | ORPHRASE  | macro('subscription_level') }}".

This is using “ORPHRASE” to capture a single word or a phrase and the matched text (‘“iom-1” level cr”’) is then sent into the “subscription_level” function for processing. The function is taking this captured string and manipulating the text by splitting it to produce the following list: “[‘iom-1’, ‘level’, ‘cr’]”. Finally, it’s returning a dictionary with the keys for ‘card-type’ and ‘subscription-level’.

{
   "card-type":{
      "card-type":"iom-1",
      "subscription-level":"cr"
   }
}

Let’s take a look at another example template to parse a Cisco IOS BGP configuration that’s also taking advantage of TTP Built-In Functions. The goal is to convert values that would be better represented as booleans in our data model, specifically the following lines: “log-neighbor-changes” and “activate”. Although we can use the ‘set’ function like our previous example to accomplish something similar, I really want to drive home the fact that we can use python functions to accomplish our desired state of a matched variable. Also, macros have unique behavior when returning data, which we will review in more detail. We will also use ‘is_ip’ to validate our neighbor address is in fact an IP Address and DIGIT as a RegEx indicator to match a number.

Here is the raw output of the running configuration for BGP:

router bgp 65001
 bgp router-id 192.168.10.1
 bgp log-neighbor-changes
 neighbor 10.1.0.1 remote-as 65000
 neighbor 10.1.0.1 update-source GigabitEthernet2.1001
 neighbor 10.1.0.5 remote-as 65000
 neighbor 10.1.0.5 update-source GigabitEthernet3.1001
 !
 address-family ipv4
  redistribute connected
  neighbor 10.1.0.1 activate
  neighbor 10.1.0.1 send-community both
  neighbor 10.1.0.1 route-map PL-EBGP-PE1-OUT out
  neighbor 10.1.0.5 activate
  neighbor 10.1.0.5 send-community both
  neighbor 10.1.0.5 route-map PL-EBGP-PE2-OUT out
 exit-address-family

Template:

<macro>
def to_bool(captured_data):
    represent_as_bools = ["activate", "log-neighbor-changes"]
    if captured_data in represent_as_bools:
      return captured_data, {captured_data: True}
</macro>

<group name="bgp">
router bgp {{ asn | DIGIT }}
 bgp router-id {{ router-id }}
 bgp {{ log-neighbor-changes | macro("to_bool") }}
 <group name="neighbor.{{ neighbor }}">
 neighbor {{ neighbor | is_ip }} remote-as {{ remote-as }}
 neighbor 10.1.0.1 update-source {{ update-source }}
 </group>
 ! {{ ignore }}
 <group name="afi.{{ afi }}">
 address-family {{ afi }}
  redistribute {{ redistribute }}
  <group name="neighbor">
  neighbor {{ neighbor | is_ip }} {{ activate | macro("to_bool") }}
  neighbor 10.1.0.1 send-community {{ send-community }}
  neighbor 10.1.0.1 route-map {{ route-map }} {{ route-map-direction }}
  </group>
 exit-address-family {{ ignore }}
 </group>
</group>

The output of our Ansible task:

TASK [DEBUG] *******************************************************************
ok: [AS65001_CE1] => {
    "msg": [
        [
            {
                "bgp": {
                    "afi": {
                        "ipv4": {
                            "neighbor": [
                                {
                                    "activate": true,
                                    "neighbor": "10.1.0.1",
                                    "route-map": "PL-EBGP-PE1-OUT",
                                    "route-map-direction": "out",
                                    "send-community": "both"
                                },
                                {
                                    "activate": true,
                                    "neighbor": "10.1.0.5",
                                    "route-map": "PL-EBGP-PE2-OUT",
                                    "route-map-direction": "out",
                                    "send-community": "both"
                                }
                            ],
                            "redistribute": "connected"
                        }
                    },
                    "asn": "65001",
                    "log-neighbor-changes": true,
                    "neighbor": {
                        "10.1.0.1": {
                            "remote-as": "65000",
                            "update-source": "GigabitEthernet2.1001"
                        },
                        "10.1.0.5": {
                            "remote-as": "65000",
                            "update-source": "GigabitEthernet3.1001"
                        }
                    },
                    "router-id": "192.168.10.1"
                }
            }
        ]
    ]
}

Well, that was easy. All we had to do was replace the values that are of interest with jinja-like syntax and define several groups with XML group tags to properly structure our results. The macro function “to_bool” was used to process the captured data and return a boolean. You may have noticed that we returned the captured_data and a dictionary in our macro, as opposed to our earlier example only returning a simple dictionary. This is because macros will behave differently according to the data that’s being returned. Here is an explanation from the Documentation:

“If macro returns True or False – original data unchanged, macro handled as condition functions, invalidating result on False and keeps processing result on True If macro returns None – data processing continues, no additional logic associated If macro returns single item – that item replaces original data supplied to macro and processed further If macro return tuple of two elements – fist element must be string – match result, second – dictionary of additional fields to add to results”

Parsing Show Commands

Let’s continue the pattern of the series and parse the output of a simple “show lldp neighbors” command output for IOS.

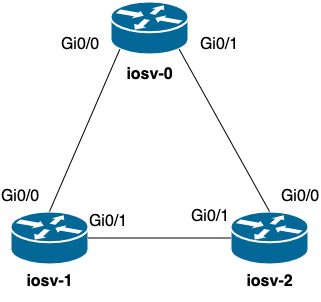
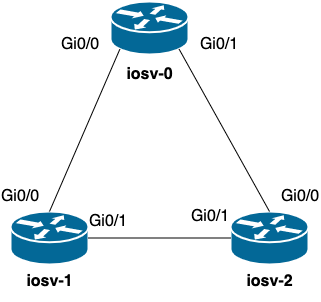
Topology

Raw Output:

Capability codes:
    (R) Router, (B) Bridge, (T) Telephone, (C) DOCSIS Cable Device
    (W) WLAN Access Point, (P) Repeater, (S) Station, (O) Other

Device ID           Local Intf     Hold-time  Capability      Port ID
R3.admin-save.com   Gi0/1          120        R               Gi0/0
R2.admin-save.com   Gi0/0          120        R               Gi0/0

Total entries displayed: 2

Now, let’s see how simple the TTP Template is to parse operational show output commands:

<group name="LLDP_NEIGHBORS" method="table">
Device ID           Local Intf     Hold-time  Capability      Port ID {{ignore}}
{{DEVICE_ID}} {{LOCAL_INT}} {{HOLD_TIME | DIGIT}} {{CAPABILITY}} {{ PORT_ID }}
</group>
<group name="TOTAL_ENTRIES">
Total entries displayed: {{ COUNT | DIGIT}}
</group>

That’s it! Let’s review some important pieces to make this a successful template.

  • Method
    • “method=’table’” is applied to the group “LLDP_NEIGHBORS” as we are parsing operational show commands in table format.
  • Ignore
    • ”” is used to tell the parser to discard the lines that we don’t care about inside of our capture group. Any lines outside of the group are simply ignored and discarded by default.

Example Playbook:

---
- name: "EXAMPLE TTP PLAYBOOK"
  hosts: R1
  connection: network_cli

  tasks:

    - name: "10. PARSE LLDP NEIGHBORS WITH TTP"
      ansible.netcommon.cli_parse:
        command: "show lldp neighbors"
        parser:
          name: ansible.netcommon.ttp
        set_fact: lldp

    - name: DEBUG
      debug:
        msg: "{{ lldp }}"

The above playbook is referencing the template at the following relative location: “templates/ios_show_lldp_neighbors.ttp”. The templates directory contains the template starting with the ansible_network_os followed by the command.

Parsed Output:

ok: [R1] => {
    "msg": [
        [
            {
                "LLDP_NEIGHBORS": [
                    {
                        "CAPABILITY": "R",
                        "DEVICE_ID": "R3.admin-save.com",
                        "HOLD_TIME": "120",
                        "LOCAL_INT": "Gi0/1",
                        "PORT_ID": "Gi0/0"
                    },
                    {
                        "CAPABILITY": "R",
                        "DEVICE_ID": "R2.admin-save.com",
                        "HOLD_TIME": "120",
                        "LOCAL_INT": "Gi0/0",
                        "PORT_ID": "Gi0/0"
                    }
                ],
                "TOTAL_ENTRIES": {
                    "COUNT": "2"
                }
            }
        ]

Finally, one thing to keep in mind is the several nested lists that were produced. It’s as simple as ensuring you are accessing the correct list when evaluating the results.

Example Ansible debug task:

- name: DEBUG
  debug:
    msg: "{{ lldp[0][0]['TOTAL_ENTRIES'] }}"

Output:

TASK [DEBUG] *******************************************************************
ok: [R1] => {
    "msg": {
        "COUNT": "2"
    }
}

Conclusion

Although we have barely scratched the surface, you can see that TTP offers many great features. I find it to be very accommodating when parsing full hierarchical running configuration outputs, more so than other available parsers. The library is constantly evolving and implementing new features. Take a second to join the Slack channel to keep up with development and ask any questions you may have!

-Hugo


ntc img
ntc img

Contact Us to Learn More

Share details about yourself & someone from our team will reach out to you ASAP!

Parsing Strategies – Ansible Native Parser

Blog Detail

Thank you for joining me for Part 4 of the parsing strategies blog series. This post will dive deeper into using Ansible’s Native Parser and the parse_cli filter plug-in. Each method requires a different templates to be created. Both defined in YAML, but they provide different outputs.

Ansible seems to have changed course as I was going to cover the Ansible network engine role that has a built-in parser, but it’s been superseded by the above parsers.

Let’s dive right in and take a look at what the show lldp neighbors parsers will look like, how they work, and how we need to modify our existing playbook to use the Ansible native parsers.

Ansible Native Parser Primer

Unlike the past two blog posts that covered NTC Templates and Cisco’s PyATS Genie library, Ansible’s native parsers do not provide any built-in templates or a library of existing templates to use to parse data. This can be a downside, as you will need to create your own. But it doesn’t require any external dependencies, which could be difficult to install in some environments.

The link in the first paragraph provides some great insight and examples on the available options when using the native parser. Our example is straightforward and doesn’t require any complex logic. The recommended way to use the parser is for it to create a dictionary with each key being an identifier and then the other data that’s captured being nested key/value pairs inside of the identifier key. You could use it to extrapolate a dictionary without any nesting depending on the output. But if you’re looking to capture multiple entries, it’s best to follow the nested key method.

Our template is stored within the templates/ folder and is named to use the built-in method for finding the templates. You can find more info in the corresponding article above, but as a refresher, it looks for the following in the templates/ folder, _.yaml.

❯ tree
.
├── ansible.cfg
├── filter_plugins
│   └── custom_filters.py
├── group_vars
│   ├── all
│   │   └── all.yml
│   └── ios.yml
├── host_vars
│   ├── iosv-0.yml
│   ├── iosv-1.yml
│   └── iosv-2.yml
├── inventory
├── pb.validate.neighbors.yml
└── templates
    └── ios_show_lldp_neighbors.yaml

6 directories, 12 files

As a refresher, let’s look at output from one of our routers for show lldp neighbors.

Capability codes:
    (R) Router, (B) Bridge, (T) Telephone, (C) DOCSIS Cable Device
    (W) WLAN Access Point, (P) Repeater, (S) Station, (O) Other

Device ID           Local Intf     Hold-time  Capability      Port ID
iosv-2              Gi0/1          120        R               Gi0/1
iosv-0              Gi0/0          120        R               Gi0/0

Total entries displayed: 2

Let’s take a look at the template.

---
- example: "iosv-2                  Gi0/1         120        R               Gi0/1"
  getval: '(?P<neighbor>\S+)\s+(?P<local_interface>\S+)\s+(?P<hold_time>\d+)\s+(?P<capabilities>\S+)?\s+(?P<neighbor_interface>\S+)'
  result:
    "{{ local_interface }}":
      neighbor: "{{ neighbor }}"
      capabilities: "{{ capabilities }}"
      hold_time: "{{ hold_time }}"
      neighbor_interface: "{{ neighbor_interface }}"

The neighbor keys, etc. are nested under ““. These templates can become complicated depending on your RegEx and the output. For example, if we were to change the hold_time to be \S+, this would capture the header in the output and capture incorrect data.

We can see that we provide an example of what the line we’re expecting to capture looks like. The getval is where we build out the RegEx using the named capture functionality. These named captures are then referenced within our result dictionary.

Our payload using the getval against the example would look like the following:

---
Fa0/13:
  neighbor: "S2"
  capabilities: "B"
  hold_time: 120
  neighbor_interface: "Gi0/13"

Due to the output being a dictionary, each additional entry will be a new top-level key with the structured data below. One thing to ensure, since this is a dictionary, is to select a top-level key that will be unique among all the output. If capabilities was used as the top-level key, there could be unintended consequences with data parsed being overwritten with newer data. For example, the output above would result in only one entry being returned.

Now that we understand how this parser works, we’ll move on to the parse_cli filter plug-in.

Ansible parse_cli Primer

Since there isn’t much flexibility for the data outputted from the Ansible native parser, we can create a parser that will prevent us from having to create a custom filter plug-in to manipulate the data to work with the assertion task. This template is also written in YAML.

Check out the parse_cli docs.

---
vars:
  lldp_neighbors:
    local_interface: "{{ item.local_interface }}"
    neighbor: "{{ item.neighbor }}"
    hold_time: "{{ item.hold_time }}"
    capabilities: "{{ item.capabilities }}"
    neighbor_interface: "{{ item.neighbor_interface }}"

keys:
  lldp_neighbors:
    value: "{{ lldp_neighbors }}"
    items: '^(?P<neighbor>\S+)\s+(?P<local_interface>\S+)\s+(?P<hold_time>\d+)\s+(?P<capabilities>\S+)?\s+(?P<neighbor_interface>\S+)'

The results of this template will provide the same output as we’d expect from the TextFSM template in part 2.

ok: [iosv-0] => changed=false 
  ansible_facts:
    parse_cli_lldp_neighbors:
      lldp_neighbors:
      - capabilities: R
        hold_time: 120
        local_interface: Gi0/0
        neighbor: iosv-1
        neighbor_interface: Gi0/0
      - capabilities: R
        hold_time: 120
        local_interface: Gi0/1
        neighbor: iosv-2
        neighbor_interface: Gi0/0

If we dissect the template a bit further, the top-level keys can be multiple key/value pairs, with the key(s) being returned by the filter. Under each key that is defined, must be value and items key/value pairs. The value will correlate to the key stored under the top-level vars key. This tells it how to structure the data once it has been parsed. The items value is the RegEx that is used to parse the unstructured data using the named capture that we covered above. This RegEx can be reused between both of these methods that we have covered in this blog post.

This method does provide additional ways to format the data, and we can actually update the template to have the same format as the Ansible native parser we discussed above.

---
vars:
  lldp_neighbors:
    key: "{{ item.local_interface }}"
    values:
      neighbor: "{{ item.neighbor }}"
      hold_time: "{{ item.hold_time }}"
      capabilities: "{{ item.capabilities }}"
      neighbor_interface: "{{ item.neighbor_interface }}"

keys:
  lldp_neighbors:
    value: "{{ lldp_neighbors }}"
    items: '^(?P<neighbor>\S+)\s+(?P<local_interface>\S+)\s+(?P<hold_time>\d+)\s+(?P<capabilities>\S+)?\s+(?P<neighbor_interface>\S+)'

And the output we receive:

ok: [iosv-1] => changed=false 
  ansible_facts:
    parse_cli_lldp_neighbors:
      lldp_neighbors:
        Gi0/0:
          capabilities: R
          hold_time: 120
          neighbor: iosv-0
          neighbor_interface: Gi0/0
        Gi0/1:
          capabilities: R
          hold_time: 120
          neighbor: iosv-2
          neighbor_interface: Gi0/1

.. warning:: Please remember that since this is a dictionary, select a top-level key that will unique among all the output. If capabilities was used as the top-level key, there could be unintended consequences with data parsed being overwritten with newer data. For example, the output above would result in only one entry being returned.

For more details, check out the documentation.

The Topology.. Again

Below is a picture of the lab topology we’re using to validate LLDP neighbors. It’s a simple topology with three Cisco IOS routers connected together and that have LLDP enabled.

Ansible Setup Updates

We’ve already covered most of the Ansible setup in Part 2, but we’ll explain the small changes we have to make to use the built-in Ansible parsers.

As a refresher, since there are no changes here, here is a look at a host var we’ve defined.

---
approved_neighbors:
  - local_intf: "Gi0/0"
    neighbor: "iosv-1"
  - local_intf: "Gi0/1"
    neighbor: "iosv-2"

Now let’s take a look at the changes in pb.validate.neighbors.yml.

---
- hosts: "ios"
  connection: "ansible.netcommon.network_cli"
  gather_facts: "no"
  vars:
    command: "show lldp neighbors"

  tasks:
    - name: "PARSE LLDP INFO INTO STRUCTURED DATA"
      ansible.netcommon.cli_parse:
        command: "{{ command }}"
        parser:
          name: "ansible.netcommon.native"
        set_fact: "lldp_neighbors"
      register: "lldp_output"

    - name: "PARSE DATA AND SET_FACT WITH PARSE_CLI FILTER PLUGIN"
      ansible.builtin.set_fact:
        parse_cli_lldp_neighbors: "{{ lldp_output['stdout'] | ansible.netcommon.parse_cli('templates/ios_show_lldp_neighbors_parse_cli.yaml') }}"

    - name: "MANIPULATE THE DATA TO BE IN STANDARD FORMAT"
      ansible.builtin.set_fact:
        lldp_neighbors: "{{ lldp_neighbors | convert_data_native }}"

    - name: "ASSERT THE CORRECT NEIGHBORS ARE SEEN VIA ANSIBLE NATIVE PARSER"
      ansible.builtin.assert:
        that:
          - "lldp_neighbors | selectattr('local_interface', 'equalto', item.local_intf) | map(attribute='neighbor') | first == item.neighbor"
          - "parse_cli_lldp_neighbors['lldp_neighbors'] | selectattr('local_interface', 'equalto', item.local_intf) | map(attribute='neighbor') | first == item.neighbor"
      loop: "{{ approved_neighbors }}"

There are a few things to dissect with the playbook. First, we changed the parser to ansible.netcommon.native. We also added a few tasks to show both the ansible.netcommon.native parser and the ansible.netcommon.parse_cli filter plug-in. Despite using both methods, we’re able to validate that both methods should result in our assertions passing.

Playbook Output

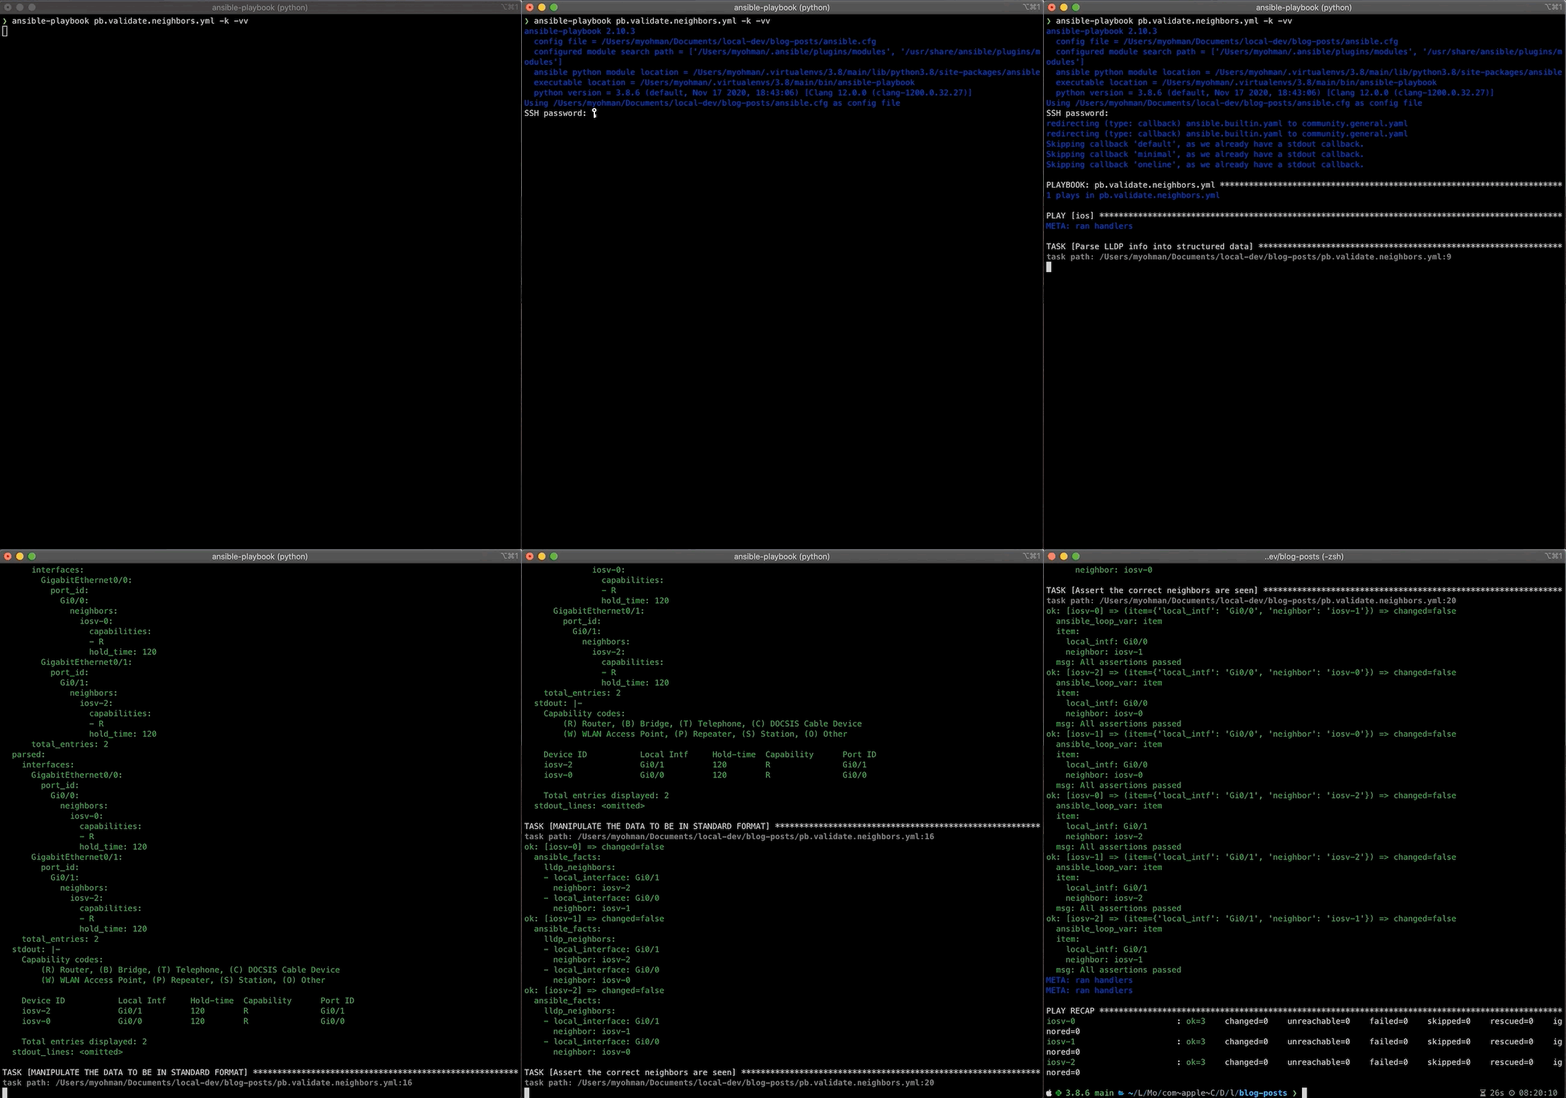
Let’s go ahead and run the playbook and see what output we get.

❯ ansible-playbook pb.validate.neighbors.yml -k -vv
ansible-playbook 2.10.5
  config file = /Users/myohman/Documents/local-dev/blog-posts/ansible.cfg
  configured module search path = ['/Users/myohman/.ansible/plugins/modules', '/usr/share/ansible/plugins/modules']
  ansible python module location = /Users/myohman/.virtualenvs/main3.8/lib/python3.8/site-packages/ansible
  executable location = /Users/myohman/.virtualenvs/main3.8/bin/ansible-playbook
  python version = 3.8.6 (default, Nov 17 2020, 18:43:06) [Clang 12.0.0 (clang-1200.0.32.27)]
Using /Users/myohman/Documents/local-dev/blog-posts/ansible.cfg as config file
SSH password: 
redirecting (type: callback) ansible.builtin.yaml to community.general.yaml
Skipping callback 'default', as we already have a stdout callback.
Skipping callback 'minimal', as we already have a stdout callback.
Skipping callback 'oneline', as we already have a stdout callback.

PLAYBOOK: pb.validate.neighbors.yml ********************************************************************************************************************************************************************************
1 plays in pb.validate.neighbors.yml

PLAY [ios] *********************************************************************************************************************************************************************************************************
META: ran handlers

TASK [Parse LLDP info into structured data] ************************************************************************************************************************************************************************
task path: /Users/myohman/Documents/local-dev/blog-posts/pb.validate.neighbors.yml:9
ok: [iosv-2] => changed=false 
  ansible_facts:
    lldp_neighbors:
      Gi0/0:
        capabilities: R
        hold_time: 120
        neighbor: iosv-0
        neighbor_interface: Gi0/1
      Gi0/1:
        capabilities: R
        hold_time: 120
        neighbor: iosv-1
        neighbor_interface: Gi0/1
  parsed:
    Gi0/0:
      capabilities: R
      hold_time: 120
      neighbor: iosv-0
      neighbor_interface: Gi0/1
    Gi0/1:
      capabilities: R
      hold_time: 120
      neighbor: iosv-1
      neighbor_interface: Gi0/1
  stdout: |-
    Capability codes:
        (R) Router, (B) Bridge, (T) Telephone, (C) DOCSIS Cable Device
        (W) WLAN Access Point, (P) Repeater, (S) Station, (O) Other
  
    Device ID           Local Intf     Hold-time  Capability      Port ID
    iosv-1              Gi0/1          120        R               Gi0/1
    iosv-0              Gi0/0          120        R               Gi0/1
  
    Total entries displayed: 2
  stdout_lines: <omitted>
ok: [iosv-0] => changed=false 
  ansible_facts:
    lldp_neighbors:
      Gi0/0:
        capabilities: R
        hold_time: 120
        neighbor: iosv-1
        neighbor_interface: Gi0/0
      Gi0/1:
        capabilities: R
        hold_time: 120
        neighbor: iosv-2
        neighbor_interface: Gi0/0
  parsed:
    Gi0/0:
      capabilities: R
      hold_time: 120
      neighbor: iosv-1
      neighbor_interface: Gi0/0
    Gi0/1:
      capabilities: R
      hold_time: 120
      neighbor: iosv-2
      neighbor_interface: Gi0/0
  stdout: |-
    Capability codes:
        (R) Router, (B) Bridge, (T) Telephone, (C) DOCSIS Cable Device
        (W) WLAN Access Point, (P) Repeater, (S) Station, (O) Other
  
    Device ID           Local Intf     Hold-time  Capability      Port ID
    iosv-1              Gi0/0          120        R               Gi0/0
    iosv-2              Gi0/1          120        R               Gi0/0
  
    Total entries displayed: 2
  stdout_lines: <omitted>
ok: [iosv-1] => changed=false 
  ansible_facts:
    lldp_neighbors:
      Gi0/0:
        capabilities: R
        hold_time: 120
        neighbor: iosv-0
        neighbor_interface: Gi0/0
      Gi0/1:
        capabilities: R
        hold_time: 120
        neighbor: iosv-2
        neighbor_interface: Gi0/1
  parsed:
    Gi0/0:
      capabilities: R
      hold_time: 120
      neighbor: iosv-0
      neighbor_interface: Gi0/0
    Gi0/1:
      capabilities: R
      hold_time: 120
      neighbor: iosv-2
      neighbor_interface: Gi0/1
  stdout: |-
    Capability codes:
        (R) Router, (B) Bridge, (T) Telephone, (C) DOCSIS Cable Device
        (W) WLAN Access Point, (P) Repeater, (S) Station, (O) Other
  
    Device ID           Local Intf     Hold-time  Capability      Port ID
    iosv-2              Gi0/1          120        R               Gi0/1
    iosv-0              Gi0/0          120        R               Gi0/0
  
    Total entries displayed: 2
  stdout_lines: <omitted>

TASK [PARSE DATA AND SET_FACT WITH PARSE_CLI FILTER PLUGIN] ********************************************************************************************************************************************************
task path: /Users/myohman/Documents/local-dev/blog-posts/pb.validate.neighbors.yml:17
ok: [iosv-0] => changed=false 
  ansible_facts:
    parse_cli_lldp_neighbors:
      lldp_neighbors:
      - capabilities: R
        hold_time: 120
        local_interface: Gi0/0
        neighbor: iosv-1
        neighbor_interface: Gi0/0
      - capabilities: R
        hold_time: 120
        local_interface: Gi0/1
        neighbor: iosv-2
        neighbor_interface: Gi0/0
ok: [iosv-1] => changed=false 
  ansible_facts:
    parse_cli_lldp_neighbors:
      lldp_neighbors:
      - capabilities: R
        hold_time: 120
        local_interface: Gi0/1
        neighbor: iosv-2
        neighbor_interface: Gi0/1
      - capabilities: R
        hold_time: 120
        local_interface: Gi0/0
        neighbor: iosv-0
        neighbor_interface: Gi0/0
ok: [iosv-2] => changed=false 
  ansible_facts:
    parse_cli_lldp_neighbors:
      lldp_neighbors:
      - capabilities: R
        hold_time: 120
        local_interface: Gi0/1
        neighbor: iosv-1
        neighbor_interface: Gi0/1
      - capabilities: R
        hold_time: 120
        local_interface: Gi0/0
        neighbor: iosv-0
        neighbor_interface: Gi0/1

TASK [MANIPULATE THE DATA TO BE IN STANDARD FORMAT] ****************************************************************************************************************************************************************
task path: /Users/myohman/Documents/local-dev/blog-posts/pb.validate.neighbors.yml:21
ok: [iosv-0] => changed=false 
  ansible_facts:
    lldp_neighbors:
    - capabilities: R
      hold_time: 120
      local_interface: Gi0/0
      neighbor: iosv-1
      neighbor_interface: Gi0/0
    - capabilities: R
      hold_time: 120
      local_interface: Gi0/1
      neighbor: iosv-2
      neighbor_interface: Gi0/0
ok: [iosv-1] => changed=false 
  ansible_facts:
    lldp_neighbors:
    - capabilities: R
      hold_time: 120
      local_interface: Gi0/1
      neighbor: iosv-2
      neighbor_interface: Gi0/1
    - capabilities: R
      hold_time: 120
      local_interface: Gi0/0
      neighbor: iosv-0
      neighbor_interface: Gi0/0
ok: [iosv-2] => changed=false 
  ansible_facts:
    lldp_neighbors:
    - capabilities: R
      hold_time: 120
      local_interface: Gi0/1
      neighbor: iosv-1
      neighbor_interface: Gi0/1
    - capabilities: R
      hold_time: 120
      local_interface: Gi0/0
      neighbor: iosv-0
      neighbor_interface: Gi0/1

TASK [Assert the correct neighbors are seen via Ansible Native Parser] *********************************************************************************************************************************************
task path: /Users/myohman/Documents/local-dev/blog-posts/pb.validate.neighbors.yml:25
ok: [iosv-0] => (item={'local_intf': 'Gi0/0', 'neighbor': 'iosv-1'}) => changed=false 
  ansible_loop_var: item
  item:
    local_intf: Gi0/0
    neighbor: iosv-1
  msg: All assertions passed
ok: [iosv-1] => (item={'local_intf': 'Gi0/0', 'neighbor': 'iosv-0'}) => changed=false 
  ansible_loop_var: item
  item:
    local_intf: Gi0/0
    neighbor: iosv-0
  msg: All assertions passed
ok: [iosv-0] => (item={'local_intf': 'Gi0/1', 'neighbor': 'iosv-2'}) => changed=false 
  ansible_loop_var: item
  item:
    local_intf: Gi0/1
    neighbor: iosv-2
  msg: All assertions passed
ok: [iosv-1] => (item={'local_intf': 'Gi0/1', 'neighbor': 'iosv-2'}) => changed=false 
  ansible_loop_var: item
  item:
    local_intf: Gi0/1
    neighbor: iosv-2
  msg: All assertions passed
ok: [iosv-2] => (item={'local_intf': 'Gi0/0', 'neighbor': 'iosv-0'}) => changed=false 
  ansible_loop_var: item
  item:
    local_intf: Gi0/0
    neighbor: iosv-0
  msg: All assertions passed
ok: [iosv-2] => (item={'local_intf': 'Gi0/1', 'neighbor': 'iosv-1'}) => changed=false 
  ansible_loop_var: item
  item:
    local_intf: Gi0/1
    neighbor: iosv-1
  msg: All assertions passed
META: ran handlers
META: ran handlers

PLAY RECAP *********************************************************************************************************************************************************************************************************
iosv-0                     : ok=4    changed=0    unreachable=0    failed=0    skipped=0    rescued=0    ignored=0   
iosv-1                     : ok=4    changed=0    unreachable=0    failed=0    skipped=0    rescued=0    ignored=0   
iosv-2                     : ok=4    changed=0    unreachable=0    failed=0    skipped=0    rescued=0    ignored=0

If we take a closer look at the output of the first task, we can see under the parsed key as well as setting the fact (lldp_neighbors), that we have our structured data from running the raw output through Ansible native parser as well as a subsequent task using the parse_cli filter plug-in.

We can see from the output, both methods have resulted in our assertions passing.


Conclusion

We went through two of the built-in parsers that Ansible provides and how we can use each of them to parse the data into desired formats to assert on. They both offer different pros and cons. If we use the built-in ansible.netcommon.parse_cli, it fetches the data for us, and then parses it with the template provided by us. This can be desirable rather than having to use the correct *_command module, and then pass the output into the ansible.netcommon.parse_cli filter plug-in. The downside to the coupled approach is that it can be difficult to manipulate the original unstructured data in later tasks and may require fetching the data from the device again.

We could have looked into setting gather_facts to yes at the play level and then using the ansible_net_neighbors facts that provides the CDP/LLDP output as structured data as well.

Below is the output of tree after all the changes discussed above.

❯ tree
.
├── ansible.cfg
├── filter_plugins
│   └── custom_filters.py
├── group_vars
│   ├── all
│   │   └── all.yml
│   └── ios.yml
├── host_vars
│   ├── iosv-0.yml
│   ├── iosv-1.yml
│   └── iosv-2.yml
├── inventory
├── pb.validate.neighbors.yml
└── templates
    ├── ios_show_lldp_neighbors.yaml
    └── ios_show_lldp_neighbors_parse_cli.yaml

Finally the updated contents of the custom_filters.py.

# -*- coding: utf-8 -*-

# GNU General Public License v3.0+ (see COPYING or https://www.gnu.org/licenses/gpl-3.0.txt)

from __future__ import absolute_import, division, print_function
__metaclass__ = type


import re

def convert_genie_data(data):

    intfs = []
    for k, v in data['interfaces'].items():
        intf_name = "Gi" + re.search(r'\d/\d', k).group(0)
        intf_dict = {}
        intf_dict['local_interface'] = intf_name
        neighbor_intf = list(v['port_id'].keys())[0]
        intf_dict['neighbor'] = list(v['port_id'][neighbor_intf]['neighbors'].keys())[0]
        intfs.append(intf_dict)

    return intfs

def convert_native_data(data):

    intfs = []
    for intf in data:
        temp_dict = {"local_interface": intf}
        temp_dict.update(data[intf])
        intfs.append(temp_dict)

    return intfs


class FilterModule:
    def filters(self):
        filters = {
            'convert_data': convert_genie_data,
            'convert_data_native': convert_native_data,
        }
        return filters

I hope you enjoyed this blog post and gained a clearer picture of the available built-in parsers provided by Ansible. The next post in this series will go over building our own custom filter plug-in to parse the data.

-Mikhail


ntc img
ntc img

Contact Us to Learn More

Share details about yourself & someone from our team will reach out to you ASAP!