Nautobot ChatOps Adds Support for Socket Mode in Slack

Blog Detail

The Nautobot ChatOps plugin just recently received a new feature for Slack that has been requested for a long time. If you are using Nautobot ChatOps plugin v1.10.0 or greater with Slack, you now have the ability to use Slack’s socket mode for connecting compared to their traditional webhook method!

In this blog post, we will dive into what exactly this means, how you can leverage socket mode, and why you may want to use it over the current method of connecting. Let’s dive in!

How Does ChatOps Connect Today?

Nautobot ChatOps today currently supports four major platforms: Slack, Microsoft Teams, Webex, and Mattermost. All four of these platforms support incoming webhooks, so this is the default setup method for them.

Let’s take a look at how this traffic flow currently works using this diagram from the official documentation page.
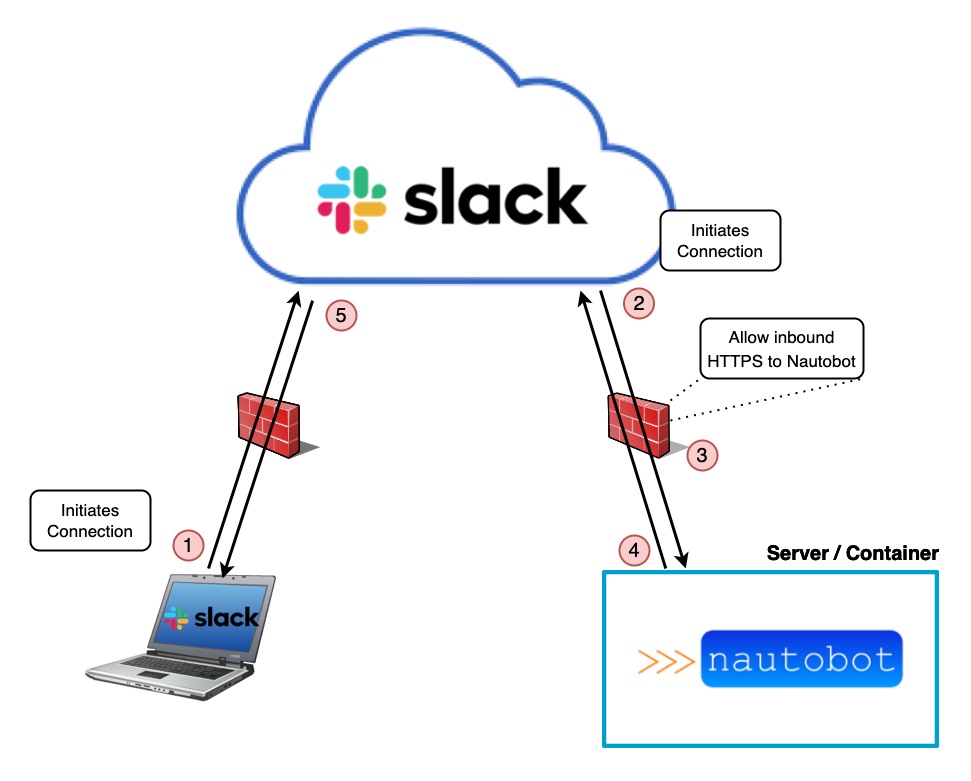
  1. When a user sends a message to the bot via the client application (phone or desktop app), the connection is initiated from the client, and the message gets sent to Slack’s cloud servers.
  2. The Slack servers then initiate a connection to the ChatOps plugin running on the Nautobot server/container.
  3. Since this is a new incoming connection, it must be port forwarded and allowed through any firewalls in your network between the internet and your Nautobot server.
  4. Since your externally facing firewall is stateful, Nautobot then replies back to Slack using the established TCP session.
  5. Slack then returns the response to the client.

The important step to notice here is step 3. In order for Slack’s web services to communicate to Nautobot with the request originating from the user/client, traffic must be explicitly allowed inbound. Normally this wouldn’t be much of an issue on a firewall. However, the issue is made more complicated for three reasons:

  1. A port must be opened and forwarded from the public internet to your Nautobot appliciation.
  2. It is not viable to simply white-list Slack’s IP addresses as the API requests originate from within AWS, so the IP ranges are quite extensive and will encompass other services on AWS besides Slack (aka the rest of the internet).
  3. Slack requires a valid Third-Party SSL Certificate before it will make the connection.

There are a few ways to secure inbound ChatOps access from Slack, such as adding verification that the webhook is legitimate, using an externally facing API Gateway, etc. One example Nautobot currently uses is verifying all inbound requests from Slack using a signed secret.

While we won’t get into all of them here, you can read about some of them in Slack’s documentation “Best practices for security”.

In the end, this still requires enabling inbound access from the public internet to your internal Nautobot instance, which tends to make InfoSec a little nervous.

Introducing socket mode.

What Is Socket Mode?

Socket mode allows traffic to no longer originate from Slack on the public internet, but instead from internally going out.
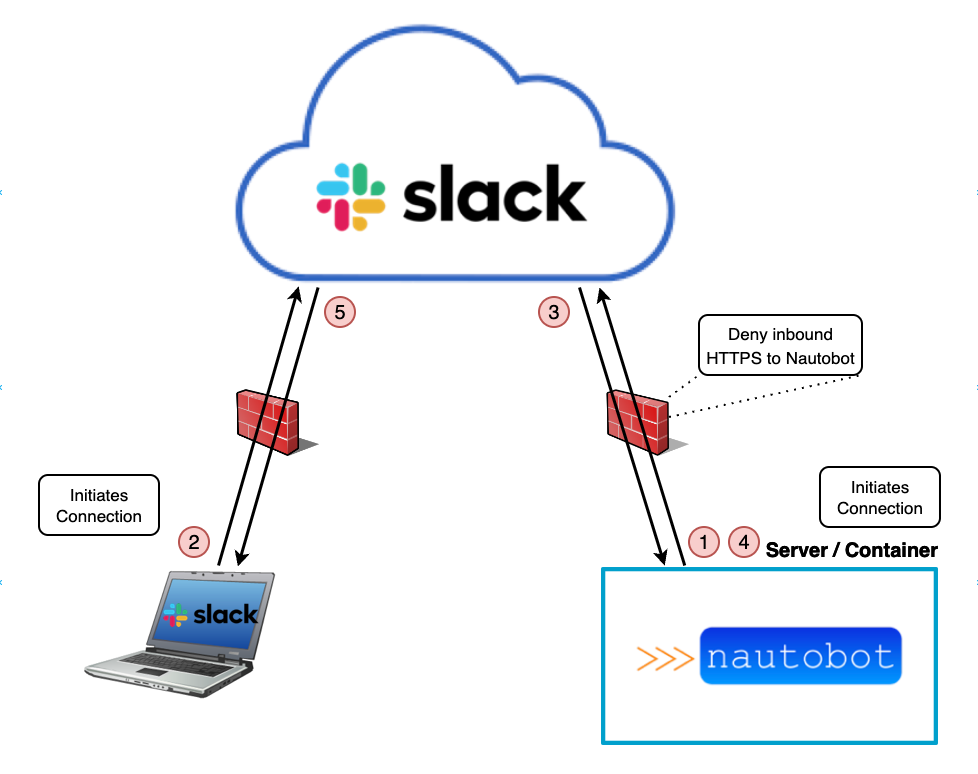
  1. The Nautobot server initiates and maintains a connection to the Slack cloud servers. Because the traffic originates from inside the network, externally facing firewalls do not need to allow inbound traffic from Slack to the Nautobot server. They only need to allow traffic outbound from the Nautobot server to Slack on the internet. This connection remains open through this entire process.
  2. A user will send a message via their desktop/mobile Slack client to the Nautobot ChatOps bot.
  3. Slack forwards the message to Nautobot over the existing WebSocket connection.
  4. Nautobot then replies over the existing WebSocket connection to Slack.
  5. Slack forwards the response to the client.

This reduces the externally facing Nautobot footprint out to the internet and does not require opening specific inbound access to Nautobot from the internet just to get ChatOps working.

Additionally, once Nautobot establishes a connection to Slack it keeps the connection active, eliminating the need to reestablish a new connection each time (as with webhooks).

Should I Use Socket Mode?

Either setup option works for Nautobot ChatOps with Slack. However, with the number of customers we’ve worked with at NTC that express concern over exposing Nautobot to the public internet and do not have an API gateway they can leverage to lock down inbound access, we expect to see many users prefer to use socket mode for security and compliance reasons.

If you currently have Nautobot ChatOps working with Slack, there is no real need to move over to socket mode. However, if you are setting it up new for the first time and your InfoSec team has concerns with enabling inbound access, socket mode may work better for your situation.

Setup Instructions

Support for socket mode with Slack was added to Nautobot v1.10.0, so if you are on an older version you will need to upgrade your Nautobot ChatOps plugin first. Since this plugin acts independently from other Nautobot ChatOps extensions (e.g., Meraki ChatOpsAnsible ChatOps, etc.), configuring this base plugin for socket mode will enable these other plugin extensions to leverage it as well without needing to specifically upgrade them (provided no other dependency conflicts exist).

Instructions for setting up Nautobot ChatOps for Slack can be found here. Note that the Nautobot application requires an additional management command to be run at startup time, nautobot-server start_slack_socket, which can be added as a systemd service so it automatically runs each time the app is restarted. Details can be found in section “Startup Slack Sockets”.

There is also an additional credential slack_app_token needing to be added to the Nautobot ChatOps plugin config section in nautobot_config.py. Details for this are found in section “Post App-Creation Steps” in the install docs as well.

Note: While socket mode support is only added to the Slack platform so far, we are working on adding in support for socket mode with the other providers (where supported) in the future.


Conclusion

I hope you enjoyed learning about our new support for socket mode with Slack. If you try it out, let me know what you think of it using the comment section below. Or feel free to submit a feature request, bug report, or even a code contribution via PR in our Nautobot ChatOps plugin public repo on GitHub.


Thanks for reading, and happy automating!

-Matt


ntc img
ntc img

Contact Us to Learn More

Share details about yourself & someone from our team will reach out to you ASAP!

Palo Alto Panorama ChatOps with Nautobot

Blog Detail

Here at Network to Code, we are continually developing new ChatOps integrations for the underlying Nautobot ChatOps Framework. We have recently released a new ChatOps integration for Palo Alto Panorama systems. This ChatOps application is used to interact with the Palo Alto Panorama system and comes prepackaged with various chat commands. You can now get specific information or run advanced ACL checks on Panorama using your existing ChatOps service including Slack, Team, Webex, and Mattermost.

For installation steps, refer to its README. To install the underlying Nautobot ChatOps framework, refer to the documentation found here.

Commands

The Nautobot ChatOps Panorama app extends the capabilities of the Nautobot ChatOps framework adding a new chat command: /panorama. As of version 1.1.0, (the current version as of this writing), there are seven commands available to use. They are:

  • capture-traffic
  • export-device-rules
  • get-device-rules
  • get-version
  • install-software
  • upload-software
  • validate-rule-exists
Commands

Capture Traffic

The capture-traffic subcommand will prompt the user to choose the interesting traffic that needs to be captured and the device name and interface to run the capture on. It will then gather the necessary information from Panorama and run the capture directly on the firewall. Then it will export the packet capture directly to the user via the ChatOps client as a .pcap file capable of being opened in Wireshark.

This is by far my favorite command available, as I’ve spent way too long trying to set up packet captures on firewalls over the years! One caveat to this command is that in order to use it Nautobot requires access to both Panorama and the management IP address of the Palo Alto device it’s running a capture on.

Export Device Rules

The export-device-rules subcommand will prompt the user to select a Palo Alto firewall, then generate a list of firewall rules on it and output it in chat in a CSV format.

Get Device Rules

The get-device-rules subcommand is similar to the previous command, in that it will prompt the user to select a Palo Alto firewall, then generate a list of firewall rules on it and output them to the chat client in an easy-to-read format.

Get Version

The get-version subcommand is one of the simplest commands available. It will simply return the current version of the Panorama system configured. It does not require any additional input or device selection.

Install Software

The install-software subcommand allows you to install a new OS version on a Palo Alto firewall that has been previously uploaded to it. As with any commands that make changes to a device, we recommend testing this on a lab or other non-production system first!

Upload Software

The upload-software subcommand allows you to upload a specific PanOS version to a Palo Alto firewall. This can be used prior to running the install-software command mentioned above.

Validate Rule Exists

The validate-rule-exists subcommand is another one of my favorites. It prompts the user to select a firewall device, as well as source and destination traffic information to check. It will then check the firewall rules to see whether there is a matching rule for this traffic. If found, it will return the results to the user. This can be very handy to quickly see whether a new rule being requested is already in place, helping prevent duplicate rule creations


Conclusion

These commands handle only a subset of the information that can be gathered by the Panorama chatbot. You can contribute more commands with minimal Python code! Because the Nautobot ChatOps plugin lowers the barrier of entry by already handling the interaction between Nautobot and chat applications like Mattermost, Microsoft Teams, Slack, and Webex, creating new commands is extremely easy. We encourage you to create your own commands by building on top of existing commands and plugins that we at NTC have created—or even create your own command to interact with something you use on a daily basis.

We also encourage, in the GitHub repo for the app, any feedback, feature requests, or reports of bugs you may find.

-Matt


ntc img
ntc img

Contact Us to Learn More

Share details about yourself & someone from our team will reach out to you ASAP!

Nautobot ChatOps for Grafana

Blog Detail

Two of the more intriguing topics I have heard lately that also seems to resonates with network engineers and network professionals is the insight telemetry provides, and the ease of use chat platforms such as Slack and Microsoft Teams deliver to your keyboard and fingertips. The Grafana ChatOps application is designed to provide the best of both worlds. Grafana ChatOps is a Nautobot extension used with the Nautobot ChatOps base framework to provide all the operational graphs provided by Grafana delivered via chat clients.

Today, we will walk through some of the features within the Grafana ChatOps integration, as well as some of the requirements and procedures to get up and running with Grafana ChatOps.

An important note on the architecture design choices with this ChatOps app (plugin) is that chat commands are defined dynamically based on the Grafana panels and dashboards (we’ll go into this a little later). When you launch the app for the first time, you will see that no chat commands have been defined yet. You can define commands automatically or manually and tie them to specific Grafana panels within a dashboard.

Installation

The package for the Grafana ChatOps app is available on PyPI and can be installed using pip.

Prior to installing the Nautobot Grafana Plugin, you should have the following installed:

For the full installation guide, please refer to the Grafana ChatOps repo Install Guide.

Usage

Building Grafana ChatOps commands can be done using a manual or automated approach. The automated approach uses the DiffSync library to synchronize Grafana dashboards, panels, and variables with the Nautobot Grafana ChatOps plugin.

Defining Commands

To define a command within the Grafana plugin for use with your chat client, there are two main components that we need to have populated.

  • Define at least one Grafana Dashboard.
  • Define at least one Grafana Panel within the Dashboard.

This tutorial will take you through the steps noted above to get a chat command exposed in your chat client.

The first step is to define a dashboard so that the Grafana plugin is aware of the dashboard that exists within Grafana. You can define a dashboard in Grafana in two ways: defining a dashboard manually or using the “Sync” feature to synchronize your Grafana dashboards automatically.

Defining a Dashboard Manually

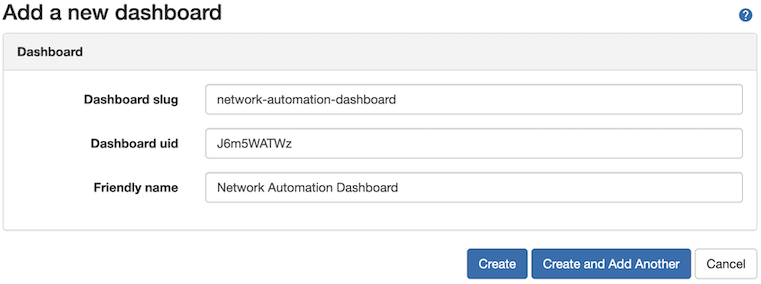
To define a dashboard manually, you can go to Plugins > Dashboards and click the + Add button located in the upper right of the screen. In the form for a new dashboard, you need to define the sluguid, and Friendly Name.

New Dashboard

NOTE: You can find the slug and uid info by navigating to your Grafana instance and going to the desired dashboard, 

New Dashboard

Defining a Dashboard Using the Sync Method

Alternatively, you can define a set of dashboards by synchronizing your Grafana dashboard configuration to the Grafana plugin. To synchronize dashboards, within Nautobot, navigate to Plugins > Dashboards and click the Sync button.

This process will utilize the DiffSync library to synchronize, create, update, and delete dashboards in Nautobot with the Dashboards that are defined in the Grafana application. Once complete, you will see all dashboards imported into Nautobot.

Defining Grafana Panels

The second step to defining Grafana commands in Nautobot for your chat client is to define the panels you wish to expose via chat.

Panels are closely associated to chat commands, where there will be a chat command for each panel defined.

Similar to dashboards, you can define panels in two ways within Nautobot.

Defining a Panel Manually

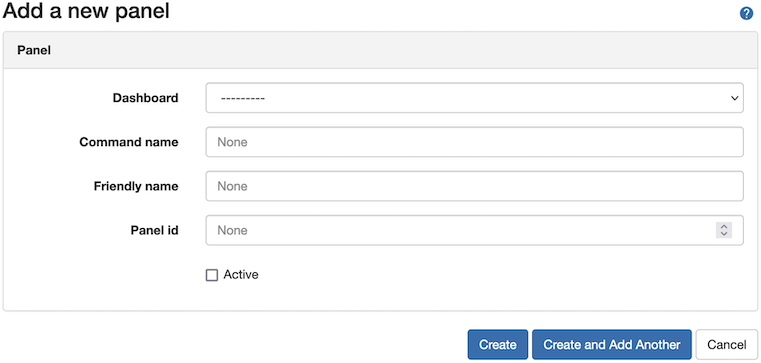
To define a panel manually, go to Plugins > Panels and click the + Add button located in the upper right of the screen. In the modal for a new panel, you need to select the dashboard that the panel is defined under, then add a command name, along with a friendly name, and define the Panel ID.

The Active checkbox will allow the command to show up in your chat client. If the panel is marked as inactive, it will still be defined in Nautobot, but restricted from being shown in the chat client.

new panel

NOTE: You can find the panel id by navigating to your desired panel, selecting View, then looking at the URL. 

New Panel

Defining Panels Using the Sync Method

Alternatively, you can define a set of panels by synchronizing your Grafana panels configuration for a given dashboard to the Grafana plugin. To synchronize panels for a dashboard, within Nautobot, navigate to Plugins > Panels and click the Sync button.

This process will utilize the DiffSync library to synchronize, create, update, and delete panels in Nautobot with the Dashboard Panels that are defined in the Grafana application. Once complete, you will see all panels for a dashboard imported into Nautobot.

Panels are synchronized on a per-dashboard basis. All panels synchronized will be INACTIVE by default, you will need to set them to active to see them in Chat.

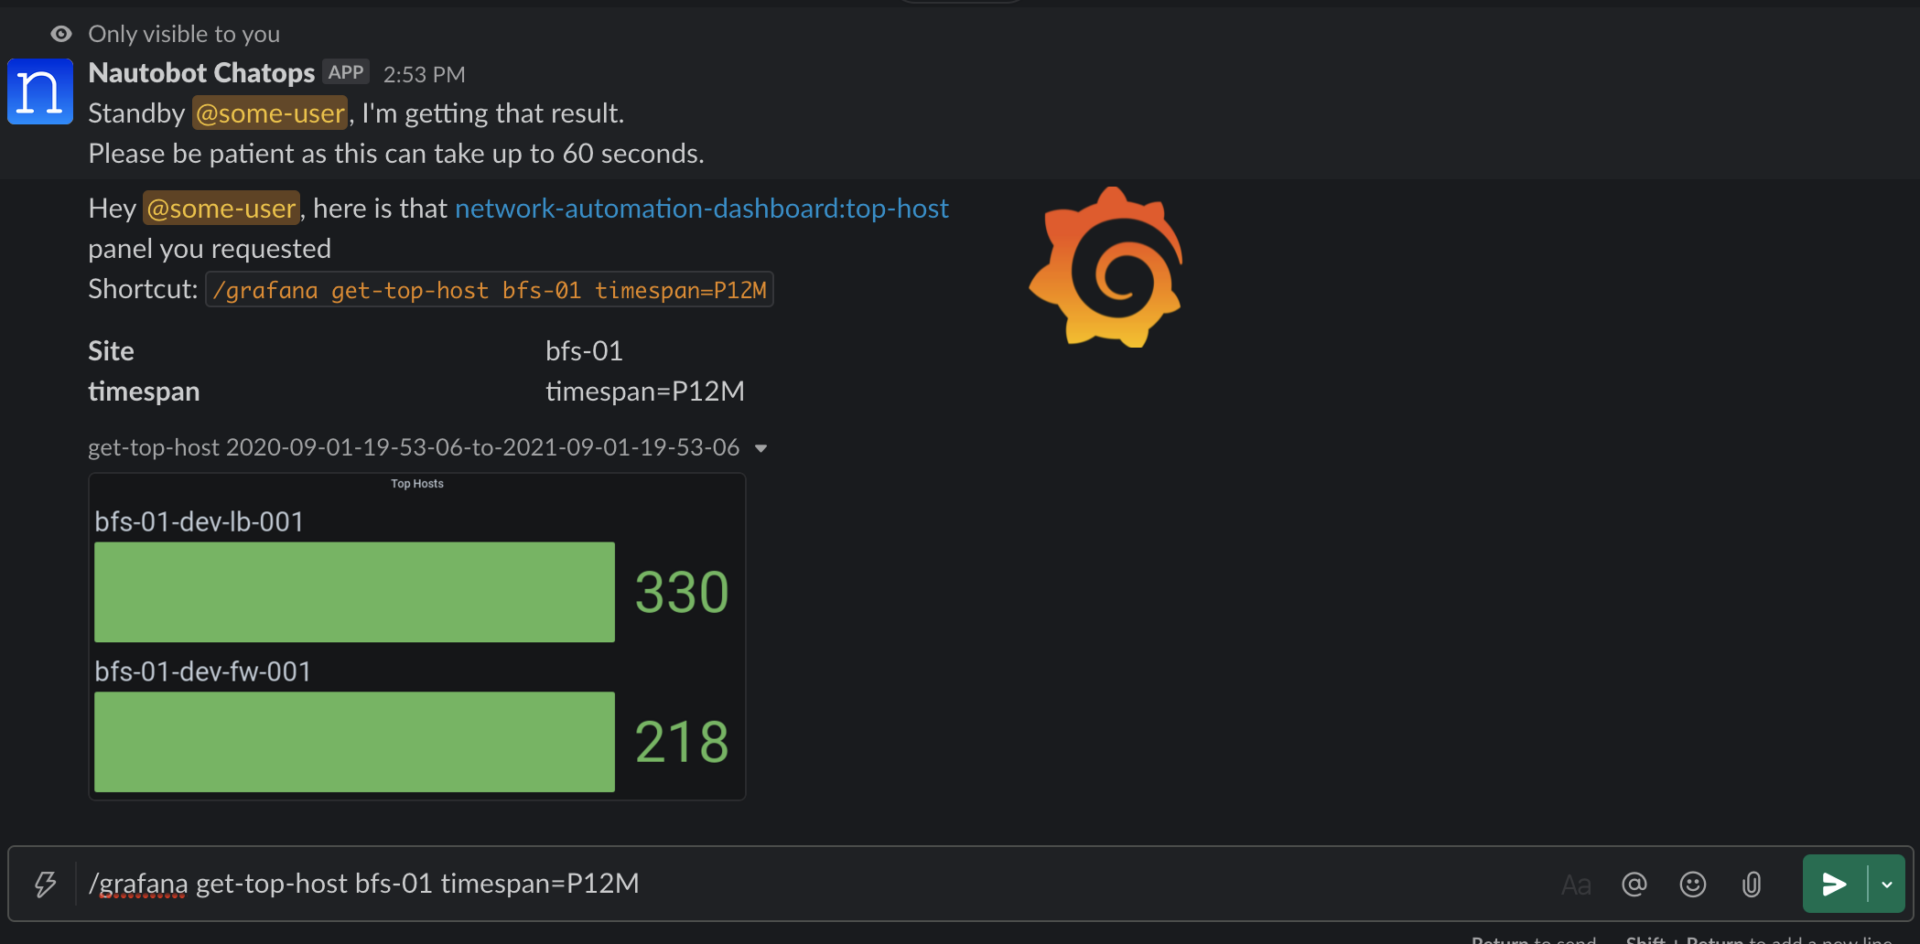
Once your dashboard and panels have been defined, and you activate the panels you wish to expose to the chat client, you will be able to see the available chat commands, as well as run commands to generate your panels. Chat Example

Advanced Usage

Additional functionality can be added to the Grafana ChatOps plugin if you have variables defined on your dashboards. Panel variables can also be imported via the “Sync” functionality and associated with a panel. Then you can go in and customize how the variables behave and even enrich the ChatOps experience using Nautobot as a Source of Truth for your variables!

To read more on the advanced usage of the Grafana ChatOps plugin with panel variables, refer to the Advanced Usage Guide in the repository.


Conclusion

ChatOps has given a conduit to retrieve and respond interactively using a platform that is already in place and used for communication across almost any device, while Grafana has provided a feature-rich observability platform. With the Nautobot Grafana integration, we can now have the best of both worlds. Let us know how you’re using the Grafana ChatOps or if you have any questions or issues in the GitHub repo.

-Josh Silvas


ntc img
ntc img

Contact Us to Learn More

Share details about yourself & someone from our team will reach out to you ASAP!