Upgrade Your Python Project With Poetry

Blog Detail

Dependency management and virtual environments are integral to the Python ecosystem, yet the primary tools in use today are far from ideal. Some of the primary methods are:

  • Dependencies management: pip by way of requirements.txt is still the de facto solution for most of us. While this approach has worked in the past, there are limitations when it comes to guaranteeing that the same project will be consistently installed.
  • Virtual environments: a common setup is to use virtualenv to create your virtual environment and manually activate it using source <path to venv>/activate. While this approach works, it requires the user to know which venv needs to be activated for each project and the command to execute can be lengthy.
  • Code packaging: (only applicable if you need to share your code), it is common to use setuptools in a setup.py file, but this solution also has some shortcomings.

If you are using any or all of the methods described above, you should take a look at Poetry to help you manage your Python project(s). Poetry’s goal is to simplify the management of Python packaging and dependencies. Amongst other things, Poetry can help:

  • Manage your dependencies by replacing requirements.txt
  • Manage your virtualenv by simplifying the creation and activation of a virtualenv for your project
  • Manage your Python package by replacing setup.py
  • Publish your application to PyPi
  • Turn Python functions into command line programs
  • Ensure package integrity

It sounds like magic and too good to be true, but there is really nothing magical happening here. Poetry is just a modern tool implementing the best practices from Python and other tools to manage a project properly. Poetry is leveraging 2 main files:

  • pyproject.toml: As the main configuration file for your Python project, this file can be edited manually and Poetry also helps to manage the file. The pyproject.toml file is not specific to Poetry and is meant to be the main configuration file for your Python project and all the tools surrounding it (Poetry, Black, etc.). It was introduced to the Python community in 2016 by PEP 518 to improve how to define Python packages, but its scope has increased year over year to become the default configuration file.
  • poetry.lock: A lock file managed by Poetry, this file should never be edited manually. With the poetry.lock file, Poetry brings a much-needed feature to Python dependencies management where we can separately maintain the list of primary dependencies, the list of development dependencies, and the exact version of the libraries that should be installed on a system. This feature is common on other languages but it has been used infrequently in Python’s setup.py or requirements.txt in the past. If you have ever generated your requirements.txt file with pip freeze > requirements.txt to ensure that you’ll always install the same version of your dependencies, you should be familiar with the problem the lock file solves. While pip freeze works most of the time, it’s not a great solution and it’s prone to version conflicts between projects, which may require manual intervention.

If you are interested in reading more about the story behind pyproject.toml, I recommend reading this blog from Brett Cannon.

Install Poetry

To install Poetry on Mac OS, Linux or Windows(bash) the recommended method is to use the below command on your system

curl -sSL https://raw.githubusercontent.com/python-poetry/poetry/master/get-poetry.py | python

For convenience, Poetry is also available via pip but it’s not the recommended method to install it. I usually reserve that for when I need to install it within a Docker container: pip install poetry.

Manage Python dependencies and virtual environment with Poetry

Below is a simple pyproject.toml file to keep track of the dependencies for a project named mypythonproject.
This file can either be generated manually or Poetry can help you to generate it with poetry init.

[tool.poetry]
name = "mypythonproject"
version = "0.1.0"
description = "My awesome Python project"
authors = ["NTC <info@networktocode.com>"]

[tool.poetry.dependencies]
python = "^3.6"
click = "^7.1.1"

Taking a closer look at the file, the first section [tool.poetry] contains information about the project itself and the second section [tool.poetry.dependencies] defines the list of dependencies for the project, including both the Python version and the list of external dependencies that would usually be in a requirements.txt file.

The pyproject.toml file should be at the root of your project (here it’s the only file in my directory). Poetry will automatically install all the dependencies with poetry install (this replaces for pip install -r requirements.txt, python setup.py install, pip install ., or pip install -e .)

➜  mypythonproject# ll
total 8
-rw-r--r--  1 damien  staff   203B May 13 09:17 pyproject.toml
➜  mypythonproject#
➜  mypythonproject# poetry install
The currently activated Python version 2.7.16 is not supported by the project (^3.6).
Trying to find and use a compatible version.
Using python3 (3.7.7)
Creating virtualenv mypythonproject-0zMZkBqq-py3.7 in /Users/damien/Library/Caches/pypoetry/virtualenvs
Updating dependencies
Resolving dependencies... (0.2s)

Writing lock file

Package operations: 1 install, 0 updates, 0 removals

  - Installing click (7.1.2)
➜  mypythonproject#

During the installation, Poetry automatically generates the poetry.lock file to track the exact version of the dependencies that have been install on my system. If the poetry.lock file was already present, it would have installed the exact version of click defined in the lock file, instead of trying to install the latest one from PyPi.

➜  mypythonproject# ll
total 16
-rw-r--r--  1 damien  staff   606B May 13 09:43 poetry.lock
-rw-r--r--  1 damien  staff   203B May 13 09:17 pyproject.toml

➜  mypythonproject# cat poetry.lock
[[package]]
category = "main"
description = "Composable command line interface toolkit"
name = "click"
optional = false
python-versions = ">=2.7, !=3.0.*, !=3.1.*, !=3.2.*, !=3.3.*, !=3.4.*"
version = "7.1.2"

[metadata]
content-hash = "1876b927e070ae12d1e9090f5ea6bcdd2bb35f09269fc2182bcb9399c5e1be2a"
python-versions = "^3.6"

[metadata.files]
click = [
    {file = "click-7.1.2-py2.py3-none-any.whl", hash = "sha256:dacca89f4bfadd5de3d7489b7c8a566eee0d3676333fbb50030263894c38c0dc"},
    {file = "click-7.1.2.tar.gz", hash = "sha256:d2b5255c7c6349bc1bd1e59e08cd12acbbd63ce649f2588755783aa94dfb6b1a"},
]

Both the pyproject.toml and the poetry.lock should be tracked in source control (git). Notice the hash values in the lock file, these values ensure the package installed locally is exactly the same as intended.

Also, during poetry install, Poetry created a new virtual environment for my project because it detected that no virtual environment was already associated with the project. Poetry is able to manage multiple environments per project and provides some commands to easily manage these virtual environments.

  • poetry env info to list the existing env
  • poetry shell to activate the default virtualenv (replaces source <path to venv>/activate, or workon <project> if you use virtualenvwrapper )
  • poetry run to run a command within the default virtual environment without activating it
➜  mypythonproject# poetry env info
 
Virtualenv
Python:         3.7.7
Implementation: CPython
Path:           /Users/damien/Library/Caches/pypoetry/virtualenvs/mypythonproject-0zMZkBqq-py3.7
Valid:          True

System
Platform: darwin
OS:       posix
Python:   /usr/local/Cellar/python/3.7.7/Frameworks/Python.framework/Versions/3.7

➜  mypythonproject# poetry shell
The currently activated Python version 2.7.16 is not supported by the project (^3.6).
Trying to find and use a compatible version.
Using python3 (3.7.7)
Spawning shell within /Users/damien/Library/Caches/pypoetry/virtualenvs/mypythonproject-0zMZkBqq-py3.7
➜  mypythonproject . /Users/damien/Library/Caches/pypoetry/virtualenvs/mypythonproject-0zMZkBqq-py3.7/bin/activate
(mypythonproject-0zMZkBqq-py3.7) ➜  mypythonproject# 

It’s possible to disable the virtual environment management in Poetry with poetry config virtualenvs.create false if you want to manage your virtual environment on your own or if you don’t want to use a virtual environment at all.

Add a new dependency to your project

Poetry provides a method to easily install and track a new dependency for your project: poetry add <python package>

In the example below, I’m adding jinja2 as a dependency to my project:

(mypythonproject-0zMZkBqq-py3.7) ➜  mypythonproject# poetry add jinja2
Using version ^2.11.2 for jinja2

Updating dependencies
Resolving dependencies... (0.2s)

Writing lock file

Package operations: 2 installs, 0 updates, 0 removals

  - Installing markupsafe (1.1.1)
  - Installing jinja2 (2.11.2)

Poetry automatically updated the pyproject.toml and the poetry.lock file in the process:

[tool.poetry]
name = "mypythonproject"
version = "0.1.0"
description = "My awesome Python project"
authors = ["NTC <info@networktocode.com>"]

[tool.poetry.dependencies]
python = "^3.6"
click = "^7.1.1"
jinja2 = "^2.11.2"

Poetry can also maintain a list of dependencies specific to your development environment. To add a new dependency to the development dependencies list you need to add the option -D: poetry add -D pytest. This will create a new section [tool.poetry.dev-dependencies] in the pyproject.toml file.

[tool.poetry.dependencies]
python = "^3.6"
click = "^7.1.1"
jinja2 = "^2.11.2"

[tool.poetry.dev-dependencies]
pytest = "^5.4.2"

Managing Python package with Poetry

As mentioned in the introduction, Poetry can also manage your Python package.
By default, Poetry will look for a directory with the name of the project and it will try to install it. In my example, since my project is named mypythonproject in the pyproject.toml, Poetry will automatically look for a directory with this name and install it.

I created a very simple file named cli.py in the directory mypythonproject

# mypythonproject/cli.py 

def main():
    print("hi there")

Here is how the project looks on my file system.

(mypythonproject-0zMZkBqq-py3.7)  ➜  mypythonproject#
.
├── mypythonproject
│   └── cli.py
├── poetry.lock
└── pyproject.toml

Running poetry install again will automatically install the delta between the pyproject.toml file and my environment, here the only delta is the library mypythonproject itself.

(mypythonproject-0zMZkBqq-py3.7) ➜  mypythonproject# poetry install
Installing dependencies from lock file

No dependencies to install or update

  - Installing mypythonproject (0.1.0)

Once installed, I can access my code from anywhere as long as I’m still within the same virtual environment. In the example below, I moved outside of the project directory and imported the function main() in Python with from mypythonproject.cli import main

(mypythonproject-0zMZkBqq-py3.7) ➜  mypythonproject# cd /
(mypythonproject-0zMZkBqq-py3.7) ➜  /
(mypythonproject-0zMZkBqq-py3.7) ➜  / python
Python 3.7.7 (default, Mar 10 2020, 15:43:33)
[Clang 11.0.0 (clang-1100.0.33.17)] on darwin
Type "help", "copyright", "credits" or "license" for more information.
>>> from mypythonproject.cli import main
>>> main()
hi there

We can also check the list of installed packages within the virtual environment with pip list:

(mypythonproject-0zMZkBqq-py3.7) ➜  / pip list | grep mypythonproject
mypythonproject       0.1.0      /Users/damien/projects/mypythonproject

If the name of your directory does not match the name of your project, you need to tell Poetry from which directory to install using packages key as part of the main [tool.poetry] section of the pyproject.toml:

[tool.poetry]
name = "mypythonproject"
version = "0.1.0"
description = "My awesome Python project"
authors = ["NTC <info@networktocode.com>"]
packages = [
    { include = "mylibraryname" },
]

Creating command line programs with Poetry

Another feature that is extremely useful in Poetry is the ability to easily turn a Python function into an executable/program that will be available in your PATH.

Building on the previous example, I can convert my function main() into a CLI tool with if __name__ == "__main__":. At this point I can execute it as a script as long as I know its exact location.

def main():
    print("hi there")

if __name__ == "__main__":
    main()
(mypythonproject-0zMZkBqq-py3.7) ➜  mypythonproject# python mypythonproject/cli.py
hi there

By leveraging [tool.poetry.scripts] feature, I can automatically turn my function main() into an executable, here called myawesomecli:

[tool.poetry.scripts]
myawesomecli = "mypythonproject.cli:main"

After reinstalling the library with poetry install, I now have access to a new executable myawesomecli:

(mypythonproject-0zMZkBqq-py3.7) ➜  mypythonproject# myawesomecli
hi there

(mypythonproject-0zMZkBqq-py3.7) ➜  mypythonproject# which myawesomecli
/Users/damien/Library/Caches/pypoetry/virtualenvs/mypythonproject-0zMZkBqq-py3.7/bin/myawesomecli

Conclusion

I hope this introduction to Poetry convinced you to give it a try, I know it’s hard to change our habits when it comes to tools and development environment sometimes. I wish I had tried Poetry a long time ago instead of waiting months before transitioning.
Poetry actually does even more than what we covered in this article, so I encourage you to check out the official documentation!

-Damien (@damgarros)


ntc img
ntc img

Contact Us to Learn More

Share details about yourself & someone from our team will reach out to you ASAP!

Introduction to Network Emulation and Requirements for Virtual Network Devices

Blog Detail

Network Emulation consists of (re)creating a network in a virtual environment using virtual devices. Network engineers have been using Network Emulation for training and demos for some time now, but some new use cases are emerging around Continuous Integration and Continuous Delivery (CI/CD) of the network itself or the tools around it.

I’ve seen a lot of interest from both big and small companies as Network Emulation aligns well with the introduction of DevOps principles in Networking (NetDevOps). Some of the largest barriers are the quality of the virtual images, which are emulating production network devices, obtained from the network vendors and the lack of proper tools available to create large emulated environments.

This is a vast topic with many different use cases and tools–as a result there are often misunderstandings, which can result in unclear specifications and requirements. However, without clear requirements, the need for better Virtual Network Devices is not clearly communicated back to the vendors and there is no path to get out of the current situation.

In this blog, I’ll cover the most common use cases for Network Emulation and how Network Emulation differs from Network Virtualization or Network Simulation, which are two different technical solutions that are often conflated with Network Emuation. In the second part of the blog will take a deeper look at the Virtual Network Device: what are their main differences with their physical counterpart and what you should look for when evaluating a Virtual Network Device for Network Emulation.

Disclaimer: My background as a network engineer is largely based in Datacenter Switching and I’ve been using Network Emulation for 5 years in different roles and environments. During my time at Juniper, I was part of the team who made the virtual QFX publicly available. Due to my background, when I’m thinking about Network Simulation, I’m thinking first about networks made of Routers and Switches but this write up should be applicable beyond datacenter, switches and routers.

3 Main Use Cases for Network Emulation

I categorized the main use cases for Network Simulation into 3 categories:

  • Network Design, Validation, and Testing: Recreate a network to validate its behavior.
  • Tools development and Validation: Use virtual devices to validate and develop tools that are dependent on network devices.
  • Training and Demo: Create a network for training or to demonstrate a new feature.

Network Design, Validation, and Testing

Ideally, everything going into production should be first thoroughly tested, whether it is a change in the design, a standard configuration change, or a new version of your favorite Network Operating System (NOS). Unfortunately, only a few organizations have the resources to have a lab network mirroring the production environment and it goes without mentioning the challenges inherent in managing such an environment.

The ability to emulate a production network in a virtual environment reduces the barrier to entry so that most organizations can have one virtual lab, and it also makes it possible to simulate networks at very large scale.

For a NetDevOps organization, the goal is to be able to test the network automatically for every change. At some point, it will be common to have an Emulated Network simulating the production network created on-demand by the Continuous Integration server, for every change. 

Tools for development and Validation

All software that interacts with a network device–whether using the CLI or an API–should be tested not only when the software itself changes but also when the network changes (see first use case : Network Validation and Testing). 

Software Testing is a topic on its own with multiple stages (unit, integration, system, etc.) Normally you will start with unit tests by leveraging simulated (mocked) interface but it’s recommended to also have some end-to-end testing with something as close as possible to your final environment. 

Depending on what you are developing, you might want to even test your software against multiple versions of your NOS to make sure that you are covering all cases.

CI/CD is already the norm in software development, in the application world it’s common to recreate a production-like environment on-demand during the testing cycle to do end-to-end testing. With a proper Network Simulation environment it would be possible to introduce networks in the mix as well.

Training and Demonstration

Protocols and architectures in networking are evolving at a very fast pace and it’s often challenging to access a a physical lab with the right devices in order to get familiar with this new technologies.

For this use case, it’s very convenient to be able to use a virtual lab that will let you explore all sorts of topologies and protocols.

This is probably the use case that people are most familiar with. For some time now, CCIE or JNCIE candidates have been practicing on virtual labs built with GNS3 or EVE-Ng.

Network vendors like Cumulus Networks or Big Switch Networks are providing virtual environments available in the cloud so that everyone can get can easily get access to their technology (Cumulus In the CloudBigswitch Labs).

Network Emulation is different than Network Virtualization and Network Simulation

Often people mix up Network EmulationNetwork Virtualization, and Network Simulation. Here are our definitions:

  • Network Virtualization consists of using a virtual device in a production network as a replacement for a physical device.
  • Network Emulation consists of emulating a production device with a virtual equivalent for testing or training, derived from the same software as the production device.
  • Network Simulation consists of simulating a production device with a completely different software. (Batfish, Forward networks …)

Network Virtualization has gained popularity in the last 5 years as it allows for better resource control, scaled out solutions and the ability to deploy as you grow that fit very well with Service Provider or Cloud use cases. The most popular Virtual Network Devices (AKA Virtual Network Function, VNF) are virtual router, firewall and load balancer.  Network Emulation and Network Simulation are close since their goal is to reproduce a production device/network in a controlled environment, but there is an important difference. Network Emulation is based on the same code as the production device, while Network Simulation is based on a third party software attempting to replicate the behavior of the network device. Both have a place and both approaches have their pros and cons in a testing strategy. A mature testing environment will often leverage both.

Differences between Physical Network Device and Virtual Network Device

The main component is the Virtual Network Device (VND) that simulates the behavior and the feature of a production network device. Ideally a VND will be at feature parity with the real device. Unfortunately, this is not true for most devices out there.  The gap between VND and production devices varies a lot from vendor to vendor or even between devices.

So if we don’t have feature parity between a production device and its virtual image, does that mean we can’t do Network Emulation? No, it’s still possible and there are some benefits but we won’t be able to emulate everything and we won’t be able to get the most out of it. For now, we need to be aware of these caveats and their workarounds. Hopefully, as more people are starting on this journey and are defining a clear list of requirements they are expecting from their network vendors and are “voting with their wallets” we should see the gap shrinking.

Nowadays, all routers or switches are making the distinction between the control-plane traffic (all the network protocols :lldp, lacp bgp, etc ..) and the data-plane traffic (real traffic). In most cases, the control plane traffic is handled by the routing engine in software and the dataplane traffic is handled with the a network processor or ASIC in hardware, in order to process Gbps or Tbps of data. The ASIC market is a topic on its own with lots of players and differences but in a nutshell, most vendors out there are not building there own chipset, they are buying them off the shelf. The goal for an VND is to have full feature parity with the physical device it’s emulating, which means that we would need to emulate both the control plane and the dataplane in order to have a complete emulation. Unfortunately, most ASIC manufacturers are not providing a software emulator for their chipset that can be distributed or they are not providing a solution at all. As a result, some VND can only emulate the control plane and are providing a different solution for the dataplane. The available solutions are disparate–some vendors are able to provide a real emulator for both the control-plane and the data-plane, and some are just providing an emulation of the control plane. As a user, it’s important to ask these questions because the architecture of a VND will have a direct impact on its features and ultimately on the level of trust you can place on it regarding some features that are usually executed on the dataplane. Also if the dataplane is not properly emulated using the same code than the production device, you won’t be able to reproduce or identify bugs that are specific to this component. It’s not necessarily a blocker but it’s important to understand the underlying architecture of a VND to understand what is representative of the production environment and what is not.

Network Device Emulation Requirements

Here are 9 points of consideration when evaluating a VND for Network Emulation:

  1. Resource consumption: Some Virtual Network Device or Virtualization solutions are optimized for production and performance instead of testing and may require a lot of resources to work properly, check the CPU usage, the number of CPU core needed and the memory.
  2. Max Number of Interfaces: The maximum number of interfaces supported is usually lower than the real device. This factor is important because it may limit the size of the network you will be able to emulate. If your VND only supports 8 interfaces, you won’t be able to create a datacenter network with more than 8 racks and only few servers per rack.
  3. List of supported features: As discussed previously, it’s very important to understand which which features are–and even more importantly which ones are not–as this will determine what can be emulated. Some vendors are not clearly publishing a list of supported/not supported features for their VND.
  4. Performance: It’s expected for an VND to be able to carry real packets in order to do end-to-end connectivity tests. The performance varies dramatically between solutions, as some VND can only carry few 100s of packets per second while others can carry 100s of Mbps of traffic.
  5. Release cycle: The release cycle is an important point that is often forgotten. Once you have integrated Network Emulation into your process and are relying on it to validate a new configuration or a new code before deploying it in production, it will become mandatory to have access to a VND image for every software release available; major, minor and bug fixes releases. Some vendor are still releasing images only for major releases of their software or for some minor releases but not all.
  6. Ability to bootstrap out-of-the box: Network Emulation benefits are decoupled when you are able to automate the creation and the provisioning of your virtual environment. It opens the door for more use cases, such as easily testing a new version of NOS. In order to automate the creation and the provisioning of your VND, you need to make sure it provide some API or solution to get its configuration at boot time (ZTP, DHCP, cloud-init ..)
  7. License & Support: What conditions need to be met to access a VND image and what is the level of support provided on the VND itself. Some vendors are still not providing official support and are considering their VND as best-effort since they are not charging for it.
  8. Support for main tools and hypervisor: Almost each hypervisor or network Emulation tool has specific requirements, so make sure to ask which one is supported out of the box. 
  9. Hardware requirements: As mentioned some VND are optimized for production and performance instead of testing, and may require some specific hardware or options. Check for Hardware Acceleration, Specific type of NIC or kernel version.

It’s important to differentiate VND designed for Network Virtualization from the one designed for Network Emulation, as the requirements are very different. VND designed for Network Virtualization are usually optimized for performance and this usually leads to bigger resource requirements


Conclusion

I hope that this blog will help increase the level of understanding and awareness on this topic and that collectively we’ll be able to articulate our requirements to our vendors better. I’m looking forward to the day when we’ll be able to truly emulate networks at scale without comprimises and when it will be mainstream to have changes tested automatically in a network emulation as part of the Continuous Integration pipeline.

-Damien (@damgarros)


ntc img
ntc img

Contact Us to Learn More

Share details about yourself & someone from our team will reach out to you ASAP!

Using VSCode Remote Containers & Python Development

Blog Detail

I’ve been using using VSCode for development for a little while and was excited when Microsoft announced they were developing extensions to attach to running containers and allow you to still develop natively within Windows using VSCode.

Let’s go ahead and get started on setting up VSCode with the Remote – Containers and Python extensions.

  1. Launch VSCode and click on the extensions icon
  2. Search for Remote – Containers and click “Install”
  3. Search for Python and click “Install”
Extension Install

One of my use cases is that I have different Python Virtual Environments created in my docker image and I’d like to be able to use those to test code with different packages so i’ll show you how you can add custom paths for VSCode to search for virtual environments in.

  1. Click File > Preferences > Settings within VSCode
  2. Search python.venvpath
  3. Add the path in the container that your virtual environments are located in to the Python: Venv Path setting. Mine are located in /src/.venvs
Extension Install

Now that is complete, you should be able to attach to a running container.

  1. Start your docker container
  2. Click on the >< icon in the bottom left of VSCode
Remote Icon
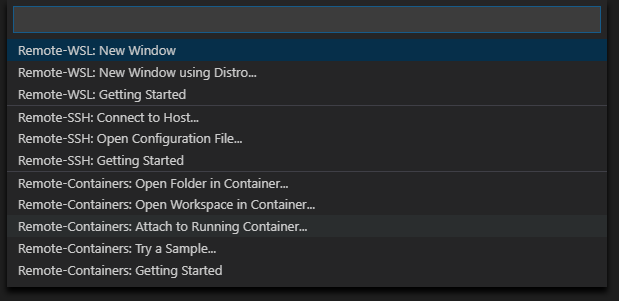
  1. Select Remote-Containers: Attach to Running Container
Attach Container
  1. Select the container you want to attach to
remote container

A new window should have popped up and you should see that you’re attached to the container now.

VSCode Remote Container

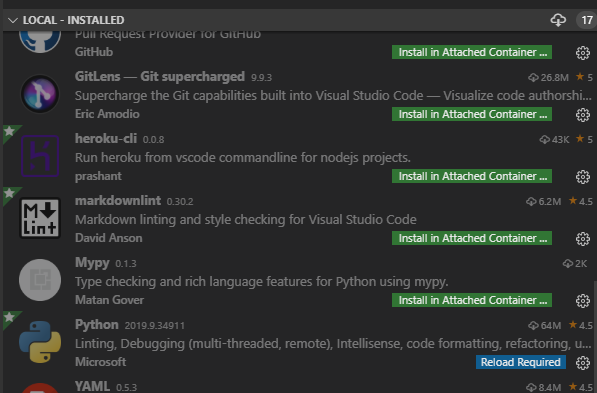
Now that we’re attached to the container within VSCode, we’ll need to install and enable the Python extension within the container.

  1. Click on the extensions icon and find Python
  2. Click Install in Attached Container
  3. Click Reload Required
Remote Python

Once it has been reloaded, you can open a directory.

Open Folder

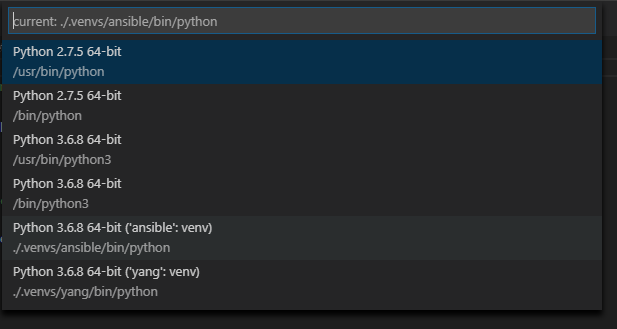
Now if I open a Python file, it will prompt me to select the Python interpeter I want to use. In this case, you’ll see the built-in Python’s that were found within PYTHONPATH and my virtual environments in /src/.venvs/

Python Interpreter

NOTE: If pylint or your selected linter isn’t installed, it will prompt to be installed.

As you can see, we can execute from the built-in terminal in VSCode and it is using my virtual environment.

VSCode Terminal1

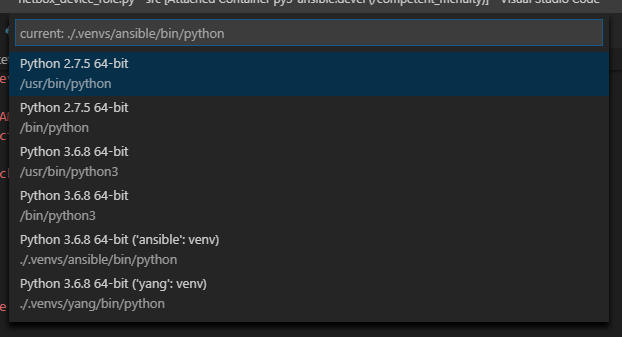
Now that I have tested the code in one virtual environment, let me test it within another. We’ll select the yang virtual environment. Click on the Python portion in the bottom left hand corner of VSCode to select a new Python interpreter

Select Interpreter
New Interpreter

Now let’s check the terminal within VSCode to validate it is using the new virtual environment

Now we can take advantage of developing natively within Windows, the benefits of using the different virtual environments to test code within, and the VSCode Python extension that helps with linting and formatting (if configured).

-Mikhail


ntc img
ntc img

Contact Us to Learn More

Share details about yourself & someone from our team will reach out to you ASAP!