Using Cisco YANG Suite to Build RESTCONF Requests

Blog Detail

Recently I had a need to do some automation against a group of IOS-XE routers and decided I’d like to take another look at using the RESTCONF API that is offered by the devices. In this post, I’ll show how Cisco YANG Suite can help reduce the development effort when working with YANG models and RESTCONF.

Translating YANG Models to RESTCONF

One of the main challenges for me with using RESTCONF in the past has been figuring out the required URL and payload for the requests. For example, a RESTCONF URL to retrieve the configuration of interface GigabitEthernet1 on a router looks like this: /data/ietf-interfaces:interfaces/interface=GigabitEthernet1, but how are the components of that URL built? Cisco’s Hank Preston wrote a very thorough and helpful blog post that explains how the YANG tree is mapped into a URL, and it is a great reference to gain further understanding.

Even with an understanding of how the URL and payloads are built from the YANG models, the process of figuring them out involves downloading, examining, and interpreting manually the YANG model file(s) for the particular feature you are trying to work with on the router. For me there was always a painful and usually time-consuming process of inspecting YANG model(s) in a text editor, and then going through trial and error until I finally managed to build the correct URL and payload to configure a feature. I thought, if only the router had a Swagger API documentation page that provided the URL and required payload like other APIs I have worked with, things would be so much easier!

Cisco YANG Suite is a tool that can provide that functionality and more! In this post, I’ll first explain how to get up and running quickly with Cisco YANG Suite. Then I’ll walk through an example scenario of using YANG Suite to automatically generate the appropriate RESTCONF calls, eliminating the need to open and interpret any YANG model files in a text editor.

Installing YANG Suite

Cisco YANG Suite can be run as a Docker container locally on your machine, which requires that you have Docker Desktop installed. For other installation options, please see the YANG Suite documentation. The first step is downloading the code to your machine from the GitHub repository. The best way to do that is with the Git command line utility, using the command:

git clone https://github.com/CiscoDevNet/yangsuite/

You will now have a yangsuite directory. Change to the directory yangsuite/docker. Here you will find the setup script start_yang_suite.sh. Execute the script to begin setup.

$ ./start_yang_suite.sh

Hello, please setup YANG Suite admin user.
username: admin
password:
confirm password:
email: matt.mullen@networktocode.com

The script prompts for definition of superuser credentials and asks whether you want to generate “test” certificates. Test certificates are self-signed certificates that are used for SSL and are automatically generated by the script. Since we are only using YANG Suite on the local machine, self-signed certificates will be fine here.

Setup test certificates? (y/n): y

################################################################
## Generating self-signed certificates...                    ##
##                                                            ##
## WARNING: Obtain certificates from a trusted authority!     ##
##                                                            ##
## NOTE: Some browsers may still reject these certificates!!  ##
################################################################

Generating a 2048 bit RSA private key
......................................................+++
.......+++
writing new private key to 'nginx/nginx-self-signed.key'
-----
You are about to be asked to enter information that will be incorporated
into your certificate request.
What you are about to enter is what is called a Distinguished Name or a DN.
There are quite a few fields but you can leave some blank
For some fields there will be a default value,
If you enter '.', the field will be left blank.
-----
Country Name (2 letter code) []:US
State or Province Name (full name) []:NC
Locality Name (eg, city) []:Raleigh
Organization Name (eg, company) []:Network to Code
Organizational Unit Name (eg, section) []:
Common Name (eg, fully qualified host name) []:
Email Address []:
Certificates generated...
Building docker containers...

Once you enter the certificate details, the containers begin launching. The containers will be running interactively in your terminal, so you must leave the terminal window where you ran the script open. Once the activity in the terminal has stopped scrolling, the containers should be running and YANG Suite will be available at the URL: https://localhost:8443.

Upon accessing the above URL for the first time, you will be prompted to accept the YANG Suite License and Privacy statement. Assuming you agree to the legal mumbo jumbo, click Accept and log in with the superuser credentials you defined during the setup script.

Translating YANG Models

Upon successful login, you will be at the Welcome screen.
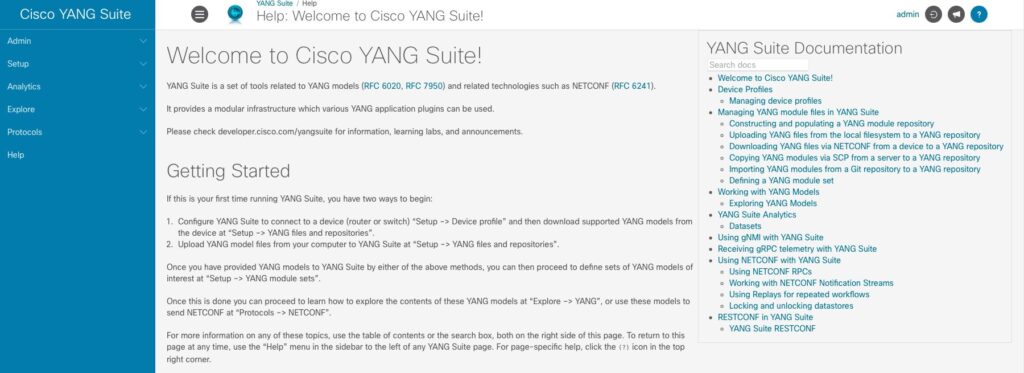
YANG Models

YANG Suite Initial Setup

There are a few one-time setup tasks that we must do in order to begin using YANG Suite:

  • Define a Device Profile
  • Create a YANG Module Repository
  • Create a YANG Module Set

The examples in this post are using the IOS-XE Always-On sandbox, which consists of a CSR1000V router with programmability features such as NETCONF and RESTCONF enabled and ready for use. You can find the credentials and other related information in the IOS-XE Always-On DevNet Sandbox.

Device Profile

The first thing we need to do is download YANG models to work with. This can be accomplished by either uploading the YANG models from your system, or by downloading them from an existing device on the network. We’ll go ahead and download the models from the router in the IOS-XE Always-On sandbox (https://sandbox-iosxe-latest-1.cisco.com). To do that, we will create a Device Profile.

Click on Setup > Device Profiles and then Create New Device. Then enter the details for the IOS XE sandbox:
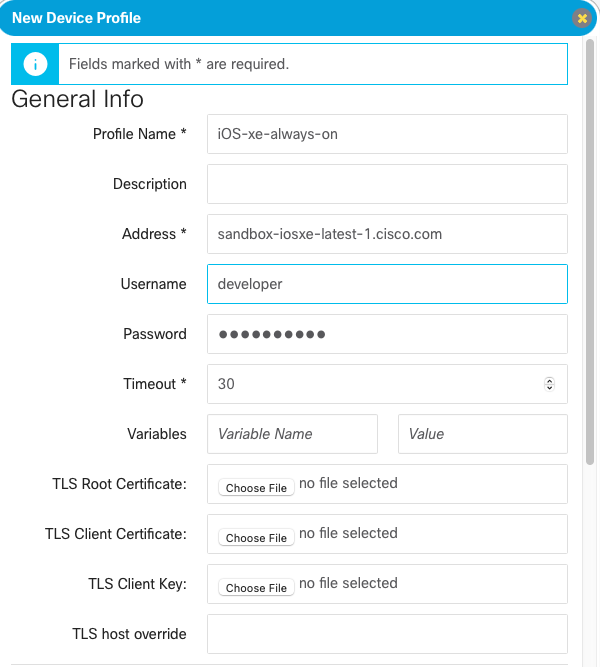
Create New Device

Ignore the “Invalid IP Address” error when entering the hostname into the Address field. This appears to be a bug.

It is also necessary to scroll down and enable the NETCONF and RESTCONF protocols. Make sure to check the Skip SSH key validation for this device checkbox under the NETCONF section. Once complete, click Create Profile.
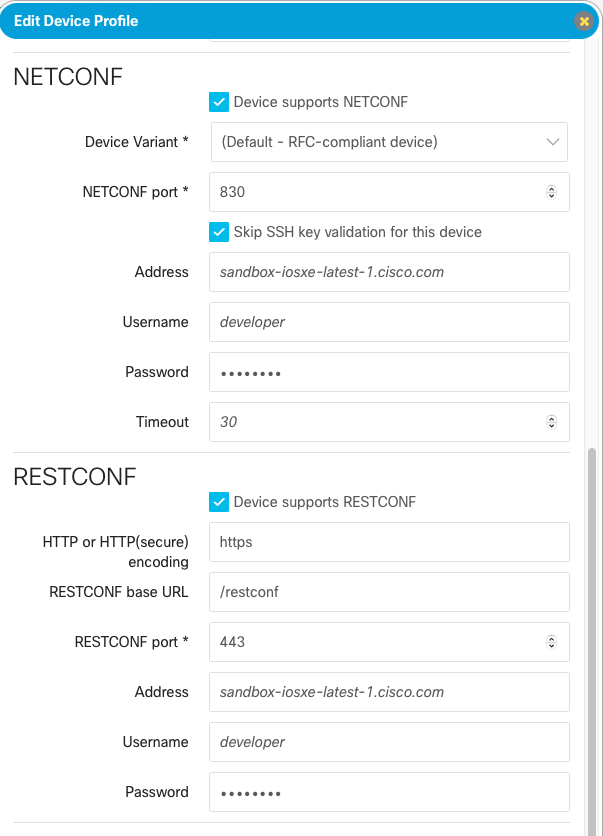
NETCONF

YANG Module Repository

Next we must set up a YANG module repository to store the models. Click on Setup > YANG files and repositories. Then click New repository.

YANG Module Repository

We’ll give this repo the name “IOS-XE”.

YANG Module Repository

On the next screen, select NETCONF and then select the device profile that we just created. Then click Get schema list.
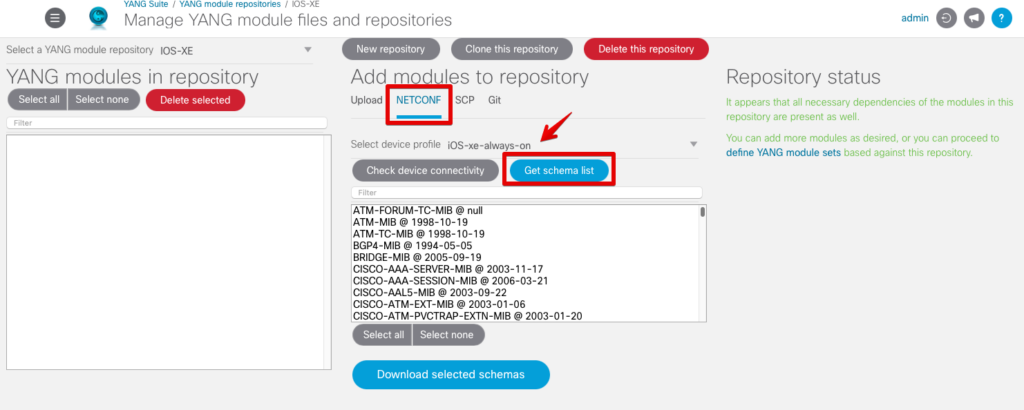
YANG Module Repository

We could filter and select various models if desired, which would save time, but we’ll go ahead and download them all. Click on Select all and then Download selected schemas. This will take a few minutes. As the modules are downloading, you can see the logs on the terminal where we launched the containers. It won’t be necessary to redo this if you shut down the containers or need to reboot your machine because the files are stored inside a Docker volume.
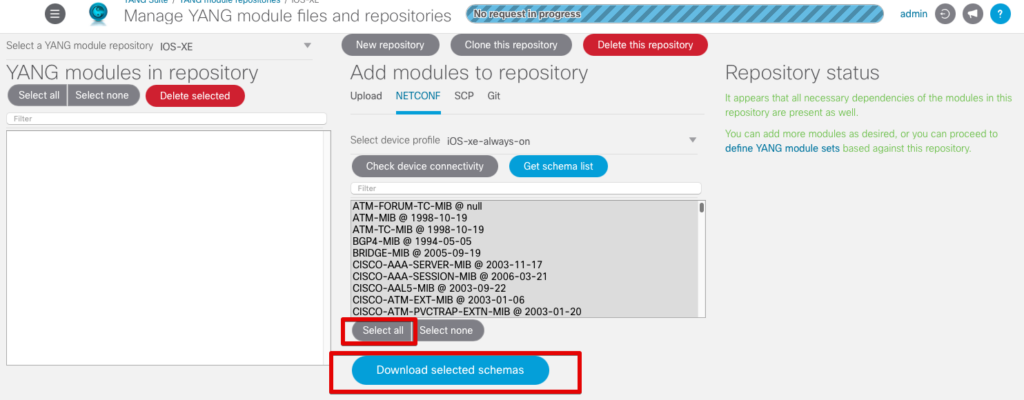
YANG Module Repository

When complete, you should see a dialogue indicating the number of modules added, and all of the modules listed in the YANG modules in repository section, as shown below.
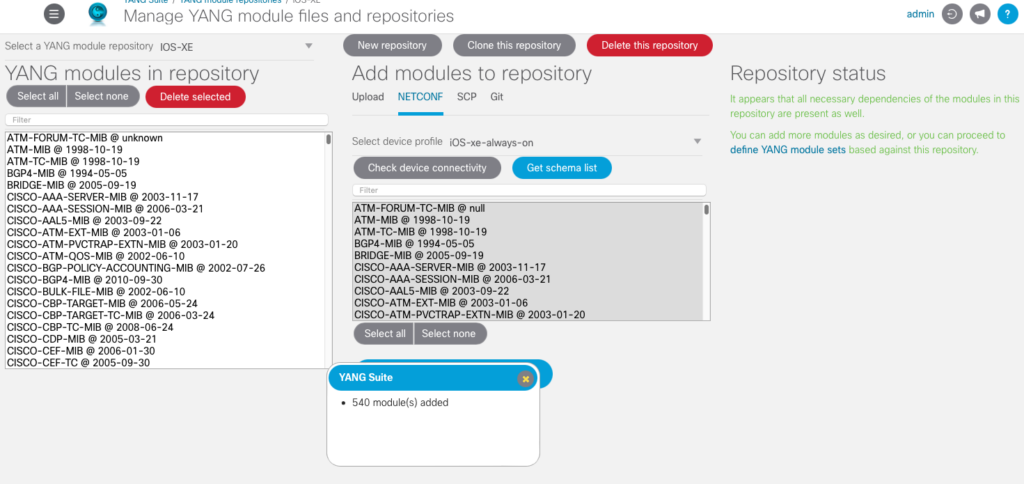
YANG Module Repository

YANG Module Set

Click on Setup > YANG module sets and click New YANG set. Then give the YANG set a descriptive name.
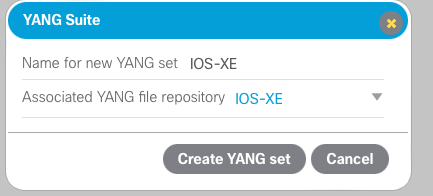
YANG Module Set

Next, click Add entire repository to add all modules to this YANG set. The modules should all be moved to the left-hand pane under YANG modules in this set. We won’t be needing any of the models referenced in the warnings panel on the right, so the warnings can be safely ignored.
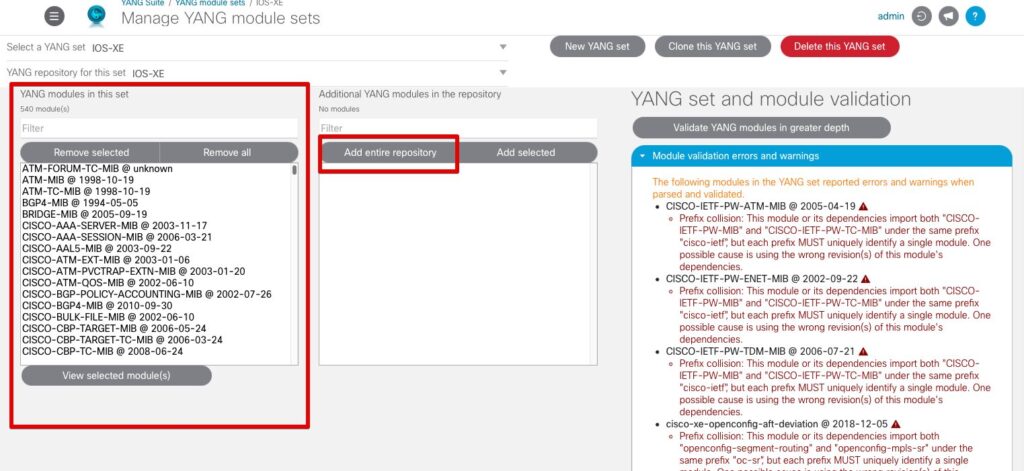
YANG Module Set

Scenario: Configure a TACACS Key

With the initial setup out of the way, let’s look at how we can determine the appropriate API calls to configure a TACACS key on a router using RESTCONF. To do that, first we need to determine what YANG model to use. In YANG Suite, click on Explore and select YANG. From the dropdown, select our YANG set that we just created.

Configure a TACACS Key

Here is where we get into a little bit of guesswork to determine which YANG model has the configuration parameters needed, but this would be the same if we were not using YANG Suite and had to manually inspect the YANG modules. Since we’re looking to change the TACACS key, it’s a good bet this has something to do with AAA; so under “Select YANG modules(s)” we’ll filter for AAA. I’ve had success with the IOS native modules; so select the Cisco-IOS-XE-aaa module and then hit Load module(s).

Configure a TACACS Key

When a module completes loading you may get a dialogue like the one shown below indicating that one or more of the modules have no tree(s) to display. This is because the Cisco-IOS-XE-aaa module doesn’t provide its own YANG data tree, but instead augments the data in the Cisco-IOS-XE-native module. In the case where a module extends or augments another, we need to work with the augmented module, in this case the Cisco-IOS-XE-native module.
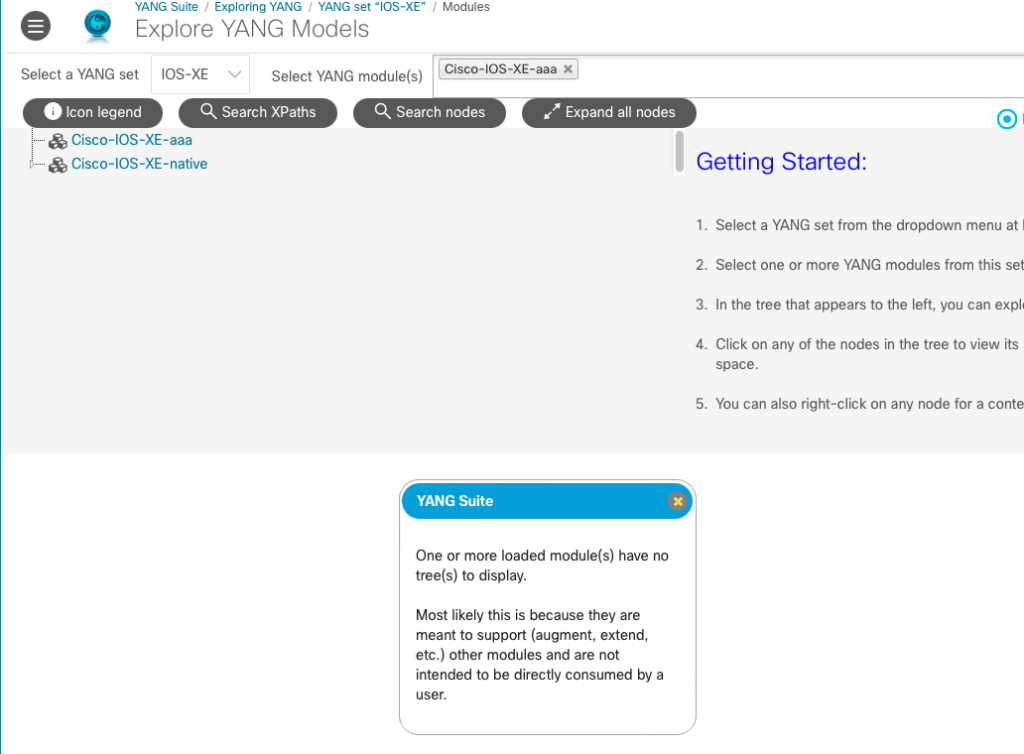
Configure a TACACS Key

Notice the triangle to the left of Cisco-IOS-XE-native in the tree listing above. This can be expanded to show the leaves of the tree. Since we are looking for TACACS configuration, we can expand the tree and use the web browser search function to find anything related to “tacacs”.

Using the web browser search function works well for this use case because there are containers (represented by folder icons in the tree) that contain the word “tacacs”. In some cases you may be looking for a configuration parameter that is not a container, but exists deeper within the YANG tree. In this case, you could use the Search XPaths and/or Search nodes buttons to help locate the correct leaf node.
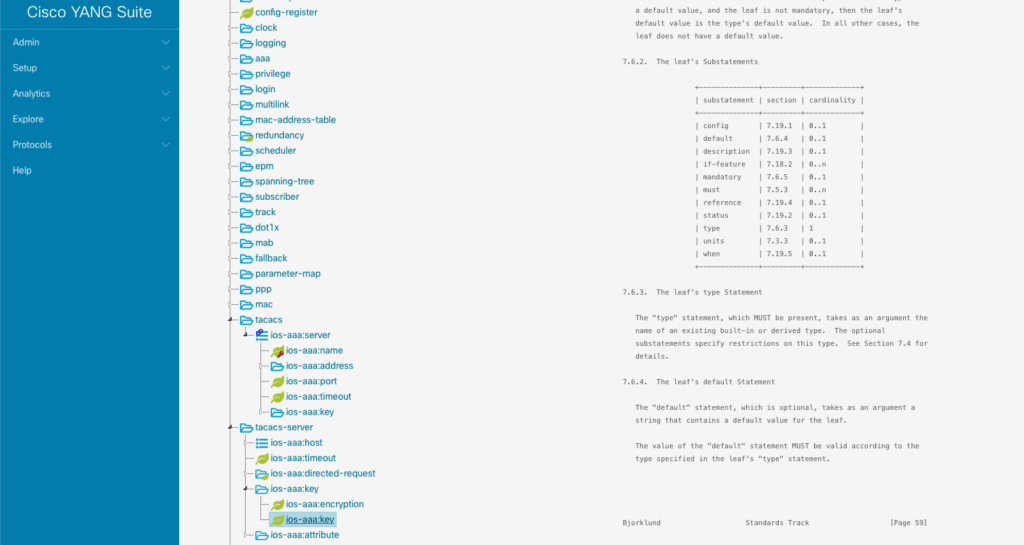
Configure a TACACS Key

By expanding the tree and then searching for “tacacs” in the browser, we can see there are two nodes for configuration of TACACS. Looking at the first “tacacs” node, I see the key (denoted by the red key icon) ios-aaa:name, indicating that this would be for a named TACACS server configuration. We could use a named TACACS configuration, but we would first have to create the named TACACS server configuration before we can create a TACACS key. To keep things simple, we’ll use the ios-aaa:tacacs-server node which doesn’t require a named TACACS server configuration. Expanding that out, we can see there is an ios-aaa:key leaf which looks promising. Now that we have located a candidate to configure the TACACS key, we can generate the RESTCONF API calls.

In YANG Suite, navigate to Protocols > RESTCONF. Select the IOS-XE YANG set we created previously, the iOS-xe-always-on device profile, and enter the Cisco-IOS-XE-native YANG module which we determined previously. You can set the depth of the leaves to be loaded to reduce the level that the tool will traverse into the tree, but I typically just set this to No limit to ensure I am seeing everything. Click Load modules(s). This will take a minute or so as it loads the nodes of the tree.

RESTCONF

Once loaded, we can then expand the tree and once again use the web browser search function to find the leaves related to “tacacs” and expand the tacacs-server node.
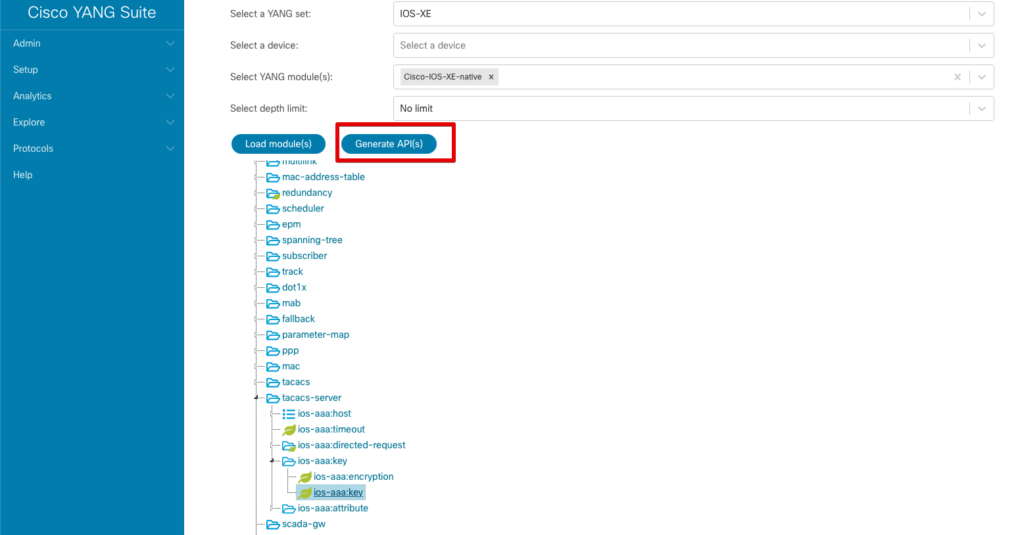
RESTCONF

Notice the Generate API(s) button that has now appeared. Select the leaf ios-aaa:key, and then click the Generate API(s) button. When complete, a new Show API(s) button should appear.
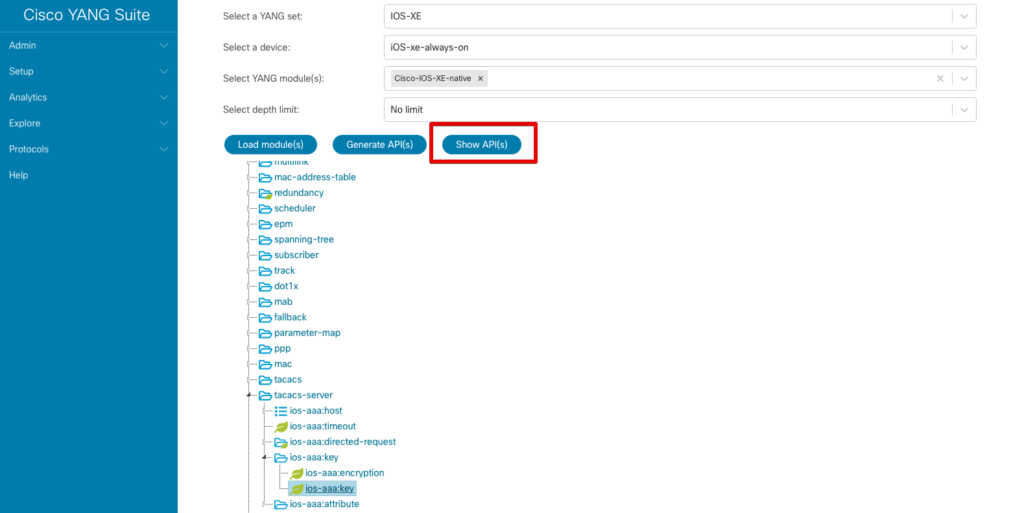
Notice the Generate API

Highlight the ios-aaa:key leaf and click the Show API(s) button. This gives us the API call URLs and payload to retrieve (GET), create (PUT), update (PATCH), or remove (DELETE) the TACACS key on the router in an easy to consume format!
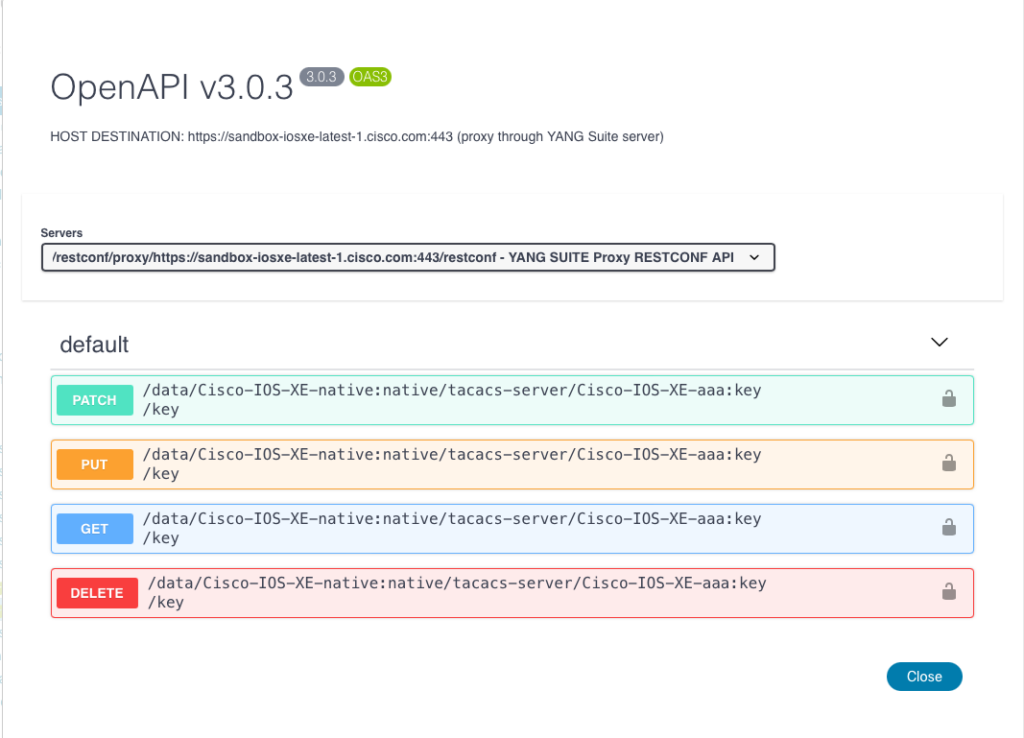
Show API

Click to expand the PUT request, which is used for creation of a new TACACS key. This displays the URL to use, as well as the request body indicating the JSON payload that should be included. In addition, note the value that would need to be set in the “Content-Type” header: application/yang-data+json.
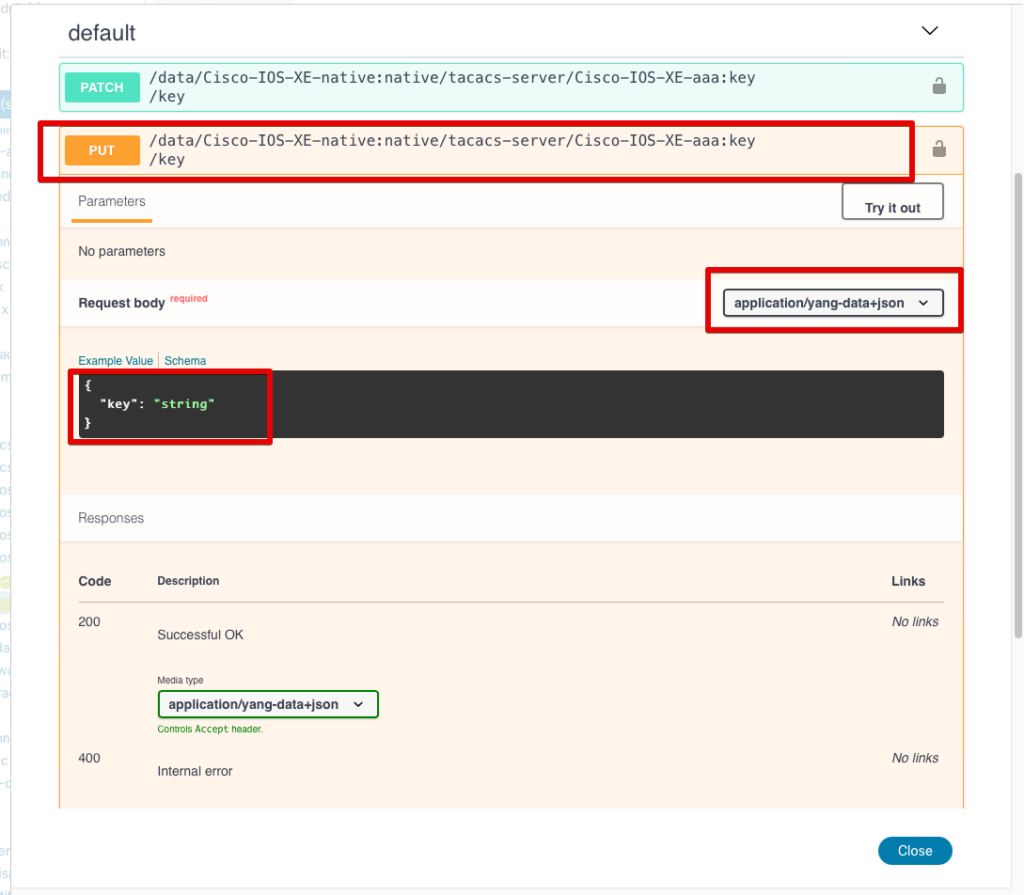
Show API

This is all the info we should need to form the request using Python or other tools! For example you could use the Python requests module to automate making the RESTCONF calls. However, we can see if it performs as expected right here from the browser by clicking the Try it out button. Here you can replace “string” in the payload with the desired TACACS key value. Then click Execute to run the command on the device.
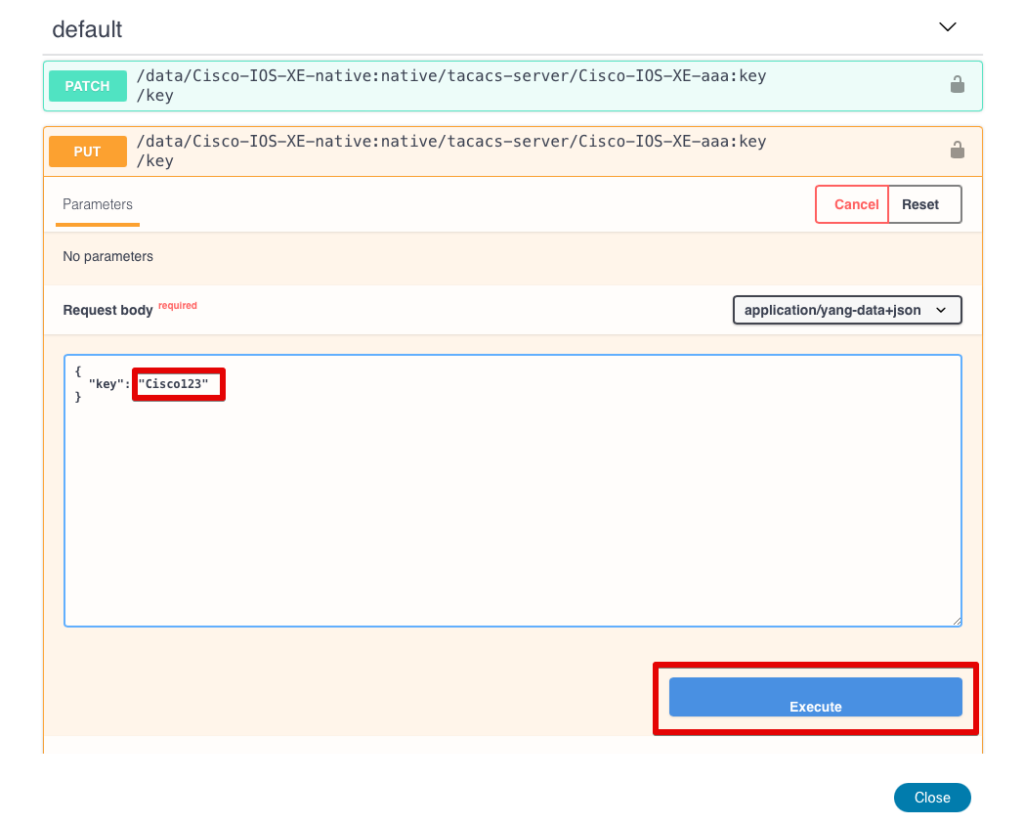
Show API

Once executed, it shows you the curl command that can be used to make the request along with the response code. The HTTP response code of 201 indicates that the TACACS key was created successfully on the remote device.
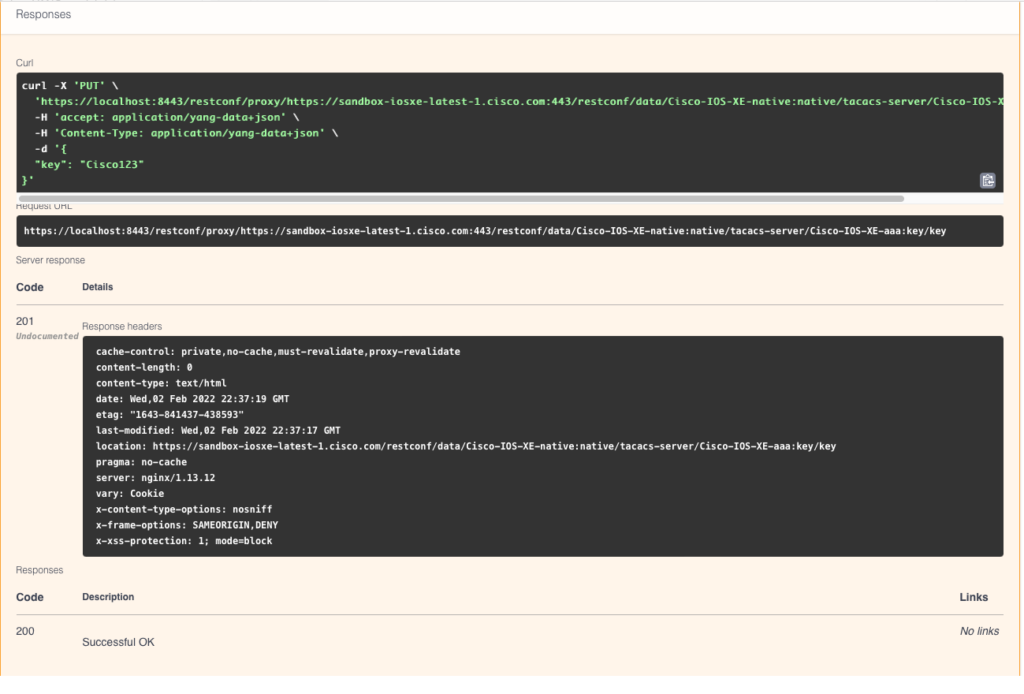
curl

Let’s check the device to see whether the CLI reflects what we just configured. To accomplish this, we will SSH directly to the CSR1000V router in the IOS-XE sandbox (sandbox-iosxe-latest-1.cisco.com).
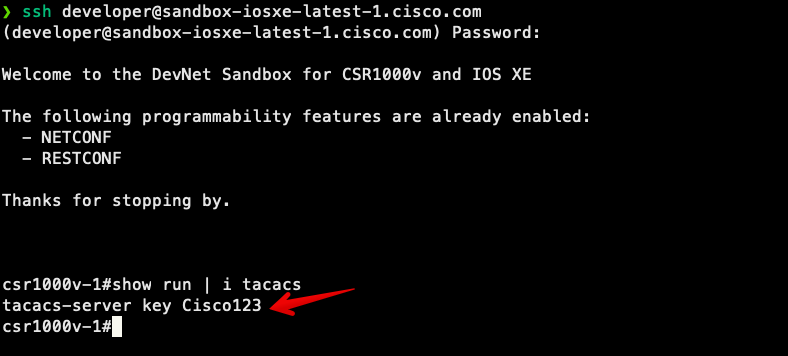
CLI

Conclusion

As I hope the demonstration above proved, YANG Suite makes it a lot easier to work with network devices using RESTCONF. Kudos to Cisco and the makers of YANG Suite for providing such a useful tool!

-Matt


ntc img
ntc img

Contact Us to Learn More

Share details about yourself & someone from our team will reach out to you ASAP!

Exploring IOS-XE and NX-OS based RESTCONF Implementations with YANG and Openconfig

Blog Detail

Here at Network to Code we work with network devices’ APIs every day. APIs are critical to enable our customers working with Network Automation. APIs are also usually the first (if applicable) choice in our solutions – even if that’s the hard way.

As we push network devices’ APIs to their limits, we go beyond the examples available on GitHub or in vendor’s documentation. One of our past use cases included RESTCONF (*) protocol usage on Cisco NX-OS 9000 series. While this was an opportunity to work with YANG, Openconfig, Postman, Python, etc. this was also a chance to understand differences between implementation of the protocol between Cisco’s platforms. For tests we used NX-OS v9.3-1 and IOS-XE 16.9.3.

Note: Jason Edelman described NETCONF and RESTCONF’s principles in 2016 in a blog post

Examining IOS-XE RESTCONF and NX-OS RESTCONF

NX-OS implementation is based on draft-ietf-netconf-restconf-10. This draft was published in March 2016, however RFC 8040 was published in January, 2017. One of the changes between those versions was a change in headers needed in the HTTP request.

For IOS-XE, the headers are declared using a dash notation in yang-data:

restconf_headers = {
    'Accept': 'application/yang-data+json',
    'Content-Type': 'application/yang-data+json'
}   

However, for NX-OS based on a draft, Cisco implemented a dot notation in yang.data:

restconf_headers = {
    'Accept': 'application/yang.data+json',
    'Content-Type': 'application/yang.data+json'
}

YANG models are different

Supported YANG models are also different between IOS-XE and NX-OS devices. It means, native models are platform specific, not necessarily vendor specific. First step when examing supported models is to retrieve advertised capabilities from the device (you might use Hank Preston’s get_capabilities.py code to do that).

Once we confirm a particular capability is supported, let’s see how to programmatically get BGP peers from NX-OS:

#!/usr/bin/env python
import requests

username = 'admin'
password = ''
device = 'nxos1'

restconf_headers = {
    'Accept': 'application/yang.data+json',
    'Content-Type': 'application/yang.data+json'
}

bgp_url = 'https://{device}/restconf/data/Cisco-NX-OS-device:System/bgp-items/inst-items/dom-items/Dom-list=default/peer-items/Peer-list'

get_response = requests.get(bgp_url.format(device=device),
                            auth=(username, password),
                            headers=restconf_headers,
                            verify=False,
                            )

Same operation for IOS-XE based platform would require a change in bgp_url variable:

#!/usr/bin/env python
import requests

username = 'admin'
password = ''
device = 'csr1'

restconf_headers = {
    'Accept': 'application/yang-data+json',
    'Content-Type': 'application/yang-data+json'
}

bgp_url = 'https://{device}/restconf/data/Cisco-IOS-XE-bgp-oper:bgp-state-data'

get_response = requests.get(bgp_url.format(device=device),
                            auth=(username, password),
                            headers=restconf_headers,
                            verify=False,
                            )

You might notice the difference in the requested URI (endpoints), as you would also notice the difference in the RESTCONF response – both responses will have different data structures, meaning, the data can not be accessed in the same way.

That being said, to add a new BGP peer under NX-OS we could use a native module and create a data structure as follows:

#!/usr/bin/env python

import json

import requests

username = 'admin'
password = ''
device = 'nxos1'

restconf_headers = {
    'Accept': 'application/yang.data+json',
    'Content-Type': 'application/yang.data+json'
}


def bgp_add(peer_address, peer_asn):
    bgp_payload = {
        "bgp-items": {
            "inst-items": {
                "dom-items": {
                    "Dom-list": [
                        {
                            "name": "default",
                            "peer-items": {
                                "Peer-list": [
                                    {
                                        "addr": peer_address,
                                        "asn": peer_asn
                                    }
                                ]
                            }
                        }
                    ]
                }
            }
        }
    }

    bgp_url = 'https://{device}/restconf/data/Cisco-NX-OS-device:System'

    requests.patch(bgp_url.format(device=device),
                   auth=(username, password),
                   headers=restconf_headers,
                   verify=False,
                   data=json.dumps(bgp_payload)
                   )

Same operation on IOS-XE would be similar, however the data payload and the URI itself looks much simpler while using XE’s native YANG model:

#!/usr/bin/env python

import json

import requests

username = 'admin'
password = ''
device = 'csr1'

restconf_headers = {
    'Accept': 'application/yang-data+json',
    'Content-Type': 'application/yang-data+json'
}


def bgp_add(peer_address, peer_asn):
    bgp_payload = {"Cisco-IOS-XE-bgp:neighbor": {'id': peer_address,
                                                 'remote-as': peer_asn}}

    # 65000 in the URL represents the ASN number
    bgp_url = 'https://{device}/restconf/data/Cisco-IOS-XE-native:native/Cisco-IOS-XE-native:router=bgp/65000/neighbor'

    requests.patch(bgp_url.format(device=device),
                   auth=(username, password),
                   headers=restconf_headers,
                   verify=False,
                   data=json.dumps(bgp_payload)
                   )

The reason of differences is the following:

In NX-OS, it is the “device” module that describes the BGP. However, in the IOS-XE it is the native BGP module, which is different than NX-OS’.

Note: The list of supported YANG modules is available on GitHub: https://github.com/YangModels/yang/tree/master/vendor/cisco

Openconfig Adoption is Progressing

The Openconfig working group produces set of YANG modules that are vendor neutral and agnostic – the overall idea of Openconfig project is, you could use the same YANG model to communicate with different vendors (and platforms), keeping the same data structures. Openconfig might sound like an alternative solution to the differences between Cisco’s native modules on NX-OS and IOS-XE.

To understand similarities and differences while using Openconfig on different platforms, let’s examine existing loopback200 interface on nxos1 device (NX-OS):

nxos1# show run int lo200

!Command: show running-config interface loopback200
!Running configuration last done at: Thu Oct 24 12:06:42 2019
!Time: Thu Oct 24 12:07:04 2019

version 9.3(1) Bios:version  

interface loopback200
  description NTC
  ip address 192.0.2.2/32

Getting url https://nxos1/restconf/data/openconfig-interfaces:interfaces/interface=lo200 would result in the following response:

{
   "interface": [
      {
         "name": "lo200",
         "config": {
            "description": "NTC",
            "enabled": "true",
            "name": "lo200",
            "type": "softwareLoopback"
         },
         "state": {
            "admin-status": "UP",
            "ifindex": "335544520",
            "oper-status": "UP",
            "description": "NTC",
            "enabled": "true",
            "mtu": "1500",
            "type": "softwareLoopback"
         }
      }
   ]
}

nxos1 response contained information about the configuration and state, structured accordingly to the openconfig-interfaces model.

Similar configuration is present on csr1 device (IOS-XE):

csr1#show run int lo200
Building configuration...

Current configuration : 89 bytes
!
interface Loopback200
 description NTC - XE
 ip address 192.0.2.2 255.255.255.255
end

Getting url https://csr1/restconf/data/openconfig-interfaces:interfaces/interface=Loopback200 would result in the following response:

{
  "openconfig-interfaces:interface": {
    "name": "Loopback200",
    "config": {
      "type": "iana-if-type:softwareLoopback",
      "name": "Loopback200",
      "description": "NTC - XE",
      "enabled": true
    },
    "state": {
      "type": "iana-if-type:softwareLoopback",
      "name": "Loopback200",
      "description": "NTC - XE",
      "enabled": true,
      "ifindex": 29,
      "admin-status": "UP",
      "oper-status": "UP",
      "last-change": "2019-10-23T01:12:11.000147+00:00",
      "counters": {
        "in-octets": "0",
        "in-unicast-pkts": "0",
        "in-broadcast-pkts": "0",
        "in-multicast-pkts": "0",
        "in-discards": "0",
        "in-errors": "0",
        "in-unknown-protos": 0,
        "out-octets": "0",
        "out-unicast-pkts": "0",
        "out-broadcast-pkts": "0",
        "out-multicast-pkts": "0",
        "out-discards": "0",
        "out-errors": "0",
        "last-clear": "2019-10-22T23:13:05.000807+00:00"
      }
    },
    "subinterfaces": {
      "subinterface": [
        {
          "index": 0,
          "config": {
            "index": 0,
            "name": "Loopback200",
            "description": "NTC - XE",
            "enabled": true
          },
          "state": {
            "index": 0,
            "name": "Loopback200.0",
            "description": "NTC - XE",
            "enabled": true,
            "admin-status": "UP",
            "oper-status": "UP",
            "last-change": "2019-10-23T01:12:11.000147+00:00",
            "counters": {
              "in-octets": "0",
              "in-unicast-pkts": "0",
              "in-broadcast-pkts": "0",
              "in-multicast-pkts": "0",
              "in-discards": "0",
              "in-errors": "0",
              "out-octets": "0",
              "out-unicast-pkts": "0",
              "out-broadcast-pkts": "0",
              "out-multicast-pkts": "0",
              "out-discards": "0",
              "out-errors": "0",
              "last-clear": "2019-10-22T23:13:05.000807+00:00"
            }
          },
          "openconfig-if-ip:ipv4": {
            "addresses": {
              "address": [
                {
                  "ip": "192.0.2.2",
                  "config": {
                    "ip": "192.0.2.2",
                    "prefix-length": 32
                  },
                  "state": {
                    "ip": "192.0.2.2",
                    "prefix-length": 32
                  }
                }
              ]
            }
          },
          "openconfig-if-ip:ipv6": {
            "config": {
              "enabled": false
            },
            "state": {
              "enabled": false
            }
          }
        }
      ]
    }
  }
}

You might notice, that some parts of the responses have the same data structures with IOS-XE being more verbose in its response (state, counters and subinterfaces with IP addressing). It is due to the deviations from the openconfig-interfaces model – as sometimes not all features could be supported, YANG models can declare particular capability as “not supported”.

As version 9 of NX-OS supports tens of Openconfig YANG modules, there is still a difference in NX-OS and IOS-XE support for Openconfig. IOS-XE offers a broader support for Openconfig. The difference in supported modules should be considered while planning Openconfig usage in your Network Automation journey. Please also note, that Openconfig support is characterized by a list of guidelines, limitations and deviations from a published models.

PATCH vs. PUT

Some of the implementation details are worth checking during your code development process. Typically, in REST APIs a PUT method represents a “create or replace” operation, while PATCH represents a “merge” operation. On NX-OS we noticed a difference in behaviour of a PUT method, which was not behaving as per RFC 8040 (and draft 10).

According to the RFC 8040 PUT method is “create or replace”:

The RESTCONF server MUST support the PUT method. The PUT method is sent by the client to create or replace the target data resource. A request message-body MUST be present, representing the new data resource, or the server MUST return a “400 Bad Request” status-line. The error-tag value “invalid-value” is used in this case.

Using PUT method on NX-OS had the same result as using PATCH method during our deployment – it used to merge our BGP changes into existing BGP configuration. PUT on IOS-XE indeed was a “create or replace” operation as RFC defines it.

The moral of the story is that APIs are still new on platforms and clearly shows the importance of user testing of network automation elements like APIs.


Conclusion

Presented examples are just some of the differences we identified during our work. As we are glad to see model driven programmability support in both device types, there are lots of factors to consider before using a particular protocol in your Network Automation system.

-Marek


ntc img
ntc img

Contact Us to Learn More

Share details about yourself & someone from our team will reach out to you ASAP!

NSO Tips and Tricks – NSO Actions

Blog Detail

I recently brought up the usefulness of custom NSO Actions in a Twitter discussion with several Cisco friends, and promised to provide a brief demo to illustrate how to use them. This is not the first time I have had this type of discussion. People who have been exposed to NSO’s functionality often gravitate towards and focus on the service mechanics, and rightly so. They are incredibly powerful and a core feature for the product. However, the flexible utility of using NSO actions is an underrated feature of NSO, which I want to educate others about.

NSO Actions

What is an NSO Action?

It is effectively an RPC call used by NSO to execute some arbitrary set of code associated with that Yang NSO Action. For example, the common action of sync-from is a built in NSO action which does not store any data on its own, but when triggered, causes NSO to execute code behind the scenes to log into a network device and sync the data from the device into NSO’s CDB.

The NSO Action is a combination of a Yang model, defining the constraints / data model of the inputs expected or outputs expected for the action, and then some code linked to it when the action is triggered. When a NSO action is created, just like any custom package in NSO, the Yang propagates the action to be available across all of the NSO APIs (CLI, GUI, REST/RESTCONF, Python, etc). This means with a few lines of Yang and a few lines of Python, you very quickly have an API interface exposed to any user who has access to NSO.

Custom NSO Actions

This blog is not meant to be a deep dive on the nitty gritty details of custom NSO actions, but rather a quick primer on what they are and how to use them. Also, for the sake of simplicity, I will focus on Python NSO actions, rather than Java, etc.

A NSO custom action is defined in a package’s yang file with the following syntax:

    tailf:action double {
      tailf:actionpoint ACTION-NAME-action;
      input {
        leaf some-input-name {
          type string;
        }
      }
      output {
        leaf result {
          type string;
        }
      }
    }

and just for comparison, looking at the NSO source Yang files(tailf-ncs-devices.yang), you can see for example, the NSO sync-from action Yang which is actually used by the NSO:

tailf:action sync-from {
        description
          "Synchronize the configuration by pulling from the device.";
        tailf:info "Synchronize the config by pulling from the device";
        tailf:actionpoint ncsinternal {
          tailf:internal;
        }
        input {
          container dry-run {
            presence "";
            leaf outformat {
              type outformat2;
              description
                "Report what would be done towards CDB, without
                 actually doing anything.";
            }
          }
          uses wait-for-lock;
        }
        output {
          uses sync-result;
        }
      }

You may notice additional data points in there, but it follows the same general pattern:

tailf:action NAME-OF-ACTION
{
  tailf:actionpoint NAME-WHERE-CODE-LINKS-TO-IT
  input
  {
    YANG-INPUT-NODES
  }
  output
  {
    YANG-OUTPUT-NODES
  }
}

Basically what is going on there–and this will be more evident when you see a live example with everything working–is the Yang model tells the NSO application, “Hey! I have a custom set of code I want to execute, and here is the name I want the action to be called in the NSO application, and here is the Yang model constraints on the input and output”.

NSO Action Example

The easiest way to get started with an NSO action is to use the bash command flag in ncs-make-package to give you a dummy example: ncs-make-package --service-skeleton python --action-example ntc-action-example

This command should be run in your nso-run/packages folder, or wherever you keep your other packages and NEDs. It will create the following folders and files:

packages$ tree ntc-action-example/
ntc-action-example/
├── README
├── package-meta-data.xml
├── python
│   └── ntc-action-example
│       ├── __init__.py
│       └── main.py
├── src
│   ├── Makefile
│   └── yang
│       └── ntc-action-example.yang
├── templates
└── test
    ├── Makefile
    └── internal
        ├── Makefile
        └── lux
            ├── Makefile
            ├── action
            │   ├── Makefile
            │   └── run.lux
            └── service
                ├── Makefile
                ├── dummy-device.xml
                ├── dummy-service.xml
                ├── pyvm.xml
                └── run.lux

10 directories, 16 files

The most relevant ones for this example will be the Yang file: ntc-action-example/src/yang/ntc-action-example.yang and the Python file: ntc-action-example/python/ntc_action_example/main.py.

Trimming Down the Yang file

First, by default this is what the Yang file will look like:

module ntc-action-example {

  namespace "http://example.com/ntc-action-example";
  prefix ntc-action-example;

  import ietf-inet-types {
    prefix inet;
  }
  import tailf-common {
    prefix tailf;
  }
  import tailf-ncs {
    prefix ncs;
  }

  description
    "Bla bla...";

  revision 2016-01-01 {
    description
      "Initial revision.";
  }

  container action {
    tailf:action double {
      tailf:actionpoint ntc-action-example-action;
      input {
        leaf number {
          type uint8;
        }
      }
      output {
        leaf result {
          type uint16;
        }
      }
    }
  }
  list ntc-action-example {
    description "This is an RFS skeleton service";

    key name;
    leaf name {
      tailf:info "Unique service id";
      tailf:cli-allow-range;
      type string;
    }

    uses ncs:service-data;
    ncs:servicepoint ntc-action-example-servicepoint;

    // may replace this with other ways of refering to the devices.
    leaf-list device {
      type leafref {
        path "/ncs:devices/ncs:device/ncs:name";
      }
    }

    // replace with your own stuff here
    leaf dummy {
      type inet:ipv4-address;
    }
  }
}

Since I used the service skeleton bash flag, we see the dummy list ntc-action-example and since I did an action example it added the container action part in the Yang file. In this example, I am not going to use the service mechanics, so I will remove it and other unused part of the Yang file just to keep it simple, so the new yang file is:

module ntc-action-example {

  namespace "http://networktocode.com/ntc-action-example";
  prefix ntc-action-example;

  import tailf-common {
    prefix tailf;
  }
  import tailf-ncs {
    prefix ncs;
  }

  description
    "An action example";

  revision 2019-09-12 {
    description
      "Giving some details for an action example.";
  }

  container action {
    tailf:action double {
      tailf:actionpoint ntc-action-example-action;
      input {
        leaf number {
          type uint8;
        }
      }
      output {
        leaf result {
          type uint16;
        }
      }
    }
  }
}

Trimming down the Python File

By default NSO creates the following Python file for all the action and service tie ins:

# -*- mode: python; python-indent: 4 -*-
import ncs
from ncs.application import Service
from ncs.dp import Action


# ---------------
# ACTIONS EXAMPLE
# ---------------
class DoubleAction(Action):
    @Action.action
    def cb_action(self, uinfo, name, kp, input, output, trans):
        self.log.info('action name: ', name)
        self.log.info('action input.number: ', input.number)

        # Updating the output data structure will result in a response
        # being returned to the caller.
        output.result = input.number * 2


# ------------------------
# SERVICE CALLBACK EXAMPLE
# ------------------------
class ServiceCallbacks(Service):

    # The create() callback is invoked inside NCS FASTMAP and
    # must always exist.
    @Service.create
    def cb_create(self, tctx, root, service, proplist):
        self.log.info('Service create(service=', service._path, ')')


    # The pre_modification() and post_modification() callbacks are optional,
    # and are invoked outside FASTMAP. pre_modification() is invoked before
    # create, update, or delete of the service, as indicated by the enum
    # ncs_service_operation op parameter. Conversely
    # post_modification() is invoked after create, update, or delete
    # of the service. These functions can be useful e.g. for
    # allocations that should be stored and existing also when the
    # service instance is removed.

    # @Service.pre_lock_create
    # def cb_pre_lock_create(self, tctx, root, service, proplist):
    #     self.log.info('Service plcreate(service=', service._path, ')')

    # @Service.pre_modification
    # def cb_pre_modification(self, tctx, op, kp, root, proplist):
    #     self.log.info('Service premod(service=', kp, ')')

    # @Service.post_modification
    # def cb_post_modification(self, tctx, op, kp, root, proplist):
    #     self.log.info('Service premod(service=', kp, ')')


# ---------------------------------------------
# COMPONENT THREAD THAT WILL BE STARTED BY NCS.
# ---------------------------------------------
class Main(ncs.application.Application):
    def setup(self):
        # The application class sets up logging for us. It is accessible
        # through 'self.log' and is a ncs.log.Log instance.
        self.log.info('Main RUNNING')

        # Service callbacks require a registration for a 'service point',
        # as specified in the corresponding data model.
        #
        self.register_service('ntc-action-example-servicepoint', ServiceCallbacks)

        # When using actions, this is how we register them:
        #
        self.register_action('ntc-action-example-action', DoubleAction)

        # If we registered any callback(s) above, the Application class
        # took care of creating a daemon (related to the service/action point).

        # When this setup method is finished, all registrations are
        # considered done and the application is 'started'.

    def teardown(self):
        # When the application is finished (which would happen if NCS went
        # down, packages were reloaded or some error occurred) this teardown
        # method will be called.

        self.log.info('Main FINISHED')

Since I am focusing just on the action, I can reduce the Python file to simply this:

# -*- mode: python; python-indent: 4 -*-
import ncs
from ncs.dp import Action


# ---------------
# ACTIONS EXAMPLE
# ---------------
class DoubleAction(Action):
    @Action.action
    def cb_action(self, uinfo, name, kp, input, output, trans):
        self.log.info('action name: ', name)
        self.log.info('action input.number: ', input.number)

        # Updating the output data structure will result in a response
        # being returned to the caller.
        output.result = input.number * 2


# ---------------------------------------------
# COMPONENT THREAD THAT WILL BE STARTED BY NCS.
# ---------------------------------------------
class Main(ncs.application.Application):
    def setup(self):
        # The application class sets up logging for us. It is accessible
        # through 'self.log' and is a ncs.log.Log instance.
        self.log.info('Main RUNNING')

        # When using actions, this is how we register them:
        #
        self.register_action('ntc-action-example-action', DoubleAction)

        # If we registered any callback(s) above, the Application class
        # took care of creating a daemon (related to the service/action point).

        # When this setup method is finished, all registrations are
        # considered done and the application is 'started'.

    def teardown(self):
        # When the application is finished (which would happen if NCS went
        # down, packages were reloaded or some error occurred) this teardown
        # method will be called.

        self.log.info('Main FINISHED')

Loading in the Package and Using the Action

As with any package, the Yang module needs to be compiled and the NSO packages need to be reloaded:

packages$ cd ntc-action-example/
ntc-action-example$ cd src
src$ ls
Makefile	yang
src$ make
mkdir -p ../load-dir
mkdir -p java/src
/Users/jabelk/ncs-all/nso-5-install/bin/ncsc  `ls ntc-action-example-ann.yang  > /dev/null 2>&1 && echo "-a ntc-action-example-ann.yang"` \
              -c -o ../load-dir/ntc-action-example.fxs yang/ntc-action-example.yang
packages$ ncs_cli -C -u admin

admin connected from 127.0.0.1 using console on ntc-jasonbelk-macbook-pro.local
admin@ncs# packages reload force

>>> System upgrade is starting.
>>> Sessions in configure mode must exit to operational mode.
>>> No configuration changes can be performed until upgrade has completed.
>>> System upgrade has completed successfully.
reload-result {
    package ntc-action-example
    result true
}
admin@ncs# conf
Entering configuration mode terminal
admin@ncs(config)# action double ?
Possible completions:
  number  <cr>
admin@ncs(config)# action double number 22
result 44
admin@ncs(config)# action double QQ
---------------------------------^
syntax error: expecting
  number -
admin@ncs(config)# 

We can see the ntc-action-example shows up in our packages, and it executes the Python, doubling whatever integer we give it. Since it has a Yang model enforcing the inputs, we are unable to give it the invalid QQ value, thus protecting the Python code from executing a doubling action on a string.

How did that work?

From the Yang side, the key connecting statement to note is tailf:actionpoint ntc-action-example-action;, and also the names of the leafs used (in this case just number under input).

Then in the Python file note at the bottom of the Python code, under the Main class in the setup function: self.register_action('ntc-action-example-action', DoubleAction), is registering the action ntc-action-example-action to be associated with the Python class defined in that file DoubleAction.

From the Python DoubleAction Class the key lines to note are:

        self.log.info('action name: ', name)
        self.log.info('action input.number: ', input.number)
        output.result = input.number * 2

Where we use the syntax input.LEAFNAME, in this case input.number to access the value passed in by the action input, and then store the result in the output.result leaf.

Modifying the NSO Custom Action

Let’s make a custom action which gives us random chuck norris jokes! This is inspired by Hank Preston’s demos using Norris to demo REST APIs.

Basically, I am taking the DoubleAction example, and tweaking the class names, editing the leafs a bit (and namespace to NTC!), and adding in a Python requests call in the action. The reason I am showing requests is because something you might want to have available in an NSO package is a requests call to some other application (like Netbox, ServiceNow, etc) to grab some data and then use it to make a decision, or store it in the NSO CDB.

The Yang File

In this Yang file we have an input of number-of-jokes which is expecting an integer of how many jokes we want, and then a result leaf which is the string of all the jokes we got.

module ntc-action-example {

  namespace "http://networktocode.com/ntc-action-example";
  prefix ntc-action-example;

  import tailf-common {
    prefix tailf;
  }
  import tailf-ncs {
    prefix ncs;
  }

  description
    "An action example";

  revision 2019-09-12 {
    description
      "Giving some details for an action example.";
  }

  container action {
    tailf:action random-norris-joke {
      tailf:actionpoint ntc-action-example-action;
      input {
        leaf number-of-jokes {
          type uint8;
        }
      }
      output {
        leaf result {
          type string;
        }
      }
    }
  }
}

The Python File

In this updated main.py, we added an import for requests, changed the DoubleAction in the class name and in the Mainsetup function. The Python code will take the integer input, call the API, extract the data from the nested data structure given from the API, and then store it in the result leaf with some newline padding for readability.

# -*- mode: python; python-indent: 4 -*-
import ncs
from ncs.dp import Action
import requests
class NorrisAction(Action):
    @Action.action
    def cb_action(self, uinfo, name, kp, input, output, trans):
        self.log.info('action name: ', name)
        self.log.info('action input.number: ', input.number_of_jokes)
        url = "http://api.icndb.com/jokes/random/"+str(input.number_of_jokes)
        resp = requests.get(url)
        data = resp.json()
        jokes = data["value"]
        joke_response = "\n\n"
        for joke in jokes:
            joke_response = joke_response + joke["joke"]
            joke_response = joke_response + "\n\n"
        output.result = joke_response
class Main(ncs.application.Application):
    def setup(self):
        self.log.info('Main RUNNING')
        self.register_action('ntc-action-example-action', NorrisAction)
    def teardown(self):
        self.log.info('Main FINISHED')

Seeing is Believing

admin@ncs# packages reload
reload-result {
    package ntc-action-example
    result true
}
admin@ncs# conf
Entering configuration mode terminal
admin@ncs(config)# action random-norris-joke number-of-jokes 2
result

Chuck Norris has banned rainbows from the state of North Dakota.

When you play Monopoly with Chuck Norris, you do not pass go, and you do not collect two hundred dollars. You will be lucky if you make it out alive.


admin@ncs(config)# action random-norris-joke number-of-jokes 6
result

Chuck Norris once roundhouse kicked someone so hard that his foot broke the speed of light, went back in time, and killed Amelia Earhart while she was flying over the Pacific Ocean.

Chuck Norris doesnt shave; he kicks himself in the face. The only thing that can cut Chuck Norris is Chuck Norris.

Chuck Norris is the only man to ever defeat a brick wall in a game of tennis.

Chuck Norris doesn't throw up if he drinks too much. Chuck Norris throws down!

Newton's Third Law is wrong: Although it states that for each action, there is an equal and opposite reaction, there is no force equal in reaction to a Chuck Norris roundhouse kick.

Chuck Norris causes the Windows Blue Screen of Death.


admin@ncs(config)#

Conclusion

One other thing to note, is that NSO actions are incredibly powerful since they also can access the NSO CDB. Since the NSO CDB has a parsed representation of the snapshot of the entire network device inventory, this means you can leverage any data easily using the NSO Python ncs library to apply CRUD operations on any data within the CDB.

If you need a primer on the NSO Python API, check out my tutorial published on DevNet here.

The final package code can be viewed here.

-JB


ntc img
ntc img

Contact Us to Learn More

Share details about yourself & someone from our team will reach out to you ASAP!