Blog Detail


Thank you for joining me for Part 2 of the parsing strategies blog series. This post will dive deeper into using NTC Templates to parse unstructured data into usable, structured data. NTC Templates uses TextFSM under the hood to be able to parse the data obtained from traditional networking devices by using Regular Expressions (RegEx). We will go over what a TextFSM template looks like, how it works, and how we can use the template in Ansible to perform topology assertions against our lab topology.
TextFSM Primer
TextFSM was created by Google to process semi-structured data from network devices into structured data that can be easily accessed programmatically. TextFSM is a Domain Specific Language (DSL) using RegEx under the hood to parse the data. This means that some RegEx knowledge is required, but there are helpful websites such as https://regexr.com or https://regex101.com that can help get you started with understanding RegEx. These websites are a great help when it comes troubleshooting my TextFSM templates and why something may not be capturing the way I would expect it to.
Let’s take a look at a TextFSM template and then break it down to better understand how TextFSM works. Below is the cisco_ios_show_lldp_neighbors.textfsm template from NTC Templates that we will be using for this post.
Value Required NEIGHBOR (\S{0,20})
Value Required LOCAL_INTERFACE (\S+)
Value CAPABILITIES (\S*)
Value Required NEIGHBOR_INTERFACE (\S+)

Start
  ^Device.*ID -> LLDP
  # Capture time-stamp if vty line has command time-stamping turned on
  ^Load\s+for\s+
  ^Time\s+source\s+is

LLDP
  ^${NEIGHBOR}\s*${LOCAL_INTERFACE}\s+\d+\s+${CAPABILITIES}\s+${NEIGHBOR_INTERFACE} -> Record
  ^${NEIGHBOR}
  ^\s+${LOCAL_INTERFACE}\s+\d+\s+${CAPABILITIES}\s+${NEIGHBOR_INTERFACE} -> Record
We’ll cover the template it more detail below, but I want to show you what the raw data looks like and how it looks after it has been parsed with TextFSM.
Capability codes:
    (R) Router, (B) Bridge, (T) Telephone, (C) DOCSIS Cable Device
    (W) WLAN Access Point, (P) Repeater, (S) Station, (O) Other

Device ID           Local Intf     Hold-time  Capability      Port ID
S2                  Fa0/13         120        B               Gi0/13
Cisco-switch-1      Gi1/0/7        120                        Gi0/1
Juniper-switch1     Gi2/0/1        120        B,R             666
Juniper-switch1     Gi1/0/1        120        B,R             531

Total entries displayed: 4
Here is the output returned after parsing semi-structured data using NTC Templates.
---
parsed_sample:
  - capabilities: "B"
    local_interface: "Fa0/13"
    neighbor: "S2"
    neighbor_interface: "Gi0/13"
  - capabilities: ""
    local_interface: "Gi1/0/7"
    neighbor: "Cisco-switch-1"
    neighbor_interface: "Gi0/1"
  - capabilities: "B,R"
    local_interface: "Gi2/0/1"
    neighbor: "Juniper-switch1"
    neighbor_interface: "666"
  - capabilities: "B,R"
    local_interface: "Gi1/0/1"
    neighbor: "Juniper-switch1"
    neighbor_interface: "531"
Values
As you can see in the output we received, the Value in the template is used as the key (column) in each dictionary (row) that is returned.
There are a few keywords that can modify how the value is processed, such as the following:
- Required: The record (row) is only saved into the table if this value is matched.
- Filldown: The previously matched value is retained for subsequent records (unless explicitly cleared or matched again). In other words, the most recently matched value is copied to newer rows unless matched again.
- List: The value is a list, appended to on each match. Normally a match will overwrite any previous value in that row.
- Key: Declares that the field’s contents contribute to the unique identifier for a row. This can be used to tie data from multiple templates together into a single structure.
- Fillup: Like Filldown, but populates upwards until it finds a non-empty entry. Not compatible with Required.
At the end of the line is where we will specify the RegEx that will match our semi-structured text for that specific Value. Depending on the data, this can be as generic as \S+, when the data is well known, or as complex as needed.
\S+matches any non-whitespace which requires the data to either be controlled or well known as stated above.
To recap what we just discussed, here is a breakdown of a Value line: Value {KEYWORD} {VALUE_NAME} (RegEx).
States
The State definitions come after the Value definitions and are separated from the values by a blank line. The lines indented after each State are the state rules that are specified to match the Value definitions specified at the beginning of the template. States are helpful to break up your template into easier to read chunks if the semi-structured data is complex. There is no upper limit to the amount of states you have in your TextFSM template, but Start is always required.
State Rules
The rules define the lines we want to capture with the Value definitions at the beginning of the template. Each rule line must start with a carat (^). The rules don’t have to end with a -> rule action, but it might be required depending on the data. The -> denotes a rule action and tells TextFSM what to do with the data captured up to this point. We will discuss the rule actions shortly. The values are denoted by ${VALUE_NAME} within the state rules which will be expanded out with the RegEx from the Value definition.
Keep in mind that the whole line does not have to be RegEx or values (${NEIGHBOR}), but can also be regular text to match on. Behind the scenes, TextFSM converts each rule to a complete RegEx string. If we take a look at the first line under the LLDP state, it would look like the following behind the scenes: ^(\S{0,20})\s*(\S+)\s+\d+\s+(\S*)\s+(\S+)
The state rule does not have to match the whole line which we can see within our template with the ` . ^Load\s+for\s+, which will match any line that starts with Load for `.
Rule and Line Actions
Rule actions can be applied per state rule line, but will affect the behavior and the placement within the states must be considered carefully. There are line actions which tell TextFSM to do with the current line while it’s processing and then rule actions tell TextFSM what to do with the captured values. Per the default action, any line that does not contain a ->, is Next.NoRecord. To better understand this, let’s dive into what options we have when it comes to using the line and rule actions by specifying ->.
Line Actions
- Next (Default): Finish with the input line, read in the next line and start matching again from the start of the state. This is the default behavior if no line action is specified.
- Continue: Retain the current line and do not resume matching from the first rule of the state. Continue processing rules as if a match did not occur (value assignments still occur).
Using the Continue line action is not a common use case when building a template, but taking a look at the cisco_ios_show_vlan.textfsm shows a use case when you want to capture multiple values that are on the same line.
Here is an example of the template:
Value List INTERFACES ([\w\./]+)

..omitted for brevity

VLANS
  ^\d+ -> Continue.Record
  ^${VLAN_ID}\s+${NAME}\s+${STATUS}\s*$$
  ^${VLAN_ID}\s+${NAME}\s+${STATUS}\s+${INTERFACES},* -> Continue
  ^\d+\s+(?:\S+\s+){3}${INTERFACES},* -> Continue
  ^\d+\s+(?:\S+\s+){4}${INTERFACES},* -> Continue
  ^\d+\s+(?:\S+\s+){5}${INTERFACES},* -> Continue
  ^\d+\s+(?:\S+\s+){6}${INTERFACES},* -> Continue
  ^\d+\s+(?:\S+\s+){7}${INTERFACES},* -> Continue
Here is an example of the semi-structured data that will be parsed:
50   VLan50                           active    Fa0/1, Fa0/2, Fa0/3, Fa0/4, Fa0/5, Fa0/6, Fa0/7, Fa0/8, Fa0/9
                                                Fa0/10, Fa0/11, Fa0/12
By using the Continue for each line, we can keep the value we captured, as well as the line it’s currently processing, and then move onto the next state rule within the State to capture the additional values on the line.
This means our structured data will look like the following:
---
parsed_sample:
  - vlan_id: "50"
    name: "VLan50"
    status: "active"
    interfaces:
      - "Fa0/1"
      - "Fa0/2"
      - "Fa0/3"
      - "Fa0/4"
      - "Fa0/5"
      - "Fa0/6"
      - "Fa0/7"
      - "Fa0/8"
      - "Fa0/9"
      - "Fa0/10"
      - "Fa0/11"
      - "Fa0/12"
Rule Actions
- NoRecord (Default): Do nothing. This is the default behavior if no record action is specified.
- Record: Record the values collected so far as a row in the return data. Non Filldown values are cleared. Note: No record will be output if there are any ‘Required’ values that are unassigned.
- Clear: Clear non Filldown values.
- Clearall: Clear all values.
- State: Transition to a different state.
- Error: This is a built-in state and will discard any captured values and return an exception.
We use the Error rule action to help troubleshoot our templates and make sure our templates are accounting for the correct data. Here is the way we use it: ` ^. -> Error`, which will provide an exception with the line that does not match any defined state rule. If you have any other questions, we provide a FAQ
` -> Continue.State` is not allowed to prevent loops within TextFSM.
If we look at the template, under the LLDP state, we see two -> Record options within it. This allows us to capture the appropriate values, but by parsing slightly different output.
We’re also able to combine the line action with the rule action. The syntax for this is LineAction.RuleAction. You can take a look at this template to see it in action and look at the raw data to get a better idea of how it’s being used.
Hopefully this overview of TextFSM provides a clearer picture when deciphering a template or when you start to create your own. Let’s move onto a quick overview of the topology and then get right into our verification playbook.
The definitions provided for value keywords, line and rule actions above were taken from the Google TextFSM wiki.
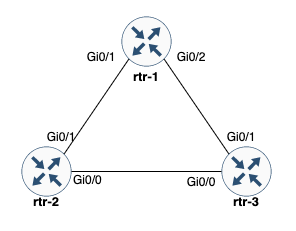
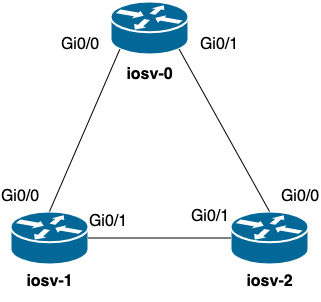
The Topology
Below is a picture of the topology we will be using to validate LLDP neighbors within our lab topology. This is a simple topology with three Cisco IOS routers that are connected together and have LLDP enabled.
Ansible Setup
Luckily our topology and the subsequent inventory will both be simple. We have the routers in a group called ios which then has a corresponding ios.yml file within the group_vars folder that has variables pertinent to connecting to these devices that I will show shortly. We then have {hostname}.yml files for each router that hold the approved_neighbors variable that we will use to validate the neighbors we see from our parsed LLDP data. Below is the tree of our directory that contains the Ansible playbook and inventory.
❯ tree
.
├── ansible.cfg
├── group_vars
│   └── ios.yml
├── host_vars
│   ├── iosv-0.yml
│   ├── iosv-1.yml
│   └── iosv-2.yml
├── inventory
└── pb.validate.neighbors.yml

2 directories, 7 files
Here is the inventory file that ties our routers to the ios group.
[ios]
iosv-0 ansible_host=10.188.1.56
iosv-1 ansible_host=10.188.1.54
iosv-2 ansible_host=10.188.1.55
Here is the contents of ios.yml file. This specifies the user we want to connect to the routers with a well as the ansible_network_os to tell Ansible what kind of networking device we will be connecting to.
If you notice, this is different than Ansible <= 2.9 syntax and uses a path to
cisco.ios.iosrather than justios. This is because we’re running Ansible 2.10 and migrating to using the syntax that Ansible will be enforcing in the future. You will notice some differences with using Ansible 2.10 in our playbook as well.
---
ansible_user: "cisco"
ansible_network_os: "cisco.ios.ios"
Here is a look at a host var we have defined.
---
approved_neighbors:
  - local_intf: "Gi0/0"
    neighbor: "iosv-1"
  - local_intf: "Gi0/1"
    neighbor: "iosv-2"
Now let’s take a look at pb.validate.neighbors.yml.
---
- hosts: "ios"
  connection: "ansible.netcommon.network_cli"
  gather_facts: "no"

  tasks:
    - name: "PARSE LLDP INFO INTO STRUCTURED DATA"
      ansible.netcommon.cli_parse:
        command: "show lldp neighbors"
        parser:
          name: ansible.netcommon.ntc_templates
        set_fact: "lldp_neighbors"

    - name: "ASSERT THE CORRECT NEIGHBORS ARE SEEN"
      assert:
        that:
          - "lldp_neighbors | selectattr('local_interface', 'equalto', item['local_intf']) | map(attribute='neighbor') | first == item['neighbor']"
      loop: "{{ approved_neighbors }}"
The playbook starts off with defining our hosts as the ios group in our inventory file which consists of our three IOS routers. The connection method uses the >= Ansible 2.10 syntax for network_cli and we have disabled gathering facts.
Let’s breakdown the two tasks we’re using to assert our operational data for LLDP neighbors matches the defined approved_neighbors variable we have for each host.
The first task uses the ansible.netcommon.cli_parse module to run the command against the device and then parse the data with our defined ansible.netcommon.ntc_templates parser. This output is saved as lldp_neighbors due to the set_fact directive on the task.
If you’re looking to run this same playbook, make sure you have
ntc-templatesinstalled viapip install ntc-templates.
The next task will loop over our approved_neighbors variable and then attempt to find a match in our parsed data by looking for an entry that has a value for the key local_interface that matches what we have set for local_intf in approved_neighbors and that the neighbor key also matches our neighbor value. Our playbook will fail if any of the neighbors do not match what we have defined in approved_neighbors.
The way Ansible is evolving and the methodologies we have used within the playbook do not limit the playbook’s potential to just ios and we can in fact swap out the ios hosts definition for all or any number of groups and hosts that are multivender. This is due to the magic behind the scenes that ansible.netcommon.cli_parse is performing with the ansible_network_os variable we set in group vars. It uses that variable to determine which nos_command module to run to connect to the device and which template to use to parse the returned data.
Playbook Output
Let’s go ahead and run the playbook and see what output we get.
❯ ansible-playbook -i inventory pb.validate.neighbors.yml -vv -k
ansible-playbook 2.10.2
  config file = /Users/myohman/local-dev/blog-posts/ansible.cfg
  configured module search path = ['/Users/myohman/.ansible/plugins/modules', '/usr/share/ansible/plugins/modules']
  ansible python module location = /Users/myohman/.virtualenvs/main-3.8/lib/python3.8/site-packages/ansible
  executable location = /Users/myohman/.virtualenvs/main-3.8/bin/ansible-playbook
  python version = 3.8.6 (default, Oct 16 2020, 21:27:09) [Clang 12.0.0 (clang-1200.0.32.2)]
Using /Users/myohman/local-dev/blog-posts/ansible.cfg as config file
SSH password:
redirecting (type: callback) ansible.builtin.yaml to community.general.yaml
redirecting (type: callback) ansible.builtin.yaml to community.general.yaml

PLAYBOOK: pb.validate.neighbors.yml ***********************************************************************************
1 plays in pb.validate.neighbors.yml

PLAY [ios] ************************************************************************************************************
META: ran handlers

TASK [Parse LLDP info into structured data] ***************************************************************************
task path: /Users/myohman/local-dev/blog-posts/pb.validate.neighbors.yml:10
ok: [iosv-0] => changed=false
  ansible_facts:
    lldp_neighbors:
    - capabilities: R
      local_interface: Gi0/1
      neighbor: iosv-2
      neighbor_interface: Gi0/0
    - capabilities: R
      local_interface: Gi0/0
      neighbor: iosv-1
      neighbor_interface: Gi0/0
  parsed:
  - capabilities: R
    local_interface: Gi0/1
    neighbor: iosv-2
    neighbor_interface: Gi0/0
  - capabilities: R
    local_interface: Gi0/0
    neighbor: iosv-1
    neighbor_interface: Gi0/0
  stdout: |-
    Capability codes:
        (R) Router, (B) Bridge, (T) Telephone, (C) DOCSIS Cable Device
        (W) WLAN Access Point, (P) Repeater, (S) Station, (O) Other

    Device ID           Local Intf     Hold-time  Capability      Port ID
    iosv-2              Gi0/1          120        R               Gi0/0
    iosv-1              Gi0/0          120        R               Gi0/0

    Total entries displayed: 2
  stdout_lines: <omitted>
ok: [iosv-1] => changed=false
  ansible_facts:
    lldp_neighbors:
    - capabilities: R
      local_interface: Gi0/1
      neighbor: iosv-2
      neighbor_interface: Gi0/1
    - capabilities: R
      local_interface: Gi0/0
      neighbor: iosv-0
      neighbor_interface: Gi0/0
  parsed:
  - capabilities: R
    local_interface: Gi0/1
    neighbor: iosv-2
    neighbor_interface: Gi0/1
  - capabilities: R
    local_interface: Gi0/0
    neighbor: iosv-0
    neighbor_interface: Gi0/0
  stdout: |-
    Capability codes:
        (R) Router, (B) Bridge, (T) Telephone, (C) DOCSIS Cable Device
        (W) WLAN Access Point, (P) Repeater, (S) Station, (O) Other

    Device ID           Local Intf     Hold-time  Capability      Port ID
    iosv-2              Gi0/1          120        R               Gi0/1
    iosv-0              Gi0/0          120        R               Gi0/0

    Total entries displayed: 2
  stdout_lines: <omitted>
ok: [iosv-2] => changed=false
  ansible_facts:
    lldp_neighbors:
    - capabilities: R
      local_interface: Gi0/1
      neighbor: iosv-1
      neighbor_interface: Gi0/1
    - capabilities: R
      local_interface: Gi0/0
      neighbor: iosv-0
      neighbor_interface: Gi0/1
  parsed:
  - capabilities: R
    local_interface: Gi0/1
    neighbor: iosv-1
    neighbor_interface: Gi0/1
  - capabilities: R
    local_interface: Gi0/0
    neighbor: iosv-0
    neighbor_interface: Gi0/1
  stdout: |-
    Capability codes:
        (R) Router, (B) Bridge, (T) Telephone, (C) DOCSIS Cable Device
        (W) WLAN Access Point, (P) Repeater, (S) Station, (O) Other

    Device ID           Local Intf     Hold-time  Capability      Port ID
    iosv-1              Gi0/1          120        R               Gi0/1
    iosv-0              Gi0/0          120        R               Gi0/1

    Total entries displayed: 2
  stdout_lines: <omitted>

TASK [Assert the correct neighbors are seen] **************************************************************************
task path: /Users/myohman/local-dev/blog-posts/pb.validate.neighbors.yml:17
ok: [iosv-0] => (item={'local_intf': 'Gi0/0', 'neighbor': 'iosv-1'}) => changed=false
  ansible_loop_var: item
  item:
    local_intf: Gi0/0
    neighbor: iosv-1
  msg: All assertions passed
ok: [iosv-1] => (item={'local_intf': 'Gi0/0', 'neighbor': 'iosv-0'}) => changed=false
  ansible_loop_var: item
  item:
    local_intf: Gi0/0
    neighbor: iosv-0
  msg: All assertions passed
ok: [iosv-0] => (item={'local_intf': 'Gi0/1', 'neighbor': 'iosv-2'}) => changed=false
  ansible_loop_var: item
  item:
    local_intf: Gi0/1
    neighbor: iosv-2
  msg: All assertions passed
ok: [iosv-1] => (item={'local_intf': 'Gi0/1', 'neighbor': 'iosv-2'}) => changed=false
  ansible_loop_var: item
  item:
    local_intf: Gi0/1
    neighbor: iosv-2
  msg: All assertions passed
ok: [iosv-2] => (item={'local_intf': 'Gi0/0', 'neighbor': 'iosv-0'}) => changed=false
  ansible_loop_var: item
  item:
    local_intf: Gi0/0
    neighbor: iosv-0
  msg: All assertions passed
ok: [iosv-2] => (item={'local_intf': 'Gi0/1', 'neighbor': 'iosv-1'}) => changed=false
  ansible_loop_var: item
  item:
    local_intf: Gi0/1
    neighbor: iosv-1
  msg: All assertions passed
META: ran handlers
META: ran handlers

PLAY RECAP ************************************************************************************************************
iosv-0                     : ok=2    changed=0    unreachable=0    failed=0    skipped=0    rescued=0    ignored=0
iosv-1                     : ok=2    changed=0    unreachable=0    failed=0    skipped=0    rescued=0    ignored=0
iosv-2                     : ok=2    changed=0    unreachable=0    failed=0    skipped=0    rescued=0    ignored=0
I ran this playbook with some verbosity to be able to show what each task returns and the format of our parsed data.
If we take a closer look at the output of the first task, we can see under the parsed key as well as setting the fact (lldp_neighbors), that we have our structured data from running the raw output through NTC Templates.
The second task shows the loop for each host and the item that it is using during the loop. If you look back at our playbook, we’re using both the local_intf and neighbor for our assertions from our approved_neighbors variable.
Conclusion
I hope you enjoyed this blog post and understand a little bit more about TextFSM, NTC Templates, and how easy they are to use with Ansible. The ease of use is not unique to Ansible as this can also easily be achieved with Netmiko or raw Python, but used Ansible due to the industry adoption of Ansible. The next post in this series will be going over PyATS Genie parsing and using it within Ansible. Our biggest change in the next post will be the assertions as the structured data will not be the same as NTC Templates and that is OK. The point of these posts it to help you decide which parsing strategies you can use throughout your journey and which ones may be more suitable for specific situations.
-Mikhail
Does this all sound amazing? Want to know more about how Network to Code can help you do this, reach out to our sales team. If you want to help make this a reality for our clients, check out our careers page.
Share :


Contact Us to Learn More
Share details about yourself & someone from our team will reach out to you ASAP!